Fund Me
Introduction
In this post I will write, build and test a solidity FundMe contract using foundry from scratch.

Objectives
- Get used to Solidity
- Learn how to use Foundry
Project
Let's make a folder and start a Foundry project by simply running the following command
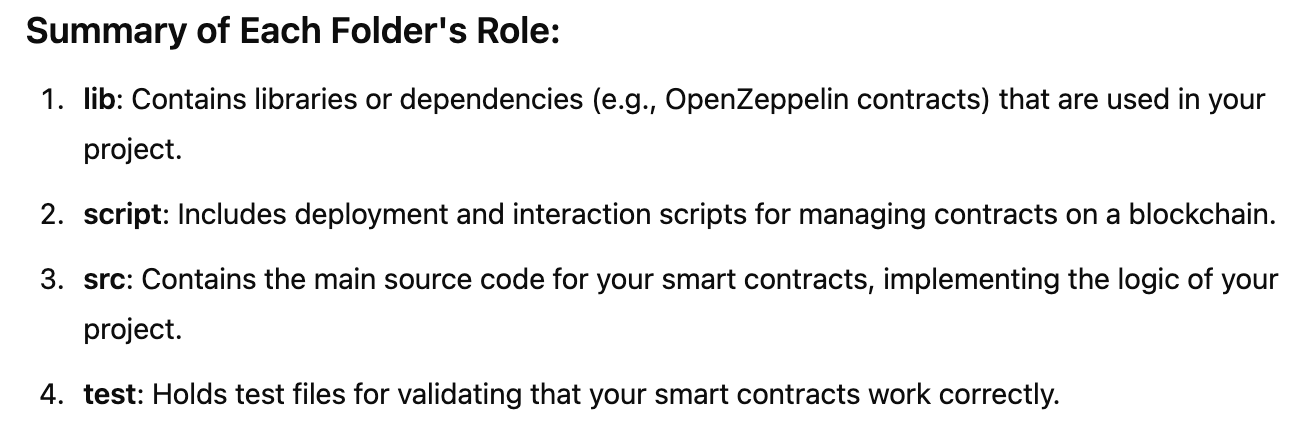
forge initThe structure of the Foundry project is as follows
➜  FundMe git:(main) tree . -d -L 1
.
├── lib
├── script
├── src
└── test
Here is a brief explanation of each folders by ChatGPT
Code
First, let's write a simple FundMe contract in src folder
FundeMe.sol
// SPDX-License-Identifier: UNLICENSED
pragma solidity ^0.8.13;

error Unauthorized();

contract FundMe {
    address public immutable i_owner;

    constructor() {
        i_owner = msg.sender;
    }

    modifier onlyOwner() {
        if(msg.sender != i_owner) {
            revert Unauthorized();
        }
        _;
    }

    address[] public funders;
    mapping(address => uint256) public amountFunded;

    function fund() public payable {
        require(msg.value > 0, "Send some funds");
        if(amountFunded[msg.sender] == 0) funders.push(msg.sender);
        amountFunded[msg.sender] += msg.value;
    }

    function withdraw() public onlyOwner {
        payable(i_owner).transfer(address(this).balance);
    }

    function totalAmountFunded() public view returns (uint256) {
        uint256 total = 0;
        for (uint256 i = 0; i < funders.length; i++) {
            total += amountFunded[funders[i]];
        }
        return total;
    }

    fallback() external payable {
        fund();
    }

    receive() external payable {
        fund();
    }


}
We can complile this contract by simply running the following command
forge build # or forge compileFoundry will compile all your contracts in the src folder and dependencies in the lib folder
Once the compiling is finished, you'll see some new folders. One of them is a folder called out. Here you'll be able to find the ABI of the smart contract together with the Bytecode and a lot of useful information.
Deploy
We can now deploy a FundMe contract. There are multiple ways and multiple places where you could deploy a smart contract. While developing using the Foundry framework the easiest and most readily available place for deployment is Anvil.
Anvil is a local testnet node shipped with Foundry. You can use it for testing your contracts from frontends or for interacting over RPC.
To run Anvil you simply have to type anvil in the terminal
After running Anvil, We can deploy the contract using the following command
forge create FundMe --interactive --broadcastIt will then ask you to enter a private key. Enter one of the private keys from anvil terminal.
We can also depoly a contract to any blockchain using the following command
forge create CONTRACT --rpc-url RPC_URL --private-key PRIVATE_KEY --broadcastHere --rpc-url and --private-key each indicates "on which blockchain we deploy" and "which account is signing the transaction?"
--broadcast means that we will broadcasts the transactions. With out this option, Foundry will simulate a transaction, also known as a dry run.
Another way to deploy our contract is to use script. Deploying a smart contract via scripting is particularly handy because it provides a consistent and repeatable way to deploy reliably and its features enhance the testing of both the deployment processes and the code itself.
Foundry eases the whole process since it is written in Solidity. This means our deployment scripts will also be written in Solidity. It is essential to distinguish Solidity as a contract language from Solidity as a scripting language. Foundry also incorporates elements that enhance our Solidity experience beyond the smart contracts realm.
So, let's write a script to deploy the FundMe contract. In Foundry we keep our scripts in the script folder.
FundMe.s.sol
Using .s.sol as a suffix is a naming convention for Foundry scripts
// SPDX-License-Identifier: MIT

pragma solidity 0.8.19;

import {Script} from "forge-std/Script.sol";
import {FundMe} from "../src/FundMe.sol";

contract DeploySimpleStorage is Script {
    function run() external returns (FundMe) {
        vm.startBroadcast();

        FundMe simpleStorage = new FundMe();

        vm.stopBroadcast();
        return simpleStorage;
    }

}
By default, scripts are executed by calling the function named run, which acts as an entrypoint.
Inside the run function, we used a keyword vm, which is a distinctive feature of Foundry known as cheat codes.
They are built-in helper functions that allow you to interact with your contracts or the blockchain in a simplified way. You can learn more about cheat codes in the official document
Now we can deploy the contract via scripting using the following command
forge script script/DeploySimpleStorage.s.sol --rpc-url RPC_URL --private-key PRIVATE_KEY --broadcastOur contract is now successfully deployed. Switch to the anvil terminal where you'll see something like this
    Transaction: 0x8b642822d2b2d65798dff4406a0c204ba2f4320ee5a09c30de7ecf03d103f0b6
    Contract created: 0x5FbDB2315678afecb367f032d93F642f64180aa3
    Gas used: 237220

    Block Number: 1
    Block Hash: 0xd4df5355730050c730e14b87da49e16788bcd474642d32e243385bc4c27868b9
    Block Time: "Mon, 27 Jan 2025 15:03:52 +0000"
Also you'll find a folder called broadcast. Foundry saves all your blockchain interactions here. The dry-run folder is used for interactions you made when you didn't have a blockchain running. Moreover, the recordings here are separated by chain id.
Test
We will now manually test a scenario in which users send ethereum to a FundMe contract and the owner of that contract withdraws the fund. In order to interact with our contract, we will use cast commands
Cast is a versatile command-line tool designed for interacting with Ethereum applications. You can make smart contract calls, send transactions, or retrieve any type of chain data - all from your command-line.
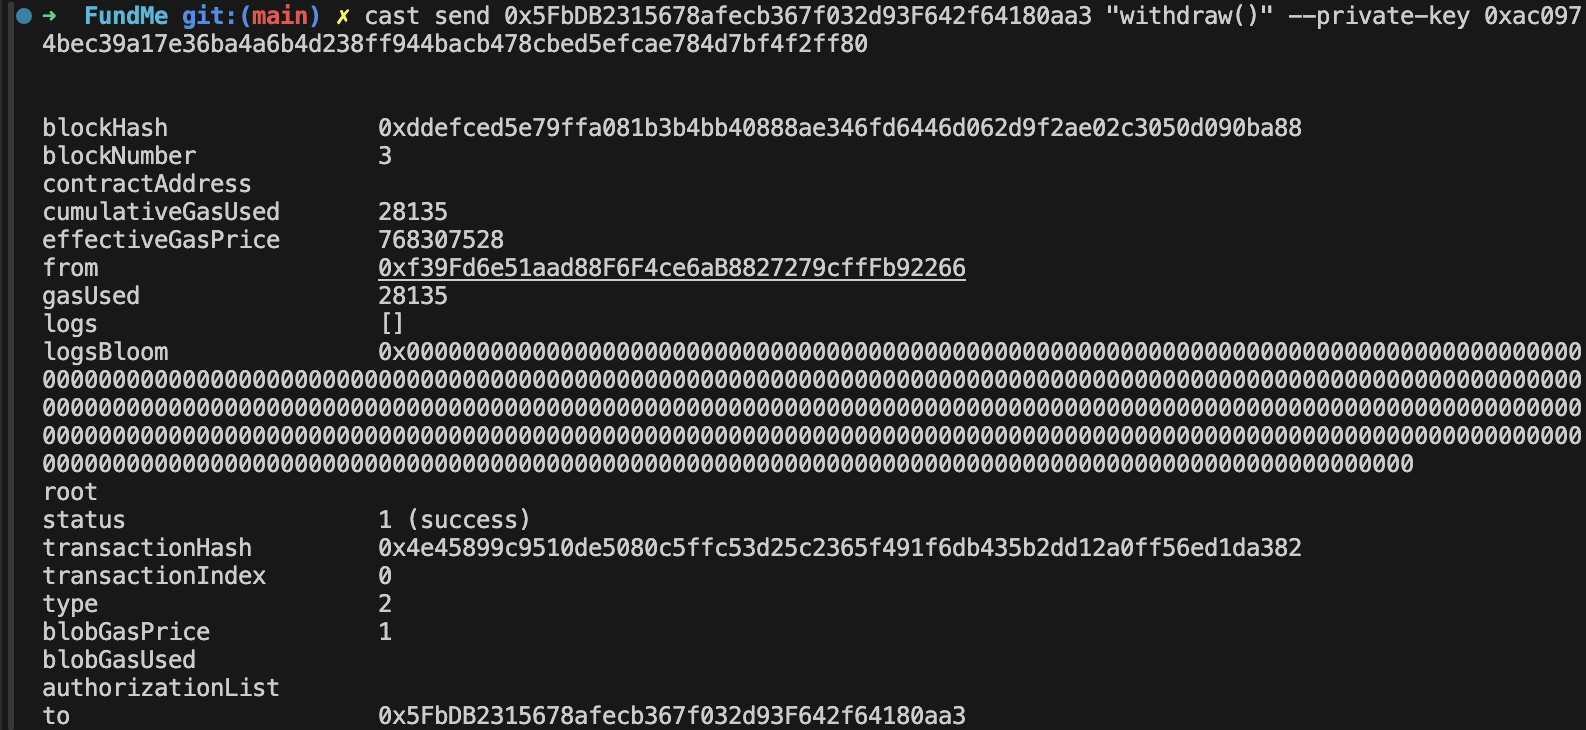
Let's say an account with address 0xf39Fd6e51aad88F6F4ce6aB8827279cffFb92266 deployed a FundMe contract at 0x5FbDB2315678afecb367f032d93F642f64180aa3

Now another user calls a "fund()" function, sending 10 ether
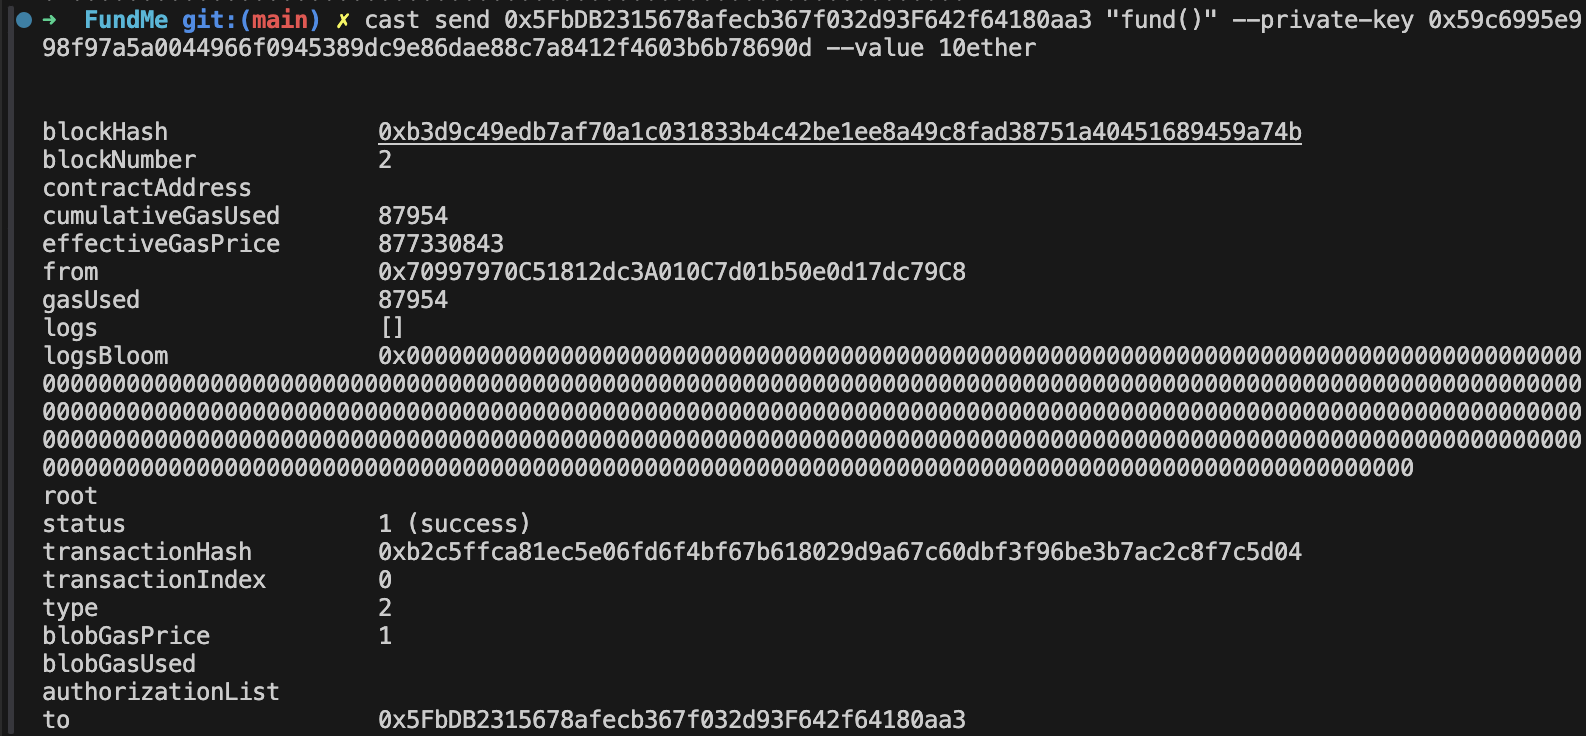
If we call a "totalAmountFunded()" function here, it returns a hex value of 10 ether

Next, the owner of the contract will withdraw the fund
Using the cast balance command, the final balance of each account is as follows

Converting to ETH amount, we can see that approximately 10 ether has been transfered

We will now write a test script for our contract.
FundMe.t.sol
Using .t.sol as a suffix is a naming convention for Foundry tests
// SPDX-License-Identifier: MIT
pragma solidity ^0.8.13;

import {Test, console} from "forge-std/Test.sol";
import {FundMe} from "../src/FundMe.sol";
import {DeployFundMe} from "../script/FundMe.s.sol";

contract FundMeTest is Test {
    FundMe fundMe;
    uint256 public constant SEND_VALUE = 0.1 ether;
    uint256 public constant STARTING_BALANCE = 10 ether;
    uint256 public constant GAS_PRICE = 1;

    function setUp() external {
        DeployFundMe deployFundMe = new DeployFundMe();
        fundMe = deployFundMe.run();
        console.log("FundMe deployed at: ", address(fundMe));
    }

    function test_OwnerIsMsgSender() public {
        assertEq(fundMe.i_owner(), msg.sender);
    }

    function test_FundAddsValueToAmountFunded() public {
        address funder = makeAddr("funder");
        vm.deal(funder, STARTING_BALANCE);
        vm.prank(funder);
        fundMe.fund{value: SEND_VALUE}();
        assertEq(fundMe.amountFunded(funder), SEND_VALUE);
    }

    function test_FundAddsFunderToArrayOfFunders() public {
        address funder = makeAddr("funder");
        vm.deal(funder, STARTING_BALANCE);
        vm.prank(funder);
        fundMe.fund{value: SEND_VALUE}();
        assertEq(fundMe.funders(0), funder);
    }

    modifier funded() {
        address funder = makeAddr("funder");
        vm.deal(funder, STARTING_BALANCE);
        vm.prank(funder);
        fundMe.fund{value: SEND_VALUE}();
        assert(address(fundMe).balance > 0);
        _;
    }

    function test_OnlyOwnerCanWithdraw() public funded {
        uint160 seed = 1;
        while(address(seed) == fundMe.i_owner()) seed++;
        vm.expectRevert();
        vm.prank(address(seed));
        fundMe.withdraw();
    }

    function test_Withdraw() public funded {
        uint256 startingFundMeBalance = address(fundMe).balance;
        uint256 startingOwnerBalance = fundMe.i_owner().balance;

        vm.startPrank(fundMe.i_owner());
        fundMe.withdraw();
        vm.stopPrank();

        assert(address(fundMe).balance == 0);
        console.log("FundMe balance after withdraw: ", address(fundMe).balance);
        assert(startingFundMeBalance + startingOwnerBalance == fundMe.i_owner().balance);
    }
}
Here the setUp function is always the first to execute whenever we run our tests. We perform all the prerequisite actions that are required before doing the actual testing, things like:
- Deployments;
- User addresses;
- Balances;
- Approvals;
We have also employed some of Foundry's main feature : "Cheatcodes". You can learn more about them here.
Now run forge test in your terminal. You can also run a specific test function by using the --mt option.
It's very important that our test have a high coverage, to ensure all our code is battle tested. Foundry provides a way to calculate the coverage. You can do that by calling forge coverage. This command displays which parts of your code are covered by tests. Read more about its options here.
Before I finish this post, I would like to introduce chisel, one of the 4 components of Foundry alongside forge, cast and anvil.
Chisel a tool that allows users to quickly test the behavior of Solidity code on a local (anvil) or forked network.
Type chisel in your terminal and press Enter. This opens up a shell that awaits your next command. You can simply write solidity in the shell then play around and see how it behaves.
To find more about other Chisel functionality, please click here.