0. Introduction
diffusers는 huggingface에서 출시한 파이썬 라이브러리로, state-of-the-art pretrained diffusion model을 다루기 위해 만들어졌다.
다양한 형태의 최신 모델들을 간단히 inference하거나, train하는 데 유용하게 활용할 수 있다.
요즘 연구실에서 연구 프로젝트에 참여하면서 Stable Diffusion을 backbone으로 한 모델들을 많이 다루고 있고, 관련한 코드는 전부 huggingface의 diffusers 라이브러리에 기반한 코드를 참고하고 구현 또한 diffusers 라이브러리 위에 구현하고 있다. 연구 프로젝트는 곧 마무리될 것 같아서, 이에 대해서는 연구가 마무리되고 다뤄보려 한다.
사실 간단한 DDPM 코드는 많이 보고 적용해보았어도 diffusers 라이브러리가 처음이었기에 처음에는 코드 리뷰를 할 때 시간도 많이 걸렸고 이를 기반으로 구현하려니 어려움이 많았다.
지금도 공부하고 있는 단계이지만, 장기적으로 생성 모델을 연구하고자 한다면 diffusers 라이브러리 위에 작업을 많이 하게 될 거고, diffusion model이 아니더라도 huggingface에서 나온 오픈소스를 빠르게 adaptation하는 능력이 필요할 거라 생각한다.
해당 시리즈에서는 diffusers 라이브러리 공식 document를 리뷰하고 정리하면서 내 스스로가 diffusers 라이브러리에 익숙해지는 것을 목적으로 한다.
나아가 내 글이 diffusers를 이해하고 코드를 사용하고자 하는 분들에게 도움이 되었으면 한다.
1. 3 Components in Diffusers
Diffuser를 구성하는 3가지 핵심 요소들이 있다.
1. DiffusionPipeline: pretrained diffusion model을 불러와 inference함으로써 빠르게 이미지를 샘플링할 수 있도록 end-to-end 형태로 디자인된 class.
- 실제로, diffusion model을 inference하는 데 단 몇 줄이면 된다.
- Popular pretrained model architectures, modules: block을 쌓는 것처럼, 모델과 모듈을 쌓아서 diffusion system을 구축하는 데 사용할 수 있다.
- 예를 들어, Diffusion Model의 UNet에서 사용되는 UNetBlock 등 ...
- Many different schedulers: 학습 과정에서는 noise가 언제 얼마나 추가되는지, inference 동안에는 어떻게 denoise된 이미지를 만들어내는지 결정하는 알고리즘
2. DiffusionPipeline
- Diffusion Model을 inference하기 위한 클래스이다. model과 scheduler를 포함하는, end-to-end system이다.
- 가장 간단한 예시로 Unconditional Image Generation, Conditional Image Generation, Image to Image 등을 지원한다. 정말 수많은 라이브러리들이 있으니 원하는 task를 수행하는 모델을 diffusers 다큐먼트에서 가져와서 사용하면 되겠다.
- 주로 모델 단위로 DiffusionPipeline이 만들어져 있다. huggingface가 오픈소스 기반 시스템인 만큼, 논문을 출간하는 개인들도 diffusers 위에 본인만의 모델 파이프라인을 만들어서 공개하기도 한다. (e.g. Instructpix2pix, ControlNet 등...)
가장 간단한 예시로, DiffusionPipeline을 호출한 뒤 from_pretrained 메서드를 사용해서 stable diffusion을 불러와보자.
from diffusers import DiffusionPipeline

pipeline = DiffusionPipeline.from_pretrained("runwayml/stable-diffusion-v1-5", use_safetensors=True)
첫 번째 인자로 huggingface hub에서 runwayml의 레포지토리에서 SD1.5 모델을 불러왔다. 그 뒤 pipeline 변수를 확인해보면,
pipeline
StableDiffusionPipeline {
  "_class_name": "StableDiffusionPipeline",
  "_diffusers_version": "0.21.4",
  ...,
  "scheduler": [
    "diffusers",
    "PNDMScheduler"
  ],
  ...,
  "unet": [
    "diffusers",
    "UNet2DConditionModel"
  ],
  "vae": [
    "diffusers",
    "AutoencoderKL"
  ]
}
모델 경로에 의해 DiffusionPipeline을 상속받는 StableDiffusionPipeline 클래스라는 것을 확인할 수 있고, PNDMScheduler, UNet2DConditionModel, AutoencoderKL 등 다양한 모듈들로 구성되어 있음을 알 수 있다.
이렇게 선언한 DiffusionPipeline은 forward() 메서드를 통해 간단히 이미지를 생성할 수 있는데, 예를 들어 Stable Diffusion은 text-to-image generation을 수행하는 모델이므로 다음과 같이 text prompt를 입력하여 image를 생성할 수 있다.
image = pipeline("An image of a squirrel in Picasso style").images[0]
image
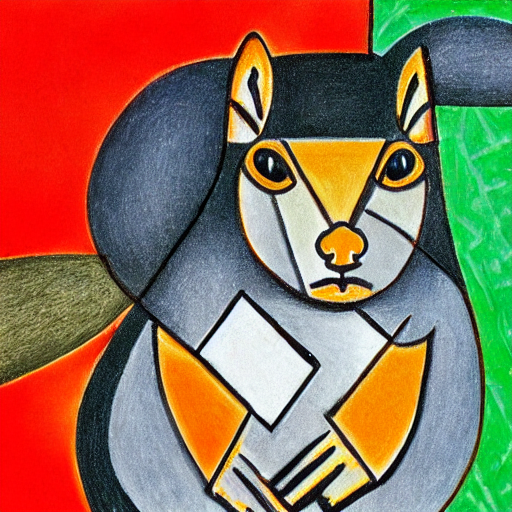
forward() 메서드는 '변수명'()의 형태로 호출할 수 있으므로, pipeline(prompt)로 나온 output에 images로 접근한 뒤 0번 이미지를 호출하는 형태로 간단하게 이미지를 샘플링하고 visualize한 것이다.
한 줄만에 diffusion model을 사용할 수 있다니, 엄청난 혁신이다.
한편, 앞서 파이프라인이 PNDMScheduler, UNet2DConditionModel, AutoencoderKL 등의 다양한 모듈들로 구성되어 있음을 확인했다. 우리는 이 모듈들에 접근하고 다른 모듈을 대입함으로써 간단하게 원하는 모듈로 pipeline을 커스터마이즈할 수 있다.
예를 들어, 다음과 같이 scheduler의 hyperparameter들을 사전 정의한 config로 바꿔줄 수 있다.
from diffusers import EulerDiscreteScheduler

pipeline = DiffusionPipeline.from_pretrained("runwayml/stable-diffusion-v1-5", use_safetensors=True)
pipeline.scheduler = EulerDiscreteScheduler.from_config(pipeline.scheduler.config)
Diffusion Model의 Denoiser 역할을 하는 UNet도 바꿔줄 수 있을 것이다. 이런 식으로 말이다.
from diffusers import EulerDiscreteScheduler

pipeline = DiffusionPipeline.from_pretrained("runwayml/stable-diffusion-v1-5", use_safetensors=True)
pipeline.unet = UNet2DConditionModel.from_config(pipeline.unet.config)
3. Models
Diffusion Model에서 'Model'이라고 하면, 일반적으로 denoise를 수행하도록 학습되는 UNet 기반의 모델일 것이다. noise prediction을 수행하거나, v-prediction을 수행하기도 한다.
Model은 from_pretrained() 메서드를 이용해서 불러와서 사용할 수 있다. 한 번 from_pretrained()로 모델을 불러오면 모델은 캐싱되고 다음부터 빠르게 불러와서 사용할 수 있다.
일반적으로 스크래치부터 UNet 모델을 짜지는 않을 테니...
예를 들어, Unconditional Image Generation task를 수행한다고 해보자.
from diffusers import UNet2DModel
repo_id = "google/ddpm-cat-256"
model = UNet2DModel.from_pretrained(repo_id, use_safetensors=True)
Unconditional Image Generation에서는 unconditional UNet, 즉 diffusers 내에 UNet2DModel로 선언되어있는 클래스를 불러와서 넣어주면 된다.
보통 UNet은 in_channel, block_out_channel 등 다양한 configuration을 결정해줘야 하는데, 이런 configuration에 접근하고자 하면 "model.config" 로 접근하면 dictionary 형태의 configuration을 확인할 수 있다.
하나 참고할 것은, 이 configuration dictionary는 'frozen', 즉 한 번 모델이 정의되고 나면 값을 바꿀 수 없다는 점이다. 가장 대표적으로 configuration의 구성 요소는 다음과 같은 변수들이 존재한다.
- sample_size: the height and width dimension of the input sample.
- in_channels: the number of input channels of the input sample.
- down_block_types and up_block_types: the type of down- and upsampling blocks used to create the UNet architecture.
- block_out_channels: the number of output channels of the downsampling blocks; also used in reverse order for the number of input channels of the upsampling blocks.
- layers_per_block: the number of ResNet blocks present in each UNet block.
모델 자체를 inference하고자 한다면, model()과 같이 변수명으로 forward()를 호출하면 되는데, 이 때 UNet2DModel로 예를 들면 forward call이 필요로 하는 것은 noisy latent와 timestep이다. 즉 이 모델은 noisy latent를 timestep만큼 denoising한 noisy residual을 반환해주는 것이다.
with torch.no_grad():
   noisy_residual = model(sample=noisy_sample, timestep=2).sample
물론 지금은 전혀 의미없는 값이 생성되겠지만, 진짜 이미지를 생성하려면 denoising process를 guide하기 위해서 scheduler을 정의하고 적절히 사용해줘야 한다.
4. Schedulers
schedulers는 noisy한 샘플을 덜 noisy한 샘플로 만드는 과정을 manage한다. (즉 denoising process를 관리한다. DDPM 논문에서 와 관련이 있다고 생각하면 쉽다.
예를 들어, DDPMScheduler를 diffusers에서 불러와보자.
from diffusers import DDPMScheduler

scheduler = DDPMScheduler.from_pretrained(repo_id)
scheduler
DDPMScheduler {
  "_class_name": "DDPMScheduler",
  "_diffusers_version": "0.21.4",
  "beta_end": 0.02,
  "beta_schedule": "linear",
  "beta_start": 0.0001,
  "clip_sample": true,
  "clip_sample_range": 1.0,
  "dynamic_thresholding_ratio": 0.995,
  "num_train_timesteps": 1000,
  "prediction_type": "epsilon",
  "sample_max_value": 1.0,
  "steps_offset": 0,
  "thresholding": false,
  "timestep_spacing": "leading",
  "trained_betas": null,
  "variance_type": "fixed_small"
}
위와 같이 denoising 과정을 guide할 수 있는 여러 component를 가진 scheduler가 들어있다. 대표적으로 beta_end, beta_start, beta_schedule 등이 눈에 띈다.
model 클래스와 다르게, scheduler는 trainable weight가 없고 parameter free라는 점을 기억하자.
대표적으로 다음과 같은 변수들이 존재한다.
- num_train_timesteps: the length of the denoising process or, in other words, the number of timesteps required to process random Gaussian noise into a data sample.
- beta_schedule: the type of noise schedule to use for inference and training.
- beta_start and beta_end: the start and end noise values for the noise schedule.
scheduler의 step 메서드를 활용해서 less noisy sample을 얻을 수 있다. 이 때 step()에는 model_output, timestep, sample을 필요로 한다.
less_noisy_sample = scheduler.step(model_output=noisy_residual, timestep=2, sample=noisy_sample).prev_sample
less_noisy_sample.shape
torch.Size([1, 3, 256, 256])
prevsample은 $x{t-1}$ 를 샘플링한 형태로, denoising loop 내 다음 과정의 model input으로 들어갈 수 있다.
다음과 같이 denoising 과정을 visualize할 수도 있다. timestep i 시점에서의 sample을 visualize하는 함수 display_sample()을 선언해주고,
import PIL.Image
import numpy as np


def display_sample(sample, i):
...     image_processed = sample.cpu().permute(0, 2, 3, 1)
...     image_processed = (image_processed + 1.0) * 127.5
...     image_processed = image_processed.numpy().astype(np.uint8)

...     image_pil = PIL.Image.fromarray(image_processed[0])
...     display(f"Image at step {i}")
...     display(image_pil)
이를 사전 정의된 scheduler의 timestep을 따라 반복해준다. 그러면 매 timestep에서의 샘플들이 출력될 것이다.
import tqdm

sample = noisy_sample

for i, t in enumerate(tqdm.tqdm(scheduler.timesteps)):
...     # 1. predict noise residual
...     with torch.no_grad():
...         residual = model(sample, t).sample

...     # 2. compute less noisy image and set x_t -> x_t-1
...     sample = scheduler.step(residual, t, sample).prev_sample

...     # 3. optionally look at image
...     if (i + 1) % 50 == 0:
...         display_sample(sample, i + 1)
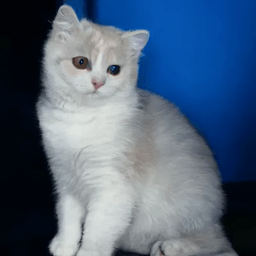
예시로, 완전한 노이즈로부터 노이즈가 서서히 걷히며 고양이 이미지가 생성되는 것을 확인할 수 있다.
5. References