0. Intro
앞선 글에서 Diffusers Quicktour을 통해 diffusers를 사용하는 개요를 알아보았다. 그 뒤에 diffusers 다큐먼트를 훑어보니 양이 정말 상당했다...
글 작성에 투자할 수 있는 시간이 많지는 않기에, 장기적으로 내 연구와 강하게 연관되어 있고 사람들이 관심 있어 할 stable diffusion을 우선적으로 꼼꼼히 리뷰해보려 한다.
사실 정말 대부분의 모델들이 stable diffusion을 기반으로 하고 있기에, diffusers에 관심이 있다면 관심 있는 (stable diffusion을 추천한다.) 라이브러리/파이프라인을 하나 잡고 top-down 형식으로 파고 들어가며 공부를 하는 방법이 좋을 것 같다.
따라서 본 글은 Diffusers 라이브러리 내 Stable Diffusion과 관련된 내용을 주로 다루며, StableDiffusionPipeline을 중심으로 리뷰를 진행한다.
나중에 시간이 되면 accelerator, dataset 등 내가 주로 사용하는 기능들 위주로 정리해보아야겠다.
1. Stable Diffusion
- Stable diffusion은 text-to-image latent diffusion model이다.
- 512x512 이미지를 생성하도록 학습됐으며, LAION-5B에 대해 학습했다.
- LAION-5B는 현존하는 무료 multi-modal 데이터셋 중 가장 큰 규모이다. (이미지-캡션) pair로 구성되어 있다.
2. Running Stable Diffusion
환경 설정은 생략, diffusers에서 StableDiffusionPipeline을 가져와 준다.
from diffusers import StableDiffusionPipeline

pipe = StableDiffusionPipeline.from_pretrained("CompVis/stable-diffusion-v1-4")

pipe.to('cuda')
위 코드는 Stable Diffusion의 초기 버전인 1.4를 기반으로 하고 있는데, 1.5, 2, 2.1 버전이 존재하고 같은 레포지토리에서 모델을 불러오는 것으로 간단히 대체할 수 있다. SDXL은 사용법이 조금 다르니 나중에 기회가 된다면 다뤄보도록 하겠다.
다음으로 text-to-image synthesis에 필요한 prompt를 정의해 준 뒤 pipe()로 forward function을 호출해주고, 결과를 확인해 본다.
prompt = "a photograph of an astronaut riding a horse"

image = pipe(prompt).images[0]

# you can save the image with
# image.save(f"astronaut_rides_horse.png")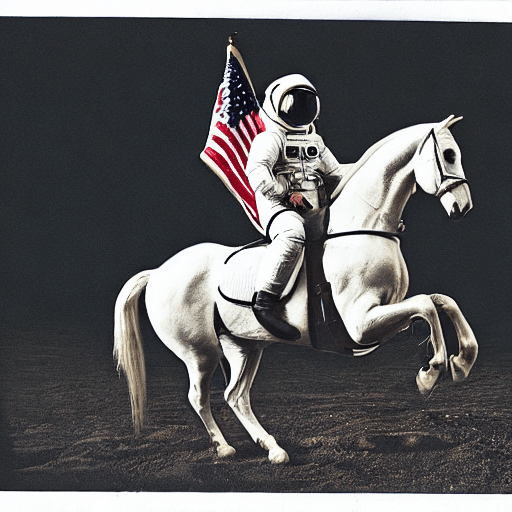
예시로, 위와 같은 사진이 나올 수 있고 현재의 코드 기준으로는 사진은 프롬프트를 작성할 때마다 매 번 달라진다. 만약 같은 사진이 나오게 하고 싶다면 시드를 명시적으로 설정해주면 된다.
import torch

generator = torch.Generator("cuda").manual_seed(1024)
image = pipe(prompt, guidance_scale=7.5, generator=generator).images[0]

# you can save the image with
# image.save(f"astronaut_rides_horse.png")
위 예시에서는 seed를 고정하는 것 이외에도 CFG guidance scale을 7.5로 변경해주었다.
guidance scale은 얼마나 text에 충실한 이미지를 만들어내는가와 관련된 것인데, text에 충실하다고 해서 이미지의 퀄리티가 좋아지는 것은 아니다. stable diffusion에서는 7~8.5 사이의 값이 적절하다고 알려져 있다.
기본적으로 stable diffusion은 적은 timestep 상에서도 잘 작동하는데, pipeline의 num_inference_steps 옵션을 변경해줄 수도 있다. 예를 들어, default로 50 step인 timestep을 15로 변경해준다고 가정해보자.
import torch

generator = torch.Generator("cuda").manual_seed(1024)
image = pipe(prompt, guidance_scale=7.5, num_inference_steps=15, generator=generator).images[0]

# you can save the image with
# image.save(f"astronaut_rides_horse.png")
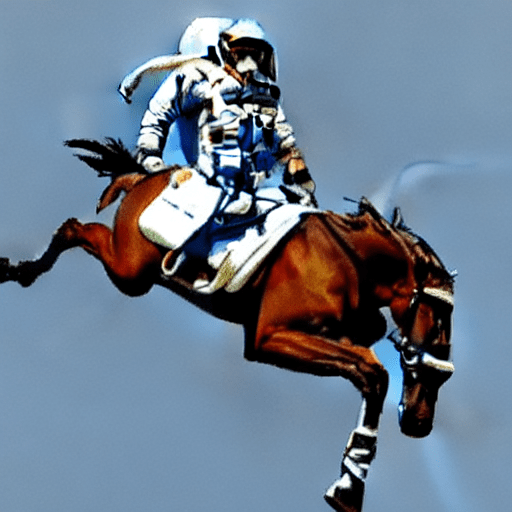
확실히 적은 타임스텝 내에서 꾸역꾸역 denoise를 하다 보니 퀄리티가 좋지 않은 이미지가 생성된다.
이외에 생성되는 이미지의 크기도 조절해줄 수 있고, 같은 프롬프트로 랜덤한 여러 장의 이미지를 만들어줄 수도 있는데 이 글에서는 생략하도록 하겠다. 관심있다면, 해당 링크를 살펴보길 바란다.
3. How does Stable Diffusion work?
사실 이 글의 핵심이다. 단순히 LDM 논문을 읽어보는 것만으로는, Stable Diffusion이 어떻게 동작하는지를 명확히 이해하기란 불가능에 가깝다.
논문을 읽어보는 것과 코드를 살펴보는 것은 다르다. 논문을 읽었을 때 명확히 이해되지 않던 부분들이 코드를 살펴보고, 돌려보면서 디버깅을 해 보면 대부분 해결된다. huggingface의 diffusers 다큐먼트가 Stable Diffusion을 이해하는 데 가장 정석적인 자료라고 생각한다.
Stable Diffusion은 Latent Diffusion (Proposed in High-Resolution Image Synthesis with Latent Diffusion Models)을 기반으로 한다.
Diffusoin model은 Image Synthesis에서 state-of-the-art 성능을 보여왔지만 denoising process가 매우 느리고, 심지어 pixel space 상에서 연산을 수행하느라 memory consumption 또한 크다는 단점이 있었다.
Latent Diffusion은 diffusion process를 실제 pixel space에서 수행하지 않고, 더 낮은 차원의 latent space에서 수행함으로써 memory consumption과 compute complexity를 줄일 수 있었다.
여기서 간단하지만 중요한 사실은, latent diffusion에서 model(UNet)은 (압축된) latent representation을 생성하도록 학습된다는 것이다.
3 Main componenets of LDM
- Variational AutoEncoder (VAE)
- U-Net
- text encoder (e.g. CLIP Text encoder)
SDXL의 경우에는 text encoder을 CLIP과 openCLIP 두 개를 사용하기도 하지만, 어쩄든 기본적으로 LDM은 다음과 같은 3가지 구성 요소를 기본적으로 갖는다.
각각이 어떤 역할을 하고, 어떻게 작동하는지 살펴보자.
1. Variational Autoencoder (VAE)
VAE는 encoder와 decoder, 2가지 파트로 구성되어 있다.
encoder는 이미지를 low dimensional의 latent representation으로 변환하고, 이는 UNet의 input으로 들어간다.
반대로, decoder는 latent representation을 image로 변환하고, 이는 UNet의 output을 변환하여 최종 이미지를 생성하는 데 활용된다.
참고로, inference 동안에는 우리는 VAE의 decoder만을 활용한다. random한 latent vector 를 text를 condition으로 받아 denoise하고 image space로 확장할 것이기 때문이다.
2. U-Net
U-Net은 ResNet block으로 구성된 encoder, decoder로 나뉜다.
encoder은 image representation을 더 작은 resolution을 가지는 image representation으로 변환하고, decoder는 반대로 더 큰 resolution의 representation으로 변환한다.
구체적으로, Diffusion Model에서의 U-Net은 noise residual을 예측하는데, 이는 denoised image representation을 예측하는 데 활용되는 정보이다.
stable diffusion에서는 cross-attention layer을 통해 text condition을 받아 output을 만들어낼 수 있으며 cross-attention layer는 encoder와 decoder에 모두, ResNetBlock 사이에 추가됐다.
3. Text-Encoder
text-encoder는 input prompt(e.g. "An astronaut riding a horse")를 UNet에 넣어줄 수 있는 적절한 형태로 변환하는 역할을 한다.
Stable Diffusion에서는 Imagen의 영향을 받아 text-encoder을 더이상 학습시키지 않고 freeze한다.
latent diffusion은 왜 빠르고 효율적인가?
더 낮은 spatial resolution 상에서 모든 연산 (Convolution, cross-attention...)을 수행하기 때문이다.
LDM 논문 상으로 LDM-8 (x8 downsampling)이 가장 성능이 좋았기 때문에 대부분의 LDM에서는 LDM-8을 기반으로 하는데, 이를 예로 들어 설명해보면 ..
(3, 512, 512) shape의 텐서가 VAE를 거친 latent space에서는 (4, 64, 64) 차원을 갖는다. 상당한 양의 연산량이 절약된다.
4. Stable Diffusion During Inference
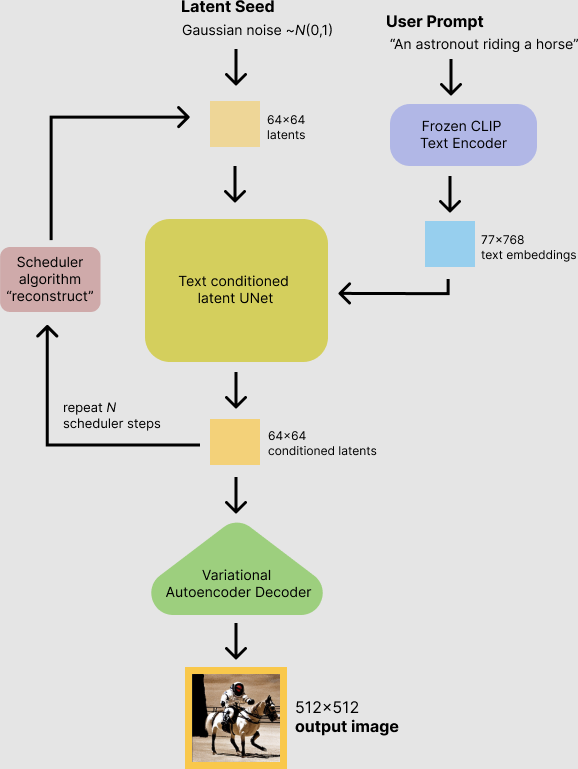
위와 같은 framework 상에서 text를 condition으로 가지며 이미지를 생성해낸다. 조금 더 설명을 덧붙이면,
- x8 downsampling된 resolution을 갖는 latent vector를 (즉, 완전한 가우시안 노이즈) 으로부터 sampling한다.
- 한편, text prompt는 CLIP의 text encoder를 거쳐 77x768 dimension의 text embedding으로 변환된다.
- UNet이 반복적으로 random latent image representation을 denoise한다.
UNet의 output은 noise residual인데, 스케쥴러와 함께 denoised latent image representation을 계산하는 데 사용된다. 많은 scheduler 알고리즘이 제시되어 있는데, Stable Diffusion에서는 기본적으로 PNDM Scheduler (introduced in EDM)를 사용한다. - denoising process는 50 timestep동안 진행된다.
5. Code Example
Stable Diffusion에 필요한 모델들을 불러오고, 이를 바탕으로 Pipeline을 구성하여 inference하는 과정을 담아본다.
다음과 같은 pre-trained model들이 필요하다.
text_encoder: Stable Diffusion uses CLIP, but other diffusion models may use other encoders such as BERT.
tokenizer: It must match the one used by the text_encoder model.
scheduler: The scheduling algorithm used to progressively add noise to the image during training.
unet: The model used to generate the latent representation of the input.
vae: Autoencoder module that we'll use to decode latent representations into real images.
각 모델들에 내장되어 있는 from_pretrained 메서드를 호출하여 huggingface hub에 있는 모델들을 불러보자.
from transformers import CLIPTextModel, CLIPTokenizer
from diffusers import AutoencoderKL, UNet2DConditionModel, PNDMScheduler

# 1. Load the autoencoder model which will be used to decode the latents into image space.
vae = AutoencoderKL.from_pretrained("CompVis/stable-diffusion-v1-4", subfolder="vae")

vae.to('cuda')

# 2. Load the tokenizer and text encoder to tokenize and encode the text.
tokenizer = CLIPTokenizer.from_pretrained("openai/clip-vit-large-patch14")
text_encoder = CLIPTextModel.from_pretrained("openai/clip-vit-large-patch14")

text_encoder.to('cuda')

# 3. The UNet model for generating the latents.
unet = UNet2DConditionModel.from_pretrained("CompVis/stable-diffusion-v1-4", subfolder="unet")

unet.to('cuda')
tokenizer을 제외하고 text_encoder, vae, unet을 GPU로 보내주었다.
다른 예시로, K-LMS Scheduler을 사용해보자.
from diffusers import LMSDiscreteScheduler

scheduler = LMSDiscreteScheduler(beta_start=0.00085, beta_end=0.012, beta_schedule="scaled_linear", num_train_timesteps=1000)
다음으로, prompt, resolution, guidance scale 등 pipeline을 정의하기 전 결정해야 할 변수들을 설정해준다.
prompt = ["a photograph of an astronaut riding a horse"]

height = 512                        # default height of Stable Diffusion
width = 512                         # default width of Stable Diffusion

num_inference_steps = 100           # Number of denoising steps

guidance_scale = 7.5                # Scale for classifier-free guidance

generator = torch.manual_seed(0)    # Seed generator to create the inital latent noise

batch_size = len(prompt)
본격적으로 model inference가 시작된다.
먼저 input prompt를 변환해줄건데, tokenizer을 거쳐 token 단위로 분리되고 그 뒤 token들이 text encoder을 통과하여 text embedding으로 변한다.
text_input = tokenizer(prompt, padding="max_length", max_length=tokenizer.model_max_length, truncation=True, return_tensors="pt")

text_embeddings = text_encoder(text_input.input_ids.to(torch_device))[0]
Classifier-free guidance를 위해서는 unconditional, 즉 여기서는 text가 condition이니까 text가 없는 상황에 대한 embedding도 만들어주어야 한다.
max_length = text_input.input_ids.shape[-1]
uncond_input = tokenizer(
    [""] * batch_size, padding="max_length", max_length=max_length, return_tensors="pt"
)
uncond_embeddings = text_encoder(uncond_input.input_ids.to(torch_device))[0]
이렇게 되면 padding token들에 대한 embedding이 생성되고, unconditional generation에서 이를 활용하여 sampling을 진행하게 된다.
Classifier-free guidance를 적용하기 위해 2개의 forward pass가 필요하다. conditional output 와 unconditional output 을 연산하여 moved noise prediction 을 만들어내기 때문이다. (CFG 수식 참고) forward를 두 번 하지 않고 token을 batch로 넣어주는 방법으로 간단히 해결 가능하다.
text_embeddings = torch.cat([uncond_embeddings, text_embeddings])다음으로, latent를 Normal Distribution으로부터 sampling한다. 이 때 resolution은 pixel space의 8배 downsampling된 값이다. (LDM-8)
latents = torch.randn(
    (batch_size, unet.in_channels, height // 8, width // 8),
    generator=generator,
)
latents = latents.to(torch_device)
다음으로, 앞서 정의한 scheduler에 num_inference_steps 변수를 timestep으로 할당하고, K-LMS에서 필요로 하는대로 latent에 initial noise sigma를 곱해준다.
scheduler.set_timesteps(num_inference_steps)
latents = latents * scheduler.init_noise_sigma
그 뒤, timestep 동안 denoising loop를 수행하여 noisy latent의 noise를 걷어낸다.
from tqdm.auto import tqdm

scheduler.set_timesteps(num_inference_steps)

for t in tqdm(scheduler.timesteps):
    # expand the latents if we are doing classifier-free guidance to avoid doing two forward passes.
    latent_model_input = torch.cat([latents] * 2)

    latent_model_input = scheduler.scale_model_input(latent_model_input, timestep=t)

    # predict the noise residual
    with torch.no_grad():
        noise_pred = unet(latent_model_input, t, encoder_hidden_states=text_embeddings).sample

    # perform guidance
    noise_pred_uncond, noise_pred_text = noise_pred.chunk(2)
    noise_pred = noise_pred_uncond + guidance_scale * (noise_pred_text - noise_pred_uncond)

    # compute the previous noisy sample x_t -> x_t-1
    latents = scheduler.step(noise_pred, t, latents).prev_sample
마지막으로, denoise를 수행한 latent space로부터 VAE decoder를 태워 우리가 알아볼 수 있는 형태의 image representation으로 변환해준다.
# scale and decode the image latents with vae
latents = 1 / 0.18215 * latents
with torch.no_grad():
image = vae.decode(latents).sample
image = (image / 2 + 0.5).clamp(0, 1)
image = image.detach().cpu().permute(0, 2, 3, 1).numpy()
images = (image * 255).round().astype("uint8")
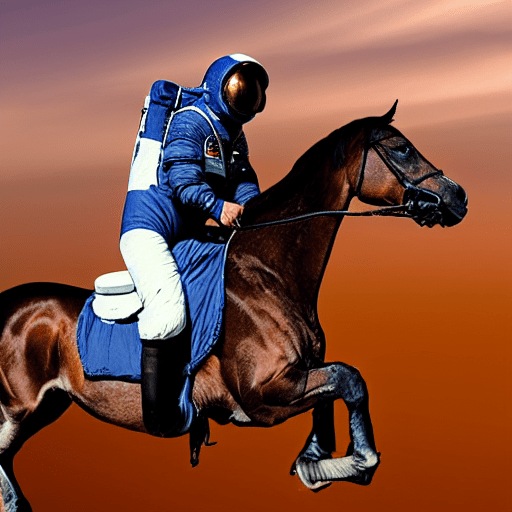
pil_images = [Image.fromarray(image) for image in images]
pil_images[0]이렇게 하면 최종적으로 input prompt에 충실한 이미지가 만들어진다!
정말 좋은 정리 글이네요 :)
한가지 여쭙고 싶은것이 있어 댓글 답니다.
저는 딥러닝, 그중에서도 Generative model(Diffusion)과 Model Compression 분야 연구를 희망하고 공부해나가고 있는 석사 입시 준비생입니다.
이번에 LDM(Stable diffusion) 논문을 읽고 코드 구현을 해보려 하던중 의문이 들었습니다.
huggingface가 제공하는 Diffuser 라이브러리/파이프라인을 이용하여 LDM을 구현이 가능한듯 보이는데, 제가 미래에 LMM(예를들어 Stable diffusion)에 대한 Model Compression 연구를 진행한다면, 이러한 Diffuser 사용만으로도 연구가 가능할지 혹은 더 세부적인 코드구현을 알아야할지 궁금합니다.
감사합니다.