Computer vision
Grad CAM(Class Activation Map)
학습시킨 모델이 이미지의 어떤 부분을 보고 분류하는지, 특징점을 잘 파악하고 있는지 알아보기 위해 시도해볼 수 있는 기술인 Grad CAM(Class Activation Map)에 대해 알아보고 구현을 통해 CIFAR-10, MNIST 데이터에 직접 적용한다.
CAM은 원래 convloution 결과에 GAP(Global Average Pooling)추가해 이 결과로 모델이 어느 부분을 보는지 관찰하는데 사용한다. 하지만 기존에 있던 모델의 구조를 변경해야한다는 점에서 한계가 있었다.
이러한 한계를 해결한 Grad CAM은 마지막 activation map의 gradient를 이용하기 때문에 모델의 구조를 변경하지 않아도 된다는 장점이 있다.
VGG-11 예시
VGG-11의 구조는 크게 features와 classifier로 구성되어 있다
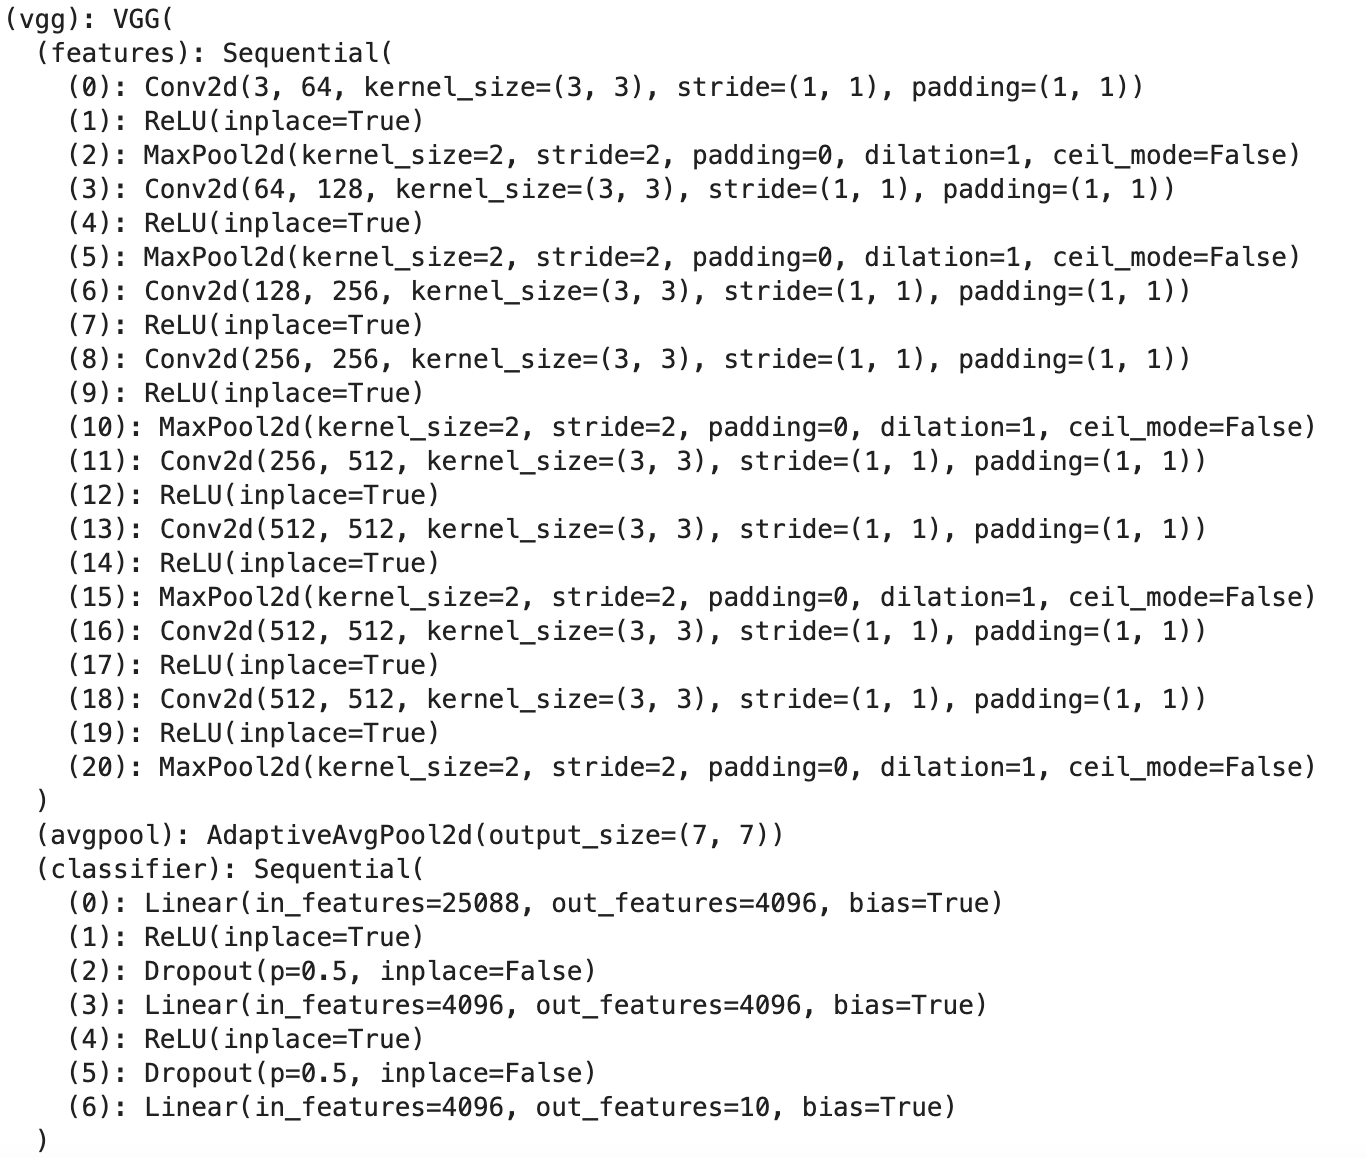
fetures의 19번째(ReLU activation) 레이어를 통과한 feature map과 gradient를 사용하기 위해 구조를 분리하면
def __init__(self):
    super(VGG, self).__init__()

    self.vgg = torchvision.models.vgg11(pretrained=True)

    self.features_conv = self.vgg.features[:20] #19 번째 layer 까지 분리

    self.max_pool = nn.MaxPool2d(kernel_size=2, stride=2, padding=0, dilation=1, ceil_mode=False)

    self.classifier = self.vgg.classifier

    # CIFAR-10 데이터셋 클래스(10)로 out_features 변경
    self.classifier[6] = nn.Linear(in_features=4096, out_features=10, bias=True)

    # 기존 VGG-11과 구조는 같음
    self.gradients = None
기존 VGG-11과 구조는 같게 유지할 수 있고 마지막 classifier의 output channel을 CIFAR-10의 클래스 개수로 맞춰주었다. 학습 과정에서 gradient를 구하기 위해 pytorch가 지원하는 hook을 사용해 학습 과정에서 gradient를 instance로 가지고 있을 수 있도록 forward 함수를 재정의 한다.
def activations_hook(self, grad):
    self.gradients = grad

def forward(self, x):
    x = self.features_conv(x)

    if self.train and x.requires_grad:
       x.register_hook(self.activations_hook)

    x = self.max_pool(x)
    x = x.view(x.size(0),-1)
    x = self.classifier(x)

    return x
학습된 모델로 부터 gradient와 activation을 얻을 수 있도록 추가적인 함수를 구현한다.
def get_activations_gradient(self):
return self.gradients
def get_activations(self, x):
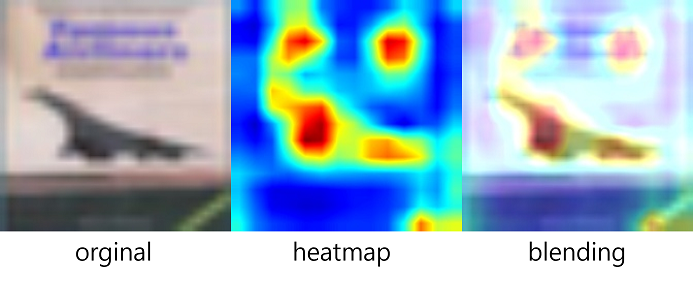
return self.features_conv(x)학습을 진행 한 후 테스트 이미지 1장으로 결과를 구하는 과정은 다음과 같다. 학습된 모델로 부터 모든 채널의 gradient를 합쳐 평균을 구하고 이미지 1장을 모델의 features에 통과시킨다음 합쳐진 gradient를 모든 채널에 더해 heatmap을 구한다.
import cv2
import os

def generate_grad_cam(model, img, target_dir='./', index=0):
    # eval 모드로 변경
    model.eval()

    # 학습된 모델로 부터 얻은 gradient 값들
    gradients = model.get_activations_gradient()

    # 모든 채널의 gradient pooling
    pooled_gradients = torch.mean(gradients, dim=[0,2,3])

    img = img.to(device)

    # (224,224,3) 크기의 이미지를 (1,224,224,3)으로 변경 (batch 형태)
    img = img.unsqueeze(0)

    # 19번째 layer까지 이미지를 통과
    activations = model.get_activations(img).detach()

    # 채널에 가중치를 부여
    for i in range(img.size(1)):
        activations[:,i,:,:] += pooled_gradients[i]

    # 히트맵, 원본, 블랜딩 이미지 생성
    heatmap = torch.mean(activations, dim=1).squeeze().cpu()
    heatmap = np.maximum(heatmap, 0)
    heatmap /= torch.max(heatmap)

    img = img[0].cpu().permute(1, 2, 0).numpy()
    resized_heatmap = heatmap.numpy()
    resized_heatmap = cv2.resize(resized_heatmap, (img.shape[1], img.shape[0]))
    resized_heatmap = np.uint8(255 * resized_heatmap)
    resized_heatmap = cv2.applyColorMap(resized_heatmap, cv2.COLORMAP_JET)

    cv2.imwrite(os.path.join(target_dir, f'heatmap_{index}.jpg'), resized_heatmap)

    img = np.uint8(255 * img)
    superimposed_img = (resized_heatmap) * 0.4 + img

    cv2.imwrite(os.path.join(target_dir, f'original_{index}.jpg'), img)
    cv2.imwrite(os.path.join(target_dir, f'blending_{index}.jpg'), superimposed_img)
test_loader에서 샘플 이미지를 몇장 뽑아 실행한 결과를 보면
images, _ = next(iter(test_loader))
generate_grad_cam(vgg, images[0], index=0)| 원본 | 히트맵 | 블랜딩 |
|---|---|---|
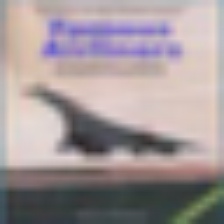 | 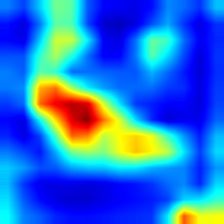 |  |
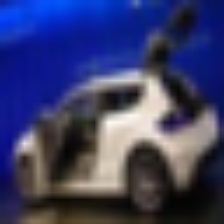 | 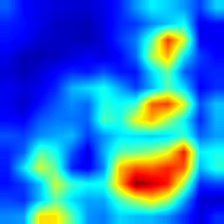 | 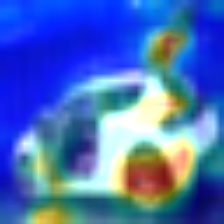 |
CIFAR-10 데이터셋을 VGG-11 구조를 가진 모델로 학습을 하였을 때 테스트 데이터에 2장에 대한 결과이다. 붉은색으로 표현된 부분이 가장 많은 영향을 준 부분으로 해석할 수 있다.
전체 코드와 실행 결과 확인
https://github.com/hyeonjini/image_classification/blob/master/grad_cam/grad_cam.ipynb
Reference
https://arxiv.org/abs/1610.02391
https://medium.com/@stepanulyanin/implementing-grad-cam-in-pytorch-ea0937c31e82
https://jsideas.net/grad_cam/