프로젝트에 적용했던 녹음기능에 대해서 소개하려고한다.
먼저 녹음하기위해 읽어야할 스크립트를 구현해보자.
record.js와 css을 적용할 record.module.css를 생성했다.
record.js
import React from 'react';
import styles from '../css/record.module.css';
import { useState } from 'react';
function Record(){
const [currentIndex, setCurrentIndex] = useState(0);
const texts = ['녹음기능',
'구현해보자',
'화이팅',
'모든 문장녹음을 완료하였습니다.'
]스크립트에 나올 문장을 text 변수에 구현했다.
text 배열을 하나씩 인덱싱할 변수로 currentIndex를 생성하였다.
currentIndex는 추후에 버튼을 눌렀을때 1씩 증가시켜 text[0], text[1] 인덱싱을 하게끔 업데이트를 하기위해 useState로 관리하였다.
  const buttonClassName = currentIndex >= 3 ? `${styles.finishbutton}` : "";
  const buttonText = currentIndex >= 3 ? "끝" : "다음";
  const progressClassName = currentIndex >= 3 ? `${styles.finishprogress}` : `${styles.progress}`;
  const progressIndex = currentIndex >= 3 ? "3" : `${currentIndex+1}`;
const scriptText = texts[currentIndex];-
buttonClassName : currentIndex값이 3 이상일때 styles.finishbutton으로 아닐시 ""로 구현했다. 현재 texts 배열은 인덱스 3까지 있으므로 texts[3]인 순간에는 "모든 문장녹음을 완료되었습니다." 라는 문장이 인덱싱되고 버튼의 css를 변경하기 위해 이렇게 구현했다.
-
buttonText : 마찬가지로 currentIndex값이 3 이상일때 끝이라는 문구가 나오게되고 아닐 때는 texts를 넘길 수 있게 다음이라는 문구를 출력하게끔 했다.
-
progressClassName : 위 buttonClassName과 같은 이유
-
progressIndex : 스크립트가 몇번째 인지 나타내는 역할 배열의 인덱스는 0부터 시작하지만 사용자한테는 1부터 시작하게끔 나타내기 위해 currentIndex+1를 해주었다.
-
scriptText : 실제로 사용자가 녹음할 문장을 나타내기위한 변수
  function handleClickNext () {
    setCurrentIndex((prevIndex) => {
      const newIndex = prevIndex + 1;
      if (newIndex >= 4) {
        return 0;
      }
      return newIndex;
    });
  }
버튼을 누를때 currentIndex값을 1씩 증가시키는 function이다. 4이상일때는 0으로 돌아가게끔 했다.
return (
<div className={styles.recordbody}>
<div className={styles.recordcontainer}>
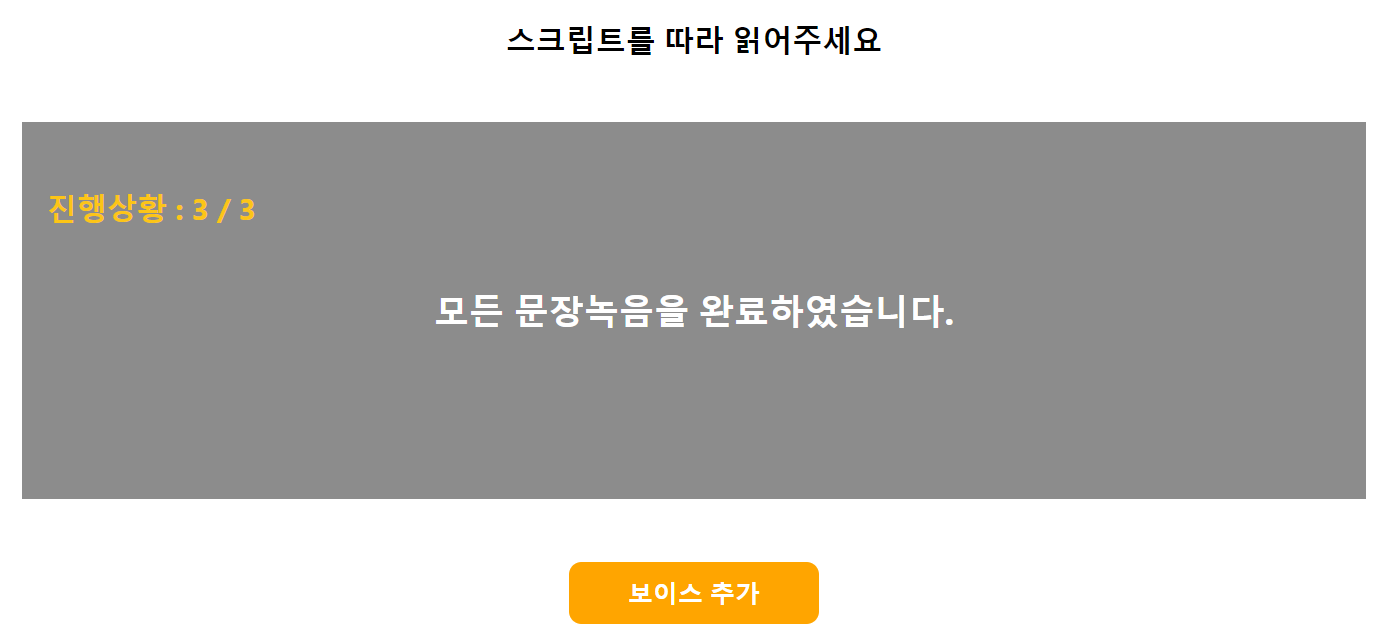
<h2>스크립트를 따라 읽어주세요</h2>
<div className={styles.script}>
<h4 className={progressClassName}>진행상황 : {progressIndex} / 3</h4>
<h3>{scriptText}</h3>
</div>
</div>
<div className={styles.btn_area}>
<div>
<button className={ buttonClassName } onClick={ handleClickNext }>{buttonText}</button>
</div>
</div>
</div>
)
}
export default Record;HTML code이다.
result.module.css
.recordbody {
    display: flex;
    justify-content: center;
    align-items: center;
    height:100vh;
    position : relative;
    flex-direction: column;
    text-align: center;
  }

  .recordbodycontainer {
    text-align: center;
  }

.btn_area button{
    width: 200px;
    height:50px;
    background: #59B95F;
    color:#fff;
    font-size:20px;
    border:none;
    border-radius:10px;
    cursor: pointer;
    font-weight: bold;
}

.recordbtn{
    background-color: #FFA500 !important;
}

.btn_area > div:first-child {
    margin-left: 0px;
}

.btn_area > div:not(:first-child) {
    margin-left: 20px;
}


.btn_area > div{
    display: inline-block;
}

.script{
    margin-top: 50px;
    margin-bottom: 50px;
    width: 70vw;
    height: 40vh;
    background-color: #8C8C8C;
    display: flex;
    justify-content: center;
    align-items: center;
    color: white;
    font-size: 24px;
    position: relative;
}

.progress{
    position: absolute;
    top: 20px;
    left: 20px;
  }

.finishprogress{
    position: absolute;
    top: 20px;
    left: 20px;
    color: #FCC517;
}

.finishbutton{
    background-color: #FFA500 !important;
}
css는 따로 설명하지않겠다. 우리는 기능이 목적이니까~!
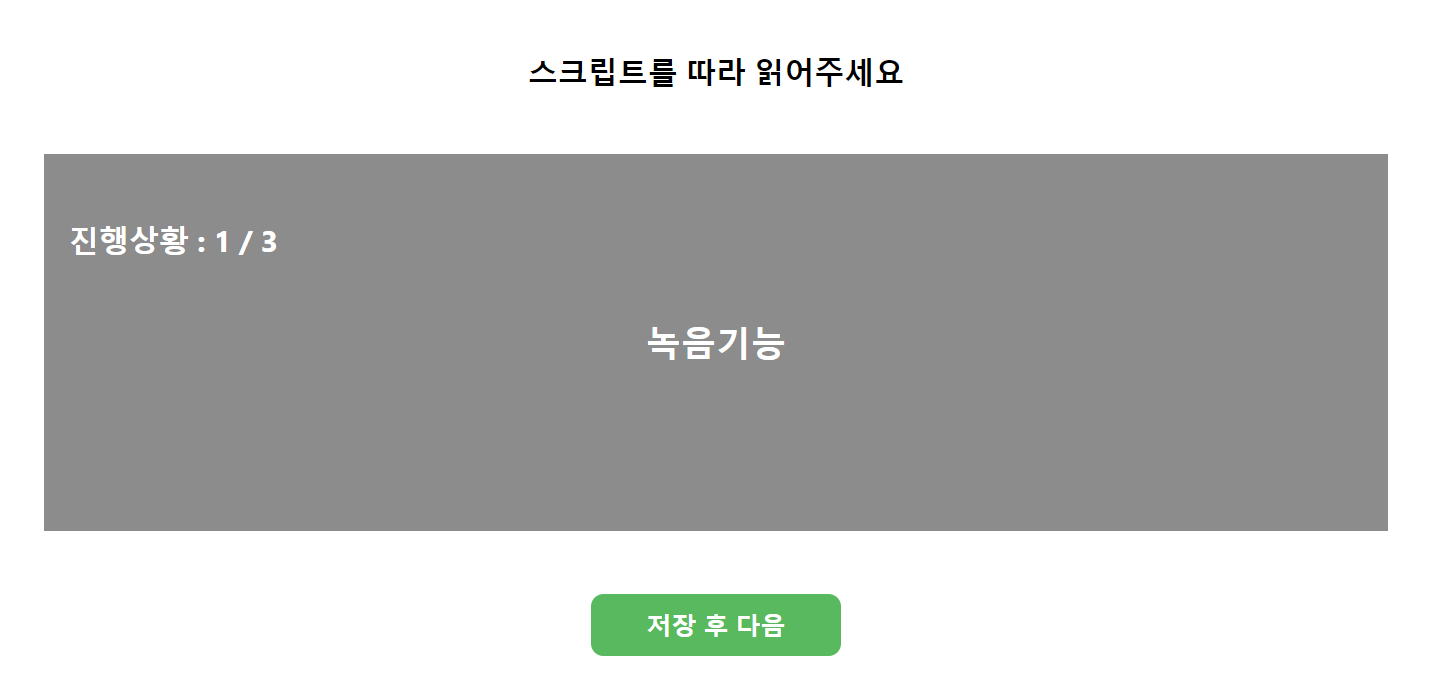
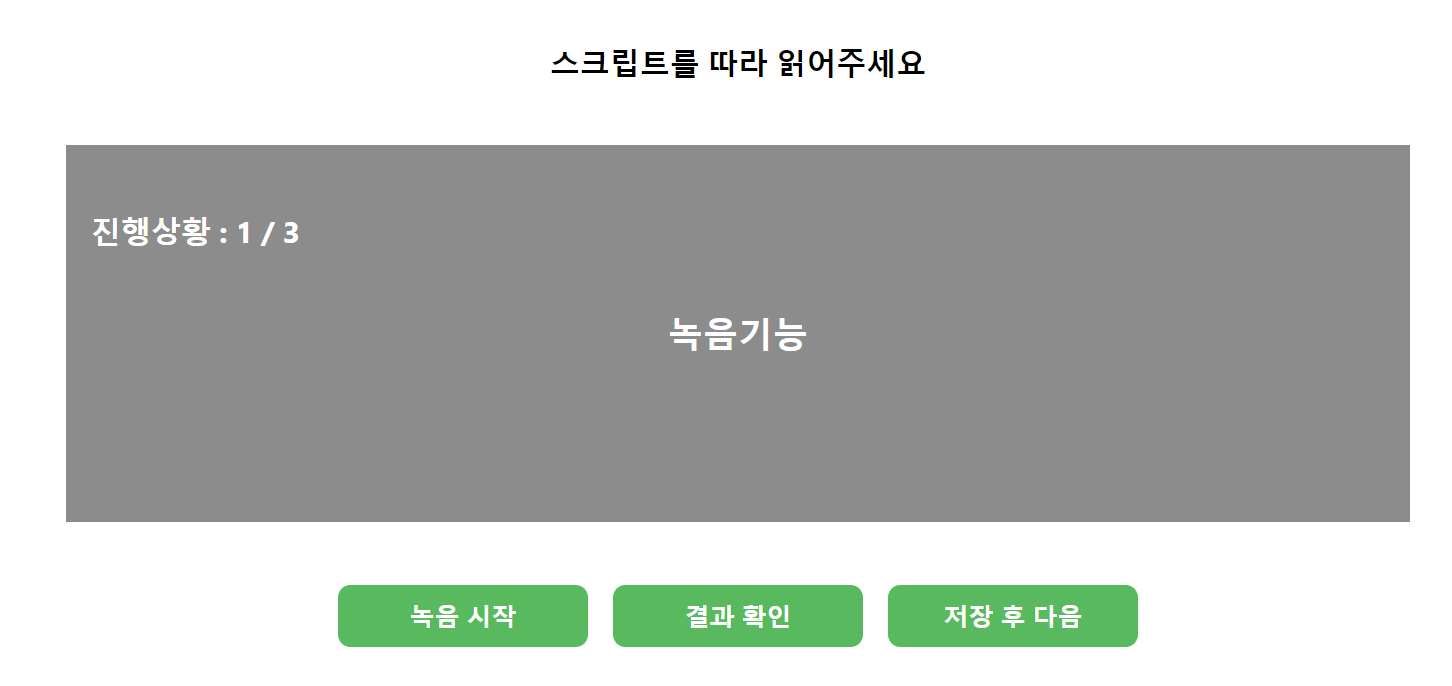
오타 없이 코드를 잘 적었다면 다음과 같은 화면을 볼 수 있을 것이다.
초록색 버튼을 누르면 handleClickNext function이 실행되면서 currentIndex값이 1씩 늘어나므로 스크립트와 진행상황이 바뀌는것을 알 수 있다.
currentIndex값이 3이상이 된 순간에는 버튼의 스타일과 진행상황의 스타일이 바뀌게끔 구현하였다.
이제 본격적으로 해당 스크립트를 녹음하는 기능을 구현해보자.
녹음기능
먼저 녹음을 진행하게끔 해줄 버튼을 생성해주겠다. 기존의 HTML CODE를 다음과 같이 수정해준다.
        <div className={styles.btn_area}>
          <div >
            <button className={onRec ? "" : styles.recordbtn} onClick={onRec ? onRecAudio : offRecAudio}>{onRec ? '녹음 시작' : '녹음 중지'}</button>
          </div>
          <div className={styles.btn_area}>
            <button onClick={onSubmitAudioFile}>결과 확인</button>
          </div>
          <div className={styles.btn_area}>
            <button className={buttonClassName} onClick={currentIndex === 3 ? handleVoice : handleClickNext}>{buttonText}</button>
          </div>
        </div>
두 개의 버튼이 늘어났다.
첫번째 버튼의 onClick 안에서 onRec가 True일때 onRecAudio, False일때 offRecAudio가 되게끔 구현했다.
onRecAudio는 녹음을 진행하는 function이고
offRecAudio는 녹음을 중단하는 function이다.
onRecAudio
const [stream, setStream] = useState();
const [media, setMedia] = useState();
const [onRec, setOnRec] = useState(true);
const [source, setSource] = useState();
const [analyser, setAnalyser] = useState();
const [audioUrl, setAudioUrl] = useState();
const chunks = []; // 오디오 청크 데이터를 저장할 배열

const onRecAudio = () => {
      // 음원정보를 담은 노드를 생성하거나 음원을 실행또는 디코딩 시키는 일을 한다
      const audioCtx = new (window.AudioContext || window.webkitAudioContext)();

      // 자바스크립트를 통해 음원의 진행상태에 직접접근에 사용된다.
      const analyser = audioCtx.createScriptProcessor(0, 1, 1);
      setAnalyser(analyser);

      function makeSound(stream) {
        // 내 컴퓨터의 마이크나 다른 소스를 통해 발생한 오디오 스트림의 정보를 보여준다.
        const source = audioCtx.createMediaStreamSource(stream);
        setSource(source);

        // AudioBufferSourceNode 연결
        source.connect(analyser);
        analyser.connect(audioCtx.destination);
      }

      // 마이크 사용 권한 획득 후 녹음 시작
      navigator.mediaDevices.getUserMedia({ audio: true }).then((stream) => {
        const mediaRecorder = new MediaRecorder(stream);


        // dataavailable 이벤트 핸들러 등록
        mediaRecorder.addEventListener('dataavailable', (e) => {
            chunks.push(e.data); // 청크 데이터를 배열에 추가
        });

        mediaRecorder.start();
        setStream(stream);
        setMedia(mediaRecorder);
        makeSound(stream);
      // 음성 녹음이 시작됐을 때 onRec state값을 false로 변경
        analyser.onaudioprocess = function (e) {
            setOnRec(false);
        };
      }) .catch((error) => {
        // 마이크 사용 권한을 받지 못했을 때 처리
        alert('마이크 사용 권한을 허용해야 녹음을 진행할 수 있습니다.');
      });
    };
간략한 설명은 주석으로 설명이 되어있다.
전체적인 흐름은 onRec을 True로 초기화하여 버튼을 눌렀을시 onClick이 onRecAudio function을 호출하게끔 만들었다.
마이크 사용 권한 요청을 하게끔 구현되어있고 녹음이 시작되면 onRec을 false로 바꾸어 해당 정보로 녹음이 진행중인지 아닌지를 판단할 수 있게 했다.
offRecAudio
  const offRecAudio = () => {
    // dataavailable 이벤트로 Blob 데이터에 대한 응답을 받을 수 있음
    media.ondataavailable = function (e) {
      chunks.push(e.data);
      setAudioUrl(e.data);
      setOnRec(true);
    };

    // 모든 트랙에서 stop()을 호출해 오디오 스트림을 정지
    stream.getAudioTracks().forEach(function (track) {
      track.stop();
    });

    // 미디어 캡처 중지
    media.stop();

    // 메서드가 호출 된 노드 연결 해제
    analyser.disconnect();
    source.disconnect();
  };
간단히 말하면 녹음정지라고 생각하면 된다. 초기 onRec은 True로 설정되었기 때문에 녹음시작 버튼을 누르면 onRec값이 True여서 onRecAudio가 호출이되고 onRecAudio에서 onRec값은 False로 바뀌게 된다.
그 후 녹음시작 버튼은 onRec이 False로 바뀌었기 때문에
<button className={onRec ? "" : styles.recordbtn} onClick={onRec ? onRecAudio : offRecAudio}>{onRec ? '녹음 시작' : '녹음 중지'}</button>위 코드의 {onRec ? '녹음 시작' : '녹음 중지'}에 의하여
녹음 중지로 태그 컨텐츠가 바뀌게 되고 녹음 중지버튼을 누르게 되면
onRec이 False이기 때문에 offRecAudio function이 호출되면서 녹음이 중지된다.
onSubmitAudioFile
  const onSubmitAudioFile = useCallback(() => {
    if (audioUrl) {
      const audio = new Audio(URL.createObjectURL(audioUrl));
      audio.play();
    }

  }, [audioUrl]);
녹음한 audio를 들어볼 수 있는 function이다.
<button onClick={onSubmitAudioFile}>결과 확인</button>결과 확인 버튼을 누르면 호출되며 자신이 녹음한 소리를 들을 수 있는 기능이다.
위 offRecAudio의 코드인
media.ondataavailable = function (e) {
      chunks.push(e.data);
      setAudioUrl(e.data);
      setOnRec(true);
    };
에 의해 AudioUrl이 Blob 데이터로 수정되었고 onSubmitAudioFile에서
URL.createObjectURL에 의하여 Blob데이터의 url을 호출하여 audio를 play할 수 있게끔 구현했다.
녹음시작 버튼을 누르면 녹음이 시작되고 녹음시작버튼이 녹음 중지로 바뀌는 것을 확인 할 수 있다.
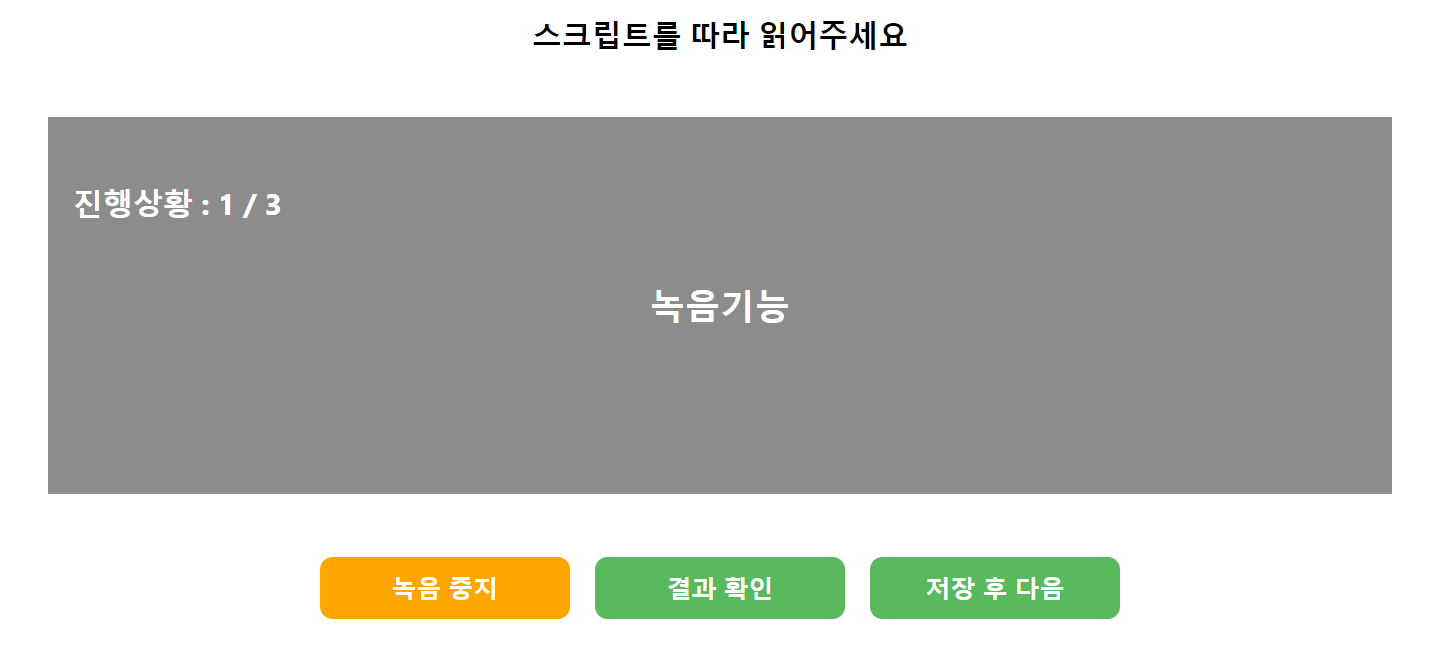
녹음을 다 했다면 녹음 중지 버튼을 눌러서 내가 녹음한 소리를 저장하고 결과 확인 버튼을 통해 잘 녹음됐는지 확인 할 수 있다.
그 후 다음 버튼을 눌러서 해당 과정을 반복 할 수 있게끔 최종적으로 구현되었다.
단순히 녹음하고 녹음한 파일을 듣기위한 기능이므로 따로 저장을 하는 코드는 추가하셔야한다.
필자는 저장 후 다음버튼을 누를때마다 녹음된 파일을 백엔드 서버로 보내서 저장하게끔 처리하였다.
const sound = new File([audioUrl], `${currentIndex}.wav`, { lastModified: new Date().getTime(), type: "audio/wav" });

uploadFileToServer(sound);
위 코드는 new File을 통해 오디오 파일 변수를 만든코드이다. Blob데이터, 파일명, 옵션 객체(수정날짜, 파일타입)
Axios를 이용해 백엔드서버로 전송하였다.
 const uploadFileToServer = (file) => {
        const formData = new FormData();
        formData.append('audioFile', file);

        axios.post('http://127.0.0.1:8000/upload-audio/', formData, {
          headers: {
            'Content-Type': 'multipart/form-data',
          },
        })
        .then(response => {
          console.log(response.data.message);
        })
        .catch(error => {
          console.error('파일 전송 중 오류 발생:', error);
        });
      };
이 포스팅이 녹음기능을 구현하는데 많은 도움이 되면 좋겠다.
전체코드
import React from 'react';
import styles from '../css/record.module.css';
import { useState, useCallback } from 'react';

function Record(){
  const [stream, setStream] = useState();
  const [media, setMedia] = useState();
  const [onRec, setOnRec] = useState(true);
  const [source, setSource] = useState();
  const [analyser, setAnalyser] = useState();
  const [audioUrl, setAudioUrl] = useState();
  const [currentIndex, setCurrentIndex] = useState(0);
  const chunks = []; // 오디오 청크 데이터를 저장할 배열
  const texts = ['녹음기능',
    '구현해보자',
    '화이팅',
    '모든 문장녹음을 완료하였습니다.'
  ]

  const buttonClassName = currentIndex >= 3 ? `${styles.finishbutton}` : "";
  const buttonText = currentIndex >= 3 ? "보이스 추가" : "저장 후 다음";
  const progressClassName = currentIndex >= 3 ? `${styles.finishprogress}` : `${styles.progress}`;
  const progressText = currentIndex >= 3 ? "3" : `${currentIndex+1}`;
  const scriptText = texts[currentIndex];

  function handleClickNext () {
    setCurrentIndex((prevIndex) => {
      const newIndex = prevIndex + 1;
      if (newIndex >= 4) {
        return 0;
      }
      return newIndex;
    });
  }

  const onRecAudio = () => {
    // 음원정보를 담은 노드를 생성하거나 음원을 실행또는 디코딩 시키는 일을 한다
    const audioCtx = new (window.AudioContext || window.webkitAudioContext)();

    // 자바스크립트를 통해 음원의 진행상태에 직접접근에 사용된다.
    const analyser = audioCtx.createScriptProcessor(0, 1, 1);
    setAnalyser(analyser);

    function makeSound(stream) {
      // 내 컴퓨터의 마이크나 다른 소스를 통해 발생한 오디오 스트림의 정보를 보여준다.
      const source = audioCtx.createMediaStreamSource(stream);
      setSource(source);

      // AudioBufferSourceNode 연결
      source.connect(analyser);
      analyser.connect(audioCtx.destination);
    }

    // 마이크 사용 권한 획득 후 녹음 시작
    navigator.mediaDevices.getUserMedia({ audio: true }).then((stream) => {
      const mediaRecorder = new MediaRecorder(stream);


      // dataavailable 이벤트 핸들러 등록
      mediaRecorder.addEventListener('dataavailable', (e) => {
          chunks.push(e.data); // 청크 데이터를 배열에 추가
      });

      mediaRecorder.start();
      setStream(stream);
      setMedia(mediaRecorder);
      makeSound(stream);
    // 음성 녹음이 시작됐을 때 onRec state값을 false로 변경
      analyser.onaudioprocess = function (e) {
          setOnRec(false);
      };
    }) .catch((error) => {
      // 마이크 사용 권한을 받지 못했을 때 처리
      alert('마이크 사용 권한을 허용해야 녹음을 진행할 수 있습니다.');
    });
  };

  const offRecAudio = () => {
    // dataavailable 이벤트로 Blob 데이터에 대한 응답을 받을 수 있음
    media.ondataavailable = function (e) {
      chunks.push(e.data);
      setAudioUrl(e.data);
      setOnRec(true);
    };

    // 모든 트랙에서 stop()을 호출해 오디오 스트림을 정지
    stream.getAudioTracks().forEach(function (track) {
      track.stop();
    });

    // 미디어 캡처 중지
    media.stop();

    // 메서드가 호출 된 노드 연결 해제
    analyser.disconnect();
    source.disconnect();
  };

  const onSubmitAudioFile = useCallback(() => {
    if (audioUrl) {
      const audio = new Audio(URL.createObjectURL(audioUrl));
      audio.play();
    }

  }, [audioUrl]);


  return  (
    <div className={styles.recordbody}>
        <div className={styles.recordcontainer}>
            <h2>스크립트를 따라 읽어주세요</h2>
            <div className={styles.script}>
                <h4 className={progressClassName}>진행상황 : {progressText} / 3</h4>
                <h3>{scriptText}</h3>
            </div>
        </div>
        <div className={styles.btn_area}>
            <div>
                <button className={onRec ? "" : styles.recordbtn} onClick={onRec ? onRecAudio : offRecAudio}>{onRec ? '녹음 시작' : '녹음 중지'}</button>
            </div>
            <div>
                <button onClick={onSubmitAudioFile}>결과 확인</button>
            </div>
            <div>
                <button className={ buttonClassName } onClick={ handleClickNext }>{buttonText}</button>
            </div>
        </div>
    </div>
    )
}
export default Record;