
API 호출
- 프로젝트 최상위 디렉토리에서 npm의 forge관련 패키지를 설치해준다.
-----------------
sudo npm install				//전체 패키지 설치
or
sudo npm install @forge/api		//부분 패키지 설치
-----------------
forge tunnel					//터널 실행
-----------------
예제 코드
1. API 호출을 위한 패키지 import
import api, { route } from "@forge/api";2. Jira Rest API 호출 함수 작성
const fetchCommentsForIssue = async (issueIdOrKey) => {
  const res = await api
    .asUser()	//OAuth로 앱의 권한을 받은 클라이언트의 권한을 상속받는다.
    .requestJira(route`/rest/api/3/issue/${issueIdOrKey}/comment`);
    //Jira에서 Rest API 3버전을 호출한다.

  const data = await res.json();
  return data.comments;
};
3. UI Kit hook 추가
ui 패키지를 추가한다.
- useProductContext : 컴포넌트가 현재 실행 중인 컨텍스트를 읽는다.
- useState : 컴포넌트에 로컬 상태를 추가하고 업데이트한다.
import ForgeUI, { render, Fragment, Text, IssuePanel, useProductContext, useState } from "@forge/ui";useProductContext에서 IssueKey를 리턴받아 사용하자.
useProductContext의 리턴되는 함수들은 여기서 확인 할 수 있다.
useState에서 실행되는 구문은 useProductContext에서 호출한 issueKey를 반환받아, 배열 안 comments 요소에 담는다. comments요소는 useState현재 상태를 의미한다.
const context = useProductContext();	//context 변수에 초기화한다.

const [comments] = useState(
	async () => await fetchCommentsForIssue(context.platformContext.issueKey)
);

console.log(`Number of comments on this issue: ${comments.length}`);- 아래 코드는 최종적으로 구현 될 index.jsx 파일의 내용이다.
import api, { route } from "@forge/api";
import ForgeUI, { render, Fragment, Text, IssuePanel, useProductContext, useState } from "@forge/ui";

const fetchCommentsForIssue = async (issueIdOrKey) => {
  const res = await api
    .asUser()
    .requestJira(route`/rest/api/3/issue/${issueIdOrKey}/comment`);

  const data = await res.json();
  return data.comments;
};

const App = () => {
  const context = useProductContext();
  const [comments] = useState(async () => await fetchCommentsForIssue(context.platformContext.issueKey));

  console.log(`Number of comments on this issue: ${comments.length}`);

  return (
    <Fragment>
      <Text>Hello world!</Text>
    </Fragment>
  );
};

export const run = render(
  <IssuePanel>
    <App />
  </IssuePanel>
);
권한 설정
User 정보의 관한 API를 가져와 사용할 경우, 별도의 OAuth 2.0 권한 설정을 해줘야 한다.
forge lint 라는 명령어를 사용하면 자동으로 필요한 권한의 범위를 manifest.yml파일에 추가해준다.
------------------
forge lint --fix			//필요한 범위만큼 자동 권한 설정
------------------
forge deploy
forge install --upgrade		//권한을 변경할 때마다 설치된 앱을 업그레이드 해야한다.
------------------
forge tunnel				//터널 재실행
------------------
수동으로 설정하고 싶을 경우 이 글을 참고할 수 있다.
실행 테스트
- 이전에 생성한 Jira 이슈를 열고, 댓글을 작성한다.
- 이슈를 새로고침한다. OAuth의 권한범위를 수정했기 때문에 별도 권한 부여 페이지로 이동할 수 있다. 페이지에서 권한을 부여해주는 버튼을 클릭한다.
- 정상적으로 실행되었다면, 이슈에 댓글을 추가할 때마다 터미널에서 아래와 같이 출력이 된다.
invocation: 158b5987a4724ee5 index.run
INFO  05:01:33.408  158b5987a4724ee5  Number of comments on this issue: 1
이슈에 댓글 수 표시하기
터미널 로그 출력에 성공했다면, 이제 Jira 이슈 화면에서 댓글 수가 보이게 출력해보자.
<Text>
	Number of comments on this issue: {comments.length}
</Text>
index.jsx에 위의 코드를 추가해 아래와 같이 구현한다.
const App = () => {
  const context = useProductContext();
  const [comments] = useState(async () => await fetchCommentsForIssue(context.platformContext.issueKey));

  console.log(`Number of comments on this issue: ${comments.length}`);

  return (
    <Fragment>
      <Text>Hello world!</Text>
      <Text>
        Number of comments on this issue: {comments.length}
      </Text>
  </Fragment>
  );
};
Jira에서 이슈를 새로고침하면 새롭게 반영된 게시물 개수가 표기된다.
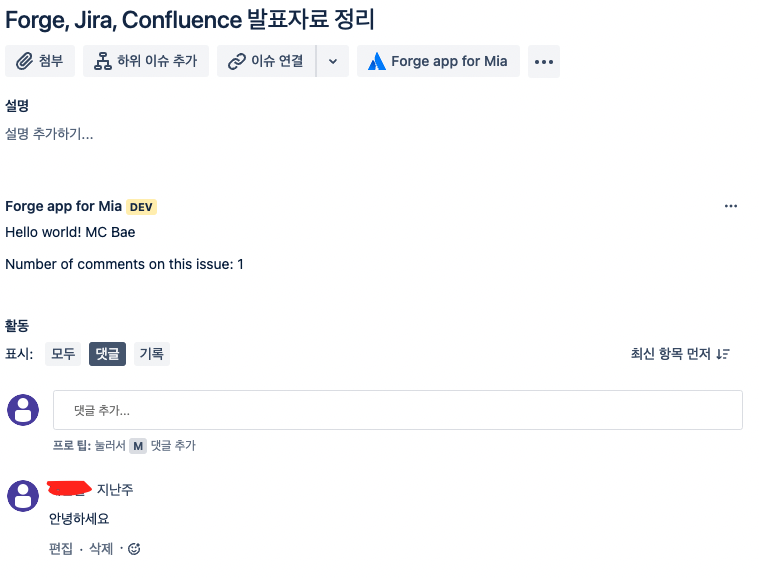
댓글 개수가 추가될 때마다 숫자가 변경되어 표기된다.
Fragment 태그를 사용하는 이유
값을 return 할 때 최상위 요소 1개만 리턴한다.
요소가 여러개일 경우 Fregment 블록으로 래핑하여 최상위 요소 하나만 리턴하게 한다.
React의 Fragment와 비슷하다.
최종 배포
현재 실행 중인 forge tunnel을 닫아도 서비스가 계속 실행되도록 앱을 배포한다.
1. Ctrl+c를 눌러 tunnel을 닫는다.
2. 터미널에 forge deploy를 입력해 앱을 배포한다.
3. Jira 이슈 페이지를 새로 고침한다.
