가. Future
비동기적인 연산의 결과를 표현하는 클래스로 멀티스레드 환경에서 처리된 데이터를 다른 스레드로 전달할 수 있다. 내부적으로 Thread-safe하게 구현되어있기 때문에 synchronized를 사용하지 않아도 된다.
1. 기본 예제
public static void main(String[] args) throws InterruptedException, ExecutionException {

	ExecutorService executor = Executors.newSingleThreadExecutor();

	Future<Integer> future = executor.submit(() -> {
		System.out.println("Start Runnable Time : " + LocalTime.now());
		Integer sum = 2;
		Thread.sleep(2000);
		return sum;
	});

	System.out.println("Waiting the task Done : " + LocalTime.now());
	Integer result = future.get();
	System.out.println("End Runnable Time : " + LocalTime.now() + "\nResult : " + result);

}
Waiting the task Done : 19:45:12.887917500
Start Runnable Time : 19:45:12.887917500
End Runnable Time : 19:45:14.901008800
Result : 2submit()으로 전달하면Callable을 수행한다.executor.service()가 호출되면Future객체는 리턴되지만Thread.sleep(2000)에 의해 아직 값은 없는 상태다.future.get()는Future객체에 값이 할당될 때 까지 기다린다. 2000ms가 지나고 나면Future에 값이 할당되고, 그 다음 문으로 넘어가게 된다.
complete()로 Future에게 전달하기
public static void main(String[] args) throws InterruptedException, ExecutionException {

	CompletableFuture<Integer> future = new CompletableFuture<>();

	Executors.newCachedThreadPool().submit(() -> {
		System.out.println("Start Time : " + LocalTime.now());
		Integer sum = 2;
		Thread.sleep(2000);
		future.complete(sum);
		return null;
	});

	System.out.println("Waiting Task Time : " + LocalTime.now());
	Integer result = future.get();
	System.out.println("END Time : " + LocalTime.now() + "\nResult : " + result);

}
Start Time : 19:55:49.772733600
Waiting Task Time : 19:55:49.772733600
END Time : 19:55:51.781059800
Result : 2future.complete()를 사용하면 연산 결과를 Future가 가져갈 수 있다.
Future.get() Timeout 설정
public static void main(String[] args) throws InterruptedException, ExecutionException, TimeoutException {
	CompletableFuture<Integer> future = new CompletableFuture<>();

	Executors.newCachedThreadPool().submit(() -> {
		System.out.println("Start Time : " + LocalTime.now());
		Integer sum = 2;
		Thread.sleep(4000);
		future.complete(sum);
		return null;
	});

	Integer result = null;

	System.out.println("Waiting Task Time : " + LocalTime.now());
	try {
		result = future.get(2000, TimeUnit.MILLISECONDS);
	}catch (TimeoutException e) {
		e.printStackTrace();
	}
	System.out.println("END Time : " + LocalTime.now() + "\nResult : " + result);

	}
}
Start Time : 20:02:34.705710500
Waiting Task Time : 20:02:34.705710500
java.util.concurrent.TimeoutException
END Time : 20:02:36.718607400
Result : null
at java.base/java.util.concurrent.CompletableFuture.timedGet(CompletableFuture.java:1886)
at java.base/java.util.concurrent.CompletableFuture.get(CompletableFuture.java:2021)
at future.Main.main(Main.java:31)get()를 호출하면Future객체에 값이 전달될 때 까지 기다리는데, 이 기다리는 시간을 설정할 수 있다.- 설정한 시간을 넘어가면
TimeoutException이 터진다.
2. 멀티 스레딩 with ThreadPool
public class Main {

	static class SquareCalculator {

		private ExecutorService executor = Executors.newSingleThreadExecutor();

		public Future<Integer> calculate(int size) throws InterruptedException {
			return executor.submit(() -> {
				Thread.sleep(2000);
				return size * size;
			});
		}

	}

	public static void main(String[] args) throws InterruptedException, ExecutionException, TimeoutException {

		SquareCalculator squareCalculator = new SquareCalculator();

		Future<Integer> future1 = squareCalculator.calculate(10);
		Future<Integer> future2 = squareCalculator.calculate(100);

		while(!(future1.isDone() && future2.isDone())) {
			System.out.println(String.format(
					"result1 is %s and result2 is %s",
					future1.isDone() ? "done" : "not done",
					future2.isDone() ? "done" : "not done"));

			Thread.sleep(1000);
		}

		Integer result1 = future1.get();
		Integer result2 = future2.get();

		System.out.println("result1 : " + result1);
		System.out.println("result2 : " + result2);
	}
}
result1 is not done and result2 is not done
result1 is not done and result2 is not done
result1 is done and result2 is not done
result1 is done and result2 is not done
result1 : 100
result2 : 10000- future1 과 future2 연산이 순차적으로 실행된 것을 알 수있다.
isDone()은Future객체에 값이 할당됐는지 여부를 boolean 으로 return 해주는 메서드다.- 위 로직을 ThreadPool을 이용해 단일 스레드가 아니라 멀티 스레드로 구성해보자.
static class SquareCalculator {

	private ExecutorService executor = Executors.newFixedThreadPool(2);

    ...
}
result1 is not done and result2 is not done
result1 is not done and result2 is not done
result1 : 100
result2 : 10000newSingleThreadExecutor가 아닌newFixedThreadPool를 이용했다.- result1 과 result2 가 동시에 처리된 것을 알 수 있었다.
나. ForkJoinPool
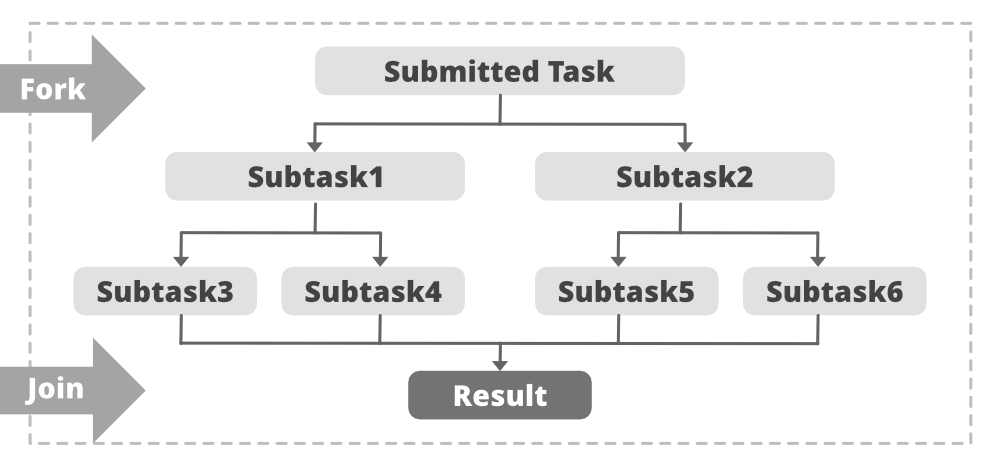
- ForkJoinPool 은
ExecutorService를 확장한 클래스로, task를 잘게 쪼개고 worker들이 이를 동시에 나눠서 처리하도록 동작한다.
ForkJoinTask<V>
ForkJoinTask는ForkJoinPool안에서 task를 처리하는 base type이다. 크게RecursiveAction과RecursiveTask라는 subclass로 나뉜다. 이 두개의 abstract class는compute()라는 메서드가 있고, 여기에 실제적인 수행 로직이 들어간다.RecursiveAction은 void 를 return하고,RecursiveTask는 value를 return 한다.
1. RecursiveAction
public class CustomRecursiveAction extends RecursiveAction{

	private String workload = "";
	private static final int THRESHOLD = 4;

	public CustomRecursiveAction(String workload) {
		this.workload = workload;
	}

	@Override
	protected void compute() {
		if(workload.length() > THRESHOLD) {
			ForkJoinTask.invokeAll(createSubtasks());
		}else {
			processing(workload);
		}
	}

	private List<CustomRecursiveAction> createSubtasks(){
		List<CustomRecursiveAction> subtasks = new ArrayList<>();

		String partOne = workload.substring(0, workload.length() / 2);
		String partTwo = workload.substring(workload.length() / 2, workload.length());

		subtasks.add(new CustomRecursiveAction(partOne));
		subtasks.add(new CustomRecursiveAction(partTwo));

		return subtasks;
	}

	private void processing(String work) {
		String result = work.toUpperCase();
		System.out.println("This result : [" + result + "] was processed by " + Thread.currentThread().getName());
	}
}


public class Main {
	public static void main(String[] args) {
		CustomRecursiveAction task = new CustomRecursiveAction("abcdefghijknm");
		new ForkJoinPool().invoke(task);
	}
}
This result : [ABC] was processed by main
This result : [DEFG] was processed by ForkJoinPool.commonPool-worker-5
This result : [HIJ] was processed by ForkJoinPool.commonPool-worker-19
This result : [KLNM] was processed by ForkJoinPool.commonPool-worker-23
THRESHOLD를 넘는 String을 잘라서 대문자로 바꾸는 작업을 하는RecursiveAction이다.ForkJoinPool에서 생성된 서로 다른 스레드들이 하나의 Task 를 나눠서 병렬 처리한 것을 확인할 수 있었다.
2. RecursiveTask
public class CustomRecursiveTask extends RecursiveTask<String>{

	private String workload = "";

	private final int THRESHOLD = 4;

	public CustomRecursiveTask(String workload) {
		this.workload = workload;
	}

	@Override
	protected String compute() {
		if(workload.length() > THRESHOLD) {
			return ForkJoinTask.invokeAll(createSubtasks())
					.stream()
					.map(ForkJoinTask::join)
					.collect(Collectors.joining());
		}else {
			return processing(workload);
		}
	}

	private Collection<CustomRecursiveTask> createSubtasks(){
		List<CustomRecursiveTask> dividedTasks = new ArrayList<>();

		dividedTasks.add(new CustomRecursiveTask(workload.substring(0, workload.length()/2)));
		dividedTasks.add(new CustomRecursiveTask(workload.substring(workload.length()/2, workload.length())));

		return dividedTasks;
	}

	private String processing(String work) {

		String result = work.toUpperCase();

		System.out.println("processing : [" + work +"]" + "to" + "[" + result + "], " + " by " + Thread.currentThread().getName());

		return result;
	}
}

public class Main {
	public static void main(String[] args) {
		CustomRecursiveTask task = new CustomRecursiveTask("abcdefghijknm");
		String result = new ForkJoinPool().invoke(task);
		System.out.println(result);
	}
}
processing : [abc]to[ABC], by ForkJoinPool-1-worker-19
processing : [jknm]to[JKNM], by ForkJoinPool-1-worker-9
processing : [def]to[DEF], by ForkJoinPool-1-worker-23
processing : [ghi]to[GHI], by ForkJoinPool-1-worker-5
ABCDEFGHIJKNMRecursiveAction과 다른 점은compute()의 반환 타입이 다르다는 점이다.
다. CompletableFuture
CompletableFuture은Future와CompletionStage를 상속한 클래스다.Future이긴 하지만, 스레드를 생성하는것 없이 task를async로 처리할 수 있고 여러 개의CompletableFuture들을 병렬 처리하고 결과들을 병합할 수 있다.
public class Main {

	public static void main(String[] args) throws InterruptedException, ExecutionException {
		CompletableFuture<Integer> future = new CompletableFuture<>();

		Executors.newCachedThreadPool().submit(() -> {
			int result = 1 + 1 ;
			Thread.sleep(2000);
			future.complete(result);
			return null;
		});

		System.out.println(future.get());

        // 결과를 미리 알고 있다면 스레드를 생성하지 않을 수 있다.
		Future<Integer> completableFuture =
				CompletableFuture.completedFuture(2);
		System.out.println(completableFuture.get());
	}
}- 결과를 미리 알고 있는 경우,
completedFuture라는 static method를 사용해서 별도 스레드 생성없이Future객체에 값을 저장할 수 있다.
1. cancel()
public class Main {

	public static void main(String[] args) throws InterruptedException, ExecutionException {
		CompletableFuture<Integer> future = new CompletableFuture<>();

		Executors.newCachedThreadPool().submit(() -> {
			int result = 1 + 1 ;
			Thread.sleep(2000);
			future.cancel(false);
			return null;
		});

		int result = 0;
		try {
			result = future.get();
		}catch (CancellationException e) {
			System.out.println("it is canceled");
		}
	}
}cancel()를 호출하면CancellationException가 발생한다.
2. supplyAsync() & runAsync()
completableFuture는runAsync와supplyAsync를 사용해서 쓰레드를 생성하지 않고도 Async로 task를 처리할 수 있다
public class Main {

	public static void main(String[] args) throws InterruptedException, ExecutionException {

        // supplyAsync()

		CompletableFuture<String> supply = CompletableFuture.supplyAsync(() -> {
			System.out.println("Processing...");
			try {
				Thread.sleep(2000);
			} catch (InterruptedException e) {
				e.printStackTrace();
			}
			return "Finished!";
		});

        String result = supply.get();
		System.out.println(result);

        // runAync()

        CompletableFuture<Void> run = CompletableFuture.runAsync(() -> {
			try {
				Thread.sleep(2000);
			} catch (InterruptedException e) {
				e.printStackTrace();
			}
			System.out.println("Finished!");
		});

	}
}- 둘의 차이점은 return type 이다.
runAsync는 return type이 void 이기 때문에 제네릭을Void로 해줘야 한다.
3. Exception Handling
CompletableFuture<String> future = CompletableFuture.supplyAsync(() -> {
    String name = null;
    if (name == null) {
        throw new RuntimeException("Computation error!");
    }
    return "Hello, " + name;
}).handle((s, t) -> s != null ? s : "Hello, Stranger!");handle()메서드로 Exception 발생 시 처리할 로직을 설정할 수 있다.
4. thenApply() & thenAccept()
supplyAsync()로 전달된 결과를 가지고 다른 작업을 처리할 수 있도록 하는 메서드다.- 둘이 비슷하지만,
thenApply()는 return 값을 가지고 있고,thenAccept()는 return 값을 가지지 않는 다는 것이다.
// thenApply()

CompletableFuture<String> future = CompletableFuture
        .supplyAsync(() -> "Hello")
        .thenApply(s -> s + " World")
        .thenApply(s -> s + " Future");

String result = future.get();

// thenAccept()

CompletableFuture<String> future1 = CompletableFuture
        .supplyAsync(() -> "Hello");

CompletableFuture<Void> future2 = future1.thenAccept(
s -> log(s + " World"));thenAccept()는 리턴 값이 없기 때문에 제네릭을Void로 설정해줘야 한다.
5. thenCompose() & thenCombine()
thenCompose(): 여러 개의CompletableFuture를 하나의CompletableFuture로 만들어주는 역할을 한다. 첫 번째CompletableFuture의 작업이 끝나면 그 결과를 가지고 두 번째CompletableFuture를 수행한다. 즉 순차적으로 처리된다.
CompletableFuture<String> future = CompletableFuture
        .supplyAsync(() -> "Hello")
.thenCompose(s -> CompletableFuture.supplyAsync(() -> s + " World"));thenCombine():thenCompose()가 여러 개의CompletableFuture를 순차적으로 처리한다면,thenCombine()는CompletableFuture를 병렬로 처리하고 모든CompletableFuture의 처리 결과를 하나로 합칠 수 있다.
CompletableFuture<String> future1 = CompletableFuture
        .supplyAsync(() -> "Future1")
        .thenApply((s) -> {
            log("Starting future1");
            try {
                Thread.sleep(2000);
            } catch (InterruptedException e) {
                e.printStackTrace();
            }
            return s + "!";
        });

CompletableFuture<String> future2 = CompletableFuture
        .supplyAsync(() -> "Future2")
        .thenApply((s) -> {
            log("Starting future2");
            try {
                Thread.sleep(2000);
            } catch (InterruptedException e) {
                e.printStackTrace();
            }
            return s + "!";
        });

future1.thenCombine(future2, (s1, s2) -> s1 + " + " + s2)
        .thenAccept((s) -> log(s));
16:12:03.569 (main) Starting future1
16:12:05.571 (main) Starting future2
16:12:07.573 (main) Future1! + Future2!- 출력 문을 보면 순차적으로 처리된 것처럼 보인다. 그 이유는
thenApply()가 동일한 쓰레드를 사용하기 때문이다. 따라서 waiting time이 존재한다.
6. thenApply() vs thenApplyAsync()
thenApplyAsync()를 사용하면 서로 다른 스레드에서 작업을 처리할 수 있다.
CompletableFuture<String> future1 = CompletableFuture
        .supplyAsync(() -> "Future1")
        .thenApplyAsync((s) -> {
            log("Starting future1");
            try {
                Thread.sleep(2000);
            } catch (InterruptedException e) {
                e.printStackTrace();
            }
            return s + "!";
        });

CompletableFuture<String> future2 = CompletableFuture
        .supplyAsync(() -> "Future2")
        .thenApplyAsync((s) -> {
            log("Starting future2");
            try {
                Thread.sleep(2000);
            } catch (InterruptedException e) {
                e.printStackTrace();
            }
            return s + "!";
        });

future1.thenCombine(future2, (s1, s2) -> s1 + " + " + s2)
        .thenAccept((s) -> log(s));

Thread.sleep(5000);
16:15:39.532 (ForkJoinPool.commonPool-worker-2) Starting future2
16:15:39.537 (ForkJoinPool.commonPool-worker-1) Starting future1
16:15:41.537 (ForkJoinPool.commonPool-worker-1) Future1! + Future2!-thenApply() 를 사용헀을 때와 다르게 Task 가 서로 다른 스레드에서 처리된 것을 알 수 있다.
7. anyOf() & allOf()
anyOf()는 여러 개의CompletableFutures에서 가장 먼저 끝나는 하나의 결과를 가져온다.
CompletableFuture<String> future1 = CompletableFuture
        .supplyAsync(() -> {
            log("starting future1");
            return "Future1";
        });

CompletableFuture<String> future2 = CompletableFuture
        .supplyAsync(() -> {
            log("starting future2");
            return "Future2";
        });

CompletableFuture<String> future3 = CompletableFuture
        .supplyAsync(() -> {
            log("starting future3");
            return "Future3";
        });

CompletableFuture.anyOf(future1, future2, future3)
        .thenAccept(s -> log("Result: " + s));
16:19:56.826 (ForkJoinPool.commonPool-worker-2) starting future2
16:19:56.826 (ForkJoinPool.commonPool-worker-1) starting future1
16:19:56.826 (ForkJoinPool.commonPool-worker-3) starting future3
16:19:56.826 (ForkJoinPool.commonPool-worker-2) Result: Future2allOf()는 모든CompletableFutures의 결과 값을 가지고 온다. 여기서get()는 null 을 return 한다.
CompletableFuture<String> future1 = CompletableFuture
        .supplyAsync(() -> "Future1");

CompletableFuture<String> future2 = CompletableFuture
        .supplyAsync(() -> "Future2");

CompletableFuture<String> future3 = CompletableFuture
        .supplyAsync(() -> "Future3");

CompletableFuture<Void> combinedFuture
        = CompletableFuture.allOf(future1, future2, future3);

log("get() : " + combinedFuture.get());
log("future1.isDone() : " + future1.isDone());
log("future2.isDone() : " + future2.isDone());
log("future3.isDone() : " + future3.isDone());

String combined = Stream.of(future1, future2, future3)
        .map(CompletableFuture::join)
        .collect(Collectors.joining(" + "));
log("Combined: " + combined);
16:22:26.615 (main) get() : null
16:22:26.615 (main) future1.isDone() : true
16:22:26.615 (main) future2.isDone() : true
16:22:26.616 (main) future3.isDone() : true
16:22:26.620 (main) Combined: Future1 + Future2 + Future3- 출력문을 확인하면
get()은 null 을 반환했음을 알 수 있다.
async method
thenApply(),thenApplyAsync()처럼 뒤에async가 붙은 메서드들이 항상 존재하는데, 만약 동일 스레드가 아닌, 다른 스레드에서 작업을 처리하고 싶다면 접미사로async가 붙은 메서드를 사용하면 된다.
참고

내 머릿속 지우개