안드로이드 12(API Level 31)에서부터 SplashScreen API가 추가되었다. (안드로이드 스플래시 화면 공식문서)
SplashScreen API는 앱 상태(콜드 스타트, 웜 스타트, 핫 스타트)에 따라 실행되는데, 안드로이드 12 이상 버전부터는 SplashScreen API가 강제적으로 실행되게 되었다.
앱 상태
- cold start : 앱이 처음부터 시작. cold start 전에는 앱의 프로세스를 만들지 않음. (기기 부팅, 앱이 처음 시작하는 경우)
- warm start : 메모리를 제거한 다음 앱을 다시 시작한 경우. (앱을 장시간 사용하지 않아 프로세스가 후순위로 밀려난 후에 앱을 실행한 경우)
- hot start : 백그라운드에 있는 앱을 포그라운드로 가져옴. 아직 메모리에 있는 상태. (짧은 시간 내에 다시 앱에 돌아오는 경우)
SplashScreen API는 화면 중앙에 앱의 아이콘을 이용해서 나타내기 때문에 제한적인 SplashScreen만 가능한 상태이다.
SplashScreen에 앱 아이콘만 이용해 나타낸다면 문제가 없겠지만, 커스텀된 화면을 적용하려고 한다면 SplashScreen API 화면을 비활성화를 해야한다. 하지만 비활성화 옵션을 알 수 없기 때문에 SplashScreen API의 창을 투명처리해서 사용하는 방식으로 사용하려고 한다!
따라서 그냥 SplashScreen API만을 이용하는 방법과 커스텀된 SplashScreen을 사용하기 위해 API를 투명화하는 방법 2가지를 설명하려고 한다.
1. SplashScreen API만 사용
1-1. 라이브러리 추가하기 (build.gradle (Module :app))
먼저 Splash API를 적용하기 위해 build.gradle (Module :app) 파일에 라이브러리를 추가해야한다.
dependencies {
   implementation 'androidx.core:core-splashscreen:1.0.0-alpha01'
}
1-2. SplashScreen 테마 만들기 (themes.xml)
<resources xmlns:tools="http://schemas.android.com/tools">
    <!-- Base application theme. -->
    <style name="Theme.SAVVY_Android" parent="Theme.Material3.DayNight.NoActionBar">
        <!-- Customize your light theme here. -->
        <item name="android:background">@color/white</item>
    </style>

    <style name="Theme.SAVVY_Android.Splash" parent="Theme.SplashScreen">
        <!-- Splash Screen 의 Background 색상.-->
        <item name="windowSplashScreenBackground">@color/white</item>
        <!-- Splash Screen 에서 사용 될 아이콘. 설정 하지 않으면 앱 아이콘 사용. -->
        <item name="windowSplashScreenAnimatedIcon">@drawable/ic_splash_logo</item>
        <!-- Splash Screen 이 끝난 후 보일 화면의 테마-->
        <item name="postSplashScreenTheme">@style/Theme.SAVVY_Android</item>

        <item name="android:statusBarColor">@color/white</item>
        <item name="android:navigationBarColor">@color/white</item>
        <item name="android:windowLightStatusBar">true</item>
    </style>
</resources>
실제로 UMC의 SAVVY 프로젝트에서 적용한 SplashScreen 테마를 수정한 예시이다.
Theme.SAVVY_Android는 앱의 기본 테마이고, Theme.SAVVY_Android.Splash는 스프래시 화면에 표시될 테마를 의미한다.
Theme.SAVVY_Android.Splash의 아이템들에 대해 알아보자.
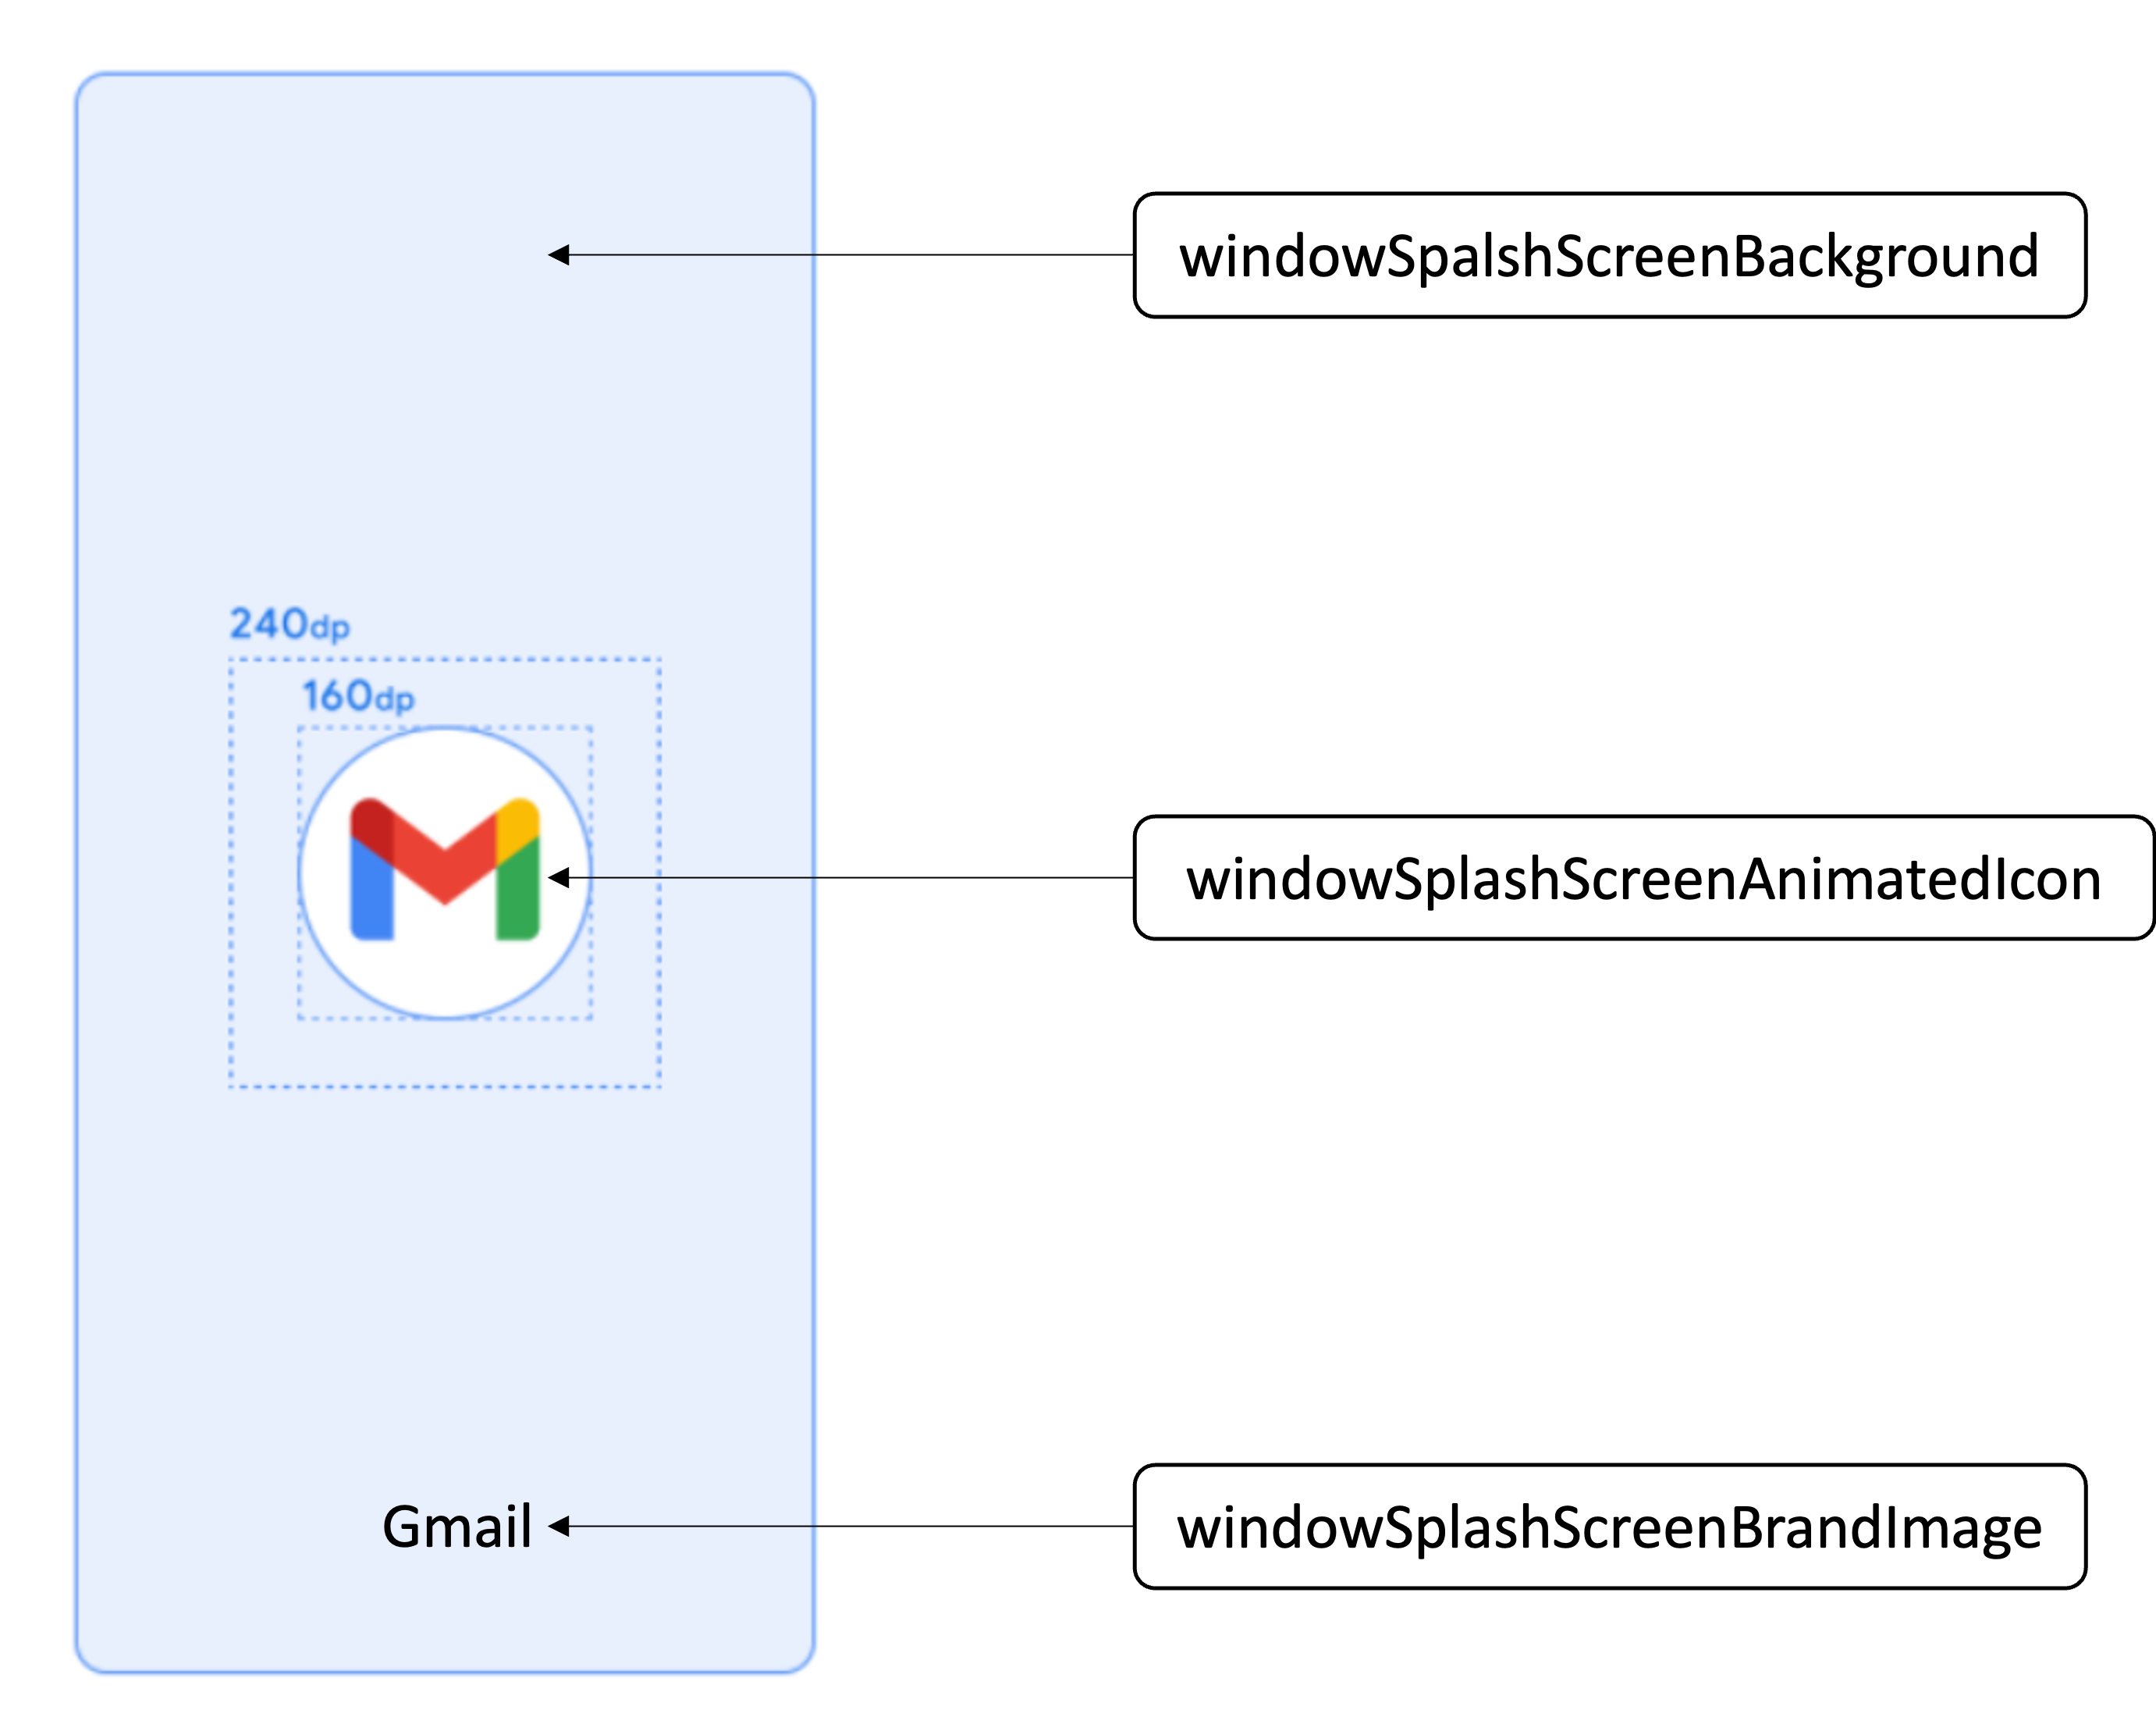
- windowSpalshScreenBackground : 배경의 색을 지정
- windowSplashScreenAnimatedIcon : 화면 중앙에 아이콘 지정
- windowSplashScreenAnimationDuration : 스플래시 화면의 지속 시간 지정 (API 33에서부터 삭제)
- windowSplashScreenIconBackground : 스플래시 화면 아이콘 뒤의 배경 색 지정
- windowSplashScreenBrandImage : 스플래시 화면 하단에 표시할 이미지 지정 (권장 안함)
- postSplashScreenTheme : 스플래시 화면 후에 보일 화면의 테마 지정
1-3. manifest에 테마 적용하기 (AndroidManifest.xml)
<?xml version="1.0" encoding="utf-8"?>
<manifest xmlns:android="http://schemas.android.com/apk/res/android"
    xmlns:tools="http://schemas.android.com/tools">


    <application
        android:allowBackup="true"
        android:dataExtractionRules="@xml/data_extraction_rules"
        android:fullBackupContent="@xml/backup_rules"
        android:icon="@mipmap/ic_launcher"
        android:label="@string/app_name"
        android:roundIcon="@mipmap/ic_launcher_round"
        android:supportsRtl="true"
        android:theme="@style/Theme.SAVVY_Android.Splash"
        tools:targetApi="31">

        <!-- 이하 생략 -->

    </application>

</manifest>AndroidManifest.xml의 application 안에 만들어준 splash 테마를 적용한다.
1-4. activity에 spalsh 적용하기
앱의 모든 activity에 installSplashScreen() 을 적용해 줘야 사용이 가능하다.
그렇지 않다면(모든 activity에 적용해주지 않는다면) java.lang.IllegalStateException: You need to use a Theme.AppCompat theme (or descendant) with this activity. 라는 에러가 발생하기 때문에 모든 activity에 넣어주어야 한다.
class SplashActivity : AppCompatActivity() {
    private lateinit var binding: ActivitySplashBinding

    override fun onCreate(savedInstanceState: Bundle?) {
        installSplashScreen() // splash screen 설정, 관리 API 함수
        binding = ActivitySplashBinding.inflate(layoutInflater)
        super.onCreate(savedInstanceState)
        setContentView(binding.root)
    }
}
이런 순서로 적용한다면 Splash API를 사용해 SplashScreen을 만들 수 있다.
2. 커스텀된 화면을 SplashScreen로 사용하기
커스텀된 화면을 SplashScreen로 사용하기 위해서는 1-1부터 1-4까지 과정에서 조금만 변형하면된다.
2-1. 라이브러리 추가하기 (build.gradle (Module :app))
1-1 과 동일하게 Splash API를 적용하기 위해 build.gradle (Module :app) 파일에 라이브러리를 추가해야한다.
dependencies {
   implementation 'androidx.core:core-splashscreen:1.0.0-alpha01'
}
2-2. SplashScreen 테마 만들기 (themes.xml)
<resources xmlns:tools="http://schemas.android.com/tools">
    <!-- Base application theme. -->
    <style name="Theme.SAVVY_Android" parent="Theme.Material3.DayNight.NoActionBar">
        <!-- Customize your light theme here. -->
        <item name="android:background">@color/white</item>
    </style>

     <style name="Theme.SAVVY_Android.Splash" parent="Theme.SplashScreen">
        <!-- Splash Screen 의 Background 색상.-->
        <item name="windowSplashScreenBackground">@android:color/transparent</item>
        <!-- Splash Screen 에서 사용 될 아이콘. 설정 하지 않으면 앱 아이콘 사용. -->
        <item name="windowSplashScreenAnimatedIcon" tools:targetApi="S">@android:color/transparent</item>
        <!-- Splash Screen 이 끝난 후 보일 화면의 테마-->
        <item name="postSplashScreenTheme">@style/Theme.SAVVY_Android</item>

        <item name="android:statusBarColor">@color/white</item>
        <item name="android:navigationBarColor">@color/white</item>
        <item name="android:windowLightStatusBar">true</item>
    </style>
</resources>
실제로 UMC의 SAVVY 프로젝트에서 적용한 SplashScreen 테마 예시이다.
windowSplashScreenBackground 와 windowSplashScreenAnimatedIcon 를 @android:color/transparent 를 이용하여 투명하게 적용한다.
2-3. manifest에 테마 적용하기 (AndroidManifest.xml)
<?xml version="1.0" encoding="utf-8"?>
<manifest xmlns:android="http://schemas.android.com/apk/res/android"
    xmlns:tools="http://schemas.android.com/tools">


    <application
        android:allowBackup="true"
        android:dataExtractionRules="@xml/data_extraction_rules"
        android:fullBackupContent="@xml/backup_rules"
        android:icon="@mipmap/ic_launcher"
        android:label="@string/app_name"
        android:roundIcon="@mipmap/ic_launcher_round"
        android:supportsRtl="true"
        android:theme="@style/Theme.SAVVY_Android.Splash"
        tools:targetApi="31">

      	<activity
            android:name=".LoginActivity"
            android:exported="false" />
        <activity
            android:name=".SplashActivity"
            android:exported="true">
            <intent-filter>
                <action android:name="android.intent.action.MAIN" />
                <category android:name="android.intent.category.LAUNCHER" />
            </intent-filter>
        </activity>

        <!-- 이하 생략 -->

    </application>

</manifest>
1-3 과 동일하게 AndroidManifest.xml의 application 안에 만들어준 splash 테마를 적용한다. 하지만 여기서 커스텀한 Spalsh 화면의 activity를 첫 시작으로 설정해야한다.
2-4. activity에 spalsh 적용하기
1-4 와 동일하게 모든 acitivty에 installSplashScreen() 을 적용한다.
이러한 순서를 따라 상황에 맞게 splashScreen을 만들어 적용할 수 있다.
Splash Screen은 한번 초기에 만들고 거의 건들지 않기 때문에 만들때 당시 고민하고 찾은 방법과 과정을 나름의 기록처럼 남겨보았다.
참고 자료
안드로이드 공식 문서
안드로이드12 스플래시 대응하기
[Android] 안드로이드12 대응 SplashScreen(스플래시 스크린) 만들기