
Git 최초 설정
깃을 설치하고 사용하기 위한 최초 설정이 필요
터미널(Mac) or 프롬프트(윈도우) 창을 열고 다음과 같은 명령어를 입력
- 사용자 이름과 이메일 설정
→ 나중에 commit을 할 때 사용자 이름과 이메일이 기록되기 때문
git config --global user.name "본인 이름"
git config --global user.email "본인 이메일 주소"
제대로 입력되었는지 확인을 위해 아래 명령어 입력
git config --list협업 전 세팅(팀장)
1. 폴더 생성
2. 초기 코드 작성
3. git init, add, commit
git init					// git폴더 생성 + 기본 branch가 main으로 설정
git add .					// 파일을 저장하기 전 상태(commit)으로 변경
git commit -m "저장 메시지"	// 로컬환경에 파일 저장
git status					// 상태 확인
4 Github Repository 생성
- Github 홈페이지에서 생성 : https://github.com/
5 Github 업로드
git remote add origin <github repositiry 주소>
	// 해당 URL을 origin이라는 이름으로 원격저장소로 정함

git branch -M main
	// 현재 branch를 Main이라는 branch로 설정
    // 일반적으로 초기 세팅할 때 사용

git push -u origin main
	// main 브랜치의 변경사항을 origin이라는 원격 저장소의 main 브랜치로 업로드
    // -u 옵션을 통해 로컬 브랜치와 원격 브랜치를 연결
    // 이후에는 git push만 입력하면 자동으로 origin main으로 업로드
협업 초기 세팅하기(팀장)
1. develop 브랜치 생성 후 github에 올리기
- main 브랜치는 초기 세팅에서 생성했기 때문에 테스트용 dev 생성해주기
git switch - c develop		// develop이라는 테스트용 branch생성
git push origin develop		// develop이라는 branch를 서버에 업로드
2. Github에서 develop 브랜치를 default로 설정하기
방법 : settings - Default branch - ⇆ 버튼 - 브랜치 선택 - Update 버튼
- clone을 할 때는 default 브랜치를 통해서 파일들을 Pull하게 됨
3. 팀원들을 Collaborator(협력자)로 등록하기
방법 : settings - collaborators - Add people - 이름 선택 후 추가 - 초대 받은 사람은 수락
협업 전 세팅(팀원)
0. 빈 폴더 생성
- 혹은 Visual Studio Code의 Terminal에서
cd ..를 통해 바탕화면으로 이동하기
1. git clone하기
- Visual Studio Code로 폴더 연 후 Terminal 실행
git clone gitRepository주소 .입력- 팀원은
git clone을 입력하면git init이 같이 실행돼서git init을 입력할 필요가 없음
- 팀원은
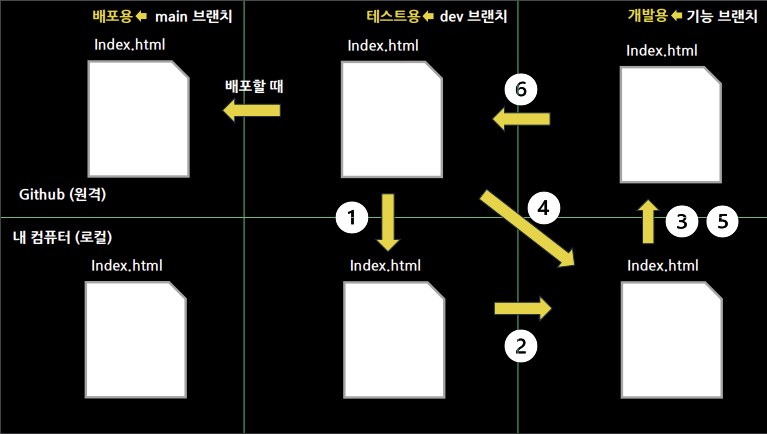
협업하기 : 기능 개발 시작
1. 기능브랜치 생성하면서 이동
git switch - c 기능브랜치이름2. 기능 개발
- 코드 작성
3. 다른 사람이 올려놓은 파일 받아서 오류가 생기는지 확인 ( 추가된 branch가 없다면 생략)
git pull origin develop
	// origin : repository 주소
    // develop : 가져올 branch명
4. 코드 저장 및 업로드
git add .
git commit -m "저장 메시지"
// git status
git push- 만약
git push --set-upstream origin feature/branch명등으로 오류가 나온다면 그대로 Terminal에 작성해주면 됨
5. Pull request 생성 : merge하기
- Github 홈페이지에서
Compare & pull request버튼 - pull request 작성
base 브랜치 ← 기능 브랜치확인- comment 작성
- 코드 리뷰 작성
- Merge pull request 버튼
- 만약 충돌이 생기면 merge버튼이 활성화 되지 않음
혹은 Terminal에서..
git switch 최종브랜치이름
git merge 합칠브랜치이름
6. Github 데이터를 내 로컬에 반영
git pull origin 브랜치명Git 협업 과정

공부 기록 보관소