
쓰레드 우선순위
- 쓰레드 작업의 중요도에 따라서 쓰레드의 우선순위를 부여할 수 있다.
- 작업의 중요도가 높을 때 우선순위를 높게 지정하면 더 많은 작업시간을 부여받아 빠르게 처리될 수 있다.
- 쓰레드는 생성될 때 우선순위가 정해진다.
- 이 우선순위는 우리가 직접 지정하거나 JVM에 의해 지정될 수 있다.
우선순위는 아래와 같이 3가지 (최대/최소/보통) 우선순위로 나뉜다.
- 최대 우선순위 (MAX_PRIORITY) = 10
- 최소 우선순위 (MIN_PRIORITY) = 1
- 보통 우선순위 (NROM_PRIORITY) = 5
→ 기본 값 : 보통 우선순위.
- 더 자세하게 나눈다면 1~10 사이의 숫자로 지정 가능
- 이 우선순위의 범위는 OS가 아니라 JVM에서 설정한 우선순위
- 쓰레드의 우선순위가 높다고 반드시 쓰레드가 먼저 종료되는 것은 아님
- 먼저 종료될 확률이 높을 뿐이다.
쓰레드 우선순위 설정 방법
setPriority() : 쓰레드의 우선순위를 설정하는 메서드
	Thread thread1 = new Thread(task1);
	thread1.setPriority(8);
getPriority() : 쓰레드의 우선순위를 반환하는 메서드
	int threadPriority = thread1.getPriority();
	System.out.println("threadPriority = " + threadPriority);
쓰레드의 그룹
- 쓰레드마다 가지는 비슷한 특징을 묶어 그룹으로서 관리
- 그룹을 한꺼번에 멈추거나 종료시키는 등의 처리로 효율적으로 쓰레드를 관리하기 위해 사용
- 모든 쓰레드들은 반드시 하나의 그룹에 포함되어 있어야 함
- 메인 쓰레드는 system그룹 하위에 있는 main 그룹에 포함됨
- 쓰레드 그룹을 지정받지 못한 쓰레드는 자신을 생성한 부모 쓰레드의 그룹과 우선순위를 상속받게 된다.
- 따라서 쓰레드 그룹을 지정하지 않으면 해당 쓰레드는 자동으로 main 그룹에 포함된다.
예시) ThreadGroup 클래스로 객체를 만들어서 Thread 객체 생성시 첫번째 매개변수로 넣어 생성
- 쓰레드 그룹으로 묶어서 비슷한 쓰레드들을 관리
- ThreadGroup 객체의 interrupt() 메서드를 실행시키면 해당 그룹 쓰레드들이 실행대기 상태로 변경 됨.
→ 쓰레드 그룹을 만든 후 그룹에 쓰레드 2개를 생성과 동시에 넣어준 다음 1초마다 print을 해서 총 4번 수행한 다음 5초에 Interrupt를 실행해 쓰레드 그룹을 멈추게 하는 코드
- ThreadGroup 객체의 interrupt() 메서드를 실행시키면 해당 그룹 쓰레드들이 실행대기 상태로 변경 됨.
public class Main {
public static void main(String[] args) {
// 람다식으로 Thread 수행
Runnable task = () -> {
// Interrupt가 들어오기 전까지 계속 수행
while (!Thread.currentThread().isInterrupted()) {
try {
Thread.sleep(1000);
System.out.println(Thread.currentThread().getName());
} catch (InterruptedException e) {
break;
}
}
System.out.println(Thread.currentThread().getName() + " Interrupted");
};
// ThreadGroup 클래스로 객체그룹 생성
ThreadGroup group1 = new ThreadGroup("Group1");
// Thread 객체 생성시 첫번째 매개변수로 그룹을 넣어줌
// Thread(ThreadGroup group, Runnable target, String name)
Thread thread1 = new Thread(group1, task, "Thread 1");
Thread thread2 = new Thread(group1, task, "Thread 2");
// Thread에 ThreadGroup 이 할당된것을 확인
System.out.println("Group of thread1 : " + thread1.getThreadGroup().getName());
System.out.println("Group of thread2 : " + thread2.getThreadGroup().getName());
thread1.start();
thread2.start();
try {
// 현재 쓰레드를 지정된 시간(5000ms)동안 멈추게 함
Thread.sleep(5000);
} catch (InterruptedException e) {
e.printStackTrace();
}
// interrupt()는 일시정지 상태인 쓰레드를 실행대기 상태로 변경
group1.interrupt();
}
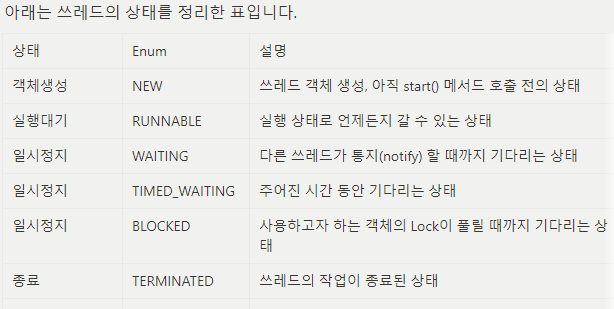
}쓰레드의 상태
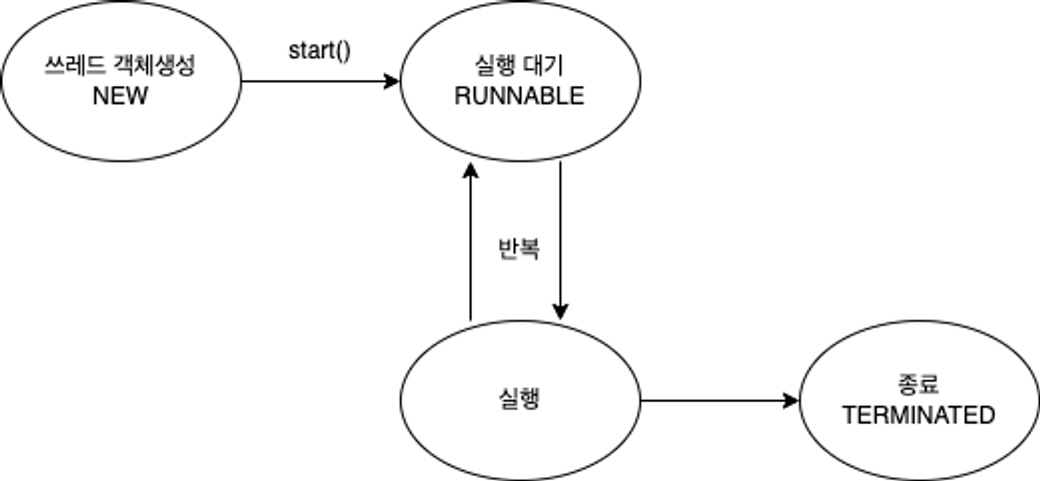
- 이처럼 쓰레드는 실행과 대기를 반복하며
run()메서드를 수행 run()메서드가 종료되면 실행이 멈추게 된다.
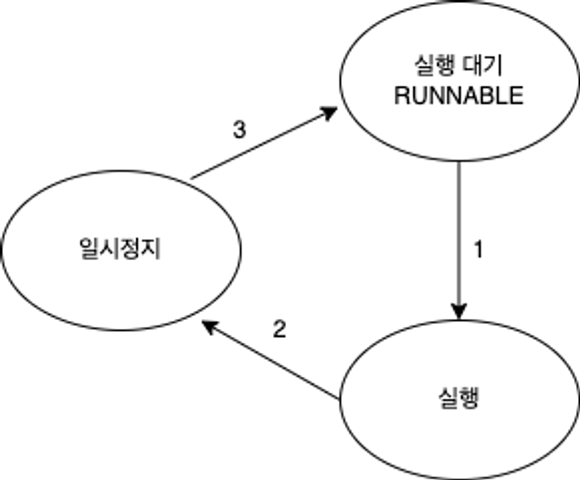
- 음악을 듣다 일시정지를 하는 것과 마찬가지로 쓰레드도 일시정지 상태를 만들 수 있다 (2)
- 일시정지 상태에서는 쓰레드가 실행을 할 수 없는 상태가 된다.
- 쓰레드가 다시 실행 상태로 넘어가기 위해서는 우선 일시정지 상태에서 실행대기 상태로 넘어가야 한다. (3)
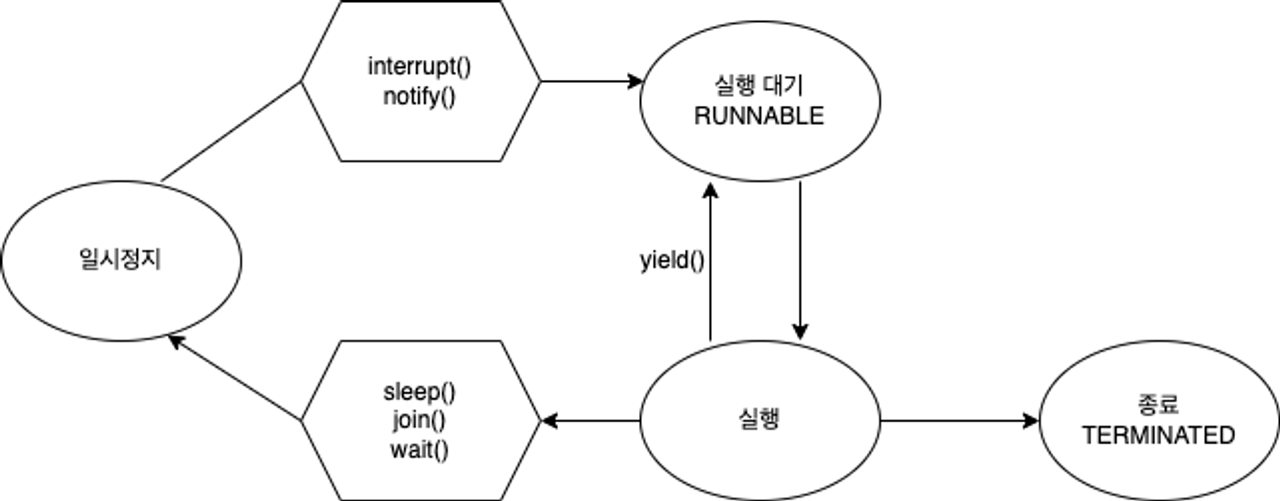
쓰레드 제어
쓰레드도 상태가 존재하고 이를 제어를 할 수 있다.
sleep()
→ 현재 쓰레드를 지정된 시간동안 멈추게 한다.
- sleep()은 자기자신(쓰레드)에 대해서만 멈추게 할 수 있다.
- 특정 쓰레드를 지목해서 멈추게 하는 것은 불가능
Thread.sleep(ms);ms(밀리초) 단위로 설정 가능- Static 메서드
- 예외처리 필수!
- sleep 상태에 있는 동안
interrupt()를 만날 경우,
다시 실행되기 때문에InterruptedException이 발생할 수 있다.
- sleep 상태에 있는 동안
예시
	try {
	    Thread.sleep(2000); // 2초
	} catch (InterruptedException e) {
	    e.printStackTrace();
	}
interrupt()
→ 일시정지 상태인 쓰레드를 실행대기 상태로 만듦
sleep()실행 중interrupt()가 실행되면 예외가 발생!Thread.currentThread().isInterrupted()로interrupted상태를 체크해서 처리하면 오류를 방지할 수 있다.
예시
public class Main {
    public static void main(String[] args) {
        Runnable task = () -> {
            while (!Thread.currentThread().isInterrupted()) {
                try {
                    Thread.sleep(1000);
                    System.out.println(Thread.currentThread().getName());
                } catch (InterruptedException e) {
                    break;
                }
            }
            System.out.println("task : " + Thread.currentThread().getName());
        };

        Thread thread = new Thread(task, "Thread");	// NEW
        thread.start();	// NEW → RUNNABLE

        thread.interrupt();	// RUNNABLE → 일시정지

        System.out.println("thread.isInterrupted() = " + thread.isInterrupted());

    }
}!Thread.currentThread().isInterrupted()로 interrupted 상태를 체크해서 처리하면 오류를 방지할 수 있다.
public class Main {
    public static void main(String[] args) {
        Runnable task = () -> {
        	// 오류 방지 코드
            while (!Thread.currentThread().isInterrupted()) {
                try {
                    Thread.sleep(1000);
                    System.out.println(Thread.currentThread().getName());
                } catch (InterruptedException e) {
                    break;
                }
            }
            System.out.println("task : " + Thread.currentThread().getName());
        };

        Thread thread = new Thread(task, "Thread");
        thread.start();

        thread.interrupt();

        System.out.println("thread.isInterrupted() = " + thread.isInterrupted());

    }
}
join()
→ 정해진 시간동안 지정한 쓰레드가 작업하는 것을 대기시키는 명령어
- 시간을 지정하지 않았을 때는 지정한 쓰레드의 작업이 끝날 때까지 대기시킴
- 시간을 지정하지 않았을 경우 thread가 작업을 끝낼 때까지 main 쓰레드 대기
Thread.sleep(ms);ms(밀리초) 단위로 설정- 예외처리 필수
interrupt()를 만날 경우
기다리는 것을 멈추기 때문에InterruptedException이 발생할 수 있다
예시
Thread thread = new Thread(task, "thread");	// NEW

thread.start();	// NEW → RUNNABLE

try {
    thread.join();
} catch (InterruptedException e) {
    e.printStackTrace();
}
yield()
→ 남은 시간을 다음 쓰레드에게 양보하고, 쓰레드 자신은 실행대기 상태로 변경하는 명령어
예시) thread1과 thread2가 같이 1초에 한번씩 출력되다가
5초뒤에 thread1에서 InterruptedException이 발생하면서 Thread.yield(); 이 실행되어
thread1은 실행대기 상태로 변경되면서 남은 시간은 thread2에게 리소스를 양보
- 처음에는 thread1과 thread2가 동시에 돌다가 5초 후에 thead1은 interrupt를 발생시켜 catch로 들어가 yield를 실행시켜 다음 쓰레드에게 양보하고 thread2는 그대로 실행하다 종료
public class Main {
    public static void main(String[] args) {
        Runnable task = () -> {
            try {
                for (int i = 0; i < 10; i++) {
                    Thread.sleep(1000);
                    System.out.println(Thread.currentThread().getName());
                    // 현재 Thread 이름을 출력
                }
            } catch (InterruptedException e) {
                Thread.yield();	// 예외처리가 될 경우 다음 쓰레드에게 양보
                // e.printStackTrace();
            }
        };

        Thread thread1 = new Thread(task, "thread1");
        Thread thread2 = new Thread(task, "thread2");

        thread1.start();
        thread2.start();

        try {
            Thread.sleep(5000);
        } catch (InterruptedException e) {
            e.printStackTrace();
        }

        thread1.interrupt();

    }
}
synchronized
→ 쓰레드가 진행중인 작업을 다른 쓰레드가 침범하지 못하도록 막는 것을 '쓰레드 동기화'(Synchronization)라고 함
- 멀티 쓰레드의 경우 여러 쓰레드가 한 프로세스의 자원을 공유해서 작업하기 때문에 서로에게 장애나 버그 등의 영향이 생길 수 있다.
- 동기화를 하려면 다른 쓰레드의 침범을 막아야하는 코드들을 ‘임계영역’으로 설정해야 한다.
- 임계영역에는 Lock을 가진 단 하나의 쓰레드만 출입이 가능
- 즉, 임계영역은 한번에 한 쓰레드만 사용이 가능
임계영역 지정 방법 : 쓰레드 동기화 방법
방법 1. 메서드 전체를 임계영역으로 지정
	public synchronized void asyncSum() {
    	...침범을 막아야하는 코드...
	}
방법 2. 특정 영역을 임계영역으로 지정
    synchronized(해당 객체의 참조변수) {
		...침범을 막아야하는 코드...
	}
예시
→ 과를 순서대로 잘 먹는 것을 확인
→ 만약 Syschronized 를 설정하지 않았을 경우 : 남은 사과의 수가 뒤죽박죽 출력될뿐만 아니라 없는 사과를 먹는 경우도 발생
public class Main {
    public static void main(String[] args) {
        AppleStore appleStore = new AppleStore();

        Runnable task = () -> {
            while (appleStore.getStoredApple() > 0) {
                appleStore.eatApple();
                System.out.println("남은 사과의 수 = " + appleStore.getStoredApple());
            }

        };

		// 3개의 thread를 한꺼번에 만들어서 start 수행
        // 생성(NEW)과 동시에 start(NEW → RUNNABLE)
        for (int i = 0; i < 3; i++) {
            new Thread(task).start();
        }
    }
}

class AppleStore {
    private int storedApple = 10;

    public int getStoredApple() {
        return storedApple;
    }

	// synchronized 처리 하기 전
    public void eatApple() {
    	// A라는 thread가 사과를 먹었은 후, 사과가 없는데 B와 C Thread는 사과를 먹는 척을 하게 됨
        if (storedApple > 0) {
            try {
                Thread.sleep(1000);
            } catch (InterruptedException e) {
                e.printStackTrace();
            }
            storedApple -= 1;
        }
    }

    // synchronized 처리 한 후
    public void eatApple() {
    	// 순서대로 사과를 먹도록 싱크를 맞춤
        synchronized (this) {
            if(storedApple > 0) {
                try {
                    Thread.sleep(1000);
                } catch (InterruptedException e) {
                    e.printStackTrace();
                }
                storedApple -= 1;
            }
        }
    }
}
wait()
→ 실행중인 쓰레드가 Lock을 반납하고 대기하게 하는 명령어
- 실행 중이던 쓰레드는 작업을 더 이상 진행할 상황이 아닐 때,
wait()을 호출하여 쓰레드가 Lock을 반납하고 해당 객체의 대기실(waiting pool)에서 대기
notify()
- 침범을 막은 코드를 수행하다가 작업을 더 이상 진행할 상황이 아니면, wait() 을 호출하여 쓰레드가 Lock을 반납 후 대기
- 그럼 다른 쓰레드가 락을 얻어 해당 객체에 대한 작업을 수행 할 수 있게 되고,
- 추후에 작업을 진행할 수 있는 상황이 되면 notify()를 호출해서,
- 작업을 중단했던 쓰레드가 다시 Lock을 얻어 진행할 수 있게 된다.
- 해당 객체의 대기실(waiting pool)에 있는 모든 쓰레드 중에서 임의의 쓰레드만 통지를 받는다.
주의사항
- wait과 notify를 사용할 때 Deadlock을 조심해야 한다.
예시
public class Main {
    public static String[] itemList = {
            "MacBook", "IPhone", "AirPods", "iMac", "Mac mini"
    };
    public static AppleStore appleStore = new AppleStore();
    public static final int MAX_ITEM = 5;

    public static void main(String[] args) {

        // 가게 점원
        Runnable StoreClerk = () -> {
                while (true) {
                    int randomItem = (int) (Math.random() * MAX_ITEM);
                    appleStore.restock(itemList[randomItem]);
                    try {
                        Thread.sleep(50);
                    } catch (InterruptedException ignored) {
                    }
                }
        };

        // 고객
        Runnable Customer = () -> {
                while (true) {
                    try {
                        Thread.sleep(77);
                    } catch (InterruptedException ignored) {
                    }

                    int randomItem = (int) (Math.random() * MAX_ITEM);
                    appleStore.sale(itemList[randomItem]);
                    System.out.println(Thread.currentThread().getName() + " Purchase Item " + itemList[randomItem]);
                }
        };


        new Thread(StoreClerk, "StoreClerk").start();
        new Thread(Customer, "Customer1").start();
        new Thread(Customer, "Customer2").start();

    }
}

class AppleStore {
    private List<String> inventory = new ArrayList<>();

    public void restock(String item) {
        synchronized (this) {
            while (inventory.size() >= Main.MAX_ITEM) {
                System.out.println(Thread.currentThread().getName() + " Waiting!");
                try {
                    wait(); // 재고가 꽉 차있어서 재입고하지 않고 기다리는 중!
                    Thread.sleep(333);
                } catch (InterruptedException e) {
                    e.printStackTrace();
                }
            }
            // 재입고
            inventory.add(item);
            notify(); // 재입고 되었음을 고객에게 알려주기
            System.out.println("Inventory 현황: " + inventory.toString());
        }
    }

    public synchronized void sale(String itemName) {
        while (inventory.size() == 0) {
            System.out.println(Thread.currentThread().getName() + " Waiting!");
            try {
                wait(); // 재고가 없기 때문에 고객 대기중
                Thread.sleep(333);
            } catch (InterruptedException e) {
                e.printStackTrace();
            }
        }

        while (true) {
            // 고객이 주문한 제품이 있는지 확인
            for (int i = 0; i < inventory.size(); i++) {
                if (itemName.equals(inventory.get(i))) {
                    inventory.remove(itemName);
                    notify(); // 제품 하나 팔렸으니 재입고 하라고 알려주기
                    return; // 메서드 종료
                }
            }

            // 고객이 찾는 제품이 없을 경우
            try {
                System.out.println(Thread.currentThread().getName() + " Waiting!");
                wait();
                Thread.sleep(333);
            } catch (InterruptedException e) {
                e.printStackTrace();
            }
        }

    }
}
Lock
→ 기존의 쓰레드 동기화(synchronized) 방식의 제약을 해결하기 위해 사용된 방법
- synchronized 블럭으로 동기화하면 자동적으로 Lock이 걸리고 풀리지만,
같은 메서드 내에서만 Lock을 걸 수 있다는 제약이 있다.
이런 제약을 해결하귀 위해 Lock클래스를 사용
종류
- ReentrantLock
- 재진입 가능한 Lock, 가장 일반적인 배타 Lock
- 특정 조건에서 Lock을 풀고, 나중에 다시 Lock을 얻어 임계영역으로 진입이 가능
- 데드락이 발생할 거 같은 상황에 유동적으로 수행하도록 해줌
- ReentrantReadWriteLock
- 읽기를 위한 Lock과 쓰기를 위한 Lock을 따로 제공
- 읽기에는 공유적이고, 쓰기에는 베타적인 Lock
- 읽기 Lock이 걸려있을 때,
- 다른 쓰레드들도 읽기 Lock을 중복으로 걸고 읽기를 수행할 수 있다. (read-only)
- 쓰기 Lock을 거는 것은 허용되지 않는다. (데이터 변경 방지)
- 읽기를 위한 Lock과 쓰기를 위한 Lock을 따로 제공
- StampedLock
ReentrantReadWriteLock에낙관적인 Lock의 기능을 추가낙관적인 Lock: 데이터를 변경하기 전에는 락을 걸지 않고, 변경할 때 락을 거는 것- 데이터 변경을 할 때 충돌이 일어날 가능성이 적은 상황에서 사용
- 읽기와 쓰기 작업 모두가 빠르게 처리 가능
- 쓰기 작업이 발생했을 때 데이터가 이미 변경된 경우, 다시 읽기 작업을 수행하여 새로운 값을 읽어들이고, 변경 작업을 다시 수행
→ 이러한 방식으로 쓰기 작업이 빈번하지 않은 경우에는 낙관적인 락을 사용하여 더 빠른 처리가 가능
- 쓰기 작업이 발생했을 때 데이터가 이미 변경된 경우, 다시 읽기 작업을 수행하여 새로운 값을 읽어들이고, 변경 작업을 다시 수행
- 쓰기 Lock에 의해 바로 해제 가능
- 무조건 읽기 Lock을 걸지 않고, 쓰기와 읽기가 충돌할 때만 쓰기 후 읽기 Lock을 함.
예시
// ReentrantLock 예시
public class MyClass {
    private Object lock1 = new Object();
    private Object lock2 = new Object();

    public void methodA() {
        synchronized (lock1) {
            methodB();
        }
    }

    public void methodB() {
        synchronized (lock2) {
            // do something
            methodA();
        }
    }
}

- methodA는 **lock1**을 가지고, methodB는 **lock2**를 가집니다.
- methodB에서 **methodA**를 호출하고 있으므로, **methodB**에서 **lock2**를 가진 상태에서 methodA를 호출하면 **lock1**을 가지려고 할 것입니다.
- 그러나 이때, methodA에서 이미 lock1을 가지고 있으므로 lock2를 기다리는 상태가 되어 데드락이 발생할 가능성이 있습니다.
- 하지만 ReentrantLock을 사용하면, 같은 스레드가 이미 락을 가지고 있더라도 락을 유지하며 계속 실행할 수 있기 때문에 데드락이 발생하지 않습니다.
- 즉, ReentrantLock을 사용하면 코드의 유연성을 높일 수 있습니다.
Condition
→ 각 쓰레드마다 상태를 정의하여 대기줄(waiting pool)에서 각 쓰레드를 구분하는 방법
- wait() & notify()의 문제점인 Waiting Pool 내 쓰레드를 구분하지 못한다는 것을 해결한 것
- wait() & notify() 대신 Condition의 await() & signal() 을 사용
예시) Condition 을 만들어서 대기줄(waiting pool)을 사용
- 기존 wait()과 notify()의 단점을 보완해 Condition1과 Condition2를 직접 생성함으로써 특정 조건에 맞는 Waiting List를 깨울 수 있다.
private ReentrantLock lock = new ReentrantLock();

// lock으로 condition 생성
private Condition condition1 = lock.newCondition();
private Condition condition2 = lock.newCondition();

private ArrayList<String> tasks = new ArrayList<>();

// 작업 메서드
public void addMethod(String task) {
		lock.lock(); // 임계영역 시작

		try {
			while(tasks.size() >= MAX_TASK) {
					String name = Thread.currentThread().getName();
					System.out.println(name+" is waiting.");
					try {
						condition1.await(); // wait(); condition1 쓰레드를 기다리게 합니다.
						Thread.sleep(500);
					} catch(InterruptedException e) {}
			}

			tasks.add(task);
			condition2.signal(); // notify();  기다리고 있는 condition2를 깨워줍니다.
			System.out.println("Tasks:" + tasks.toString());
		} finally {
			lock.unlock(); // 임계영역 끝
		}
	}
Condition 추가설명
- wait()과 notify()는 객체에 대한 모니터링 락(lock)을 이용하여 스레드를 대기시키고 깨운다.
그러나 wait()과 notify()는 waiting pool 내에 대기중인 스레드를 구분하지 못하므로,
특정 조건을 만족하는 쓰레드만 깨우기가 어렵다. - 이러한 문제를 해결하기 위해 JDK 5에서는 java.util.concurrent.locks 패키지에서 Condition 인터페이스를 제공한다.
Condition은 waiting pool 내의 쓰레드를 분리하여 특정 조건이 만족될 때만 깨우도록 할 수 있으며,
ReentrantLock 클래스와 함께 사용한다.
따라서 Condition을 사용하면 wait()과 notify()의 문제점을 보완할 수 있다.