💛 요소 노드 주요 프로퍼티
🔅innerHTML
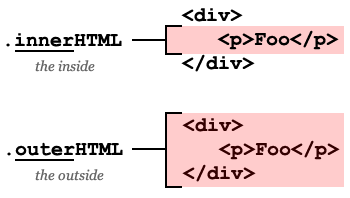
요소 안에 있는 HTML 자체를 문자열로 리턴해준다. 주의해야할 점은 태그와 태그 사이에 있는 줄바꿈이나 들여쓰기 등도 모두 포함된다.
const myTag = document.querySelector('#list-1');
console.log(myTag.innerHTML); //
innerHTML은 요소 안에 있는 HTML을 수정할 때 더 자주 활용된다. innerHTML프로퍼티에 HTML 코드를 아래와 같이 문자열로 할당하면 해당요소가 값이 완전히 수정된다.
const myTag = document.querySelector('#list-1');

myTag.innerHTML = '<li>Exotic</li>';
🔅outerHTML
console.log(myTag.outerHTML);해당 요소를 포함한 전체 HTML 코드를 문자열로 리턴해준다. innerHTML과 마찬가지로 줄바꿈이나 들여쓰기 등 모두 포함되어 리턴한다. outerHTML에서 좀 더 주의해야할 때는 이 프로퍼티에 새로운 값을 할당했을 때이다.
innerHTML과 마찬가지로 outerHTML에도 새로운 코드를 할당해 줄 수 있다. 그런데 outerHTML은 해당 요소 자체를 가리키는 특성 때문에 요소 자체가 새로운 요소로 교체 되는 결과를 얻게 된다. 간혹 해당 요소를 수정하는 것처럼 오해하는 경우가 있는데, outerHTML에 값을 할당하면 처음 선택한 요소는 사라진다.
🔅textContent
console.log(myTag.textContent);
myTag.textContent = 'new text';
innerHTML과 비슷하다. 요소 안에 있는 내용들 중 HTML태그를 제외한 text들만 가져온다. 이 또한 새로운 값을 할당해서 요소 안의 값을 수정해 줄 수 있다.
그러나 textContent는 말그대로 text만 다루기 때문에 특수문자도 text로 처리해버린다. 만약 사용자의 입력값을 웹페이지에 반영해야 할 때, innerHTML이 아닌 textContent를 사용하게 되면 원하지 않는 HTML코드가 웹페이지에 추가되는 것을 방지할 수 있다.
💛 요소 노드 추가하기
const today = document.querySelector('#today');

today.innerHTML = '<li>처음</li>' + today.innerHTML;
today.innerHTML = today.innerHTML + '<li>마지막</li>';

today.outerHTML = '<p>이전</p>' + today.outerHTML;

const newToday = document.querySelector('#today');
newToday.outerHTML = newToday.outerHTML + '<p>다음</p>';- 요소 노드 만들기: document.createElement('태그이름')
const first = document.createElement('li');- 요소 노드 꾸미기: etx) textContent, innerHTML, ...
first.textContent = '처음';- 요소 노드 추가하기: NODE.prepend, append, after, before
tomorrow.prepend(first);

const last = document.createElement('li');
last.textContent = '마지막';
tomorrow.append(last);

const prev = document.createElement('p');
prev.textContent = '이전';
tomorrow.before(prev);

const next = document.createElement('p');
next.textContent = '다음';
tomorrow.after(next);
메소드를 호출할 때 여러 값을 전달하면 전달 순서대로 한 번에 추가할 수 있다. 한 가지 주의할 점은 prepend나 before 같은 경우는 요소를 앞으로 추가할 때 전달한 순서 그대로 앞에 추가한다는 점을 알아야 한다.
💛 요소 노드 삭제 & 이동
const today = document.querySelector('#today');
const tomorrow = document.querySelector('#tomorrow');- 요소 삭제하기: Node.remove();
tomorrow.remove();
today.children[2].remove();- 노드 이동하기: prepend, append, before, after
today.append(tomorrow.children[1]); // 오늘 할 일의 마지막에 내일 할 일의 첫 번째 요소 넣기
tomorrow.children[1].after(today.children[1]); // 오늘 할 일의 1번 요소를 내일 할 일의 1번 요소 뒤로 이동
tomorrow.lastElementChild.before(today.children[1]);
글 잘 봤습니다.