앱 델리게이트를 만들지 않고 오직 SwiftUI 를 이용해 노티피케이션 기능을 구현하고 싶었다.
노티피케이션 기능을 구현하기 위해서는 세 가지 단계를 거쳐야한다.
- 알림 권한 요청
- 알림을 만들고 보내기
- 타이밍에 맞춰 알림 발동
NotificationManager 작성
먼저 NotificationManager 부터 작성해주자.
파일을 만들고 UserNotifications 를 불러온다.
import SwiftUI
import UserNotifications
노티피케이션 기능은 UNUserNotificationCenterDelegate 를 통해 사용할 수 있다. 이를 위해서는 NSObject 를 선언해줘야한다.
알림에 따라 화면 구성이 변동될 수 있으므로 ObservableObject 를 선언한다. 관련 변수들은 Published 로 처리해주면 된다.
UNUserNotificationCenterDelegate 는 알림 수신 및 처리를 위해 필요한 핵심 요소이다. 여기서는 willPresent, didReceive 와 같이 알림이 울릴 때나 알림을 받았을 때 등의 작업을 처리할 수 있다.
위 세 가지를 선언해주고, 해당 클래스를 싱글톤으로 만들어준다.
그리고 클래스 상속 및 해당 클래스를 노티피케이션 델리게이트와 동일시하게 해준다.
결론은 이 매니저 클래스가 노티피케이션 델리게이트, 즉 대리자 역할을 해낼 셈이다.
class NotificationManager: NSObject, ObservableObject, UNUserNotificationCenterDelegate {
    static let nm = NotificationManager()

    override init() {
        super.init()
        UNUserNotificationCenter.current().delegate = self
    }
}
다음과 같이 세 가지 함수를 작성해준다.
request_authorization : 사용자에게 알림 권한 요청을 보낸다.
schedule_notification : 알림 객체를 만들고 내용을 작성한다. 더불어 해당 알림이 언제 울리게 할지를 정한다.
userNotificationCenter : 해당 함수는 willPresent 과 didReceive 에 따라 작동하는 함수다. 알림이 울릴 때와, 알림을 받았을 때 어떤 작업을 처리할지 작성하면 된다.
class NotificationManager: NSObject, ObservableObject, UNUserNotificationCenterDelegate {
    static let nm = NotificationManager()

    override init() {
        super.init()
        UNUserNotificationCenter.current().delegate = self
    }

    func request_authorization() {
        UNUserNotificationCenter.current().requestAuthorization(options: [.alert, .badge, .sound]) { granted, error in
            if let error = error {
                print("Request Authorization Error: \(error.localizedDescription)")
            } else if granted {
                print("permission granted")
            } else {
                print("permission denied")
            }
        }
    }

    func schedule_notification() {
        let content = UNMutableNotificationContent()
        content.title = "title"
        content.body = "content"
        content.sound = UNNotificationSound.default

        // trigger
        let trigger = UNTimeIntervalNotificationTrigger(timeInterval: 5, repeats: false)

        let request = UNNotificationRequest(identifier: UUID().uuidString, content: content, trigger: trigger)

        UNUserNotificationCenter.current().add(request) { error in
            if let error = error {
                print("error: \(error.localizedDescription)")
            } else {
                print("notification scheduled")
            }
        }
    }

    func userNotificationCenter(_ center: UNUserNotificationCenter, willPresent notification: UNNotification, withCompletionHandler completionHandler: @escaping (UNNotificationPresentationOptions) -> Void) {
            completionHandler([.alert, .sound])
        }

        func userNotificationCenter(_ center: UNUserNotificationCenter, didReceive response: UNNotificationResponse, withCompletionHandler completionHandler: @escaping () -> Void) {
            completionHandler()
        }
}
앱 수준에서 알림 권한 요청하기
앱 시작과 동시에 사용자에게 알림 권한 요청을 받기 위해 앱 수준에서 요청을 시도한다.
노티피케이션 매니저의 인스턴스를 만들고, request_authorization 함수로 권한을 요청한다.
import SwiftUI

@main
struct Notification_tutorialApp: App {
    @StateObject var nm = NotificationManager.nm

    var body: some Scene {
        WindowGroup {
            notificationView()
                .onAppear {
                    nm.request_authorization()
                }
        }
    }
}
알림 만들고 보내기
남은 일은 메인 뷰에서 알림을 만들고 보내는 일이다.
적당히 뷰를 구성하고 버튼을 누르면 알림을 보내도록 작성하였다.
import SwiftUI
import UserNotifications

struct notificationView: View {
    var body: some View {
        VStack {
            Text("로컬 알림")
                .font(.largeTitle)
                .padding()
            Button {
                NotificationManager.nm.schedule_notification()
            } label: {
                Text("알림 보내기")
                    .background(.blue)
                    .foregroundStyle(.white)

            }
        }
        .onAppear {
            NotificationManager.nm.request_authorization()
        }
    }
}

#Preview {
    notificationView()
}
특정 시간대에 알림 보내기
위 코드는 버튼을 누르고 몇 초 후에 알림이 발동되는 형식이었다.
이런 알림 방법은 실전에서 딱히 쓰이지는 않는다.
대부분 알림 기능이라면 사용자가 지정한 시간대에 알림이 울리는 방식이다.
이러한 기능은 UNCalendarNotificationTrigger 를 이용하여 구현할 수 있다.
NotificationManager 파일로 돌아가서 schedule_notification 함수를 수정해주자.
    func schedule_notification(at dateComponents: DateComponents) {
        let content = UNMutableNotificationContent()
        content.title = "title"
        content.body = "content"
        content.sound = UNNotificationSound.default

        // trigger
        let trigger = UNCalendarNotificationTrigger(dateMatching: dateComponents, repeats: true)

        let request = UNNotificationRequest(identifier: UUID().uuidString, content: content, trigger: trigger)

        UNUserNotificationCenter.current().add(request) { error in
            if let error = error {
                print("error: \(error.localizedDescription)")
            } else {
                print("notification scheduled")
            }
        }
    }
매개변수로 DataComponents 타입을 받는다. 해당 타입은 hour 와 minute 로 구성되어 있다.
이번에는 repeats 를 true 로 설정해주는데, 이는 매일 해당 시간대마다 알림을 울리기 때문이다.
이제 notificationView 로 이동해서 오전 11시마다 알림을 울리도록 만들어보겠다.
struct notificationView: View {
    var body: some View {
        VStack {
            Text("로컬 알림")
                .font(.largeTitle)
                .padding()
            Button {
                let dateComponents = DateComponents(hour: 11, minute: 0)
                NotificationManager.nm.schedule_notification(at: dateComponents)
            } label: {
                Text("알림 보내기")
                    .background(.blue)
                    .foregroundStyle(.white)

            }
        }
        .onAppear {
            NotificationManager.nm.request_authorization()
        }
    }
}
특정 요일마다 알림 울리기
UNCalendarNotificationTrigger 에서는 시간대를 설정하는 것뿐만이 아니라 특정 요일도 지정할 수 있다.
schedule_notification 함수의 매개변수로 요일을 특정할 정수값과 DateComponets 값을 받는다.
일요일은 1, 월요일은 2, 이런 식이며 마지막 요일인 토요일은 7이다.
dateComponents 객체를 만들고 매개변수로 받은 요일, 시간을 넣어준다.
이렇게 만든 객체를 trigger 에 넘겨준다.
이때, 트리거는 dateMatching 타입으로 설정해준다.
    func schedule_notification(onDayOfWeek dayOfWeek: Int, atTime time: DateComponents) {
        var dateComponents = DateComponents()
        dateComponents.weekday = dayOfWeek
        dateComponents.hour = time.hour
        dateComponents.minute = time.minute

        let content = UNMutableNotificationContent()
        content.title = "title"
        content.body = "content"
        content.sound = UNNotificationSound.default

        // 특정 요일에 울리게 하기
        let trigger = UNCalendarNotificationTrigger(dateMatching: dateComponents, repeats: true)

        let request = UNNotificationRequest(identifier: UUID().uuidString, content: content, trigger: trigger)

        UNUserNotificationCenter.current().add(request) { error in
            if let error = error {
                print("error: \(error.localizedDescription)")
            } else {
                print("notification scheduled")
            }
        }
    }
이제 월요일 오전 11시에 알림이 울리도록 설정해보겠다.
struct notificationView: View {
var body: some View {
VStack {
Text("로컬 알림")
.font(.largeTitle)
.padding()
Button {
let dateComponents = DateComponents(hour: 11, minute: 0)
NotificationManager.nm.schedule_notification(onDayOfWeek: 2, atTime: dateComponents)
} label: {
Text("알림 보내기")
.background(.blue)
.foregroundStyle(.white)
}
}
.onAppear {
NotificationManager.nm.request_authorization()
}
}
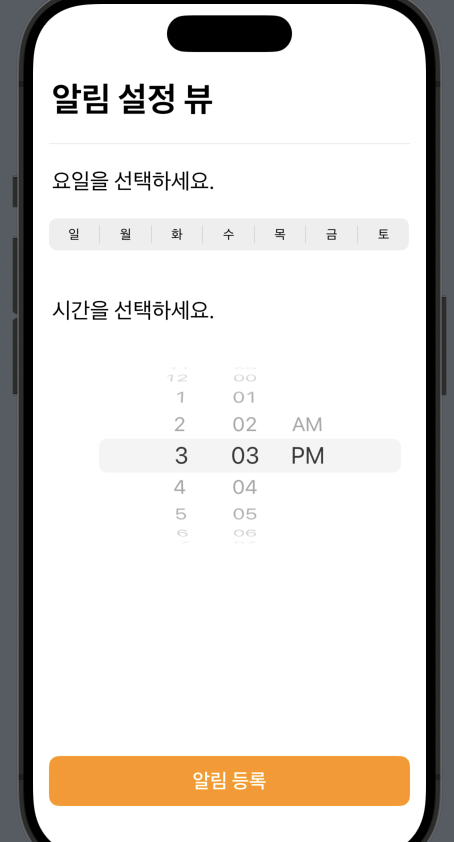
}구현 예제
이제 picker 를 이용해서 날짜와 요일을 입력받고 지정한 타이밍에 알림을 울리도록 뷰를 구성해보겠다
DayOfWeek 작성
먼저, 요일을 String 에서 Int 타입으로 바꿀 수 있도록 enum 으로 지정해주자. DayOfWeek 라는 파일을 만들고 아래와 같이 작성한다.
enum 에서 CaseIterable 을 채택하면 enum 에서 지정한 모든 케이스에 대해 반복 및 접근이 가능하게 만들 수 있다.
따라서 이를 이용해 각 요일에 해당하는 정수값을 반환하도록 만든다.
이제 DayOfWeek.allCases 를 통해 요일 배열을 불러올 수 있다.
rawValue.num 을 이용하면 해당 요일에 대응하는 정수값이 매칭되어 반환된다.
import Foundation

enum DayOfWeek: String, CaseIterable {
    case sun = "일"
    case mon = "월"
    case tue = "화"
    case wed = "수"
    case thu = "목"
    case fri = "금"
    case sat = "토"

    var num: Int {
        switch self {
        case .sun: return 1
        case .mon: return 2
        case .tue: return 3
        case .wed: return 4
        case .thu: return 5
        case .fri: return 6
        case .sat: return 7
        }
    }

    static func from(string: String) -> DayOfWeek? {
        return DayOfWeek.allCases.first { $0.rawValue == string }
    }
}
NotificationViewPicker 작성
다음으로 요일과 날짜를 입력받을 뷰를 작성한다.
NotificationViewPicker 라는 이름으로 파일을 만들고 다음과 같이 작성한다.
아래 코드에서 몇 가지만 살펴보자.
먼저, 반복문을 돌릴 요일배열 객체부터 만들어준다.
let dayWeeks = DayOfWeek.allCases그리고 반복문으로 dayWeeks 를 돌아주면서 요소의 rawValue 를 뿌려준다.
Picker 를 다룰 때는 항상 selection 값을 지정해주는데, 이 값은 항상 바인딩 값을 받는다.
Picker("", selection: $selected_item) {
    ForEach(dayWeeks, id: \.self) { dayWeek in
        Text(dayWeek.rawValue)
    }
}
picker 로 선택한 selection 값들을 다음 뷰인 DatePicker 로 넘겨준다.
이때, 작업을 편하게 처리하기 위해 DateComponents 타입으로 묶어서 넘겨줄거다. 이를 수행하는 함수가 date_to_dc 이다.
시간 값과 요일 정수값을 받아서 DateComponents 값으로 변환 후 반환한다.
날짜 타입 데이터에서 시간 값을 뽑아내고 싶을 때는 Calender 를 이용해야한다. 아래처럼 캘린더 객체를 만들고, dateComponents 메소드를 이용해 뽑아낼 Date 값을 넣어주면 된다.
notificationView(input_data: date_to_dc(
    input_time: selected_time,
    input_dayWeek: selected_item.num)
)

func date_to_dc(input_time: Date, input_dayWeek: Int) -> DateComponents {
    let calender = Calendar.current // 캘린더 객체 생성
    let c = calender.dateComponents([.hour, .minute, .weekday], from: input_time)

    return c
}
NotificationViewPicker 뷰의 전체 코드다.
import SwiftUI

struct NotificationViewPicker: View {
    // 요일 enum 불러오기
    let dayWeeks = DayOfWeek.allCases
    @State var selected_item: DayOfWeek = .tue
    @State var selected_time = Date()

    var body: some View {
        VStack {
            HStack {
                Text("알림 설정 뷰")
                    .font(.largeTitle)
                    .bold()
                    .padding(.leading, 3)
                    .padding(.bottom)
                Spacer()

            }
            Divider()
            HStack {
                Text("요일을 선택하세요.")
                    .padding(.leading, 3)
                    .padding(.bottom)
                    .padding(.top)
                    .font(.title2)
                Spacer()
            }

            Picker("", selection: $selected_item) {
                ForEach(dayWeeks, id: \.self) { dayWeek in
                    Text(dayWeek.rawValue)
                }
            }
            .pickerStyle(.segmented)
            .padding(.bottom, 30)

            HStack {
                Text("시간을 선택하세요.")
                    .padding(.leading, 3)
                    .font(.title2)
                Spacer()
            }
            DatePicker("", selection: $selected_time, displayedComponents: [.hourAndMinute])
                .datePickerStyle(.wheel)

        }
        .padding()

        Spacer()

        notificationView(input_data: date_to_dc(input_time: selected_time, input_dayWeek: selected_item.num))
    }

    func date_to_dc(input_time: Date, input_dayWeek: Int) -> DateComponents {
        let calender = Calendar.current // 캘린더 객체 생성
        let c = calender.dateComponents([.hour, .minute, .weekday], from: input_time)

        return c
    }
}


#Preview {
    NotificationViewPicker()
}
Notification 수정
계속해서 notificationView 를 수정해보자.
여기에서는 버튼을 누르면 DateComponents 값을 알림 형태로 쏴주는 일만을 수행한다.
먼저, 이전 뷰에서 받는 DateComponents 를 담을 객체를 하나 만든다.
var input_data: DateComponents그리고 버튼을 눌렀을 때, 발동할 schedule_notification 함수의 매개변수로 input_data 를 넘겨주자.
NotificationManager.nm.schedule_notification(dc: input_data)아래는 notificationView 뷰의 전체 코드이다.
import SwiftUI
import UserNotifications

struct notificationView: View {
    var input_data: DateComponents
    var body: some View {
        VStack {
            Button {
                print(input_data)
                NotificationManager.nm.schedule_notification(dc: input_data)
            } label: {
                ZStack {
                    RoundedRectangle(cornerRadius: 10)
                        .frame(height: 50)
                        .foregroundStyle(.orange)
                    Text("알림 등록")
                        .bold()
                        .font(.title3)
                        .foregroundStyle(.white)
                }
                .padding()
            }
        }
        .onAppear {
            NotificationManager.nm.request_authorization()
        }
    }
}

#Preview {
    notificationView(input_data: DateComponents(hour: 16, minute: 19, weekday: 3))
}
Schedule_notificartion 수정
마지막으로 NotificationManager 에서 schedule_notification 함수를 약간 수정해줘야 한다.
처음 작성했던 코드는 요일 정수값과 날짜를 받아서 둘을 DateComponents 객체에다 합치는 것이었다.
하지만 이번 예제에서는 미리 DateComponents 를 만들어 넘겼으므로 그냥 이걸 받아다가 알림을 쏘면 끝이다.
func schedule_notification(dc: DateComponents) {

        let content = UNMutableNotificationContent()
        content.title = "title"
        content.body = "content"
        content.sound = UNNotificationSound.default

        // 특정 요일에 울리게 하기
        let trigger = UNCalendarNotificationTrigger(dateMatching: dc, repeats: true)

        let request = UNNotificationRequest(identifier: UUID().uuidString, content: content, trigger: trigger)

        UNUserNotificationCenter.current().add(request) { error in
            if let error = error {
                print("error: \(error.localizedDescription)")
            } else {
                print("notification scheduled")
            }
        }
    }
이로써 지정된 타이밍에 Notification 기능으로 알림을 울리는 예제를 완성해보았다.