- 위의 설명을 읽어보면 그냥 우리만의 aws를 만드는것이다.
설치 전 설정
가상 컴퓨터 준비
		 cpu   mem	hdd
Control		2	4	100
Network		1	2	20
Compute		4	4	100
설치 전 설정
방화벽 및 네트워크 설정
/etc/hosts
- dns 서버에 물어 보기 전에 /etc/hosts를 먼저 봄.
- dns와 굳이 통신하지 않아도 열 수 있음.
- 윈도우에도 있음.
- C:\Windows\System32\drivers\etc

3대 모두 설정
- 그래서 우리가 localhost로 들어갔을 때 자기 ip로 접속이 되는 것.
- vi /etc/hosts 파일 맨 마지막 줄에 다음 내용 추가
[control 노드 IP] control.[이니셜].com
[network 노드 IP] network.[이니셜].com
[comput 노드 IP] compute.[이니셜].com
- vi /etc/hostname 파일에 기존 내용 지우고 다음과 같이 수정
[노드 이름].[이니셜].com
-
dnf install network-scripts -y
-
systemctl disable firewalld
-
systemctl stop firewalld
-
setenforce 0
-
sed -i 's/=enforcing/=disabled/g' /etc/sysconfig/selinux
- 재부팅 되도 selinux 방화벽 해제 하게 설정하는 코드임.
-
systemctl disable NetworkManager
-
systemctl stop NetworkManager
-
systemctl enable network
-
systemctl start network
ssh 설정
- 실행을 control node에서 시키면 ssh로 network와 compute node로 접근함.
- 타 vm에서 ssh로 접근하면 password를 물어본다.
- 그래서 다운로드를 하다가 password를 물어보는거 때문에 끊길 수가 있다.
- 이런걸 막기 위해서 ssh 공개키와 비공개키를 생성한다.
Control 노드
- ssh-keygen
- 엔터 3번
- 이 공개키를 내가 접속할 서버에 저장해두면, 패스워드 없이 이 서버에 접속할 수 있다.
- ssh-copy-id root@control.[이니셜].com
패스워드 입력 - ssh-copy-id root@compute.[이니셜].com
패스워드 입력 - ssh-copy-id root@network.[이니셜].com
패스워드 입력

- 위의 과정을 다 하면 ssh 접속이 원격으로 가능하다.
- 물론 비밀번호 없이 접속이 가능하다.
- 공개키와 비공개키를 이용한 접속이다.
- 그리고 ip 주소가 /etc/hosts 에서 매핑해놨기 때문에 굳이 dns 서버에 묻지 않고 접속이 가능한 것이다.
설치
설치 프로그램 다운
3대 모두
- dnf config-manager --enable powertools
- dnf install -y centos-release-openstack-yoga
- dnf update -y
controll 노드만
- dnf install -y openstack-packstack
설치 파일 생성 및 수정
-
packstack --gen-answer-file=/root/yoga-answer.txt
-
vi /root/yoga-answer.txt
41 CONFIG_SWIFT_INSTALL=n
46 CONFIG_CEILOMETER_INSTALL=n
50 CONFIG_AODH_INSTALL=n
94 CONFIG_COMPUTE_HOSTS=[compute 노드 IP]
98 CONFIG_NETWORK_HOSTS=[network 노드 IP]
134 CONFIG_STORAGE_HOST=[compute 노드 IP]
521 CONFIG_CINDER_VOLUMES_SIZE=50G
1136 CONFIG_PROVISION_DEMO=n- packstack --answer-file=/root/yoga-answer.txt 명령어로 실행
네트워크 설정
network 노드
- vi /etc/sysconfig/network-scripts/ifcfg-ens160
DEVICE=ens160
TYPE=OVSPort
DEVICETYPE=ovs
OVS_BRIDGE=br-ex
ONBOOT=yes-
전부 지우고 위의 코드 대입
-
vi /etc/sysconfig/network-scripts/ifcfg-br-ex
DEVICE=br-ex
DEVICETYPE=ovs
TYPE=OVSBridge
BOOTPROTO=static
IPADDR=200.200.200.30
NETMASK=255.255.255.0
GATEWAY=200.200.200.2
ONBOOT=yes- 위의 코드 대입 후, systemctl restart network
결과
control 노드
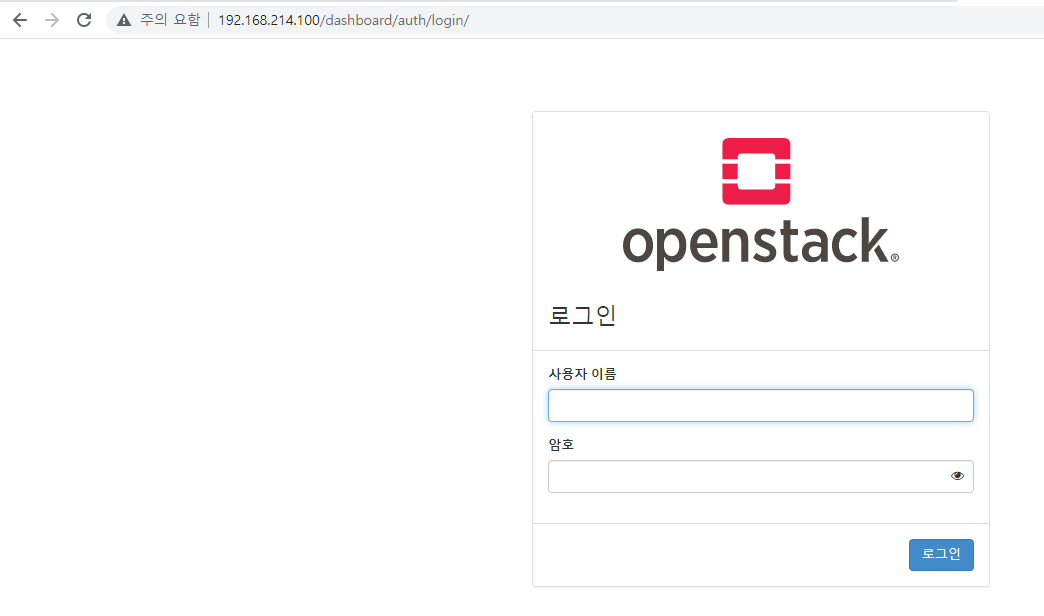
- 전부 다 설정한 후, 가상환경 사설 ip/dashboard 로 접속을 하면 위의 그림과 같이 웹사이트로 접속이 된다.
- 사용자 이름은 admin이다.
- 비밀번호는?

- /root 경로 아래에 위의 그림과 같이packstack... 하는 파일이 보인다.
- cat packstack... | grep ADMIN_PW 를 쓰면 비밀번호가 적혀있다.
- 복사해서 위의 웹사이트에 붙여넣기를 한 후 로그인을 하면?
- 위의 화면으로 뜬다!
진짜 실습 시작
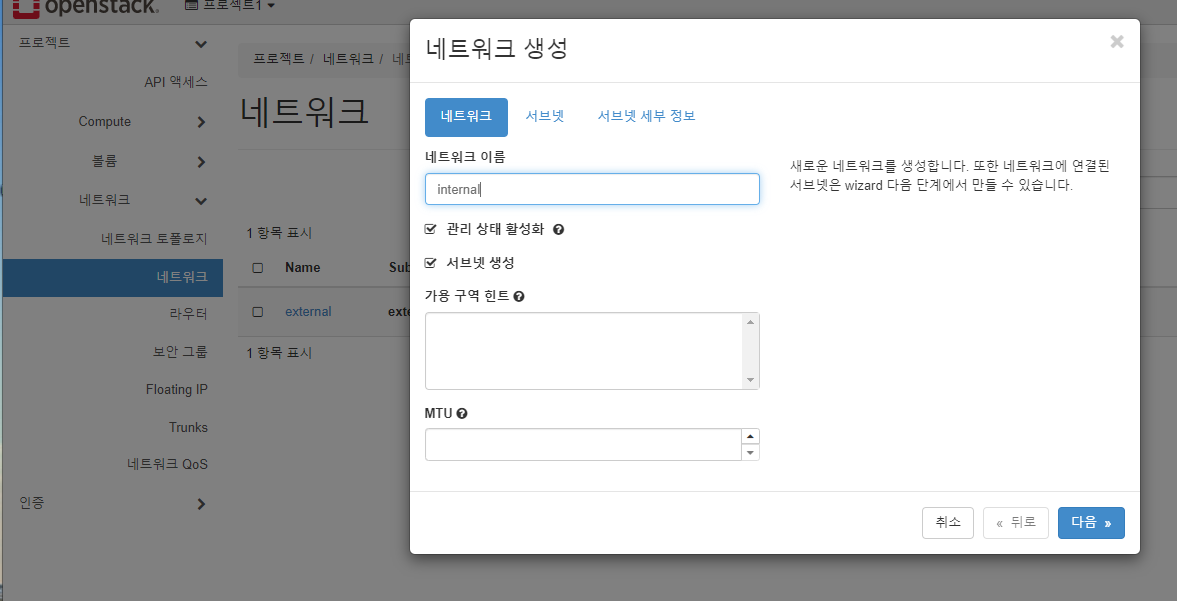
네트워크 추가

- 왼쪽 메뉴항목에 위의 그림처럼 클릭 후, 네트워크 생성
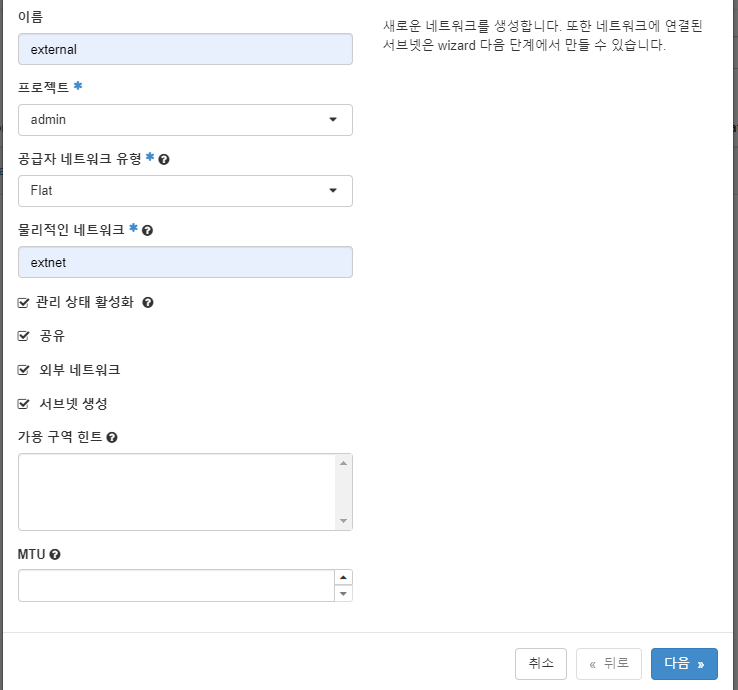
- 위의 그림처럼 적어준다.
- 외부 네트워크를 만들어주는 것이기 때문에 이름을 external로 정했는데 아무거나 해도 상관없다.
- 프로젝트는 admin으로 설정해놓는다.
- 물리적인 네트워크는 외부 네트워크인 extnet이다.
- 서브넷 이름도 아무렇게나 적어줘도 된다.
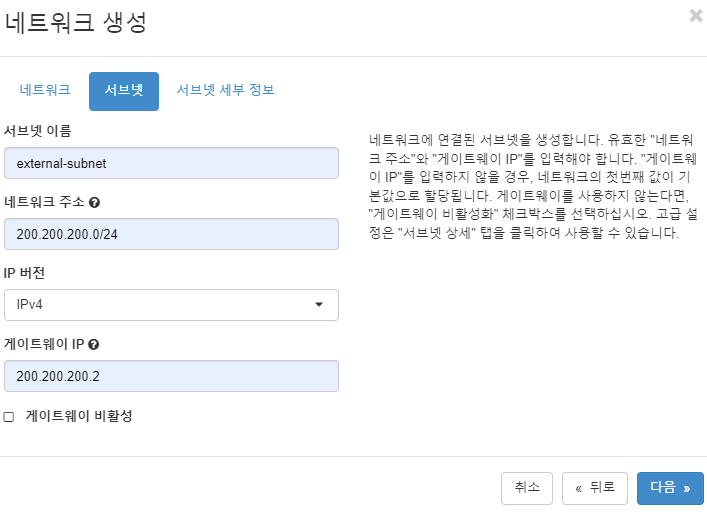
- 네트워크 주소는 현재 가상환경의 네트워크 대역을 적어준다.
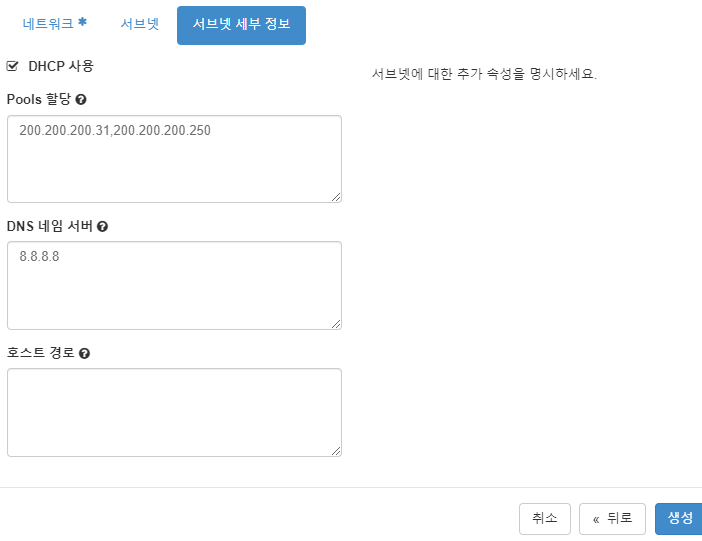
- pools는 범위이다. 31번부터 250번까지 할당.
- dns는 8.8.8.8 그리고 생성을 한다.
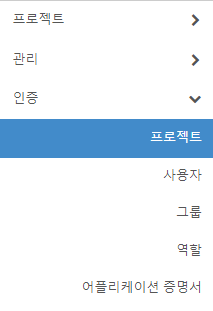
- 그리고 왼쪽 메뉴에 인증 -> 프로젝트칸에 들어가서 프로젝트 생성을 누른다.
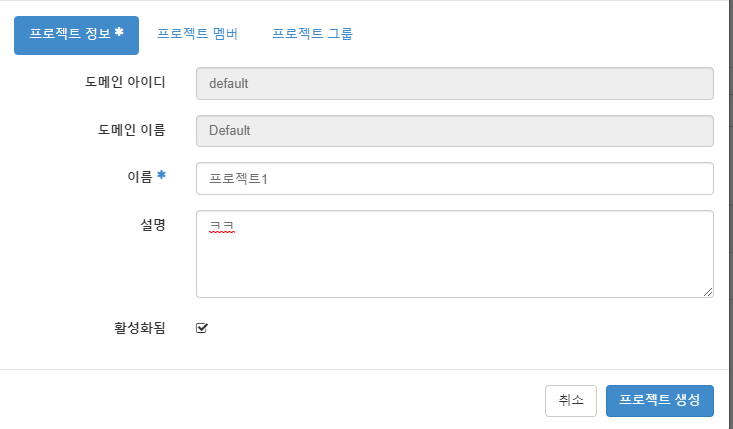
- 이름은 마찬가지로 아무거나 써도 된다.
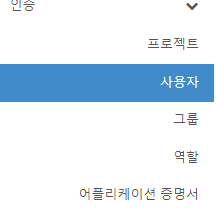
- 그리고 다시 왼쪽 메뉴에서 인증 -> 사용자로 가서 이 외부 네트워크를 사용할 사용자를 만들어 줄 것이다.
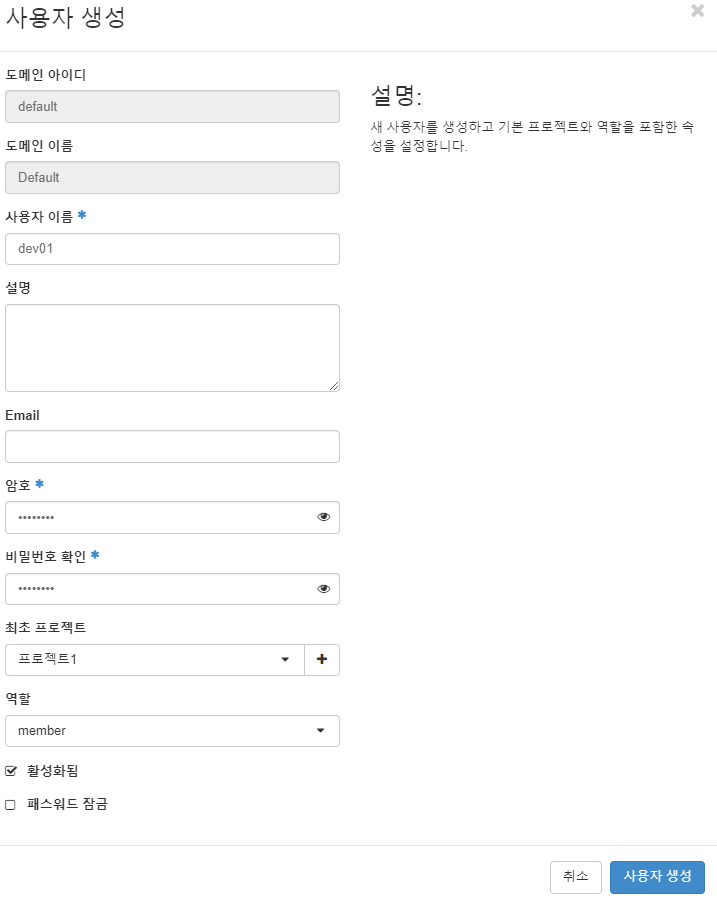
- 사용자 이름은 본인이 쓰고 싶은거, 암호도 마찬가지
- 프로젝트는 우리가 위에서 생성한 프로젝트를 선택하고 역할을 __로 시작하는 member가 아닌 그냥 member를 선택하고 생성한다.
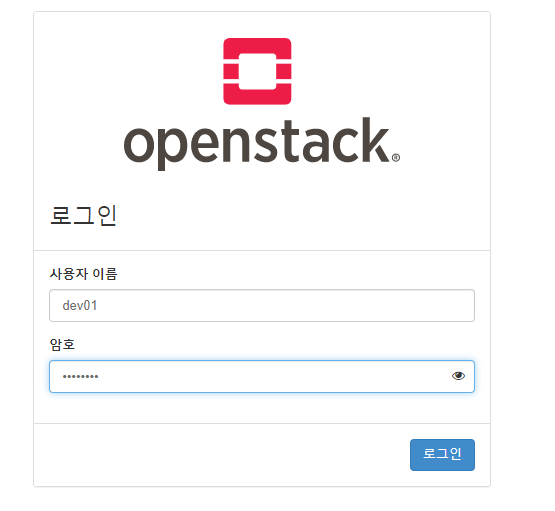
- 생성한 사용자로 다시 로그인을 하자.
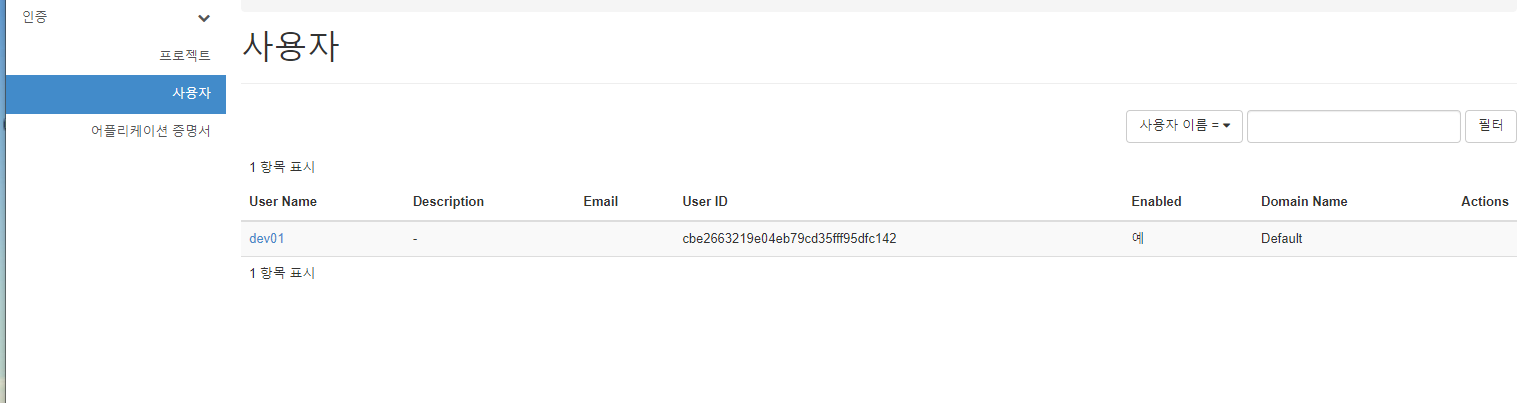
- 뭔가 메뉴가 많이 줄어들었다.
- 관리자가 아닌 일개 개인 유저라 그렇다.
- 사용자 칸에 들어가면 본인밖에 없다.
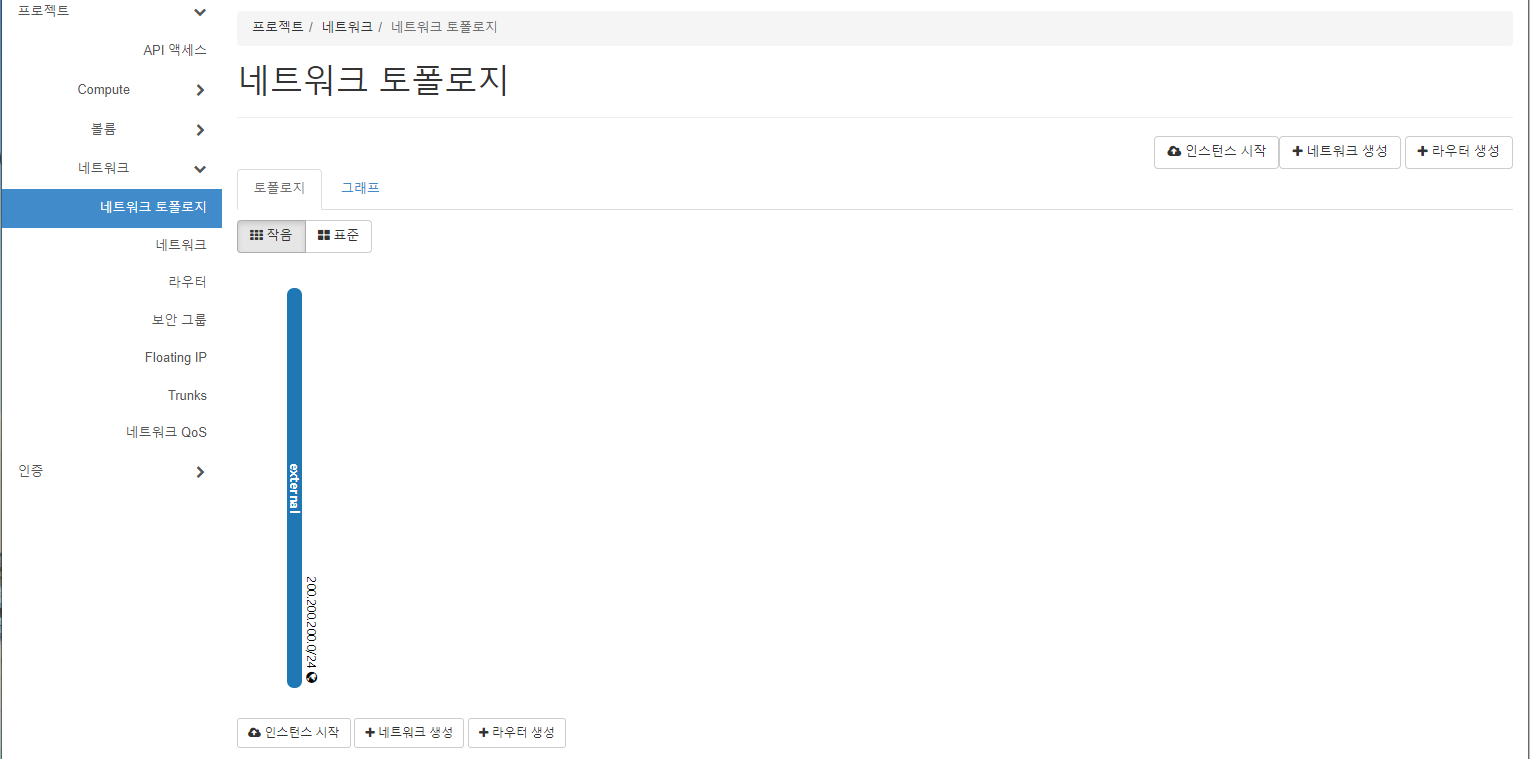
- 네트워크 토폴로지를 보면 관리자가 설정해준 외부 네트워크인 external이 있는걸 볼 수있다.
- 여기서 이제 내부 네트워크를 설정할 것이다.
- 이름은 아무렇게 한다.
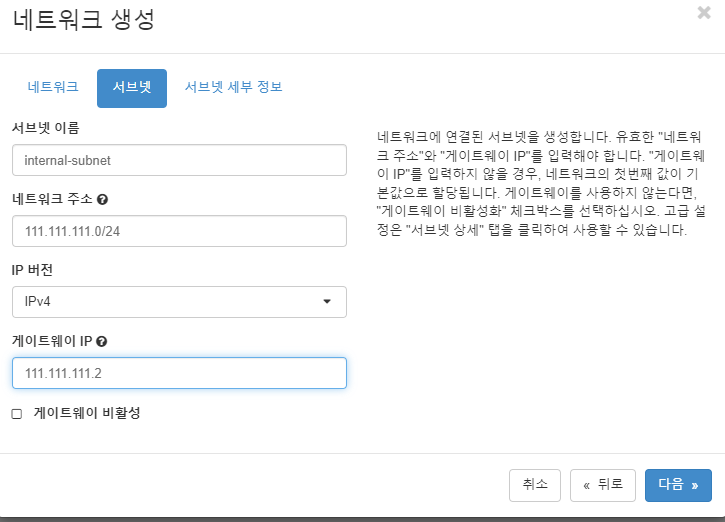
- 서브넷 이름도 마찬가지로 아무렇게 하고, 네트워크 주소는 가상환경 200.~~ ip를 쓰는 가상환경의 가상환경이기 때문에 주소를 자신이 쓰고 싶은거 아무거나 대역을 설정해서 써준다.
- 게이트웨이는 자신이 설정한 대역대에 맞게 설정해준다.
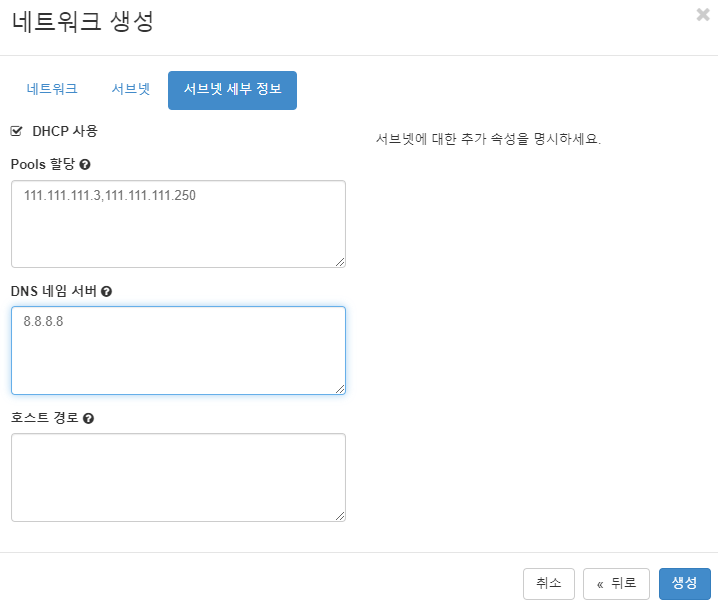
- pool 할당을 위와 같이 해주고 생성
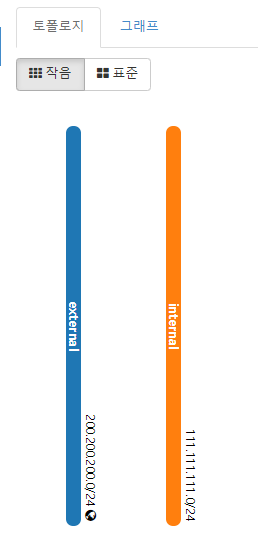
- 둘이 연결이 안되어있음.
- 외부랑 연결을 해줘야 다운 같은 것을 받기 때문에, 네트워크에서 가상의 라우터를 생성해줄것임.
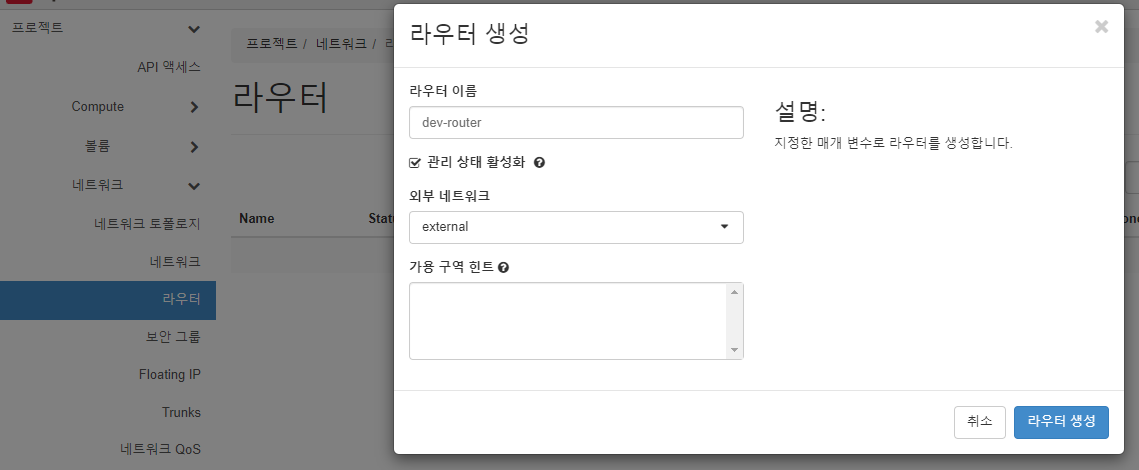
- 라우터 생성을 들어가서 이름을 아무렇게 설정해주고 외부 네트워크를 관리자로 생성한 네트워크를 클릭한다.
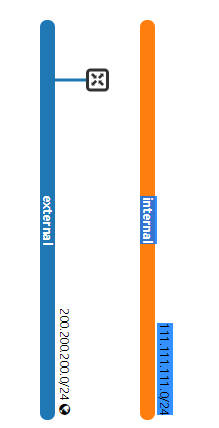
- 그러고 네트워크 토폴로지에 들어가면 위의 그림처럼 외부 네트워크에 라우터가 달린 것을 볼 수 있다.

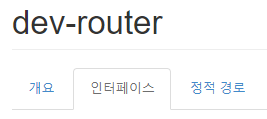
- 그리고 우리가 만들 router를 클릭해서 들어가자
- 인터페이스를 누르고 생성을 눌러서 우리의 내부 네트워크와 연결을 해주자!
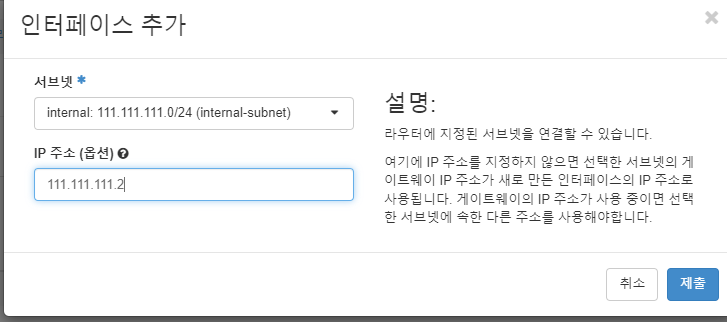
- 위의 그림처럼 설정을 해준다면??
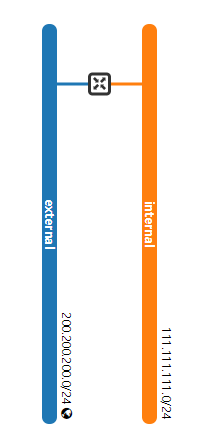
- 라우터가 외부 네트워크와 내부 네트워크를 연결해준 것을 볼 수 있다.
관리자 계정
- 관리자가 따로 설정을 해놔야 사람들이 쓸 수 있다.
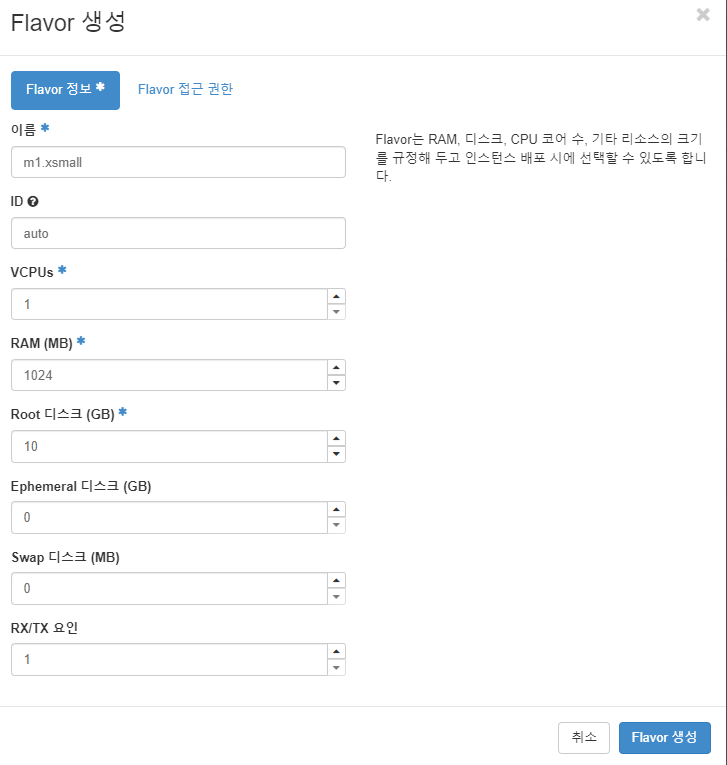
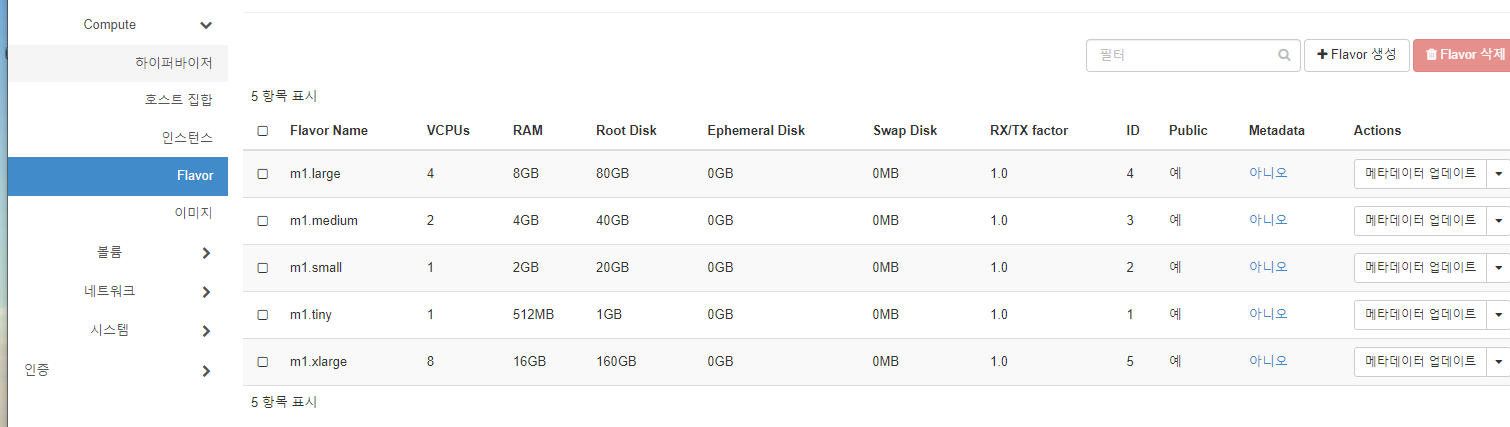
- 새로운 flavor를 생성하자.
- 해당 사양만큼 쓸 수 있게 설정해주는 것이다.
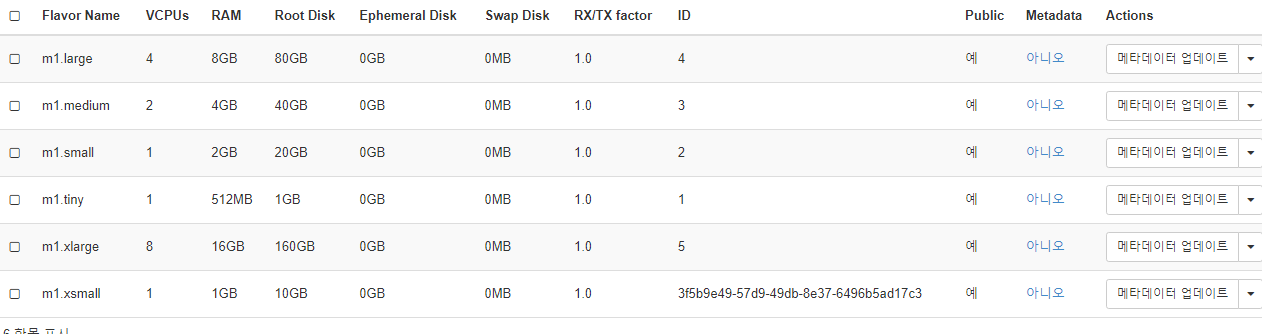
- 생성된 것을 확인할 수 있다.
이미지 등록
- 관리자가 이미지 탭으로 가서 이미지를 등록해주면 전체적으로 다 쓸 수 있는 이미지를 설정해 주는 것이다.
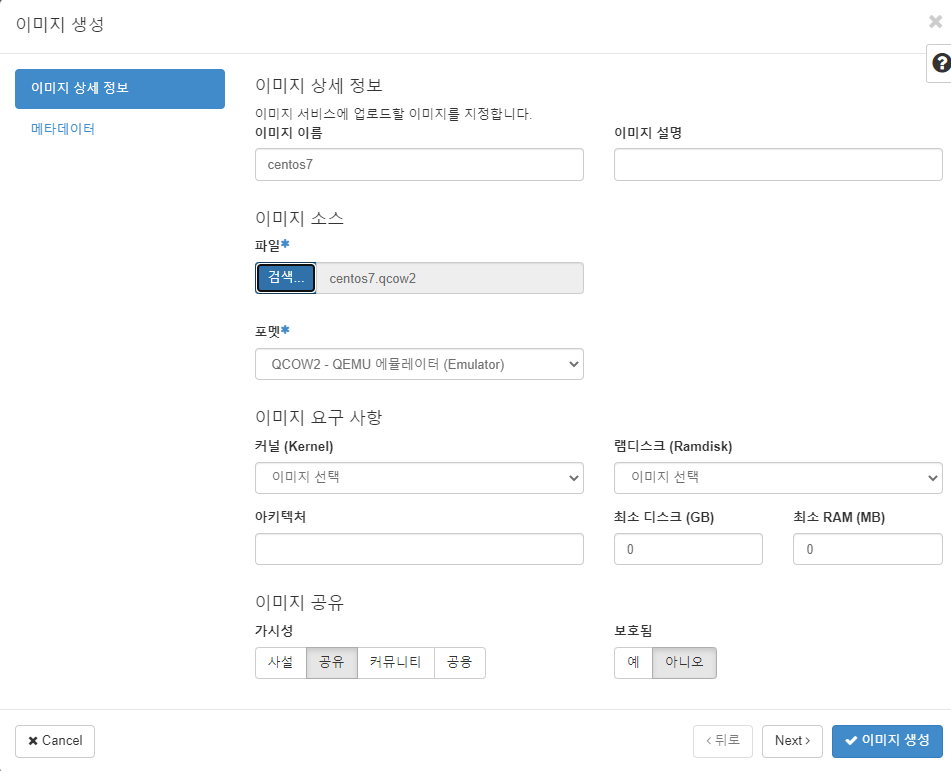
- 위의 그림처럼 설정해준다.
- 파일은 이미지 파일 커스텀 설정 <- 해당 게시글에 들어가서 centos 7 을 세팅해서 가져오도록 하자!

- 생성을 누르면 사이즈가 너무 커서 오류가 난다.

- filezilla를 이용해 직접 이미지 파일을 root 폴더에 넣어준다.
- 물론 controll 노드에 넣어준다.
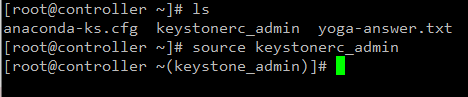
- source 명령어로 keystonerc_admin 실행
- 그러면 프롬포트가 바뀌게 된다.
- 이렇게 되면 명령어로 클라우드를 관리할 수 있다!!
- openstack image create --disk-format qcow2 --public --file ./centos7.qcow2 centos7
- 위의 명령어를 입력해서 image를 쉘에서 직접 만들어주자.
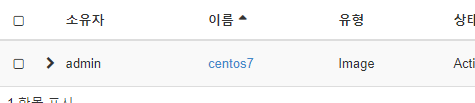
- 그 후, 대쉬보드에 들어가서 이미지를 확인하면 만들어져있는것을 확인할 수 있다.
인스턴스 생성 (일반 사용자)
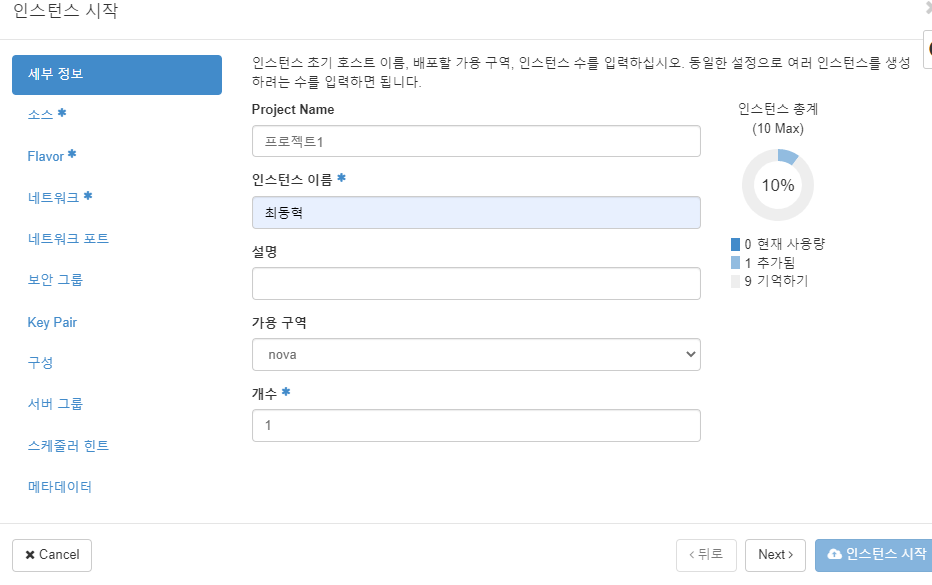
- admin 계정을 로그아웃 하고 아까 만든 사용자 계정으로 로그인 해서 인스턴스 생성을 누르자.
이미지 선택
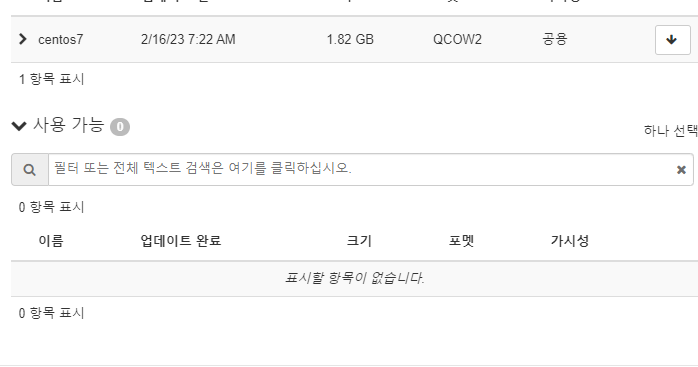
- 소스는 아까 우리가 올린 centos7을 위로 올려준다.
볼륨 크기 선택
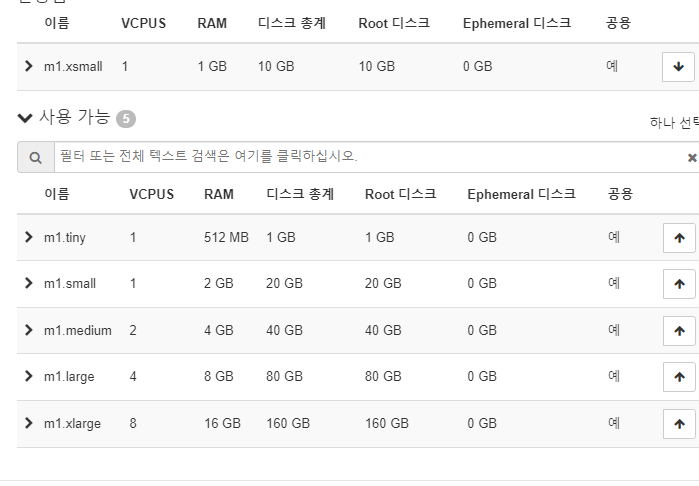
- flavor도 아까 만든 xsmall을 위로 올려준다.
네트워크 선택
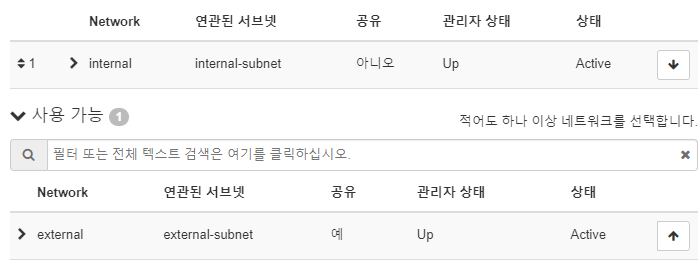
- 네트워크는 internal로 설정해준다.
키 페어 생성
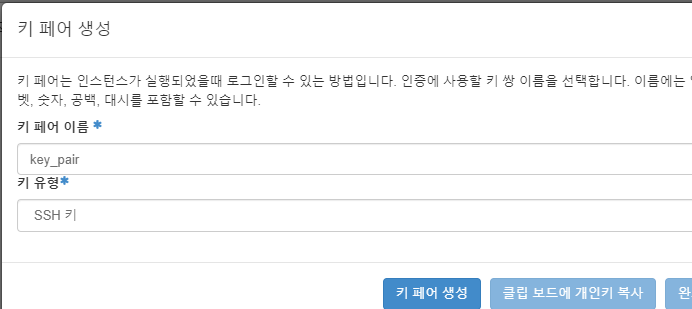
- 키 페어는 ssh 키로 생성해준다.
- 복사해서 메모장으로 로컬에 저장해놓도록 하자.
- aws에서는 ppk와 pem이 있었는데, 둘다 암호를 저장해둔건데 생긴게 다른 것이다. ppk가 putty 클라이언트에서 사용하고, pem은 openssh 클라이언트 프로그램에서 사용하는 키 형식이다.
- openstack에서는 pem으로 줘서 우리가 ppk로 변환시켜줘야한다.
키 변환
-
pem 타입을 ppk 타입으로
-
변환해주는 파일에 들어가서

- 클릭 후 다운로드

- Load 버튼 클릭
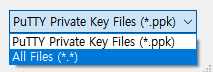
- 오른쪽 밑에 확장자를 All Files로 변경 후 저장해둔 key_pair 파일 클릭

- save priavte key 클릭 후 로컬 컴퓨터에 저장
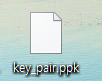
- ppk 형식으로 저장된 것을 확인할 수 있다.
인스턴스 생성

- 일단 인스턴스 생성을 누르자.
- 엄청 느리다.. 다 될 때까지 기다려야 한다.
외부 IP 할당

- 생성된 인스턴스 가장 오른쪽에 Actions가 있다. 아래 화살표 클릭
- 유동 IP 연결 -> +버튼 -> IP 할당 클릭 -> 연결
방화벽 설정
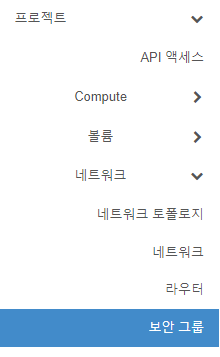
- 프로젝트 -> 네트워크 -> 보안그룹

- 가장 오른쪽에 규칙관리 클릭
- 그리고 규칙 추가 클릭

- 규칙으로 ssh 추가해주고 추가 버튼 클릭
putty로 접속
- 우리가 생성한 key_pair의 ppk 파일이 최신 버전이여서 가장 최신버전의 putty를 설치해야 한다.
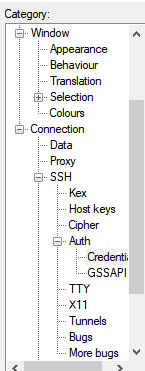
- Connection -> SSH -> Auth -> Gredentials에 들어간다.

-
private key 파일을 넣는 곳에 내 로컬에 저장되어 있는 ppk파일을 불러온다.
-
그 후, 위에서 할당한 ip 주소를 session에 넣고 접속하면 우리가 생성한 인스턴스로 접속이 된다!

항상 성장하는 개발자 최동혁입니다.