변환의 종류
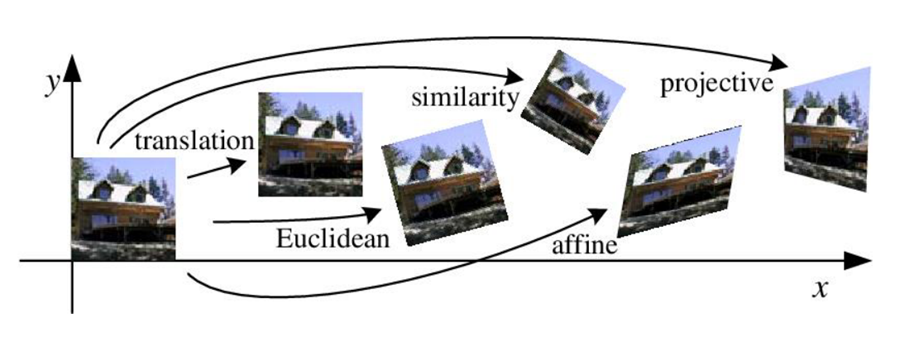
Translation :
이동변환, 크기 및 각도가 보존
Euclidean (Translation + Rotation) :
이동변환에 회전변환이 추가됨, 크기 및 각도가 보존
Similarity (Euclidean + Scaling) :
유클리디안 변환에 크기변환이 추가됨, 크기는 변하고 각도는 보존
Affine :
이동, 회전, Scale, 반전까지 포함된 변환, 3개의 점을 기준으로 선의 수평성을 유지하며 변환한다
Perspective :
affine 변환에서 선의 수평성 또한 유지하지 않으며, 4개의 점을 기준으로 변환한다.
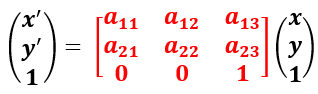
행렬 연산을 통한 변환
Affine transformation Matrix (2x3) DOF 6 (6개의 자유도 즉, 6개의 변수)
6개의 자유도를 가진 행렬로 구하기 위해 3개의 방정식이 필요하다.
아래 그림은 편한 이해를 위해 행렬을 확장하여 나타냈다.
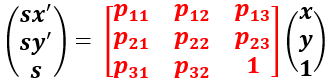
Perspective transformation Matrix (3x3) DOF 8 (8개의 자유도 즉, 8개의 변수)
8개의 자유도를 가진 행렬로, 구하기 위해 4개의 방정식이 필요하다.
예제 코드
import cv2
import numpy as np
src = cv2.imread("D:\dev\wego-project\erp_udp/bookcode\lena512.bmp", 1)
height, width, channel = src.shape
# 변환할 좌표와 목적 좌표를 순서에 맞게 정의
srcPoint = np.array([[300, 200], [400, 200], [500, 500], [200, 500]], dtype=np.float32)
dstPoint = np.array([[0, 0], [width, 0], [width, height], [0, height]], dtype=np.float32)
# affine transformation matrix 구하기 (2 x 3) 행렬
a_matrix = cv2.getAffineTransform(srcPoint[:3],dstPoint[:3])
a_matrix_inv = cv2.getAffineTransform(dstPoint[:3],srcPoint[:3])
# perspective transformation matrix 구하기 (3 x 3) 행렬
p_matrix = cv2.getPerspectiveTransform(srcPoint, dstPoint)
# 각 transformation matrix 구조와 값 확인
print(f"affine matrix {a_matrix.shape}\n{a_matrix}\n")
print(f"perspective matrix {p_matrix.shape}\n{p_matrix}\n")
# 각 transformation matrix 원본에 적용
a_dst = cv2.warpAffine(src, a_matrix, (width, height))
p_dst = cv2.warpPerspective(src, p_matrix, (width, height))
# affine 변환시 사용된 src좌표 직접 변환
for point in srcPoint[:3]:
cv2.circle(src,(point).astype(int),10,[255,0,0],-1)
# 행렬 연산을 위해 마지막항 1추가 (2, ) -> (3, )
ap =(np.append(point,1))
# 행렬 연산 A(2x3)*src(3x1) = (2x1)
a_point = (np.matmul(a_matrix, ap))
print(f"affine transformation : \n{a_matrix} x {ap} = {a_point}\n")
cv2.circle(a_dst,(a_point).astype(int),10,[255,0,0],-1)
# 변환된 좌표를 역행렬을 연산하여 원래 좌표로 변환
bp = (np.append(dstPoint[3],1)).T
b_point = np.matmul(a_matrix_inv, bp)
cv2.circle(src,(b_point.T).astype(int),8,[255,0,0],3)
# perspective 변환시 사용된 src좌표 직접 변환
for point in srcPoint:
cv2.circle(src,(point).astype(int),5,[0,255,0],-1)
pp = (np.append(point,1))
p_point = (np.matmul(p_matrix, pp))
print(f"perspective transformation : \n{p_matrix} x {pp} = {p_point}")
# row 3을 1로 맞춰주기 위해 행렬을 row3의 값으로 나눔
p_point /= p_point[2]
print(f"\n = {p_point}\n")
# row 3의 값을 삭제
p_point = np.delete(p_point, 2)
cv2.circle(p_dst,(p_point).astype(int),10,[0,255,0],-1)
cv2.imshow("src",src)
cv2.imshow("affine transformation", a_dst)
cv2.imshow("perspective transformation", p_dst)
cv2.waitKey()
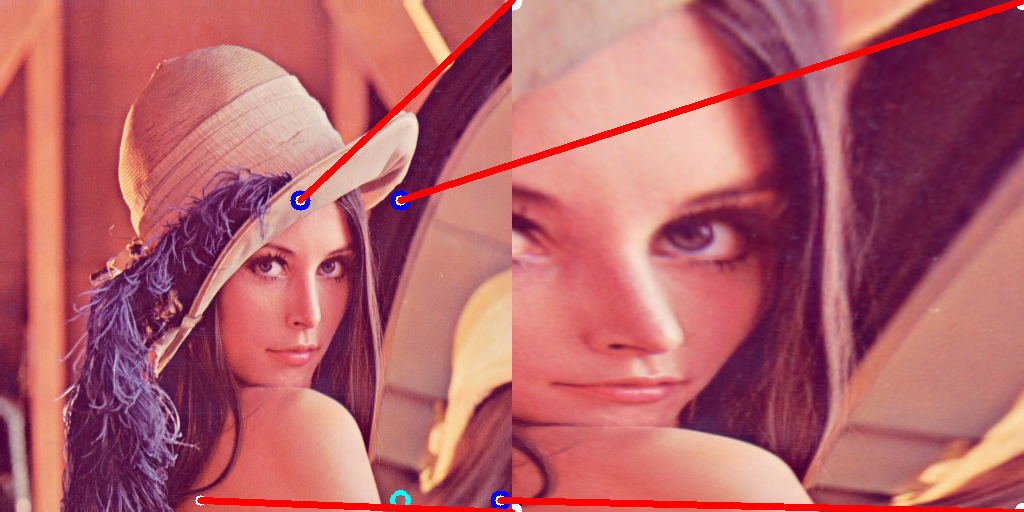
cv2.destroyAllWindows()결과
Affine
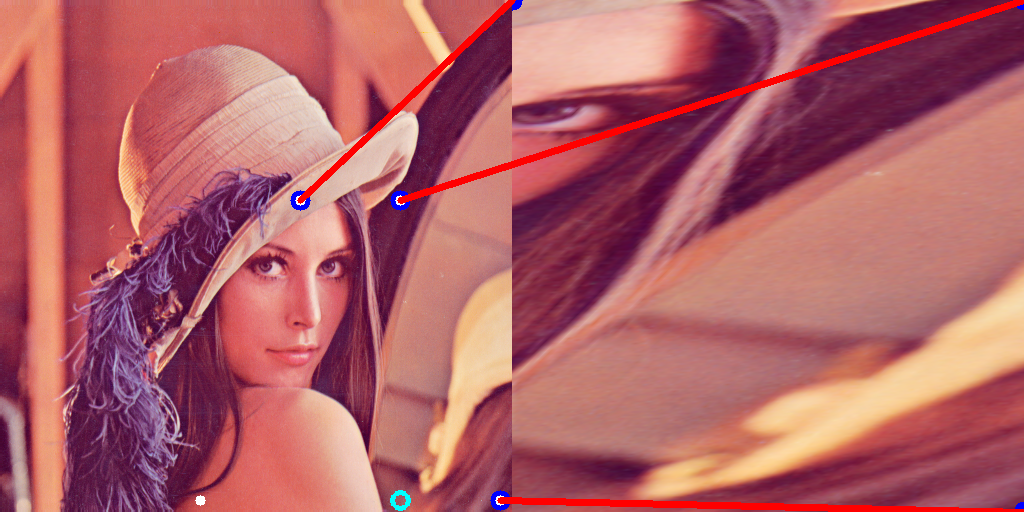
3개의 점을 기준으로 변환 평행성을 유지하며 변환

민트색 점이 평행성을 유지하기위해 3개의 점의 기준에 의해 설정된 점이다.

파란색점 3개 민트색 1개, 4개의 점 안의 영역을 원본이미지 사이즈로 좌표변환 하여 변환 한다
Perspective
4개의 점을 기준으로 변환, 흰색점 4개 안의 영역을 원본이미지 사이즈로 좌표변환 하여 변환
Autonomous driving vision