1. JDBC를 이용하여 MySQL의 BURGERS 테이블을 조회해보자.
JDBC 실행 순서별 설명
- Class.forName() 메서드를 이용해서 JDBC 드라이버를 로딩
Class.forName("com.mysql.cj.jdbc.Driver");- 데이터 베이스 연결
String url = "jdbc:mysql://localhost:3306/BURGERS?serverTimezone=UTC"; //DB연결 (로컬호스트 뒤에 연결 할 DB명)
			String user = "아이디"; //mysql 워크벤치 아이디
String pass = "비밀번호"; //mysql 워크벤치 비밀번호- Connection 객체 생성으로 계정 연결
Connection con = DriverManager.getConnection(url, user, pass);- DB와 연결된 con 객체로 부터 Statement 객체 획득.
Statement stmt = con.createStatement();- SQL문 실행 및 결과처리
ResultSet result = stmt.executeQuery("select * from BURGER");

				while(result.next()) {

					// 컬럼 이름을 이용해서 데이터를 뽑는게 더 안전하다.
					// getString("컬럼이름")
					int id = Integer.parseInt(result.getString("id"));
					String name = result.getString("name");
					int price = Integer.parseInt(result.getString("price"));
					int kcal = Integer.parseInt(result.getString("kcal"));

					System.out.println("번호:" + id);
					System.out.println("메뉴명:" + name);
					System.out.println("가격:" + price);
					System.out.println("칼로리:" + kcal);
					System.out.println();


}- JDBC 연결 과정에서 필요했던 객체들을 close
public static void close(Connection conn) {
		if(conn != null) {
			try {
				conn.close();
			} catch (SQLException e) {
				// TODO Auto-generated catch block
				e.printStackTrace();
			}
		}

	}


	public static void close(Statement conn) {
		if(conn != null) {
			try {
				conn.close();
			} catch (SQLException e) {
				// TODO Auto-generated catch block
				e.printStackTrace();
			}
		}

	}

	public static void close(PreparedStatement conn) {
		if(conn != null) {
			try {
				conn.close();
			} catch (SQLException e) {
				// TODO Auto-generated catch block
				e.printStackTrace();
			}
		}

	}

	public static void close(ResultSet rs) {
		if (rs != null) { try { rs.close(); } catch (SQLException e) { e.printStackTrace(); } }
	}
전체 코드
import java.sql.Connection;
import java.sql.DriverManager;
import java.sql.PreparedStatement;
import java.sql.ResultSet;
import java.sql.SQLException;
import java.sql.Statement;

public class dbtest2 {

	public static void main(String[] args) {
		// TODO Auto-generated method stub
		System.out.println("MySQL연결");


		// 8.x 버전
		try {
			Class.forName("com.mysql.cj.jdbc.Driver"); // Class.forName() 메서드를 이용해서 JDBC 드라이버를 로딩
			String url = "jdbc:mysql://localhost:3306/BURGERS?serverTimezone=UTC";   //DB연결
			String user = "아이디";  //mysql 워크벤치 아이디
			String pass = "비밀번호"; //mysql 워크벤치 비밀번호

			// 데이터베이스 실제 연결을 도와주는 클래스
//			Connection con = DriverManager.getConnection(url, user, pass);
			try {
				Connection con = DriverManager.getConnection(url, user, pass);

				if(con != null) {
					System.out.println("DB연결 성공!");
				}


//				//DB와 연결된 conn 객체로 부터 Statement 객체 획득.
//				//내가 데이터베이스에게 질의를 할 수 있다.
//				Statement stmt = con.createStatement();
//

				Statement stmt = con.createStatement(); //DB와 연결된 con 객체로 부터 Statement 객체 획득.

				//조회 select
				// 쿼리문이 데이터를 가지고 온다. 객체 형식으로
				// next() 다음 데이터가 있으면 true, 없으면 false
				ResultSet result = stmt.executeQuery("select * from BURGER");

				while(result.next()) {

					// 컬럼 이름을 이용해서 데이터를 뽑는게 더 안전하다.
					// getString("컬럼이름")
					int id = Integer.parseInt(result.getString("id"));
					String name = result.getString("name");
					int price = Integer.parseInt(result.getString("price"));
					int kcal = Integer.parseInt(result.getString("kcal"));

					System.out.println("번호:" + id);
					System.out.println("메뉴명:" + name);
					System.out.println("가격:" + price);
					System.out.println("칼로리:" + kcal);
					System.out.println();


				}

			} catch (SQLException e) {
				// TODO Auto-generated catch block
				e.printStackTrace();
				System.out.println("연결 에러");
			}

		} catch (ClassNotFoundException e) {
			// TODO Auto-generated catch block
			System.out.println("드라이버 로딩 에러");
			e.printStackTrace();
		}


	}

	// 데이터베이스 작업에 사용한 객체를 닫는 메서드
	public static void close(Connection conn) {
		if(conn != null) {
			try {
				conn.close();
			} catch (SQLException e) {
				// TODO Auto-generated catch block
				e.printStackTrace();
			}
		}

	}


	public static void close(Statement conn) {
		if(conn != null) {
			try {
				conn.close();
			} catch (SQLException e) {
				// TODO Auto-generated catch block
				e.printStackTrace();
			}
		}

	}

	public static void close(PreparedStatement conn) {
		if(conn != null) {
			try {
				conn.close();
			} catch (SQLException e) {
				// TODO Auto-generated catch block
				e.printStackTrace();
			}
		}

	}

	public static void close(ResultSet rs) {
		if (rs != null) { try { rs.close(); } catch (SQLException e) { e.printStackTrace(); } }
	}

}
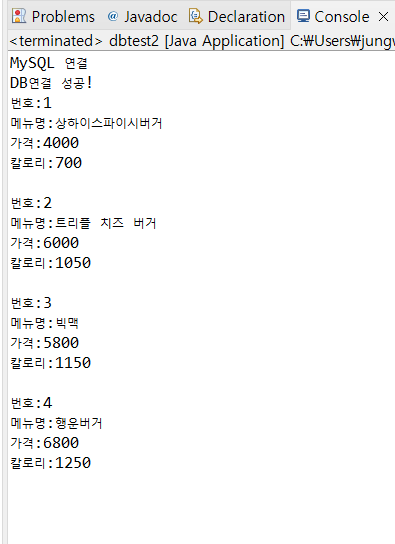
실행 결과
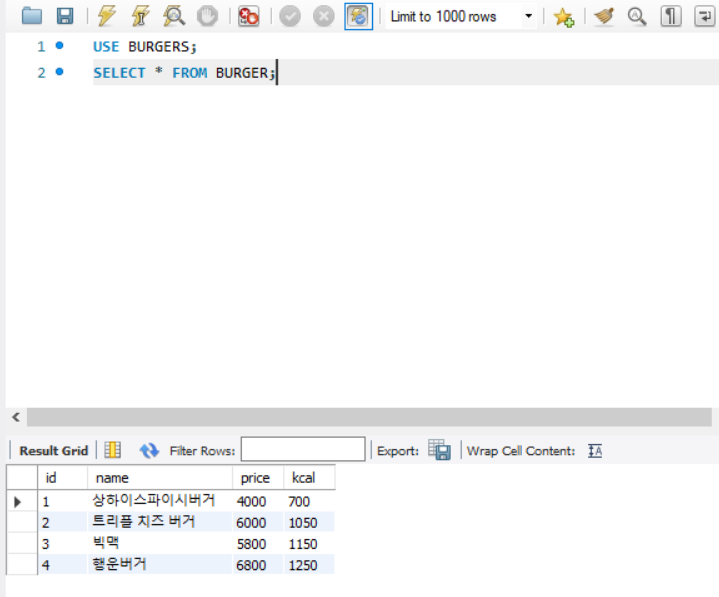
MySQL의 BURGER 테이블
JDBC로 BURGER 테이블 불러오기 성공
2. JDBC를 이용하여 MySQL의 BOOKSTORE 테이블을 조회해보자.
전체 코드
import java.sql.Connection;
import java.sql.DriverManager;
import java.sql.PreparedStatement;
import java.sql.ResultSet;
import java.sql.SQLException;
import java.sql.Statement;

public class dbtest3
{

	public static void main(String[] args) {
		// TODO Auto-generated method stub
		System.out.println("MySQL 연결");

		// - Class.forName() 메서드를 이용해서 JDBC 드라이버를 로딩


		// 8.x 버전
		try {
			Class.forName("com.mysql.cj.jdbc.Driver"); // Class.forName() 메서드를 이용해서 JDBC 드라이버를 로딩
			String url = "jdbc:mysql://localhost:3306/BOOKSTORE?serverTimezone=UTC";   //DB연결
			String user = "아이디";  //mysql 워크벤치 아이디
			String pass = "비밀번호"; //mysql 워크벤치 비밀번호

			// 데이터베이스 실제 연결을 도와주는 클래스
//			Connection con = DriverManager.getConnection(url, user, pass);
			try {
				Connection con = DriverManager.getConnection(url, user, pass);

				if(con != null) {
					System.out.println("DB연결 성공!");
				}


//				//DB와 연결된 conn 객체로 부터 Statement 객체 획득.
//				//내가 데이터베이스에게 질의를 할 수 있다.
//				Statement stmt = con.createStatement();
//
				Statement stmt = con.createStatement(); //DB와 연결된 con 객체로 부터 Statement 객체 획득.

				//조회 select
				// 쿼리문이 데이터를 가지고 온다. 객체 형식으로
				// next() 다음 데이터가 있으면 true, 없으면 false
				ResultSet result = stmt.executeQuery("select * from BOOK");

				while(result.next()) {

					// 컬럼 이름을 이용해서 데이터를 뽑는게 더 안전하다.
					// getString("컬럼이름")
					int BOOKID = Integer.parseInt(result.getString("BOOKID"));
					String BOOKNAME = result.getString("BOOKNAME");
					String PUBLISHER = result.getString("PUBLISHER");
					int PRICE = Integer.parseInt(result.getString("PRICE"));

					System.out.println("BOOKID:" + BOOKID);
					System.out.println("BOOKNAME:" + BOOKNAME);
					System.out.println("PUBLISHER:" + PUBLISHER);
					System.out.println("PRICE :" + PRICE );
					System.out.println();


				}

			} catch (SQLException e) {
				// TODO Auto-generated catch block
				e.printStackTrace();
				System.out.println("연결 에러");
			}

		} catch (ClassNotFoundException e) {
			// TODO Auto-generated catch block
			System.out.println("드라이버 로딩 에러");
			e.printStackTrace();
		}


	}

	// 데이터베이스 작업에 사용한 객체를 닫는 메서드
	public static void close(Connection conn) {
		if(conn != null) {
			try {
				conn.close();
			} catch (SQLException e) {
				// TODO Auto-generated catch block
				e.printStackTrace();
			}
		}

	}


	public static void close(Statement conn) {
		if(conn != null) {
			try {
				conn.close();
			} catch (SQLException e) {
				// TODO Auto-generated catch block
				e.printStackTrace();
			}
		}

	}

	public static void close(PreparedStatement conn) {
		if(conn != null) {
			try {
				conn.close();
			} catch (SQLException e) {
				// TODO Auto-generated catch block
				e.printStackTrace();
			}
		}

	}

	public static void close(ResultSet rs) {
		if (rs != null) { try { rs.close(); } catch (SQLException e) { e.printStackTrace(); } }
	}

}
실행 결과
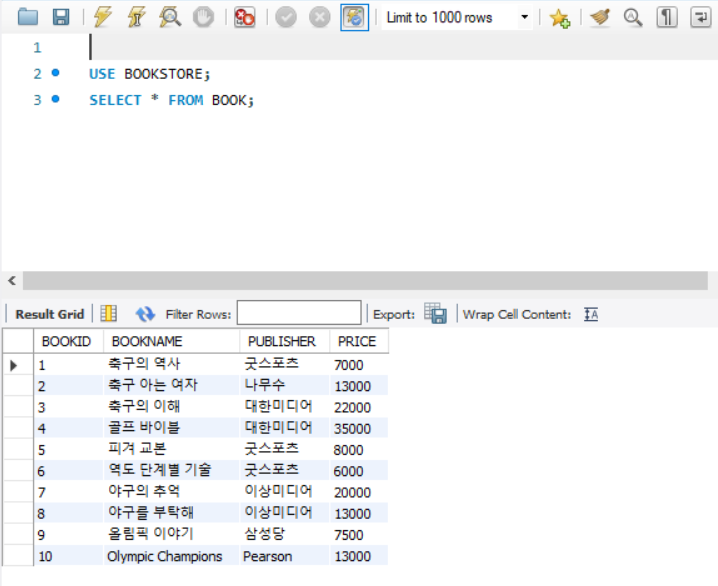
MySQL의 BOOK 테이블
JDBC로 BOOK 테이블 불러오기 성공

