
🛍️ 쇼핑몰 dummy data
https://fakestoreapi.com
위 사이트에서 읽어올 것이다.
⚡️ React-query 사용하기
https://tanstack.com/query/v3/docs/react/quick-start
react-query 다운로드
yarn add react-queryreact-query dev-tool 사용
import { ReactQueryDevtools } from 'react-query/devtools'▼ src/queryClient.ts
import {
  useQuery,
  useMutation,
  useQueryClient,
  QueryClient,
  QueryClientProvider,
} from "react-query";

type AnyOBJ = { [key: string]: any };

export const getClient = (() => {
  let client: QueryClient | null = null;
  return () => {
    if (!client) client = new QueryClient({});
    return client;
  };
})();

const BASE_URL = "https://fakestoreapi.com";

export const fetcher = async ({
  method,
  path,
  body,
  params,
}: {
  method: "GET" | "POST" | "PUT" | "DELETE" | "PATCH";
  path: string;
  body?: AnyOBJ;
  params?: AnyOBJ;
}) => {
  try {
    const url = `${BASE_URL}${path}`;
    const fetchOptions: RequestInit = {
      method,
      //   headers: {
      //     "Content-Type": "application/json",
      //     "Access-Control-Allow-Origin": BASE_URL,
      //   },
    };
    const res = await fetch(url, fetchOptions);
    const json = await res.json();
    return json;
  } catch (err) {
    console.error(err);
  }
};

export const QueryKeys = {
  PRODUCTS: "PRODUCTS",
};
no queryclient set 오류
error: no queryclient set, use queryclientprovider to set one at usequeryclient2
강의대로 따라했는데 위와 같은 오류가 계속 났다.
구글링하고 gpt한테 질문해봐도 App을 Queryclient 태그로 감싸라는 내용이었는데, app.tsx에서도 해보고, main.tsx에서도 해봤지만 해결되지 않았다. 그러다가 강의 질문란에 나의 오류에 대한 질문을 올려놓은 것을 봤고, 강사님의 답변은 아래와 같았다.
vite-plugin-next-react-router가 업데이트되면서 좀더 편리한 방법으로 바뀌었네요. https://github.com/zoubingwu/vite-plugin-next-react-router
내용중에 이런게 있습니다.
This plugin will scan your pages folder then automatically inject code to index html, you don't have to write any other code for initial rendering, just like Next.js. There is a example project under /example/react folder. 이 플러그인은 페이지 폴더를 스캔한 다음 자동으로 코드를 삽입하여 html을 인덱싱하므로 Next.js와 마찬가지로 초기 렌더링을 위해 다른 코드를 작성할 필요가 없습니다.
현재의 app.tsx 및 main.tsx가 불필요해졌습니다.
app.tsx와 main.tsx가 의미가 없기 때문에 오류가 계속 발생하는 것이었다.
QueryClientProvider 태그로 감싸기
▼ src/pages/_layout.tsx
const Layout: React.FC = () => {
  const queryClient = getClient();
  return (
    <QueryClientProvider client={queryClient}>
      <Suspense fallback={"loading..."}>
        <Outlet />
      </Suspense>
      <ReactQueryDevtools initialIsOpen={false} />
    </QueryClientProvider>
  );
};
따라서 _layout.tsx 파일에서 QueryClientProvider 태그로 감싸도록 했다.
data 불러오기
▼ src/pages/index.tsx
const ProductList = () => {
  const { data } = useQuery(QueryKeys.PRODUCTS, () =>
    fetcher({
      method: "GET",
      path: "/products",
    })
  );
  console.log(data);
};

export default ProductList;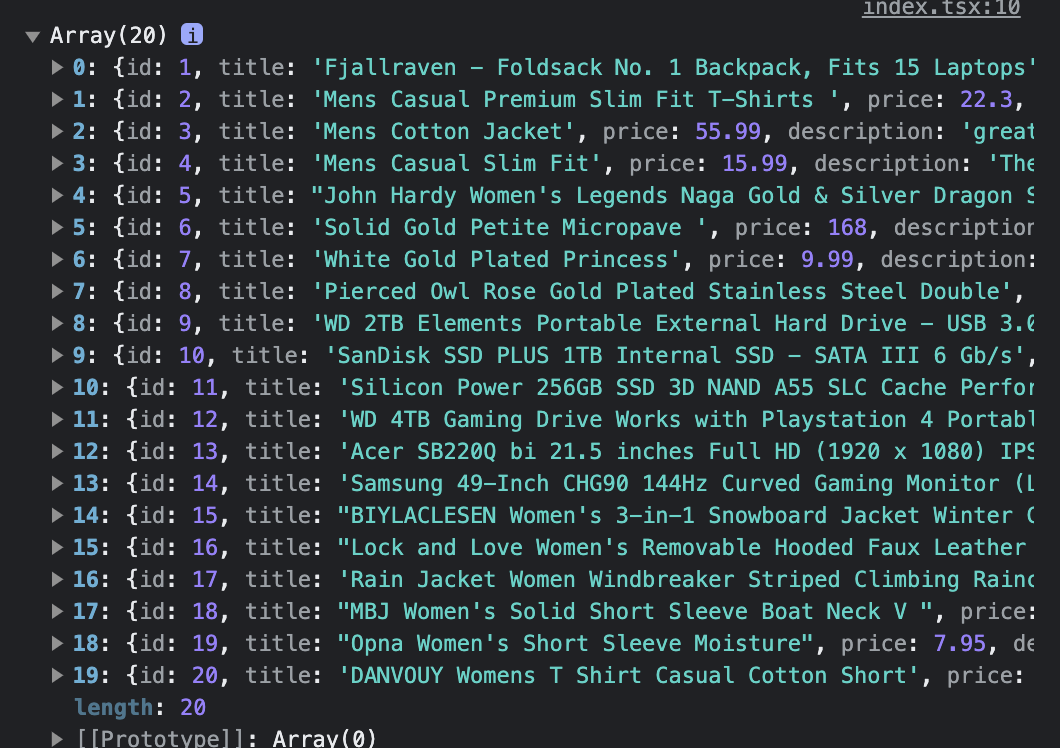
console을 확인해보면 위와 같이 data가 제대로 받아진 것을 확인할 수 있다.
⚡️ 페이지에 쇼핑 리스트 띄우기
Product type 정의
▼ src/types.ts
export type Rating = {
  rate: number;
  count: number;
};

export type Product = {
  category: string;
  description: string;
  id: number;
  image: string;
  price: number;
  rating: Rating;
  title: string;
};
ProductItem 컴포넌트 정의
▼ src/components/product/item.tsx
const ProductItem = ({
  category,
  description,
  id,
  image,
  price,
  rating,
  title,
}: Product) => (
  <li>
    <p>{category}</p>
    <p>{title}</p>
    <p>{description}</p>
    <img src={image} />
    <span>${price}</span>
    <span>{rating.rate}</span>
    <span>{rating.count}</span>
  </li>
);

export default ProductItem;
products 페이지에 상품리스트 띄우기
▼ src/pages/products.index.tsx
const ProductList = () => {
  const { data } = useQuery<Product[]>(QueryKeys.PRODUCTS, () =>
    fetcher({
      method: "GET",
      path: "/products",
    })
  );
  console.log(data);

  return (
    <div>
      <ul>
        {data?.map((product) => (
          <ProductItem {...product} key={product.id} />
        ))}
      </ul>
    </div>
  );
};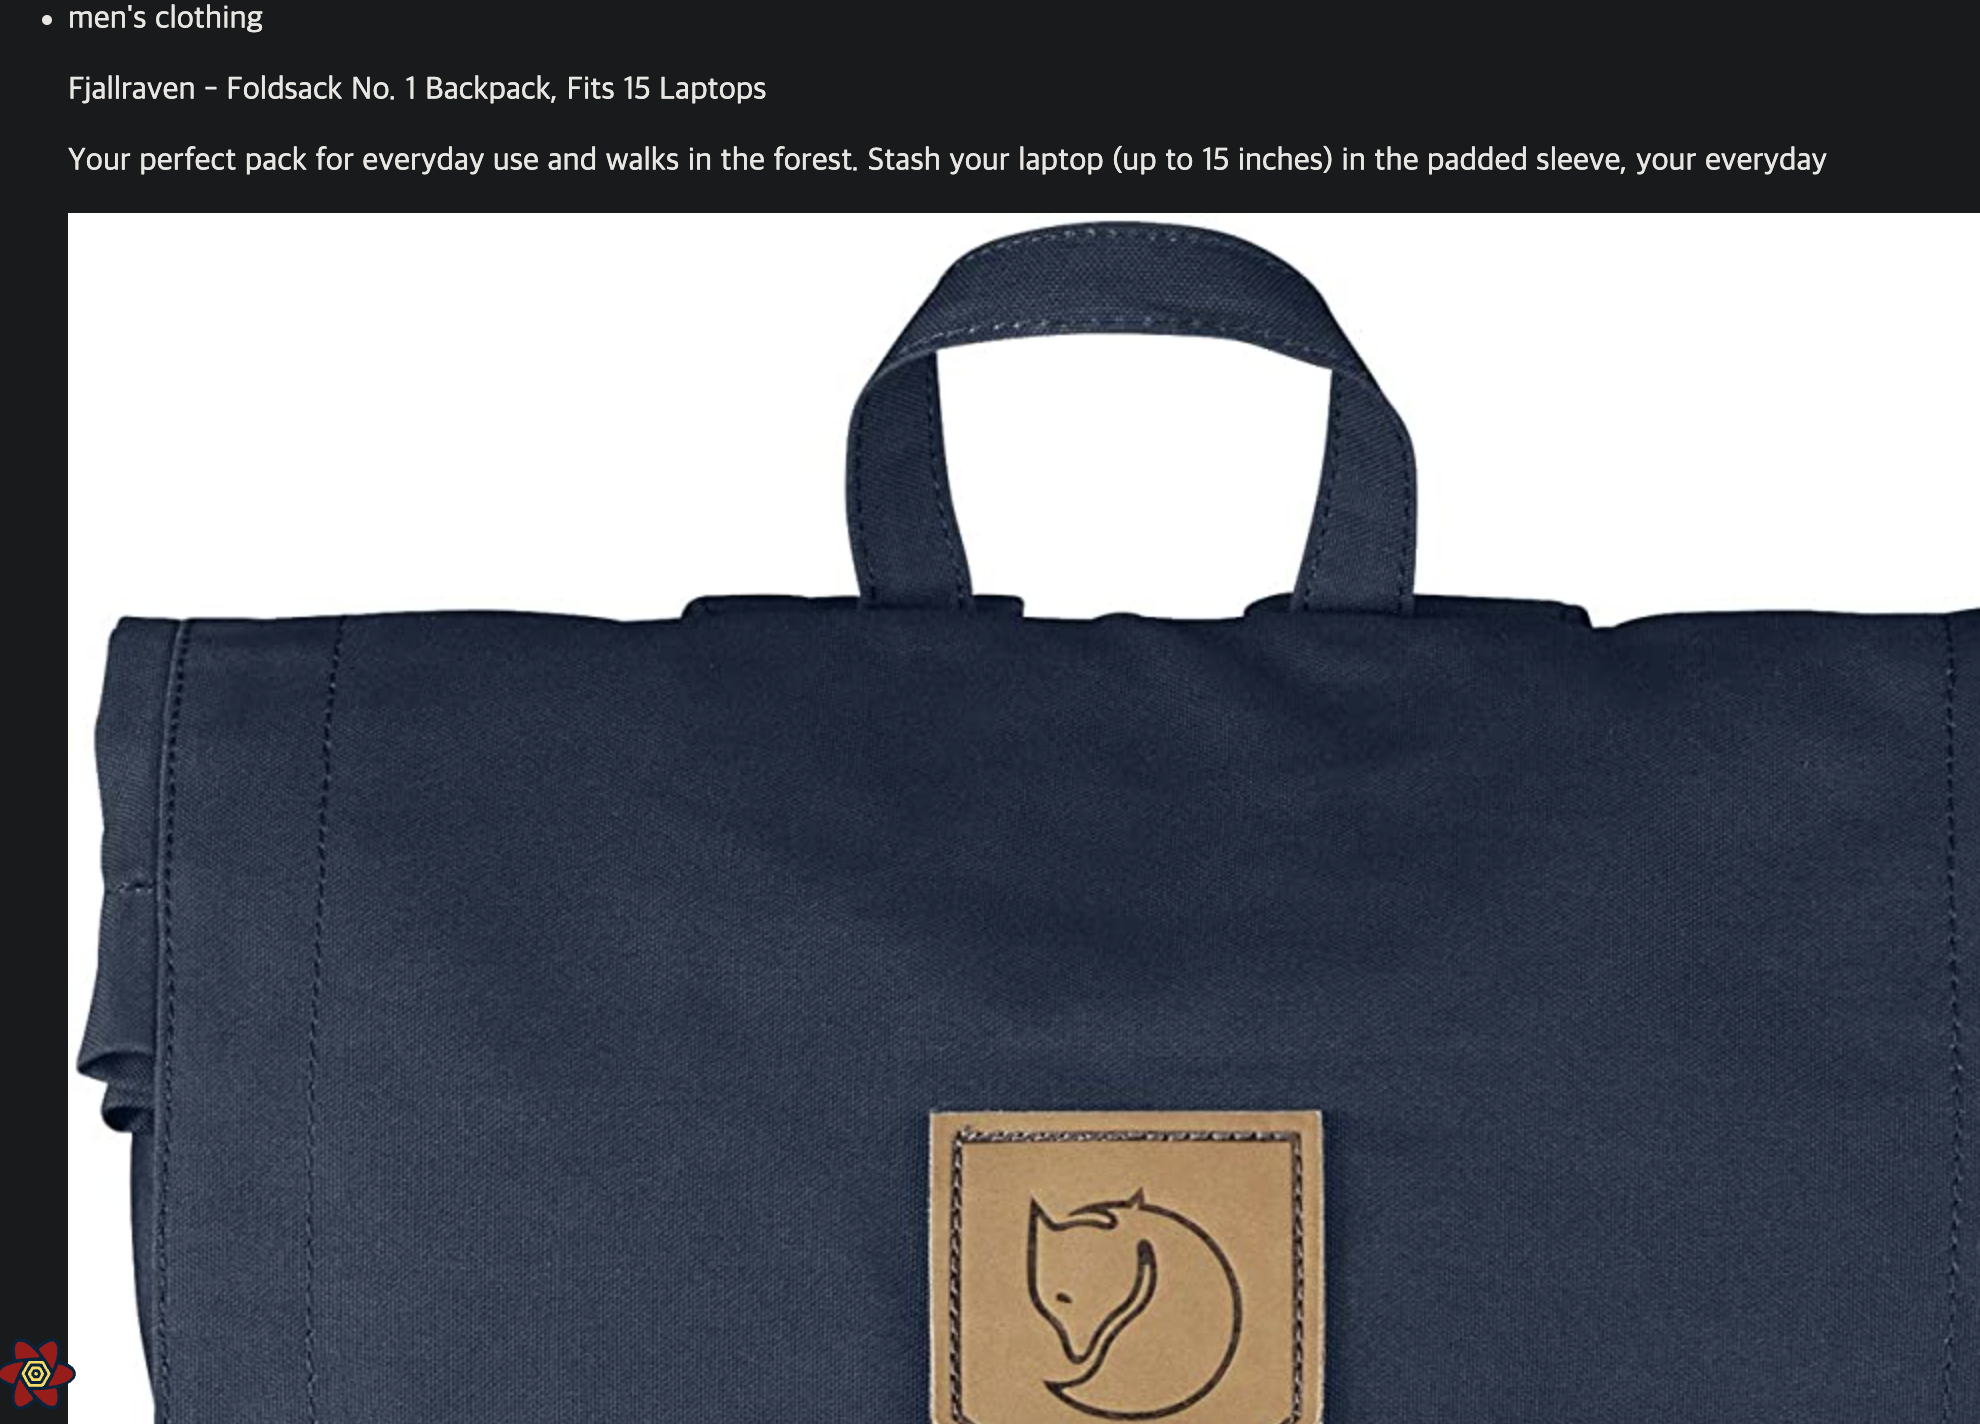
그러면 이렇게 리스트가 뜨긴한다.
이미지가 매우 크고 상품 목록을 보기 어려우므로 스타일을 적용할 것이다.
⚡️ vite에서 scss 사용하기
https://vitejs.dev/guide/features.html#css-pre-processors
scss 설치
yarn add --dev sassproducts 스타일 적용하기
product 태그들에 className을 지정한 후 스타일을 적용한다.
▼ src/scss/products.scss
.products {
  list-style: none;
  display: grid;
  grid-template-columns: repeat(3, 1fr);
  gap: 10px;
}

.product-item {
  border: 1px solid #000;
  padding: 10px;

  &_image {
    width: 100%;
  }
  &_description {
    font-size: small;
  }
}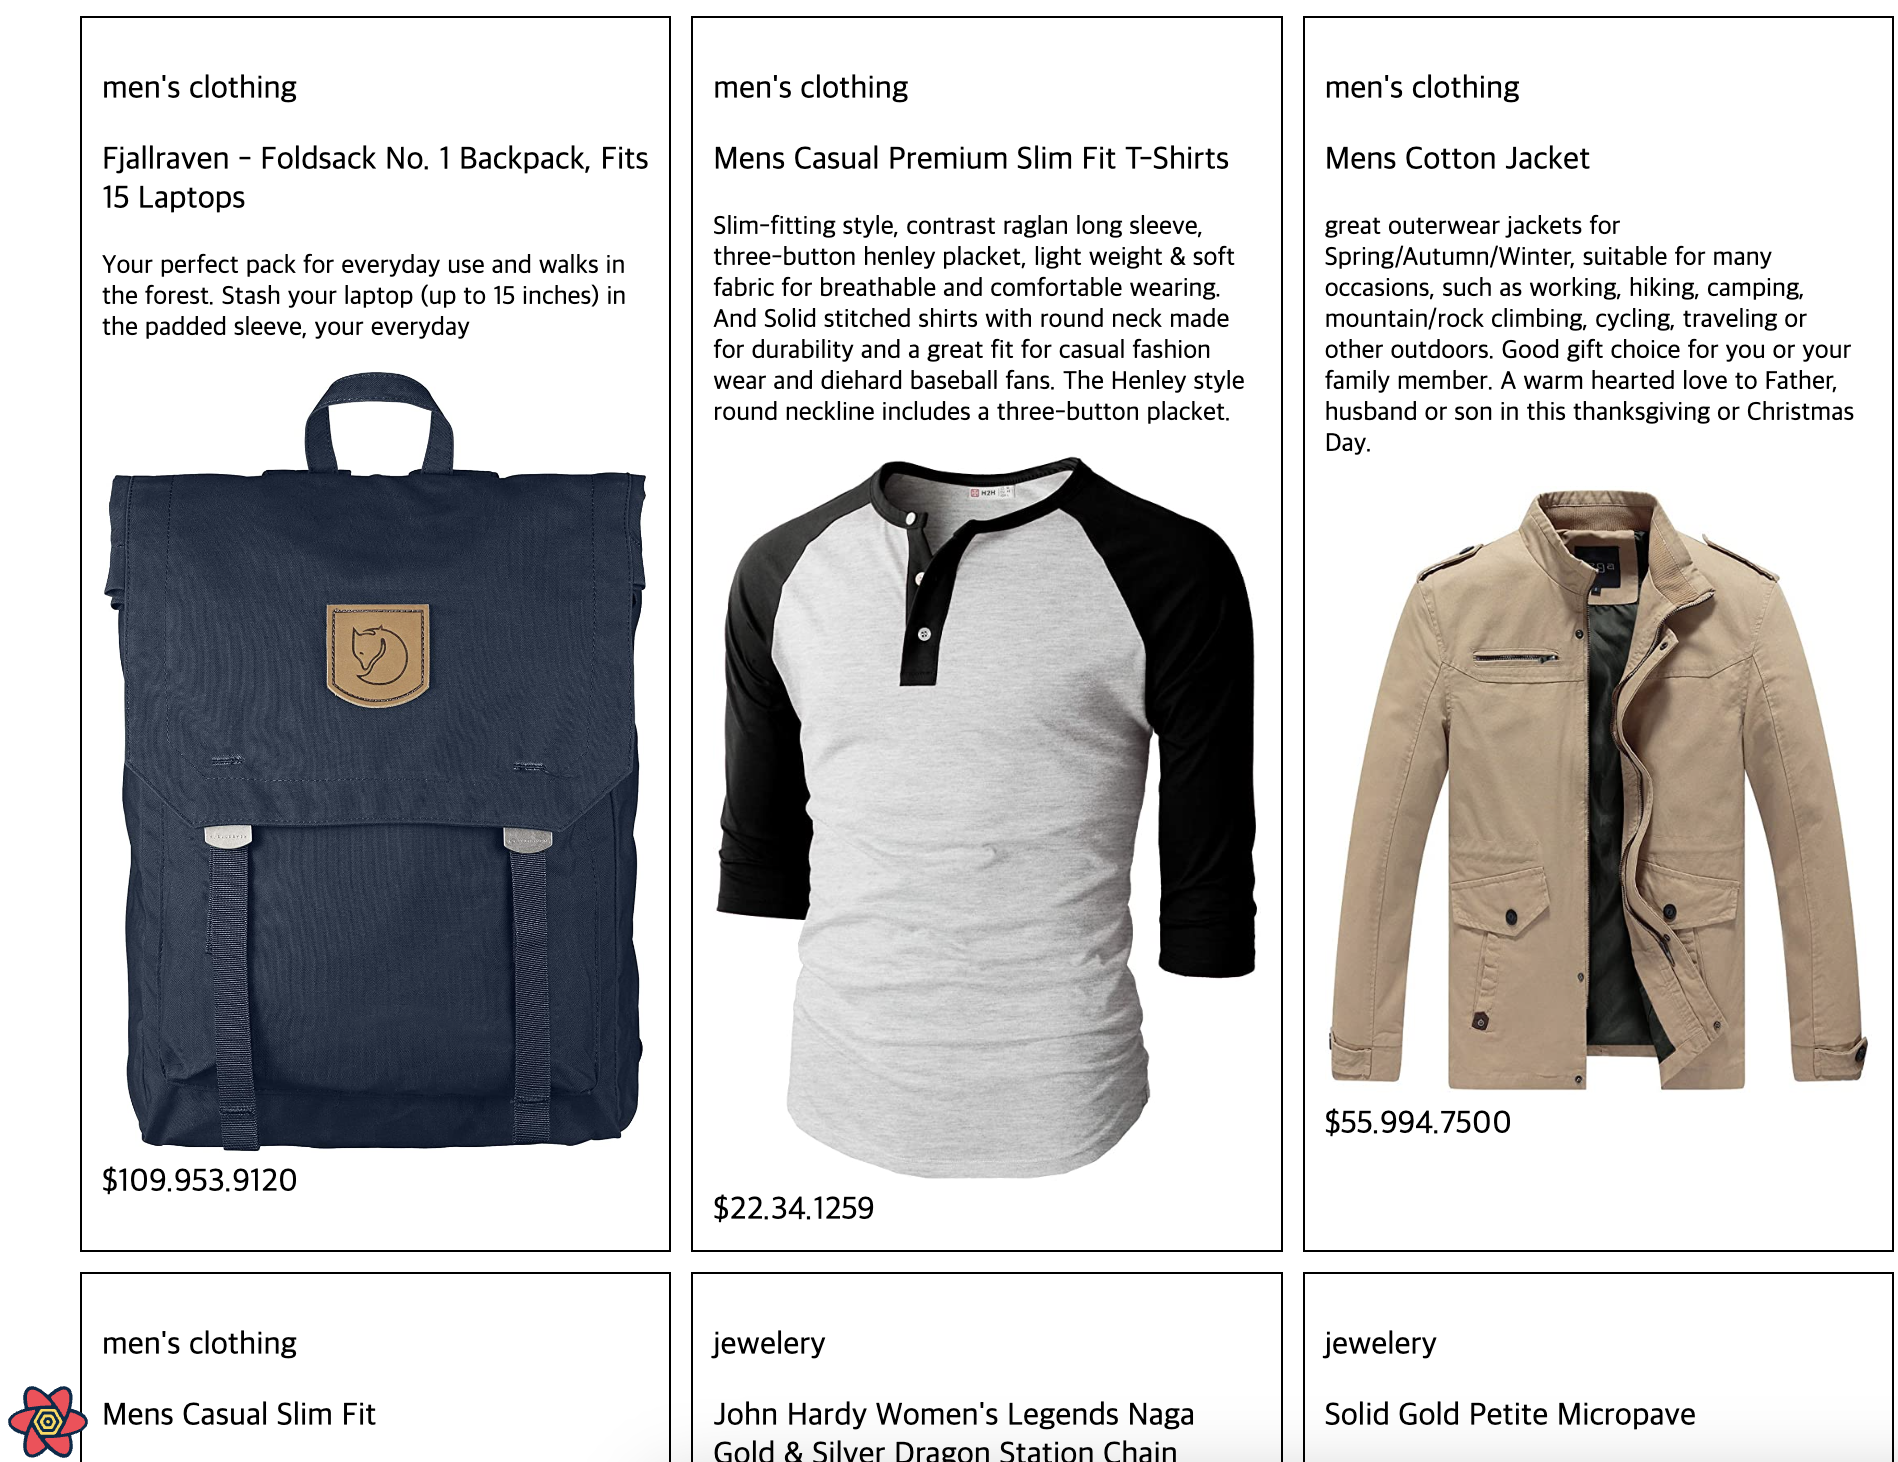
그러면 위와 같이 적용된다 !
⚡️ 상품 상세페이지로 이동하기
react-router-dom의 Link를 import하고, Link로 감싸준다.
▼ src/components/product.item.tsx
import { Link } from "react-router-dom";

...

  <li className="product-item">
    <Link to={`/products/${id}`}>
      <p className="product-item_category">{category}</p>
      <p className="product-item_title">{title}</p>
      <p className="product-item_description">{description}</p>
      <img className="product-item_image" src={image} />
      <span className="product-item_price">${price}</span>
      <span className="product-item_rating_rate">{rating.rate}</span>
      <span className="product-item_rating_count">{rating.count}</span>
    </Link>
  </li>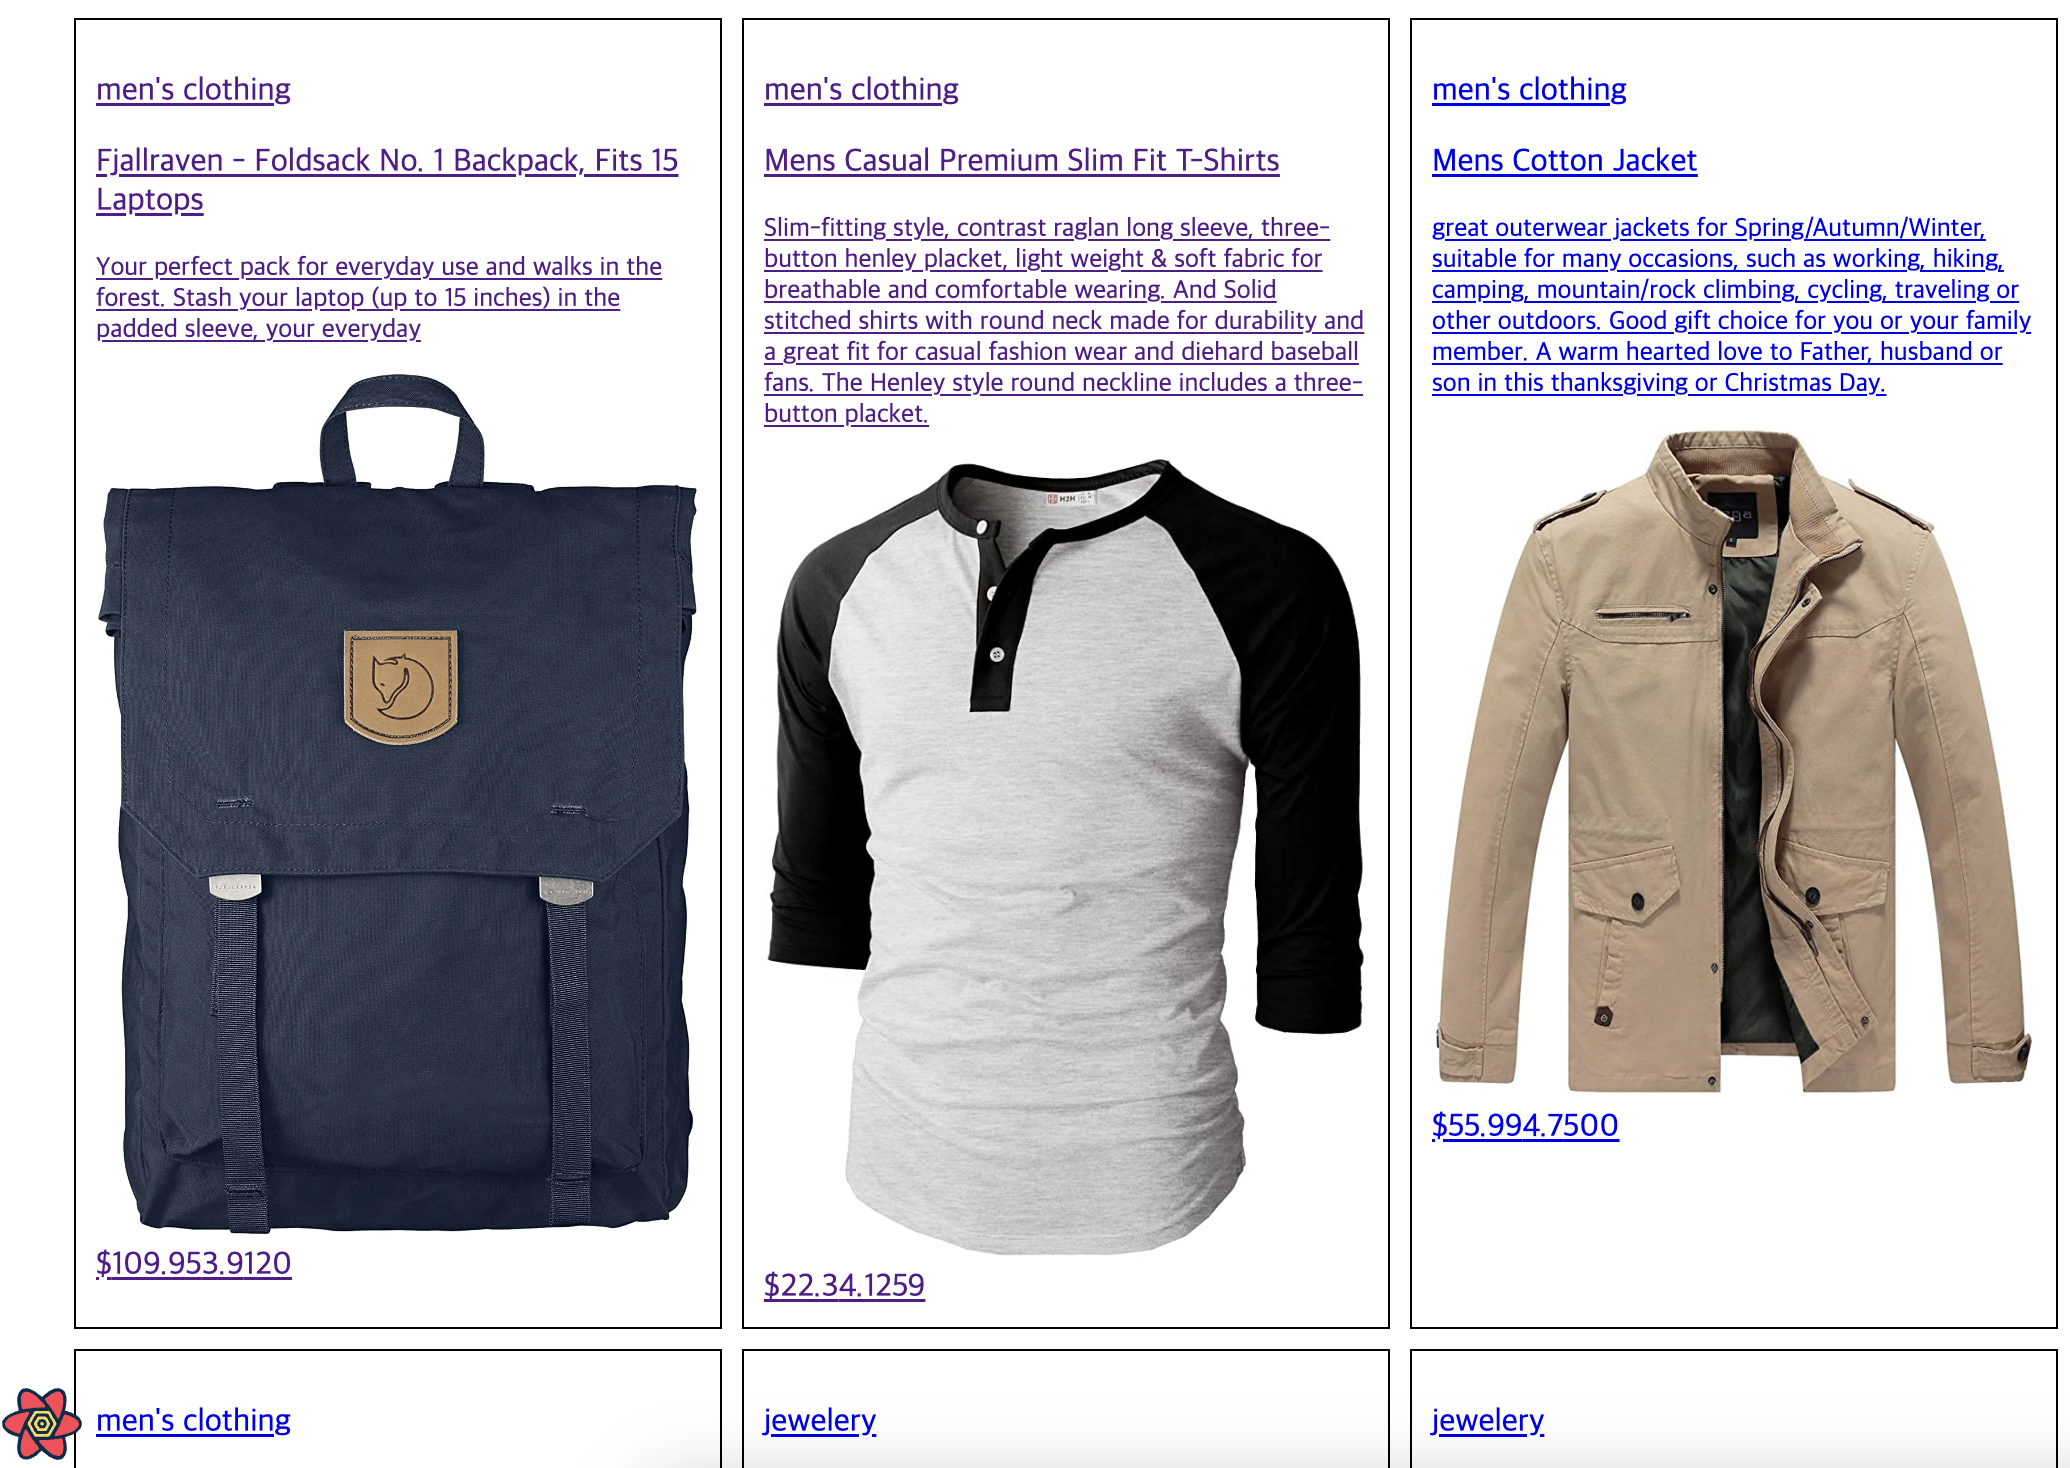
그러면 위와 같이 하이퍼링크가 표시가 생기고 각각 클릭하면 /products/id 형식으로 페이지가 이동된다.
⚡️ 상품 상세페이지 작성
▼ src/pages/products/[id].tsx
const ProductDetail = () => {
  const { id } = useParams<"id">();

  const { data } = useQuery<Product>([QueryKeys.PRODUCTS, id], () =>
    fetcher({ method: "GET", path: `/products/${id}` })
  );
  if (!data) return null;

  const { category, title, image, description, price, rating } = data;

  return (
    <div className="product-detail">
      <p className="product-detail_category">{category}</p>
      <p className="product-detail_title">{title}</p>
      <p className="product-detail_description">{description}</p>
      <img className="product-detail_image" src={image} />
      <span className="product-detail_price">${price}</span>
      <span className="product-detail_rating_rate">{rating.rate}</span>
      <span className="product-detail_rating_count">{rating.count}</span>
    </div>
  );
};
상품 목록 페이지에서 특정 상품을 클릭하면 해당하는 상세페이지로 연결된다.
⚡️ Params와 body 전달
이 부분은 좀 어렵다 .. ... 이해가 잘 안가지만.. .일단
▼ src/queryClient.ts
    if (params) {
      const searchParams = new URLSearchParams(params);
      url += "?" + searchParams.toString();
    }

    if (body) fetchOptions.body = JSON.stringify(body);
를 추가한다.
나중에 axios나 graphQL을 쓸 때 이부분만 queryClient만 수정하면 되므로 따로 뺀다.
⚡️ 상품상세 컴포넌트 분리
기존에는 [id].tsx파일에서 상세데이터를 출력했었는데 상품상세 컴포넌트 ProductDatail를 따로 분리하여 사용할 것이다.
▼ src/components/product/detail.tsx
const ProductDetail = ({
  item: { category, title, image, description, price, rating },
}: {
  item: Product;
}) => (
  <div className="product-detail">
    <p className="product-detail_category">{category}</p>
    <p className="product-detail_title">{title}</p>
    <p className="product-detail_description">{description}</p>
    <img className="product-detail_image" src={image} />
    <span className="product-detail_price">${price}</span>
    <span className="product-detail_rating_rate">{rating.rate}</span>
    <span className="product-detail_rating_count">{rating.count}</span>
  </div>
);
이후 [id].tsx 에서는 해당 컴포넌트를 호출한다.
    <div>
      <h2>상품상세</h2>
      <ProductDetail item={data} />
    </div>
결과는 이전과 동일하다.
⚡️ 쿼리 옵션 추가하기
▼ src/queryClient.ts
      client = new QueryClient({
        defaultOptions: {
          queries: {
            cacheTime: 1000 * 60 * 60 * 24,
            staleTime: 1000,
            refetchOnMount: false,
            refetchOnReconnect: false,
            refetchOnWindowFocus: false,
          },
        },
});- cacheTime
: 쿼리 결과를 캐시하는 시간을 설정한다. 이 경우 1일(24시간)로 설정되어 있으므로, 동일한 쿼리를 반복해서 호출할 때 24시간 동안 이전 결과를 캐시하여 사용 - staleTime
: 쿼리 결과가 최신이 아닌 경우, 이전 결과를 반환하는 시간을 설정한다. 이 경우 1초로 설정되어 있으므로, 최신 데이터가 아닌 경우 이전 데이터를 반환한다. - refetchOnMount
:컴포넌트가 마운트될 때 쿼리를 다시 호출할지 여부를 설정한다. - refetchOnReconnect
: 인터넷 연결이 다시 연결될 때 쿼리를 다시 호출할지 여부를 설정한다. - refetchOnWindowFocus
: 윈도우 포커스가 변경될 때 쿼리를 다시 호출할지 여부를 설정한다.
⚡️ Cart 페이지 추가하기
물건을 장바구니에 넣어 구매하므로, 장바구니(cart)가 필요하다.
▼ src/pages/cart/index.tsx
const Cart = () => {
  return <h2>장바구니</h2>;
};

export default Cart;
지금은 간단하게 장바구니 텍스트만 띄우는 페이지를 추가했다.
⚡️ Gnb 추가하기
Gnb(Global Navigation Bar)는 웹 사이트 또는 웹 응용 프로그램의 전역 탐색을 위한 네비게이션 바이다.
▼ src/components.gnb.tsx
const Gnb = () => (
  <nav className="gnb">
    <ul>
      <li>
        <Link to="/">홈</Link>
      </li>
      <li>
        <Link to="/products">상품목록</Link>
      </li>
      <li>
        <Link to="/cart">장바구니</Link>
      </li>
    </ul>
  </nav>
);
export default Gnb;
Gnb컴포넌트를 _layout.tsx에 추가하고, 간단하게 스타일을 적용해준다.
▼ src/scss/index.scss
.gnb {
  ul {
    list-style-type: none;
    display: flex;
    flex-direction: row;
    gap: 10px;
  }
}
그러면 모든 페이지의 상단에 해당 gnb가 보이고, 클릭하면 각 페이지로 이동하게 된다.