
Nest 프로젝트 설치 및 생성
NestJs는 아주 간단한 CLI를 제공한다. 아래의 명령어로 nest를 글로벌로 설치하고 새 프로젝트를 만들 수 있다.
Nest 프로젝트를 생성
$ npm i -g @nestjs/cli
$ nest new project-name
nest 프로젝트를 설치 시 ts-jest도 함께 설치가 되는데 KT망에서 설치가 안되는 이슈가 있다. package.json에서 ts-jest를 빼고 설치하면 정상적으로 설치가 된다.
Controllers

모든 MVC 패턴에 컨트롤러의 역할은 외부 애플리케이션에 대한 특정 요청을 수신하는 곳이며 요청이 끝났을 때 응답을 반환한다. (클라이언트의 요청을 받고 응답하는 곳)
$ nest g co [name]위 CLI를 실행하면 아래와 같은 컨트롤러가 자동으로 생성된다.
라우팅
import { Controller, Get } from '@nestjs/common';

@Controller('cats')
export class CatsController {
  @Get()
  findAll(): string {
    return 'This action returns all cats';
  }
  @Get(':id')
  findOne(@Param('id') id: string) {
    return `This action returns a #${id} cat`;
  }

}
@Controller 데코레이터의 선언은 해당 클래스가 Controller의 역할을 한다는 것이고 메소드 앞의 @Get() ,@Put(), @Post() ...등은 HTTP 요청 메소드 형태대로 데코레이터를 선언할 수 있다. 해당 데코레이터로 API를 RestFul 하게 작성할 수 있다.
Providers
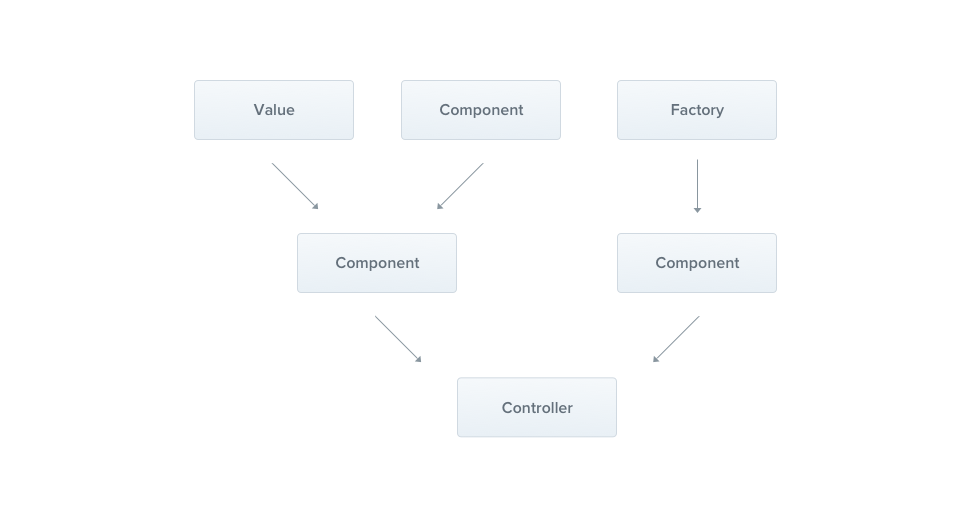
Provider는 Nest의 기본 개념이다. 많은 기본 Nest 클래스는 서비스, 리포지토리, 팩토리, 헬퍼 등 Provider로 취급될 수 있다.
Provider의 핵심은 의존성으로 주입할 수 있다는 것이다.
$ nest g s [name]아래는 Nest의 Service라는 Provider이다 Service는 Controller에서 받은 요청의 로직을 처리하는 부분이다.
import { Injectable } from '@nestjs/common';
import { Cat } from './interfaces/cat.interface';

@Injectable()
export class CatsService {
  private readonly cats: Cat[] = [];

  create(cat: Cat) {
    this.cats.push(cat);
  }

  findAll(): Cat[] {
    return this.cats;
  }
}
의존성 주입
클래스의 생성자를 통해 의존성을 주입할 수 있다. Cat Controller에 Cat Service를 주입해보자.
import { Controller, Get, Post, Body } from '@nestjs/common';
import { CreateCatDto } from './dto/create-cat.dto';
import { CatsService } from './cats.service';
import { Cat } from './interfaces/cat.interface';

@Controller('cats')
export class CatsController {

  // Service 공급자 의존성 주입
  constructor(private catsService: CatsService) {}

  @Get()
  async findAll(): Promise<Cat[]> {
    return this.catsService.findAll();
  }
}
Provider 등록
이제 CatService를 CatController에 주입하였고 마지막으로 아래와 같이 모듈에 등록해주어야 한다.
하지만 좀 더 나은 프로젝트 구성을 위해 CatModule을 생성하고 해당 CatModule을 AppModule에 등록하는 구조로 작성해보자.
// ./cat.module.ts
import { Module } from '@nestjs/common';
import { CatController } from './cat.controller';
import { CatService } from './cat.service';

@Module({
  imports: [],
  controllers: [CatController],
  providers: [CatService],
})
export class CatModule {}
import { Module } from '@nestjs/common';
import { CatModule } from './cats/cat.module';

@Module({
  imports:[CatModule]
  controllers: [],
  providers: [],
})
export class AppModule {}
Modules
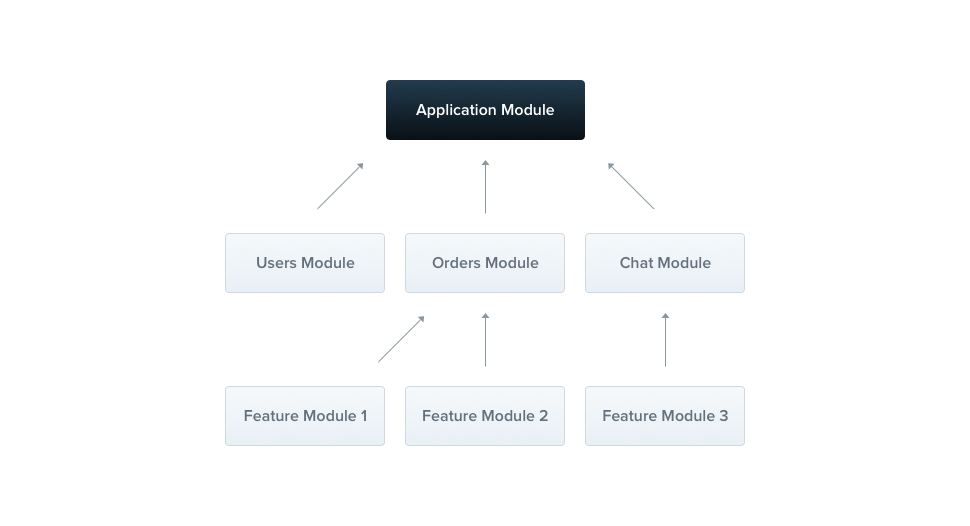
Nest에서 모듈은 @Module() 데코레이터로 주석이 달린 클래스이다.
각 애플리케이션에는 최소 하나의 모듈인 루트 모듈이 있다. Nest에서 모듈은 기본적으로 싱글톤 이므로 여러 모듈 간에 동일한 공급자 인스턴스를 쉽게 공유할 수 있다.
import { Module } from '@nestjs/common';
import { CatModule } from './cats/cat.module';

@Module({
  imports:[CatModule]
  controllers: [],
  providers: [],
})
export class AppModule {}
동적 모듈
Nest 모듈에는 동적 모듈이라는 강력한 기능이 포함되어있다. 자세한 내용은 technologyNeck.log 님 이 작성하신 글을 참고하였다.
Validation
DTO
DTO는 Data Transfer Object의 약자로 계층간 데이터 교환이 이루어질 수 있도록 하는 객체이다. DTO는 어떠한 비즈니스 로직을 가져서는 안되며, 저장,검색, 직렬화, 역직렬화 로직만을 가져야한다.
NestJs에서는 interface나 class를 이용해서 정의한다. (class로 정의하는걸 추천)
DTO는 데이터 유효성을 체크하는 데 효율적이며 더 안정적인 타입 체크를 할 수 있다.
Pipe
파이프는 일반적으로 두 가지 목적으로 사용된다. 첫 번째는 입력 데이터를 원하는 형식으로 변경하고 두 번째는 데이터의 유효성을 검사하고 유효성 체크에 실패하면 예외를 throw한다.
Pipe 사용하기
파이프의 범위는 세 가지로 구분된다.
-
Handler-level
핸들러 레벨은 아래와 같이 하나의 Handler 요청에 파이프를 넣어주는 방식이다.@UsePipes데코레이터를 사용한다. -
Parameter-level
파라미터 레벨은 파라미터 하나에 대한 파이프를 말한다. -
Global-level
글로벌 레벨은 어플리케이션 전체 레벨에 대한 파이프이다.
클라이언트에서 들어오는 모든 요청에 적용이된다.
가장 상단 영역인main.ts에 넣어주면 된다.
import { ValidationPipe } from '@nestjs/common';
import { NestFactory } from '@nestjs/core';
import { AppModule } from './app.module';

async function bootstrap() {
  const app = await NestFactory.create(AppModule);
  app.useGlobalPipes(
    new ValidationPipe({
      whitelist: true, //  validater에 도달하지 않게 함
      forbidNonWhitelisted: true, // 유효하지 않은 데이터는 request를 막음
      transform: true,
    }),
  );
  await app.listen(3000);
}
bootstrap();
DTO와 Pipe로 데이터 유효성 검사하기
npm i class-validator class-transfomer예를들어 회원가입을 할 때 유저 데이터에 관한 DTO를 만든다고 해보자.
class-validator 모듈을 설치하면 @IsString(), @MinLength()등과 같이 유효성 체크를 할 수 있는 데코레이터를 사용할 수 있다.
@Matches() 은 프로퍼티에 정규표현식을 적용하여 유효성을 체크할 수 있다.
import { IsString, Matches, MaxLength, Min, MinLength } from 'class-validator';

export class AuthCredentialDto {
  @IsString()
  @MinLength(4)
  @MaxLength(20)
  username: string;

  @IsString()
  @MinLength(4)
  @MaxLength(20)
  @Matches(/^[a-zA-Z0-9]*$/, {
    message: 'password only aceepts english and number',
  })
  password: string;
}
이제 파라미터 레벨에서 회원가입 시 유효성 체크를 해보자!
  @Post('signup')
  signUp(
    @Body(ValidationPipe) authCredentialDto: AuthCredentialDto,
  ): Promise<void> {
    return this.userService.signUp(authCredentialDto);
  }
위와 같이 작성하면 Body로 들어오는 클라이언트 데이터에 대해 유효성 검사를 할 수 있다.