이 글은 스프링 공식 사이트의 가이드를 해석한 글입니다.
번역에 오류가 있을 수 있습니다.
원문 https://spring.io/guides/gs/securing-web/
웹 애플리케이션 보호하기
이 가이드는 자원(resources)이 보호된 간단한 웹 애플리케이션을 만들게 도와줍니다.
당신은 이것을 만들겁니다
당신은 로그인 폼으로 보호하는 페이지를 갖는 스프링 MVC 애플리케이션을 만듭니다.
당신이 필요한 것
약 15분
가장 익숙한 IDE 또는 편집기
- JDK1.8 또는 그 이후 버전
- Gradle 4+ 또는 Maven 3.2+
당신의 IDE에 코드들을 바로 import 할 수 있다.
Spring Tool Suite(STS)
* Intellij IDEA
이 가이드를 끝마치는 법
다른 대부분의 스프링 시작하기 가이드처럼
각각의 부분을 전부 따라가도 되고 이미 익숙하다면 세팅하는 과정은 생략해도 된다. 어떤 방법으로든 작동하는 코드를 작성할 것이다.
처음부터 시작하려면 스프링 이니셜라이저와 시작하기 로 가라.
기본적인 것들을 생략하려면 이것들을 따라해라:
-
다운로드받고 압축을 풀거나 깃 클론해라
git clone https://github.com/spring-guides/gs-securing-web.git -
gs-securing-web/initial 로 cd(디렉토리 이동)해라
-
보호되지 않은 웹 애플리케이션 만들기 로 이동해라.
작업을 마치면 gs-securing-web/complete 안의 코드를 보며 결과를 확인하라.
스프링 이니셜라이저로 시작하기
메이븐을 사용한다면 스프링 이니셜라이저로 가서 Spring Web 과 Thymeleaf 디펜던시를 추가해 새로운 프로젝트를 만들어라.
아래의 pom.xml은 당신이 메이븐을 선택했을때의 설정이다.
<?xml version="1.0" encoding="UTF-8"?>
<project xmlns="http://maven.apache.org/POM/4.0.0" xmlns:xsi="http://www.w3.org/2001/XMLSchema-instance"
	xsi:schemaLocation="http://maven.apache.org/POM/4.0.0 https://maven.apache.org/xsd/maven-4.0.0.xsd">
	<modelVersion>4.0.0</modelVersion>
	<parent>
		<groupId>org.springframework.boot</groupId>
		<artifactId>spring-boot-starter-parent</artifactId>
		<version>2.4.3</version>
		<relativePath/> <!-- lookup parent from repository -->
	</parent>
	<groupId>com.example</groupId>
	<artifactId>securing-web</artifactId>
	<version>0.0.1-SNAPSHOT</version>
	<name>securing-web</name>
	<description>Demo project for Spring Boot</description>

	<properties>
		<java.version>1.8</java.version>
	</properties>

	<dependencies>
		<dependency>
			<groupId>org.springframework.boot</groupId>
			<artifactId>spring-boot-starter-thymeleaf</artifactId>
		</dependency>
		<dependency>
			<groupId>org.springframework.boot</groupId>
			<artifactId>spring-boot-starter-web</artifactId>
		</dependency>

		<dependency>
			<groupId>org.springframework.boot</groupId>
			<artifactId>spring-boot-starter-test</artifactId>
			<scope>test</scope>
		</dependency>
	</dependencies>

	<build>
		<plugins>
			<plugin>
				<groupId>org.springframework.boot</groupId>
				<artifactId>spring-boot-maven-plugin</artifactId>
			</plugin>
		</plugins>
	</build>

</project>
Gradle을 사용한다면 스프링 이니셜라이저로 가서 Spring Web 과 Thymeleaf 디펜던시를 추가해 새로운 프로젝트를 만들어라.
아래의 build.gradle은 당신이 Gradle을 선택했을때의 설정이다.
plugins {
	id 'org.springframework.boot' version '2.4.3'
	id 'io.spring.dependency-management' version '1.0.11.RELEASE'
	id 'java'
}

group = 'com.example'
version = '0.0.1-SNAPSHOT'
sourceCompatibility = '1.8'

repositories {
	mavenCentral()
}

dependencies {
	implementation 'org.springframework.boot:spring-boot-starter-thymeleaf'
	implementation 'org.springframework.boot:spring-boot-starter-web'
	testImplementation('org.springframework.boot:spring-boot-starter-test')
}

test {
	useJUnitPlatform()
}
직접 시작하기(옵션)
직접 프로젝트를 세팅하고 싶다면 아래의 과정들을 따라해라:
-
https://start.spring.io/ 로 가라. 이 서비스는
당신이 필요한 모든 디펜던시와 설정들을 도와준다. -
Gradle이나 Maven중 하나를 골라라.
이 가이드는 당신이 자바를 사용한다는 것으로 가정한다. -
Dependencies를 누르고 Spring Web과 Thymeleaf 를 골라라.
-
Generate을 눌러라.
-
ZIP파일을 다운로드해라. 이 파일은 당신의 선택들로 만들어진
웹 애플리케아션 아카이브다.
당신의 IDE가 Spring Initializr을 포함한다면 이 과정을
당신의 IDE 안에서 할 수 있다.
보호되지 않은 웹 애플리케이션 만들기
보안을 웹 애플리케이션에 적용시키기 전에 보안을 적용할 웹 애플리케이션이 필요하다. 이 과정을 통해 간단한 웹 애플리케이션을 만들 것이다.
다음 과정에서 스프링 시큐리티로 보안을 적용할 것이다.
이 웹 애플리케이션은 두개의 간단한 View(페이지)를 갖는다:
home 페이지와 "Hello, World" 페이지다. home 페이지는 타임리프 템플릿으로 아래와 같이 만들어진다. (경로는 src/main/resources/templates/home.html 이다)
<!DOCTYPE html>
<html xmlns="http://www.w3.org/1999/xhtml" xmlns:th="https://www.thymeleaf.org" xmlns:sec="https://www.thymeleaf.org/thymeleaf-extras-springsecurity3">
    <head>
        <title>Spring Security Example</title>
    </head>
    <body>
        <h1>Welcome!</h1>

        <p>Click <a th:href="@{/hello}">here</a> to see a greeting.</p>
    </body>
</html>
이 간단한 View는 /hello 로 가는 a태그가 있다.
그 페이지는 아래와 같이 작성된다. (경로는 src/main/resources/templates/hello.html 이다)
<!DOCTYPE html>
<html xmlns="http://www.w3.org/1999/xhtml" xmlns:th="https://www.thymeleaf.org"
      xmlns:sec="https://www.thymeleaf.org/thymeleaf-extras-springsecurity3">
    <head>
        <title>Hello World!</title>
    </head>
    <body>
        <h1>Hello world!</h1>
    </body>
</html>
이 웹 애플리케이션은 스프링 MVC가 기반이다. 결과적으로 이 페이지들을 보여주기 위해 뷰 컨트롤러를 만들고 스프링 MVC를 설정해야 한다.
아래의 코드는 스프링 MVC를 설정하는 클래스다.
(경로는 src/main/ java/com/example/securingweb/MvcConfig.java 이다)
package com.example.securingweb;

import org.springframework.context.annotation.Configuration;
import org.springframework.web.servlet.config.annotation.ViewControllerRegistry;
import org.springframework.web.servlet.config.annotation.WebMvcConfigurer;

@Configuration
public class MvcConfig implements WebMvcConfigurer {

	public void addViewControllers(ViewControllerRegistry registry) {
		registry.addViewController("/home").setViewName("home");
		registry.addViewController("/").setViewName("home");
		registry.addViewController("/hello").setViewName("hello");
		registry.addViewController("/login").setViewName("login");
	}

}
addViewControllers() 메서드(WebMvcConfigurer 의 같은 이름의 메서드를 오버라이딩 한 메서드)는 4개의 뷰 컨트롤러를 추가한다. 두개의 뷰 컨트롤러는
각각 home(home.html)과 hello(hello.html)을 매핑한다. 네번째 뷰 컨트롤러는 login으로 돼있는 뷰를 매핑한다. 다음 과정에서 이 페이지를 만들 것이다.
이 시점에서 애플리케이션 실행하기 로 이동해 로그인 할 필요 없이 애플리케이션을 실행 할 수 있다.
이제 보호되지 않은 웹 애플리케이션을 만들었으니 보안을 적용할 수 있다!
(드디어 시큐리티에 대한 얘기가 나오는구나...)
스프링 시큐리티 설정
인증되지 않은 유저가 /hello 에 접근하는 것을 막아야 한다고 해보자.
지금은 사용자가 home page 링크를 클릭하면 아무런 방해 없이 페이지를 볼 수 있다. 우리는 사용자가 이 페이지를 보기 전에 로그인하도록 장애물을 넣어야 한다.
애플리케이션에서 스프링 시큐리티 설정을 이용해 할 수 있다. 스프링 시큐리티가 클래스패스에 있다면 스프링 부트는 "basic" 인증방식으로 모든 HTTP 엔드포인트를 자동으로 보호한다. 그러나 우리는 시큐리티 설정을 커스터마이즈할 수 있다. 첫번째로 할 일은 스프링 시큐리티를 클래스패스에 추가하는 것이다.
Gradle을 사용한다면 build.gradle의 dependecies에 두 줄을 추가하면 된다(하나는 애플리케이션용, 하나는 테스트용).
implementation 'org.springframework.boot:spring-boot-starter-security'
implementation 'org.springframework.security:spring-security-test'
다음은 build.gradle의 전체 코드를 보여준다.
plugins {
	id 'org.springframework.boot' version '2.4.3'
	id 'io.spring.dependency-management' version '1.0.11.RELEASE'
	id 'java'
}

group = 'com.example'
version = '0.0.1-SNAPSHOT'
sourceCompatibility = '1.8'

repositories {
	mavenCentral()
}

dependencies {
	implementation 'org.springframework.boot:spring-boot-starter-thymeleaf'
	implementation 'org.springframework.boot:spring-boot-starter-web'
	implementation 'org.springframework.boot:spring-boot-starter-security'
	implementation 'org.springframework.security:spring-security-test'
	testImplementation('org.springframework.boot:spring-boot-starter-test')
}

test {
	useJUnitPlatform()
}
메이븐을 사용한다면 pom.xml에 두개의 추가적인 dependency를 추가해야 한다(하나는 애플리케이션용, 하나는 테스트용).
<dependency>
  <groupId>org.springframework.boot</groupId>
  <artifactId>spring-boot-starter-security</artifactId>
</dependency>
<dependency>
  <groupId>org.springframework.security</groupId>
  <artifactId>spring-security-test</artifactId>
  <scope>test</scope>
</dependency>
아래는 pom.xml의 전체 코드다.
<?xml version="1.0" encoding="UTF-8"?>
<project xmlns="http://maven.apache.org/POM/4.0.0" xmlns:xsi="http://www.w3.org/2001/XMLSchema-instance"
	xsi:schemaLocation="http://maven.apache.org/POM/4.0.0 https://maven.apache.org/xsd/maven-4.0.0.xsd">
	<modelVersion>4.0.0</modelVersion>
	<parent>
		<groupId>org.springframework.boot</groupId>
		<artifactId>spring-boot-starter-parent</artifactId>
		<version>2.4.3</version>
		<relativePath/> <!-- lookup parent from repository -->
	</parent>
	<groupId>com.example</groupId>
	<artifactId>securing-web</artifactId>
	<version>0.0.1-SNAPSHOT</version>
	<name>securing-web</name>
	<description>Demo project for Spring Boot</description>

	<properties>
		<java.version>1.8</java.version>
	</properties>

	<dependencies>
		<dependency>
			<groupId>org.springframework.boot</groupId>
			<artifactId>spring-boot-starter-thymeleaf</artifactId>
		</dependency>
		<dependency>
			<groupId>org.springframework.boot</groupId>
			<artifactId>spring-boot-starter-web</artifactId>
		</dependency>
		<dependency>
			<groupId>org.springframework.boot</groupId>
			<artifactId>spring-boot-starter-security</artifactId>
		</dependency>
		<dependency>
			<groupId>org.springframework.security</groupId>
			<artifactId>spring-security-test</artifactId>
			<scope>test</scope>
		</dependency>

		<dependency>
			<groupId>org.springframework.boot</groupId>
			<artifactId>spring-boot-starter-test</artifactId>
			<scope>test</scope>
		</dependency>
	</dependencies>

	<build>
		<plugins>
			<plugin>
				<groupId>org.springframework.boot</groupId>
				<artifactId>spring-boot-maven-plugin</artifactId>
			</plugin>
		</plugins>
	</build>

</project>
다음의 시큐리티 설정(src/main/java/com/example/securingweb/WebSecurityConfig.java)은 오직 인증된 유저들만 인사를 받을 수 있게 한다.
package com.example.securingweb;

import org.springframework.context.annotation.Bean;
import org.springframework.context.annotation.Configuration;
import org.springframework.security.config.annotation.web.builders.HttpSecurity;
import org.springframework.security.config.annotation.web.configuration.EnableWebSecurity;
import org.springframework.security.config.annotation.web.configuration.WebSecurityConfigurerAdapter;
import org.springframework.security.core.userdetails.User;
import org.springframework.security.core.userdetails.UserDetails;
import org.springframework.security.core.userdetails.UserDetailsService;
import org.springframework.security.provisioning.InMemoryUserDetailsManager;

@Configuration
@EnableWebSecurity
public class WebSecurityConfig extends WebSecurityConfigurerAdapter {
	@Override
	protected void configure(HttpSecurity http) throws Exception {
		http
			.authorizeRequests()
				.antMatchers("/", "/home").permitAll()
				.anyRequest().authenticated()
				.and()
			.formLogin()
				.loginPage("/login")
				.permitAll()
				.and()
			.logout()
				.permitAll();
	}

	@Bean
	@Override
	public UserDetailsService userDetailsService() {
		UserDetails user =
			 User.withDefaultPasswordEncoder()
				.username("user")
				.password("password")
				.roles("USER")
				.build();

		return new InMemoryUserDetailsManager(user);
	}
}
WebSecurityConfig 클래스의 @EnableWebSecurity 어노테이션은 스프링 시큐리티의 웹 시큐리티를 활성화하고 스프링 MVC의 통합을 제공한다.
또한 WebSecurityConfigurerAdapter 을 상속받아 두개의 메서드를 오버라이드하는데 이 메서드들은 웹 시큐리티의 상세한 설정을 돕는다.
configure(HttpSecurity)메서드는 어떤 URL 경로가 보호될지 결정한다.
"/" 와 "/home" 경로는 아무런 인증도 요구되지 않도록 설정됐다.
나머지의 모든 경로들은 인증이 되어야 접근할 수 있다.(anyRequest().permitAll())
사용자가 성공적으로 로그인 하면 인증을 요구했던 이전의 페이지로 리다이렉트된다. loginPage()에서 설정된 커스턴 /login 페이지는 모든 사람이 볼 수 있도록 허용됐다.
userDetailService() 메서드는 하나의 사용자를 in-memory 공간에 넣는다. 그 사용자의 username 은 user, password는 password, role(권한)은 USER다.
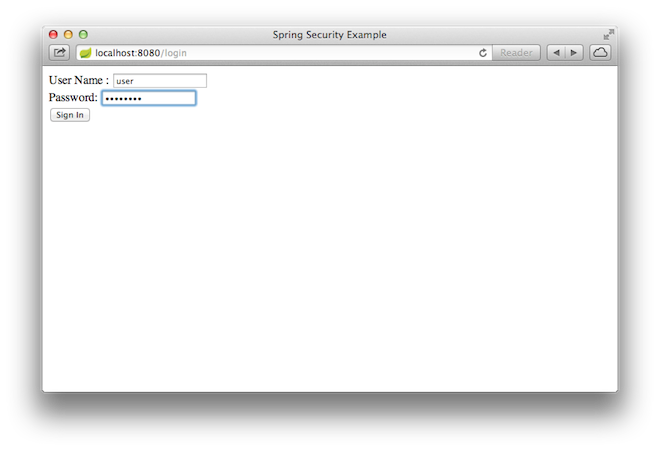
이제 로그인 페이지를 만들어야 한다. 이미 login 을 매핑한 뷰 컨트롤러가 있기 때문에 login.html만 만들면 된다. 다음은 login.html이다.
<!DOCTYPE html>
<html xmlns="http://www.w3.org/1999/xhtml" xmlns:th="https://www.thymeleaf.org"
      xmlns:sec="https://www.thymeleaf.org/thymeleaf-extras-springsecurity3">
    <head>
        <title>Spring Security Example </title>
    </head>
    <body>
        <div th:if="${param.error}">
            Invalid username and password.
        </div>
        <div th:if="${param.logout}">
            You have been logged out.
        </div>
        <form th:action="@{/login}" method="post">
            <div><label> User Name : <input type="text" name="username"/> </label></div>
            <div><label> Password: <input type="password" name="password"/> </label></div>
            <div><input type="submit" value="Sign In"/></div>
        </form>
    </body>
</html>
타임리프 템플릿은 username과 password를 입력받아 POST방식으로 /login에 요청한다. 앞서 설정한대로 스프링 시큐리티는 이 요청을 가로채고 사용자를 인증하는 필터를 제공한다. 인증에 실패하면 /login?error 페이지로 리다이렉트 될 것이고 그 페이지는 적절한 에러 메시지를 보여줄 것이다. 성공적으로 로그아웃 했다면 애플리케이션은 /login?logout 으로 이동될 것이고 그 페이지는 적절한 성공 메시지를 보여줄 것이다.
마지막으로 우리는 사용자에게 현재의 user name 과 로그아웃을 보여줘야 한다. 현재의 사용자에게 인사하고 로그아웃 폼을 포함하도록 hello.html 을 수정해야 한다.
<!DOCTYPE html>
<html xmlns="http://www.w3.org/1999/xhtml" xmlns:th="https://www.thymeleaf.org"
      xmlns:sec="https://www.thymeleaf.org/thymeleaf-extras-springsecurity3">
    <head>
        <title>Hello World!</title>
    </head>
    <body>
        <h1 th:inline="text">Hello [[${#httpServletRequest.remoteUser}]]!</h1>
        <form th:action="@{/logout}" method="post">
            <input type="submit" value="Sign Out"/>
        </form>
    </body>
</html>
스프링 시큐리티의 HttpServletRequest#getRemoteUser() 를 통해
usename 을 보여준다. "Sign Out" 폼은 POST방식으로 /logout에 요청한다. 성공적으로 로그아웃 되면 사용자응 /login?logout으로 리다이렉트시킨다.
애플리케이션 실행하기
스프링 이니셜라이저는 애플리케이션 클래스를 만들어 준다. 이런 경우에는 그 클래스를 수정하지 않아도 된다. 다음은 애플리케이션 클래스다.
(src/main/java/com/example/securingweb/SecuringWebApplication.java)
package com.example.securingweb;

import org.springframework.boot.SpringApplication;
import org.springframework.boot.autoconfigure.SpringBootApplication;

@SpringBootApplication
public class SecuringWebApplication {

	public static void main(String[] args) throws Throwable {
		SpringApplication.run(SecuringWebApplication.class, args);
	}

}
실행되는 JAR 빌드하기
Gradle이나 Maven의 커맨드로 애플리케이션을 실행 할 수 있다.
또한 모든 필요한 디펜던시, 클래스, 자원들을 포함하고 있는 하나의 JAR파일을 빌드 하고 실행시킬 수도 있다. 실행되는 JAR 파일을 빌드하는 것이
개발 환경에서 애플리케이션을 유지보수하거나 배포하는 데 편리하다.
Gradle을 사용한다면 ./gradlew bootRun 으로 애플리케이션을 실행할 수 있다. ./gradlew build 로 JAR파일을 빌드할 수도 있다.
(실행)
java -jar build/libs/gs-securing-web-0.1.0.jar
Maven을 사용한다면 ./mvnw spring-boot:run 으로 실행하고,
./mvnw clean package로 빌드하여 실행할 수 있다.
(실행)
java -jar target/gs-securing-web-0.1.0.jar
이 과정들은 실행가능한 JAR 파일을 만드는 것이다.
전통적인 WAR 파일을 빌드할 수도 있다.
애플리케이션이 시작되면 http://localhost:8080으로 접속해보자.
home 페이지가 보일 것이다.
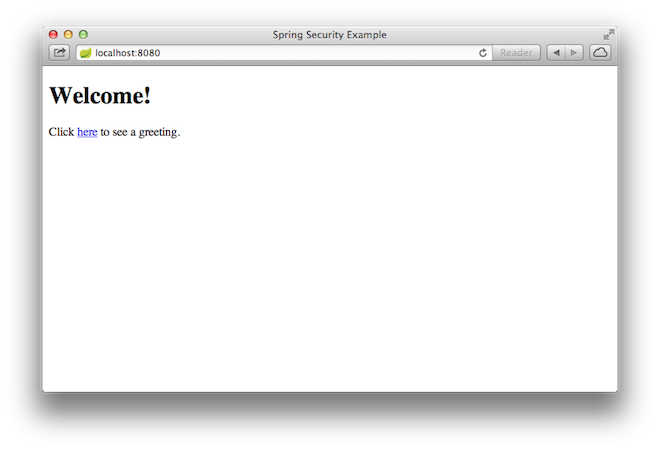
링크를 클릭하면 인사하는 페이지인 /hello로 이동될 것이다. 그러나
페이지가 보호되어 있고 당신은 로그인하지 않았기 때문에 로그인 페이지로 이동시킬 것이다.
보호되지 않은 상태로 이 과정으로 넘어온다면 login 페이지를 볼 수 없다.
전 과정으로 돌아가 보안을 위한 코드를 다시 작성하자
로그인 페이지에서 username 엔 user, password엔 password를 입력해 로그인 해보자. 로그인 폼을 제출했다면 인증되어 /hello로 이동할 것이다.

Sign Out 버튼을 클릭하면 인증은 취소될 것이다. 그리고 로그아웃됐다는 메시지와 함께 로그인 페이지로 다시 이동될 것이다.
요약
축하합니다! 스프링 시큐리티를 이용해 보안된 간단한 웹 애플리케이션을 만들었습니다.