이 글은 스프링 MVC 프로젝트 기반이기 때문에
xml 설정을 이용합니다.
출처: 코드로 배우는 스프링 웹 프로젝트
필터와 인터셉터
스프링 시큐리티는 필터와 인터셉터로 동작한다.
둘 모두 request를 중간에서 필터링 해준다.
차이점은
- 필터는 스프링과 무관한 서블릿 자원이다.
- 인터셉터는 스프링 컨텍스트 내에서 동작한다.
그렇기 때문에 인터셉터와 컨텍스트 내의 빈들과 함께 다양한 방식의
인증을 구현할 수 있다.
시큐리티 설정
pom.xml 에 다음 의존성들을 추가한다.
<!-- https://mvnrepository.com/artifact/org.springframework.security/spring-security-core -->
		<dependency>
		    <groupId>org.springframework.security</groupId>
		    <artifactId>spring-security-core</artifactId>
		    <version>5.0.6.RELEASE</version>
		</dependency>
		<!-- https://mvnrepository.com/artifact/org.springframework.security/spring-security-config -->
		<dependency>
		    <groupId>org.springframework.security</groupId>
		    <artifactId>spring-security-config</artifactId>
		    <version>5.0.6.RELEASE</version>
		</dependency>

		<!-- https://mvnrepository.com/artifact/org.springframework.security/spring-security-web -->
		<dependency>
		    <groupId>org.springframework.security</groupId>
		    <artifactId>spring-security-web</artifactId>
		    <version>5.0.6.RELEASE</version>
		</dependency>
		<!-- https://mvnrepository.com/artifact/org.springframework.security/spring-security-taglibs -->
		<dependency>
		    <groupId>org.springframework.security</groupId>
		    <artifactId>spring-security-taglibs</artifactId>
		    <version>5.0.6.RELEASE</version>
		</dependency>
이제 security-context.xml 을 생성한다.
생성한 뒤 namespace에서 security 를 체크한다.
그리고 beans 태그를 아래와 같이 대체한다.
<?xml version="1.0" encoding="UTF-8"?>
<beans xmlns="http://www.springframework.org/schema/beans"
	xmlns:xsi="http://www.w3.org/2001/XMLSchema-instance"
	xmlns:security="http://www.springframework.org/schema/security"
	xsi:schemaLocation="http://www.springframework.org/schema/beans http://www.springframework.org/schema/beans/spring-beans.xsd
		http://www.springframework.org/schema/security http://www.springframework.org/schema/security/spring-security.xsd
		http://www.springframework.org/schema/beans
		http://www.springframework.org/schema/beans/spring-beans.xsd" >
아직 설정을 위한 준비중이다.
필터로 스프링 동작에 관여하도록 해야 하기 때문에 web.xml에 필터를 추가한다.
	<!-- 스프링 시큐리티가 스프링 동작에 관여하도록 필터 설정 -->
	<filter>
		<filter-name>springSecurityFilterChain</filter-name>
		<filter-class>org.springframework.web.filter.DelegatingFilterProxy</filter-class>
	</filter>

	<filter-mapping>
		<filter-name>springSecurityFilterChain</filter-name>
		<url-pattern>/*</url-pattern>
	</filter-mapping>
이제 프로젝트를 실행해 보면 springSecurityFilterChain 라는 빈을 찾을 수 없다는 에러가 뜰 것이다. security-context.xml에 대한 정보를 스프링에게 주지 않았기 때문이다.
web.xml 의 context-param에 security-context.xml 을 추가한다.
	<context-param>
		<param-name>contextConfigLocation</param-name>
		<param-value>
		/WEB-INF/spring/root-context.xml
		/WEB-INF/spring/security-context.xml
		</param-value>
	</context-param>
security-context.xml 에는 아래의 설정을 추가한다.
<!-- 시큐리티의 시작지점 지정 -->
<security:http>

  <security:form-login />

</security:http>

<!-- 스프링 시큐리티가 동작하려면 AuthenticationManager 라는 인터페이스가 필요함 -->
<security:authentication-manager>

</security:authentication-manager>
시큐리티 동작 확인
기본적인 스프링 시큐리티 설정이 완료됐으니 동작을 확인해보자.
일단 3개의 URI를 매핑하는 컨트롤러를 만들어보자.
@RequestMapping("/sample/*")
@Controller
public class SampleController {

	@GetMapping("/all")
	public void doAll() {
		System.out.println("모든 사람 접근 가능");

	}

	@GetMapping("/member")
	public void doMember() {
		System.out.println("member 만 접근 가능");
	}

	@GetMapping("/admin")
	public void doAdmin() {
		System.out.println("admin 만 접근 가능");
	}

}
3개의 URI는 각각 다른 접근 권한을 갖는다.
매핑되는 jsp 는 화면에 권한에 맞는 적절한 간단한 텍스트가 보여지도록 만들자. jsp 생성은 너무 간단하기 때문에 생략.
인증(Authentication)과 인가(Authorization)
스프링 시큐리티는 인증과 인가를 도와준다.
인증은 자신을 증명하는 것이고
인가는 남에 의해서 자격이 부여되는 것이다.
말이 어렵기 때문에 예를 들어보겟다.
당신이 어떤 커뮤니티의 이용자다.
일단 들어가서 뻘글이라도 쓰려면 로그인을 해야한다.
로그인을 하는 행위는 당신 자신을 증명하는 것이다. 이는 인증이다.
당신의 권한은 평범한 유저이기 때문에 글 등록/수정/삭제가 가능하다.
하지만 관리자가 아니기 때문에 남이 쓴 특정 게시글을 삭제하거나
유저의 ip를 차단할 수 는 없다.
당신은 어떤 로직이나 사람에 의해 평범한 유저로 '인가'받았고 그 권한에 따라 제한된 행위를 할 수 있다.
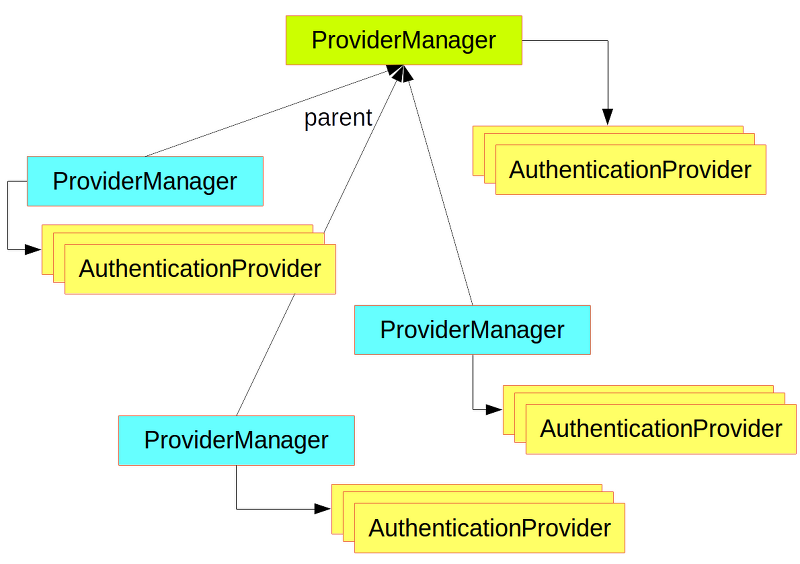
스프링 내부의 간단한 구조.
이 사진에서 맨 위의 AuthenticationManager와 ProviderManager
그리고 AuthenticationProvider 까지만 보자.
인증을 담당하는 AuthenticationManager은 스프링 시큐리티에서 가장 중요하다. AuthenticationManager은 다양한 방식의 인증을 처리할 수 있도록 설계돼있다.
ProviderManager는 인증에 대한 처리를 AuthenticationProvider에게 위임한다.
AuthenticationManager는 실제 인증 작업을 수행한다.
이때 인증된 정보와 함께 권한 정보를 같이 전달하게 되는데
이 작업은 UserDetailsService라는 인터페이스의 구현체가 수행한다.
사용자의 정보와 그 정보에 맞는 권한을 반환한다.
개발자가 스프링 시큐리티를 커스터마이징 하는 방식은 크게
- AuthenticationProvider 직접 구현
- UserDetailsService 를 구현
하는 방식으로 나뉘는데 보통 후자를 사용한다.
새로운 프로토콜이나 인증 구현 방식을 직접 구현하는 경우에는 전자의 방식으로 커스터마이징 한다.
다음에는 로그인과 로그아웃 처리에 대해 배운다