[Kotlin Coroutines Deep Dive] Chapter 02. 코틀린 코루틴 라이브러리 (5장 - 10장)
Kotlin Coroutines Deep Dive

6장 코루틴 빌더
중단 함수는 중단 함수 내부에서만 실행 가능합니다. 그렇다면 최초의 중단함수는 어디서 실행될까요? 그 정답은
코루틴 빌더를 활용하여 일반 함수와 중단함수를 연결할 수 있습니다.
대표적인 3가지
- launch
- runBlocking
- async
3가지가 있습니다.
Launch 빌더
이는 thread함수를 호출하여 새로운 쓰레드를 시작하는 것과 비슷하게 동작합니다. (일반 멀티 쓰레드의 방식과 동일)
즉, 각각의 launch는 별개로 실행됩니다.
runBlocking 빌더
코루틴은 쓰레드를 블로킹하지 않고 작업을 중단시키기만 하는 것이 일반적인 법칙입니다. 하지만 블로킹이 필요할 경우 runBlocking을 활용해야 합니다. 이는 내부의 블록이 실행될까지 쓰레드를 중단시킵니다.
runBlocking 내부에서는 코루틴들이 이벤트 큐에 담겨 하나의 쓰레드위에서 돌아갑니다.
"실 환경에서는
runBlocking을 활용하면 안된다." 라고 하지만,Spring MVC를 활용할 경우 코루틴를 활용하고자 한다면 실질적인 답은runBlocking을 활용하여 코루틴 스코프를 만드는 것입니다. (쓰레드 단위로 API가 처리되기 때문에 한 쓰레드를 블록하여 코루틴 활용
Async 빌더
이는 launch와 비슷하지만 값을 반환하도록 설계되어 있습니다. 이는 Deferred<T>객체를 반환하며 이는 Job을 상속받기에 코루틴의 중단 및 실행의 기능도 수행할 수 있습니다.
이는 호출되자마자 코루틴을 즉시 시작합니다. 호출되고나서 Defferred값이 생성되면 값을 내부에 저장해 놓다가, await이 호출되는 동시에 즉시 값을 사용합니다. (값이 생성되기 전에 await를 호출하면 값이 나올 때 까지 대기)
코루틴을 즉시 실행하지만,
await를 할 떄 예외를 모아서 반환합니다. async { async { } } 로 되어있다면 최상위에서 내부 에러가 바로 반환되지 않습니다. -> 뒤에 설명
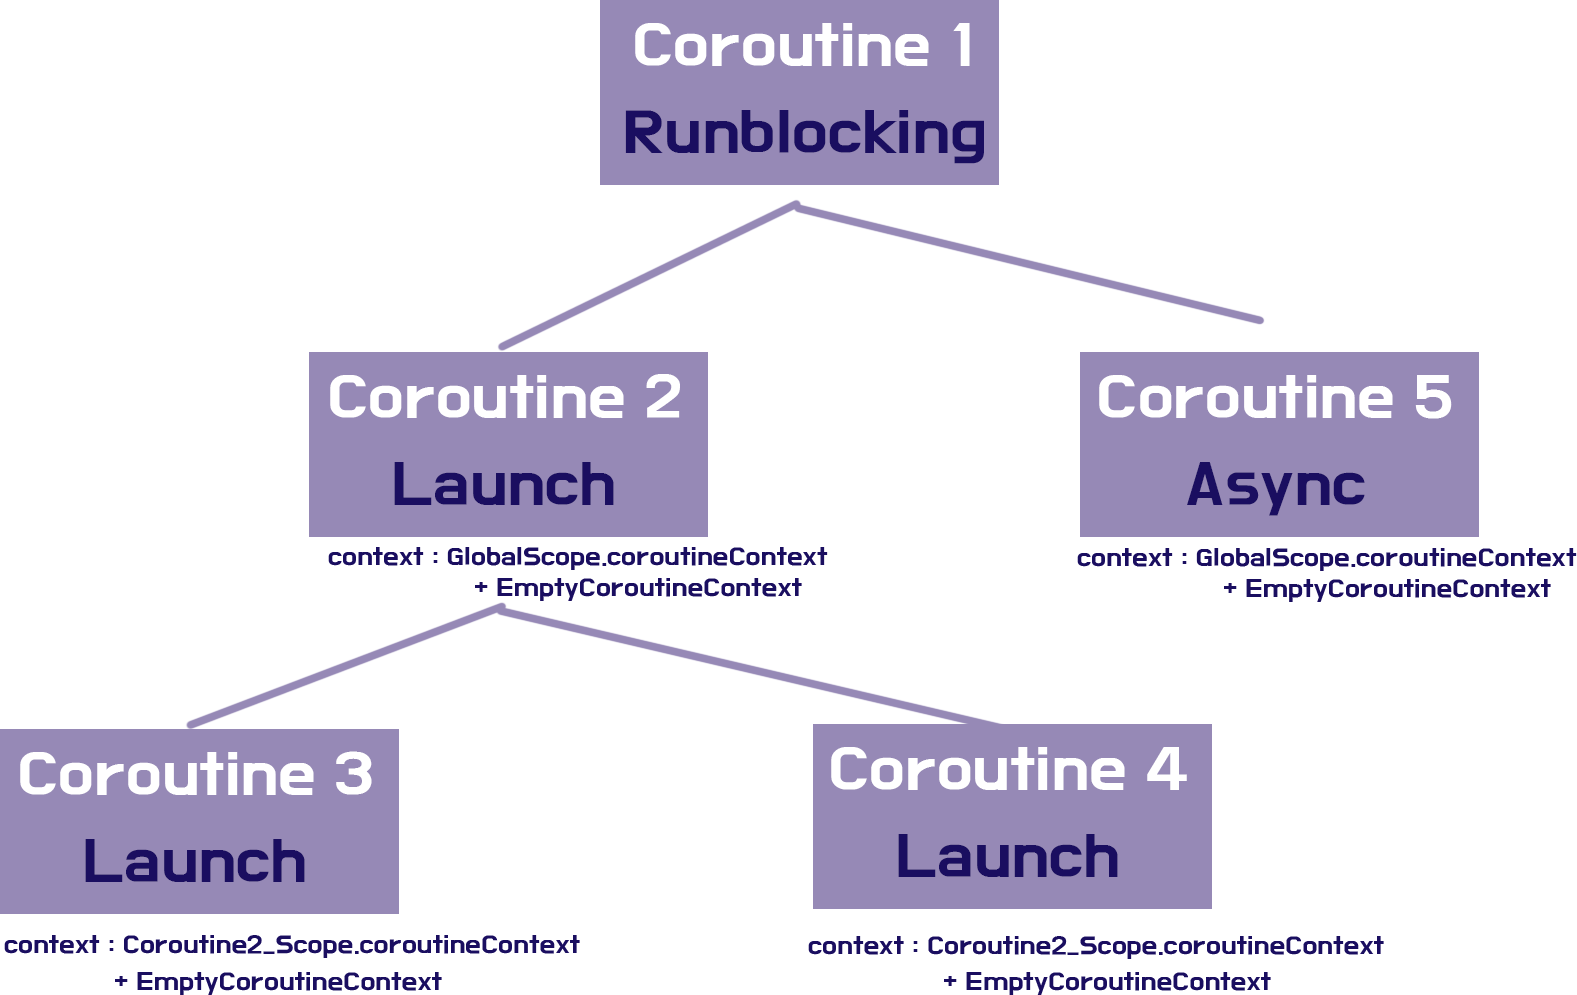
구조화된 동시성
fun main() = runBlocking {
	launch {  }
    val value = async {
    	// ..
    }
}
위의 예제는 runBlocking내부에서 launch, this.launch를 부모 코루틴스코프에서 코루틴을 생성하고 있습니다.
public fun <T> CoroutineScope.async
public fun CoroutineScope.launch
async,launch는 모두 코루틴 스코프의 확장함수입니다.
참고) 코루틴 스코프는 내부에 코루틴콘텍스트를 구현하고 있습니다.
public interface CoroutineScope {
   public val coroutineContext: CoroutineContext
}
이렇게 부모는 자식들에게 코루틴스코프를 제공하고 자식들은 부모의 스코프 내부에서 실행됩니다. 이를 통해 구조화된 동시성이라는 개념이 구현됩니다.
구조화된 동시성은 다음과 같은 특징이 있습니다.
- 부모는 모든 자식 작업이 끝날 때까지 기다립니다.
- 부모 코루틴이 취소되면 자식도 취소됩니다.
- 자식 코루틴에 에러가 나면 부모 코루틴 또한 에러가 납니다.
- 자식은 부모로부터 컨텍스트를 상속받습니다.
참고) 안드로이드에서는 생명주기가 있는 모든 컴포넌트로부터 코루틴 스코프를 제공하고(Android KTX), 스프링 웹플럭스의 경우는 리엑터콘텍스트로부터 코루틴콘텍스트로의 치환을 제공합니다.
// 리액터 콘텍스트
public class ReactorContext(public val context: Context) : AbstractCoroutineContextElement(ReactorContext) {

    public constructor(contextView: ContextView): this(Context.of(contextView))

    public companion object Key : CoroutineContext.Key<ReactorContext>

    override fun toString(): String = context.toString()
}
중단함수 내부에서의 스코프 활용 (coroutineScope)
coroutineScope는 람다 표현식이 필요로 하는 스코프를 만들어주는 코루틴 빌더입니다. 이는 코루틴 스코프를 생성하여 그 내부에서 동작하는 코루틴들을 조정할 수 있습니다. 이 또한 구조화된 동시성을 제공하며
이는 중첩된 코루틴들 간에 작업을 조직화하고 제어하기 위한 목적으로 쓰입니다.
async와 동일하게 이는 람다식이 반환하는 것이면 무엇이든 반환합니다.
coroutineScope 빌더는 다음과 같은 특징을 가지고 있습니다.
-
블록 내의 모든 코루틴이 완료될 때까지 블록을 완료하지 않습니다. 다시 말하면,
coroutineScope블록은 자체의 완료를 현재 실행 중인 모든 코루틴의 완료에 의존합니다. -
부모 스코프의 취소에 의해 모든 하위 코루틴이 취소됩니다. (구조화된 동시성)
이에 대한 자세한 설명은 11장에서 합니다
7장 코루틴 컨텍스트
코루틴 빌더의 첫 번째 파라미터는 CoroutineContext입니다.
public fun <T> CoroutineScope.async
public fun CoroutineScope.launch
코루틴 스코프는 아래와 같습니다.
public interface CoroutineScope {
   public val coroutineContext: CoroutineContext
}Continuation은 다음과 같습니다.
@SinceKotlin("1.3")
public interface Continuation<in T> {

    public val context: CoroutineContext

    public fun resumeWith(result: Result<T>)
}
이처럼 코루틴과 관련된 중요한 요소들은 모두 CoroutineContext를 사용하고 있습니다.
CoroutineContex란??
이는 코루틴에 필요한 원소나 원소들의 집합을 나타내는 인터페이스입니다.
Job,CoroutineName,CoroutineDispatcher와 같은Element객체들이 맵과 같이 인덱싱된 집합을 의미합니다.
특이한 점은 각 Element또한 CoroutineContext입니다.
코루틴 콘텍스트에서 오버라이드된 plus연산자가 코루틴 콘텍스트들 간의 덧셈을 제공합니다.
@SinceKotlin("1.3")
public interface CoroutineContext {

    public operator fun <E : Element> get(key: Key<E>): E?

    public fun <R> fold(initial: R, operation: (R, Element) -> R): R

    public operator fun plus(context: CoroutineContext): CoroutineContext

    public interface Element : CoroutineContext {

        public val key: Key<*>

        public override operator fun <E : Element> get(key: Key<E>): E?

        public override fun <R> fold(initial: R, operation: (R, Element) -> R): R

        public override fun minusKey(key: Key<*>): CoroutineContext
    }
}
컨텍스트에서 모든 원소는 식별할 수 있는 Key를 가지고 있습니다. 각 키는 주소로 비교가 됩니다. 예를 들어 CoroutineName이나 Job은 CoroutineCOntext인터페이스를 구현한 CoroutineContext.Element를 구현합니다.
 fun main() = runTest {
	 val name: CoroutineName = CoroutineName("Coroutine Name")
	 val element: CoroutineContext.Element = name
	 val context: CoroutineContext = element

	 val job: Job = Job()
	 val jobElement: CoroutineContext.Element = job
	 val jobContext: CoroutineContext = jobElement

	 println(context)
	 println(jobContext)
}

// 출력 결과
CoroutineName(Coroutine Name)
JobImpl{Active}@53fd0d10
즉 위와 같은 대입이 가능합니다. SupervisorJob, CoroutineExceptionHandler, Dispatchers 객체 등 모두 다 코루틴컨텍스트입니다.
CoroutineContext에서 원소 찾기
코루틴콘텍스트는 하나의 컬렉션이라 볼 수 있고 get()또한 오버라이드 하고 있기에 유일한 키를 가진 원소를 찾을 수 있습니다. (Map과 비슷)
import kotlinx.coroutines.CoroutineName
import kotlinx.coroutines.Job
import kotlinx.coroutines.test.runTest
import kotlin.coroutines.CoroutineContext

 fun main() = runTest {
	 val coroutineContext: CoroutineContext = CoroutineName("Coroutine Name")
	 val coroutineName: CoroutineName? = coroutineContext[CoroutineName]
	 println(coroutineName?.name)
	 val job: Job? = coroutineContext[Job]
	 println(job)
}

// 출력 결과
Coroutine Name
null
클래스의 이름이 컴패니언 객체에 대한 참조로 사용되는 코틀린의 특징 때문에
coroutineContext[CoroutineName]는coroutineContext[CoroutineName.key]가 됩니다.
public data class CoroutineName(
    val name: String
) : AbstractCoroutineContextElement(CoroutineName) {

    public companion object Key : CoroutineContext.Key<CoroutineName>

    override fun toString(): String = "CoroutineName($name)"
}
컨텍스트 더하기
CoroutineContext는 컨텍스트끼리의 덧셈을 오버라이드하여 제공합니다. 다른 키를 가진 두 원소를 더하여 만들어진 컨텍스트는 두 가지 키를 모두 가집니다.
 @Test
 fun main() = runTest {
	 val coroutineContext: CoroutineContext = CoroutineName("Coroutine Name")
	 val job: CoroutineContext = Job()

	 (coroutineContext + job).let {
		 println(it[CoroutineName])
		 println(it[Job]?.isActive)
	 }
}

// 출력 값
CoroutineName(Coroutine Name)
true
같은 키를 가진 또 다른 원소가 더해지면 맵처럼 새로운 원소가 기존의 원소를 대체합니다.
    public operator fun plus(context: CoroutineContext): CoroutineContext =
        if (context === EmptyCoroutineContext) this else
            context.fold(this) { acc, element ->
            	// 동일 키 객체를 지우기
                val removed = acc.minusKey(element.key)
                if (removed === EmptyCoroutineContext) element else {
                	// 지워진 객체를 바라보는 인터셉터도 지우기
                    val interceptor = removed[ContinuationInterceptor]
                    if (interceptor == null) CombinedContext(removed, element) else {
                        val left = removed.minusKey(ContinuationInterceptor)
                        if (left === EmptyCoroutineContext) CombinedContext(element, interceptor) else
                            CombinedContext(CombinedContext(left, element), interceptor)
                    }
                }
            }
minus의 경우는 오퍼레이터 연산자를 구현하지 않고,minusKey라는 함수를 통해 제공합니다.
fold의 경우는Kotlin의fold와 동일하게 작동
비어있는 코루틴 컨텍스트
CoroutineContext는 컬렉션이므로 빈 컨텍스트 또한 만들 수 있습니다. 빈 컨텍스트는 원소가 없으므로, 다른 컨텍스트에 더해도 아무런 변화가 없습니다.
@SinceKotlin("1.3")
public object EmptyCoroutineContext : CoroutineContext, Serializable {
    private const val serialVersionUID: Long = 0
    private fun readResolve(): Any = EmptyCoroutineContext

    public override fun <E : Element> get(key: Key<E>): E? = null
    public override fun <R> fold(initial: R, operation: (R, Element) -> R): R = initial
    public override fun plus(context: CoroutineContext): CoroutineContext = context
    public override fun minusKey(key: Key<*>): CoroutineContext = this
    public override fun hashCode(): Int = 0
    public override fun toString(): String = "EmptyCoroutineContext"
}
코루틴 컨텍스트와 빌더
코루틴은 기본적으로 부모의 콘텍스트를 상속받아 사용합니다. 하지만 코루틴 빌더에서 인자로 특정 컨텍스트를 만들어 부모의 컨텍스트를 대체할 수 있습니다.
@Test
fun main() = runTest(CoroutineName("World")) {
	launch(CoroutineName("Hello")) {
		 println(this.coroutineContext[CoroutineName]?.name) // Hello
	}
	println(this.coroutineContext[CoroutineName]?.name) // World
}
컨텍스트의 plus오퍼레이터는 같은 키를 가진 이전 원소를 대체합니다. (아무것도 설정되지 않으면 디폴트로 설정됩니다.)
public fun CoroutineScope.launch(
    context: CoroutineContext = EmptyCoroutineContext,
    start: CoroutineStart = CoroutineStart.DEFAULT,
    block: suspend CoroutineScope.() -> Unit
): Job
8장 잡과 자식 코루틴 기다리기
구조화된 동시성의 다양한 특징 중 하나는 자식이 부모로부터 컨텍스트를 물려 받는 것입니다. 이는 Job컨텍스트와 관련이 있습니다.
Job은 코루틴을 취소하거나 상태를 파악하는 등 다양하게 사용되는 객체입니다.
Job이란?
잡은 수명을 가지고 있으며, 취소 가능합니다. Job의 생명주기는 다음과 같습니다.
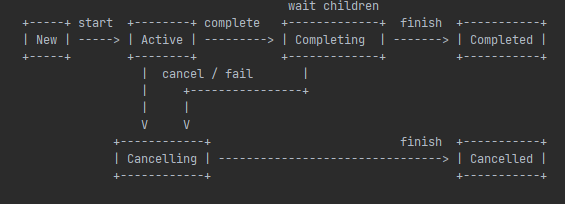
Active: 잡이 실행되고 코루틴은 잡을 수행합니다. (대부분의 코루틴은 해당 상태로 시작)New: 지연상태인 코루틴만 해당 상태에서 실행됩니다.Completing: 완료되었을 때 자식을 기다리는 상태입니다.
이는 내부 프로퍼티로 제공합니다.
| State | isActive | isCompleted | isCancelled |
|---|---|---|---|
| New (optional initial state) | false | false | false |
| Active (default initial state) | true | false | false |
| Completing (transient state) | true | false | false |
| Cancelling (transient state) | false | false | true |
| Cancelled (final state) | false | true | true |
| Completed (final state) | false | true | false |
코루틴 빌더는 부모의 잡을 기초로 자신들의 잡을 생성
코루틴 빌더는 명시적으로 Job을 반환합니다. (async의 Deffered또한 Job의 인터페이스를 구현하고 있습니다.)
또한 job에 대한 확장 프로퍼티도 제공합니다.
public val CoroutineContext.job: Job get() = get(Job) ?: error("Current context doesn't contain Job in it: $this")모든 코루틴은 자신만의 Job을 생성하며 인자 또는 부모 코루틴으로부터 온 잡은 새로운 잡의 부모로 사용됩니다.
internal open class JobImpl(parent: Job?) : JobSupport(true), CompletableJob {

    init { initParentJob(parent) }

    // ...

   protected fun initParentJob(parent: Job?) {
        assert { parentHandle == null }
        if (parent == null) {
            parentHandle = NonDisposableHandle
            return
        }
        parent.start() // make sure the parent is started
        @Suppress("DEPRECATION")
        val handle = parent.attachChild(this)
        parentHandle = handle
        if (isCompleted) {
            handle.dispose()
            parentHandle = NonDisposableHandle // release it just in case, to aid GC
        }
    }
}
이렇게 잡은 트리형태로 구성되며, 부모 잡은 자식 잡을 모두 참조할 수 있으며, 자식 또한 부모를 참조할 수 있습니다.
잡은 빌더의 인자를 기반으로 생성되며 새로운 Job컨텍스트를 자식에서 만들어 반환한다면 부모와 자식이 아무런 관계가 성립되지 않기에 구조화된 동시성을 제공할 수 없습니다.
@Test
fun main() = runBlocking {
	launch {
		val job = launch(Job()) {
			delay(1000L)
			println(this.coroutineContext.job)
			println("Hello")
		}
		println(this.coroutineContext.job)
		println("World")
		// job.join()
	}
	println(this.coroutineContext.job)
}

// 출력
"coroutine#1":BlockingCoroutine{Active}@1fa1cab1
"coroutine#2":StandaloneCoroutine{Active}@6c2c1385
WorldJob의 join을 활용해 해당 코루틴이 완료될 때 까지 기다릴 수 있습니다.
잡 팩토리 함수
Job() 팩토리 함수를 활용하여 코루틴 없이도 Job을 만들 수 있습니다.
@Test
fun main() = runBlocking {
	val parentJob = Job()

	launch(parentJob) {
		delay(500)
		println(this.coroutineContext.job)
		println("Coroutine 1 is still working")
	}

	launch(parentJob) {
		delay(700)
		println(this.coroutineContext.job)
		println("Coroutine 2 is still working")
	}

	println(parentJob)
	parentJob.join()
}


// 출력 값
JobImpl{Active}@5f354bcf // 부모 잡
"coroutine#2":StandaloneCoroutine{Active}@56928307 // 자식 코루틴1 잡
Coroutine 1 is still working
"coroutine#3":StandaloneCoroutine{Active}@38089a5a // 자식 코루틴2 잡
Coroutine 2 is still working
무한로딩...
하나의 잡을 다른 코루틴들의 부모로 지정하고 join을 호출하는 것은 작동하지 않습니다.
이는 자식 코루틴의 잡은 완료되었지만, 부모의 잡은 완료되지 않았기 떄문입니다. 따라서 위의 소스가 작동하기 위해서는 부모의 잡이 아닌 부모의 자식들의 잡이 join되도록 해야합니다.
parentJob.children.forEach { it.join() }Job()은 생성자 처럼 보이지만, 사실 팩토리 함수입니다.
public fun Job(parent: Job? = null): CompletableJob = JobImpl(parent)이는 CompletableJob을 반환하며 이는 Job인터페이스와 함께 두 가지 메서드를 추가로 확장합니다.
public interface CompletableJob : Job {

    public fun complete(): Boolean

    public fun completeExceptionally(exception: Throwable): Boolean
}-
complete():job을 완료하는데 사용합니다. 모든 자식 코루틴은 작업이 완료될 때 까지 실행된 상태를 유지하지만, 이미 완료된 잡에서 새로운 코루틴이 시작될 수는 없습니다. -
completeExceptionally(e: Throwable) : Boolean: 인자로 받은 예외로 잡을 완료시킵니다. 모든 자식 코루틴은 예외를 래핑한CancellationException으로 즉시 취소됩니다.
9장 취소.
기본적인 취소
Job인터페이스는 취소하는 cancel메서드를 가지고 있습니다. 이 메소드를 호출하면 다음과 같은 효과를 지닙니다.
- 호출한 코루틴은 첫 번째 중단점에서 잡을 끝냅니다.
- 잡이 자식을 가지고 있다면, 그들 또한 취소됩니다. (부모는 영향 X)
- 잡이 취소되면, 취소된 잡은 새로운 코루틴의 부모로 사용될 수 없습니다. (
Cancelling상태가 됨)
이렇게 취소된 잡은 CancellationException을 반환합니다.
public fun cancel(cause: CancellationException? = null)일반적으로는 job.cancel()을 수행하고, job.join()을 통해 잡이 끝나는 것을 기다려야지 경쟁 상태를 예방할 수 있습니다.
책에서는 아래와 같은 소스에서 경쟁상태가 발생
@Test
fun main() = runBlocking {
	coroutineScope {
		val job = launch {
			repeat(1_000) {
				delay(100L)
				Thread.sleep(100L)
				println("Print $it")
			}
		}

		delay(1000)
		job.cancel()
        // job.join()
		println("Job Cancelled")
	}
}
따라서 Job은 CancelAndJoin()메소드도 제공합니다.
취소를 컨트롤 하기
Cancelling된 잡을 활용해 코루틴을 시작하는 것은 불가능합니다. (만약 시작하면 바로 CancellationException 발생)
코루틴이 취소되었을 때 중단 함수를 호출해야하는 경우
withContext와 함께NonCacellation객체를 활용할 수 있습니다. (컨벤션)
@Test
fun main() = runBlocking {
	val job = Job()

	launch(job) {
		try {
			delay(200L)
			println("Coroutine Finish")
		} finally {
			println("Finally")
			withContext(NonCancellable) {
				delay(1000L)
				println("CleanUp Code")
			}
		}
	}

	delay(100L)
	job.cancelAndJoin()
	println("Done")
}

// 출력 결과
Finally
CleanUp Code
Done
NonCancellation이란??
public object NonCancellable : AbstractCoroutineContextElement(Job), Job 언제나 Job.isActive가 true인 잡이며, withContext와 함께 사용하도록 디자인되어 있습니다.
 * withContext(NonCancellable) {
 *     // this code will not be cancelled
 * }
이 Job은 launch, async 및 기타 코루틴 빌더와 함께 사용하지 말 것
만약 launch(NonCancellable) { ... }와 같이 작성하면 부모가 취소될 때 해당 작업의 자식들은 모두 취소되지 않습니다. (더구나 부모와 자식 간의 전체 부모-자식 관계가 끊어져 구조화된 동시성 제공 X) 이에 따라 부모는 자식의 완료를 기다리지 않으며, 자식이 충돌할 때도 부모는 취소되지 않습니다.
invokeOnCompletion
해당 메서드는 Job이 Completed나 Cancelled와 같은 마지막 상태에 도달했을 때 호출될 핸들러를 지정합니다.
    /**
	    잡의 `complete`에 따른 핸들러를 지정합니다.
        잡이 이미 끝났으면 즉시 실행됩니다. (예외 또는 취소 원인은 `null`로 지정됩니다.)

        핸들러에 전달되는 `cause`의 의미:
  			작업이 정상적으로 완료된 경우 `null`입니다.
  		작업이 정상적으로 취소된 경우는 [CancellationException] 예외를 발생합니다.

		[handler]에서 예외를 던져서는 안 됩니다. 이는 해당 오류가 아니라 [CompletionHandlerException]으로 포장되어 반환됩니다.

		`CompletionHandler`의 구현은 빠르고 블로킹되지 않으며 스레드 안전해야 합니다.
    	[handler]가 호출되는 실행 컨텍스트에 대한 보장이 없습니다.
	*/
public fun invokeOnCompletion(handler: CompletionHandler): DisposableHandle
중단될 수 없는 걸 중단하기
@Test
fun main() = runBlocking {

    val job = Job()
	launch(job) {
		repeat(1_000) {
			Thread.sleep(200)
			// yield()
			println("Printing $it")
		}
	}

	delay(1000L)
	println("Cancell Doing")
	job.cancelAndJoin()
	println("Cancelled successful")
	delay(1000L)
}

// 출력
Printing 0
Printing 1
Printing 2
Printing 3
Printing 4
Printing 5
....Thread.sleep()은 중단점을 제공하지 않음
이는 코틀린 내부에 중단점이 없기에 발생합니다. 따라서 시간을 집약적 메소드 사이에 yield연산자를 활용하여 다른 작업을 수행할 수 있는 기회를 만들어야합니다.
Job.isAtive, ensureActive()등을 활용하여 기회를 제공할 수 있다고 합니다
테스트 과정중
Disaptcher에 의해 해당 함수는 중단되지 않을 수도 있습니다. Dispatcher.Default 또는 Dispatcher.IO를 활용해 각각 다른 쓰레드에서 코루틴이 작동하게끔 해야합니다. 디스패쳐 메인으로 돌리면 하나의 쓰레드 위에서Thread.sleep()이 계속 돌아서 코루틴이 스위칭을 못 함
@Test
fun main() = runBlocking {
	val job = Job()

	launch(job) {
		repeat(1_000) {
			Thread.sleep(200)
			ensureActive()
			println("Printing $it")
		}
	}

	delay(1000L)
	println("Cancel Doing")
	job.cancelAndJoin()
	println("Cancelled successful")
	delay(1000L)
}

// 출력
Printing 0
Printing 1
Printing 2
...
suspendCancellableCoroutine
이는 중지 가능한 코루틴을 시작하되, 코루틴이 취소되었을 때 행동을 invokeOnCancellation을 활용해 구현할 수 있습니다. 즉 코루틴의 실행과 함께 정리 작업이 필요할 때(소켓 닫기, 생명주기 정리)등에 사용합니다.
- 공식 자료 예제
suspendCancellableCoroutine { continuation ->
   val resource = openResource() // Opens some resource
   continuation.invokeOnCancellation {
       resource.close() // Ensures the resource is closed on cancellation
   }
   // ...
}- 개인 견해 :
suspendCoroutine또는suspendCancellableCoroutine는 정지함수가 아닌 함수와 정지함수를 동시에 사용하고자 할 때 사용합니다. 이는 정지함수 내부에서만 실행할 수 있지만, 내부는 정지함수가 아니며, 타API호출이나DB호출 이후 콜백과Continuation.resume()등을 통해 값을 반환합니다. 즉, 이는 정지함수와 동기함수를 이어주는 인터페이스의 역할을 수행합니다.
@Test
fun main() = runTest {
	val result = suspendCancellableCoroutine<Int> { cancellableContinuation ->
		// 내부는 코루틴 스코프 제공 X
        // delay(1000L) // ERROR! - Suspension functions can be called only within coroutine body

    	// cancellable함수임으로 캔슬되었을 때 행동 정의 가능
		cancellableContinuation.invokeOnCancellation { error ->
			println("cancelled by $error")
		}

        // 동기 함수와 비동기 함수를 이어줌
        apiCalls(
        	onSuccess = { result ->
            	cancellableContinuation.resume(result)
            },
            onFailed = { error ->
            	cancellableContinuation.cancel(error)
            }
        )
	}

    launch {
    	println("Good")
    }

	println(result)
}
그렇다고 DB, API 요청에 모두 위와 같이 정지 코루틴을 활용하고, yield를 통해 코루틴을 양보하는 것은 어려운 일입니다. 따라서 결국에는 코루틴과 같이 동작하는 reactive하게 제공되는 API를 활용하여 구현하는 것을 권장합니다. (Retrofit, Room, webClient 등등...)
10장 예외 처리
코루틴의 예외는 부모와 자식들 모두를 취소시킵니다.
이는 각각의
Job의 트리형태로 부모와 이어져있기 때문입니다. (구조화된 동시성)내부 소스에서
Job이 예외를 발생시킬 때 부모, 자식에게 전파함
코루틴에서 이러한 예외를 처리하기위해서 try-catch가 아닌 SupervisorJob을 활용합니다.
SupervisorJob
이는 자식에서 발생한 모든 예외를 무시할 수 있습니다.
@Test
fun main() = runBlocking {
	val scope = CoroutineScope(SupervisorJob())
	scope.launch {
		delay(1000L)
		throw Error("Some Error")
	}

	scope.launch {
		delay(2000L)
		println("Good")
	}

	delay(3000L)
}

// 출력
Exception in thread "DefaultDispatcher-worker-1 @coroutine#2" java.lang.Error: Some Error
...
GoodSupervisorJob은 코루틴을 시작하는 스코프로 사용되며, 이는 해당 잡의 자식들의 예외를 전달하지 않습니다.
supervisorScope
예외 전파를 막는 또다른 방법으로 supervisorScope이 있습니다. 이는 다른 코루틴에서 발생한 예외를 무시하고 부모와의 연결을 유지한다는 점에서 아주 편리합니다.
이는 coroutineScope와 동일하게 새로운 스코프에서 코루틴을 시작하지만, SupervisorJob의 기능을 상속한다고 보면 됩니다.
@Test
fun main() = runBlocking {
	supervisorScope {
		launch {
			delay(1000L)
			throw Error("Some Error")
		}

		launch {
			delay(2000L)
			println("Good")
		}
	}
	delay(1000L)
	println("Done")
}

// 출력 결과
Exception in thread "Test worker @coroutine#2" java.lang.Error: Some Error
...
Good
Done
await
async 코루틴 빌더는 launch처럼 부모 코루틴을 종료하고 부모와 관련있는 다른 코루틴 빌더도 종료시킵니다. 하지만 await()은 어떨까요?
이는 Launch와 동일하게 작동 -> 에러를 부보 및 자식에게 전달 하지만 타이밍이 다릅니다. 즉, await할 때 오류를 전파하게 됩니다.
CancellationException은 부모까지 전파되지 않습니다.
public actual typealias CancellationException = java.util.concurrent.CancellationException코루틴 내부에서 예외들 중 CancellationException이 서브클래스라면 부모로 전파되지 않습니다.
하지만 에러를 전파하지 않을 뿐 현재 코루틴을 취소합니다. (자식 코루틴도 취소됨)
object TestException : CancellationException()

@OptIn(ExperimentalCoroutinesApi::class)
@Test
fun coroutineTest() = runTest {
   launch {
       launch {
           delay(1000)
           println("Good")

       }
       throw TestException
   }
   launch {
       delay(2000)
       println("Hello")
   }
}

// 출력
(2초뒤)
Hello
코루틴 예외 핸들러
코루틴의 예외를 처리할 때는 CoroutineExceptionHandler컨텍스트를 활용할 수 있습니다. 이를 통해 예외가 발생했을 때 리스너를 달 수 있습니다.
@Test
fun coroutineTest() = runBlocking {
    val handler = CoroutineExceptionHandler { coroutineContext, throwable ->
        println("coroutineContext : $coroutineContext and error : $throwable")
    }

    val scope = CoroutineScope(SupervisorJob() + handler)

    scope.launch {
        delay(1000L)
        throw Error("Some Error")
    }
    scope.launch {
        delay(2000)
        println("do something")
    }

    delay(3000)
}

// 출력
coroutineContext : [...] and error : java.lang.Error: Some Error
do something
요약
코루틴의 기본 빌더는 예외가 자식에서 부모로 전파됩니다.
이를 핸들링하기 위해 SupervisorJob, supervisorScope, CoroutineExceptionHandler 등을 활용할 수 있습니다.