
21장 플로우 만들기
원시값을 가지는 플로우
flowOf를 활용해 간단하게 플로우를 만들 수 있다.
flowOf(1, 2, 3, 4,5 ).colect {
	// TODO
}
값이 없는 플로우면 emptyFlow<Int>의 형태로 제공
컨버터
asFlow를 활용해 다음과 같은 타입을 플로우로 바꿀 수 있다.
IterableIteratorSequenceMonoFluxList
등등
함수를 플로우로 선언하기
함수가 플로우를 반환하도록 할 수 있다.
fun someFunction(): Flow<Int> = flow {
	// Do Something
    emit(2)
}
플로우와 리액티브 스트림
Flux, Mono또한 라이브러리에서 플로우의 변환을 제공한다.
kotlinx-coroutines-reactor라이브러리를 활용하라
채널 플로우와 콜백 플로우
채널 플로우
채널 플로우는 코루틴을 하나 열어서 값들을 미리 방출합니다. (채널과 동일하다고 봐도 됨) 이에 따라 emit 대신 send를 사용합니다.
콜백 플로우
콜백플로우는 채널플로우와 비슷하지만 값들을 전송하거나 받을 때 콜백을 달 수 있습니다.
두 가지 형태 모두 특정한 상황에서 사용되며 이런게 있다 정도로만 알고 넘어가기
요약
flowOF, emptyFlow, asFlow, fun func() = flow {}, channelFlow, callbackFlow 등 존재
22장 플로우 생명주기 함수
플로우는 데코레이터로 생명주기에 따른 콜백을 달 수 있다.
onEach
플로우 각각의 값에 대한 콜백 수행
원소가 흐를 때마다 호출 됨
suspend fun main() {
	flowOf(1, 2, 3, 4)
    	.onEach { println(it) }
        .collect()
}

// 출력 결과
1
2
3
4
onStart
플로우가 시작되는 경우 호출되는 리스너 설정
첫 번째 원소가 호출될 때 같이 실행 됨
suspend fun main() {
	flowOf(1, 2, 3, 4)
    	.onStart { println("Start") }
    	.onEach { println(it) }
        .collect()
}

// 출력 결과
Start
1
2
3
4
특이한 점은 첫 원소가 호출될 때 같이 실행되지만, onStart에서 emit을 하게 된다면 해당 원소가 가장 먼저 소비된다.
@Test
fun main() = runTest {
	flowOf(1, 2, 3, 4)
		.onStart {
			println("Start")
			emit(0)
		}
		.onEach { println(it) }
		.collect()
}

// 출력 결과
0
1
2
3
4
onCompletion
플로우가 완료될 때 실행되는 콜백
getUserInfo()
	.onStart { showProgressBar() }
    .onComplete { hideProgressBar() }
    .collectLatest { showUserInfo(it) }
    .flowOn(iODisPatcher)
OnEmpty
플로우가 예기치 않은 이벤트를 발생하면 값을 내보내기전에 완료될 수 있다.
onEmpty는 원소를 내보내기 전에 플로우가 완료되면 실행된다. (기본값 대용 사용 가능)
@Test
fun main() = runTest {
	flow<List<Int>> {
		delay(1000L)
	}.onEmpty {
		println("Emit EmptyList")
		emit(emptyList())
	}.onEach { println(it) }
	 .collect()
}

// 출력 결과
Emit EmptyList
[]
Catch
예외가 발생하면 플로우는 아애로 흐르며 처리하는 단계를 하나씩 닫는다. 하지만 예외를 잡을 수도 있다.
@Test
fun main() = runTest {
    val flow = flow {
        emit(1)
        emit(2)
        throw IllegalArgumentException("Test Error")
        emit(3)
    }
    flow.catch {
        println("Catch Error $it")
    }.onEach { println(it) }
        .collect()
}

// 출력 결과
1
2
Catch Error java.lang.IllegalArgumentException: Test Error- 기존의 플로우는 멈추게 된다. (onCompletion은 호출)
- 또한 catch의 윗부분에서 발생한 에러만 수집하게 된다.
@Test
fun main() = runTest {
    val flow = flow {
        emit(1)
        emit(2)
        throw IllegalArgumentException("Test Error")
        emit(3)
    }
    flow.catch {
        println("Catch Error $it")
    }.onEach {
        println(it)
        throw IllegalArgumentException("Test Error2")
    }.collect()
}

// 출력 결과
1

Test Error2
java.lang.IllegalArgumentException: Test Error2
잡히지 않은 예외
플로우에서 잡히지 않은 에러는 예외를 뱉게된다. 이는 try-catch를 통해 예외를 잡을 수 있다.
하지만 마지막 연산에 대한 예외 처리가 불가능 함으로 아래와 같은 방식은 도움이 됮 ㅣ않는다.
@Test
fun main() = runTest {
    launch {
        try {
            val flow = flow {
                delay(1000L)
                emit(1)
                delay(1000L)
                emit(2)
                throw IllegalArgumentException("Test Error")
                emit(3)
            }
            flow.onEach {
                println(it)
            }.collect()
        } catch (e:Exception){
            println("Error Has Thrown")
        }
    }

    launch {
        repeat(5){
            delay(1000L)
            println("Do Something..")
        }
    }
}

// 출력 결과
1
Do Something..
2
Error Has Thrown
Do Something..
Do Something..
Do Something..
Do Something..collect에서 에러가 발생할 수 있다면, onEach로 해당 행동을 옮기고, onEach를 달자.
flow.onEach { do something }
	.catch { catch error }
    .collect()
flowOn
플로우의 람다식은 모두 중단 함수이다. 따라서 코루틴 컨텍스트가 필요하며 코루틴의 디스패쳐의 기능을 flowOn이 수행하게 된다.
- 기본 값은
unConfined라고 생각해도 좋다. (collect된 콘텍스트에서 진행한다.)
kotlin.lang - flowOn
주어진 콘텍스트에 따라 플로우의 수집 환경을 변경한다. (이전 콘텍스트에만 적용되고 이후 콘텍스틑 적용되지 않는다.)
에서는 아래와 같은 예제를 제공하지만 항상 이처럼 동작하지는 않는다.
withContext(Dispatchers.Main) {
    val singleValue = intFlow // will be executed on IO if context wasn't specified before
        .map { ... } // Will be executed in IO
        .flowOn(Dispatchers.IO)
        .filter { ... } // Will be executed in Default
        .flowOn(Dispatchers.Default)
        .single() // Will be executed in the Main
}
컨텍스트를 변경해도 디스패처를 변경하지 않은 경우 플로우의 순차적 특성을 유지한다.
하지만 디스패쳐가 변경되게 된다면 채널을 생성해 해당 채널에 플로우를 모두 수집해 놓고, 해당 채널에서 다른 코루틴으로 플로우를 방출하게 된다.
- 중간에 버퍼가 하나 생긴다고 생각
따라서 flowOn으로 디스패쳐가 변경된 상태에서 플로우의 다운스트림은 업스트림 플로우가 이미 방출되었을 때 취소될 수 있다. (동기화 에러 발생 가능)
그리고 flowOn에 콘텍스트 키가 동일하다면 첫번째 오퍼레이터가 우선순위를 가지게 된다.
@Test
fun main() = runTest {

    val userFlow = flow {
        repeat(2) {
            emit(("User$it"))
        }
    }

    userFlow
        .map {
            val ctx = currentCoroutineContext()
            val dispatcher = ctx[ContinuationInterceptor]
            val name = ctx[CoroutineName]?.name
            println("Mapping Context : name : $name dispatcher : $dispatcher")
            "Mapped $it"
        }
        .flowOn(CoroutineName("Name2") + Dispatchers.IO)
        .onEach {
            val ctx = currentCoroutineContext()
            val dispatcher = ctx[ContinuationInterceptor]
            val name = ctx[CoroutineName]?.name
            println("Mapping Context : name : $name dispatcher : $dispatcher")
        }
        .flowOn(CoroutineName("Name3") + Dispatchers.Default)
        .collect {
            val ctx = currentCoroutineContext()
            val dispatcher = ctx[ContinuationInterceptor]
            val name = ctx[CoroutineName]?.name
            println("Mapping Context : name : $name dispatcher : $dispatcher")
            println("Collect $it")
        }
}

// 출력 결과
Mapping Context : name : Name2 dispatcher : Dispatchers.IO
Mapping Context : name : Name2 dispatcher : Dispatchers.IO
Mapping Context : name : Name3 dispatcher : Dispatchers.Default
Mapping Context : name : Name3 dispatcher : Dispatchers.Default
Mapping Context : name : null dispatcher : StandardTestDispatcher[scheduler=kotlinx.coroutines.test.TestCoroutineScheduler@648c94da]
Collect Mapped User0
Mapping Context : name : null dispatcher : StandardTestDispatcher[scheduler=kotlinx.coroutines.test.TestCoroutineScheduler@648c94da]
Collect Mapped User1
LaunchIn
collect는 플로우가 완료될 때 까지 코루틴을 중단한다.
launch빌더로collect를 매핑하면 코루틴이 정지되지 않고 실행될 수 있다. (단 collect 못 씀)
@Test
fun main() = runTest {

    val userFlow = flow {
        repeat(2) {
            emit(("User$it"))
        }
    }

    launch(CoroutineName("Name3") + Dispatchers.Default) {
        userFlow
            .onEach {
                val ctx = currentCoroutineContext()
                val dispatcher = ctx[ContinuationInterceptor]
                val name = ctx[CoroutineName]?.name
                println("Mapping Context : name : $name dispatcher : $dispatcher")
            }
            .flowOn(CoroutineName("Name2") + Dispatchers.IO)
            .onEach {
                val ctx = currentCoroutineContext()
                val dispatcher = ctx[ContinuationInterceptor]
                val name = ctx[CoroutineName]?.name
                println("Coroutine Context : name : $name dispatcher : $dispatcher")
            }
            .launchIn(this)
    }
}

// 출력 결과
Mapping Context : name : Name2 dispatcher : Dispatchers.IO
Mapping Context : name : Name2 dispatcher : Dispatchers.IO
Coroutine Context : name : Name3 dispatcher : Dispatchers.Default
Coroutine Context : name : Name3 dispatcher : Dispatchers.DefaultRxJava의 subscribeOn과 publishOn의 개념과 비슷하다.
요약
- 플로우에 다양한 데코레이터를 달 수 있다.
- onEach, onCompletion, onEmpty 등
- 플로우를 어디서 시작할지 지정할 수 있다.
- flowOn, launchIn 등
- 플로우를 어떻게 만드는지
- flowOf, flow {}, 함수형 flow 등등
23장 플로우 처리
플로우는 값이 흐르는 파이프 정도로 생각했다. 이런 파이프라인에서는 데이터를 수정할 수 있다. 이를 플로우 처리라고 한다.
컬렉션 처리에 사용되는 함수 대부분을 모두 사용가능하다.
map
컬렉션의 map과 동일하다. 다만 중간 콜렉션을 생성하지않는 다는 점, LAZY로 계산된다는 점이 다르다.
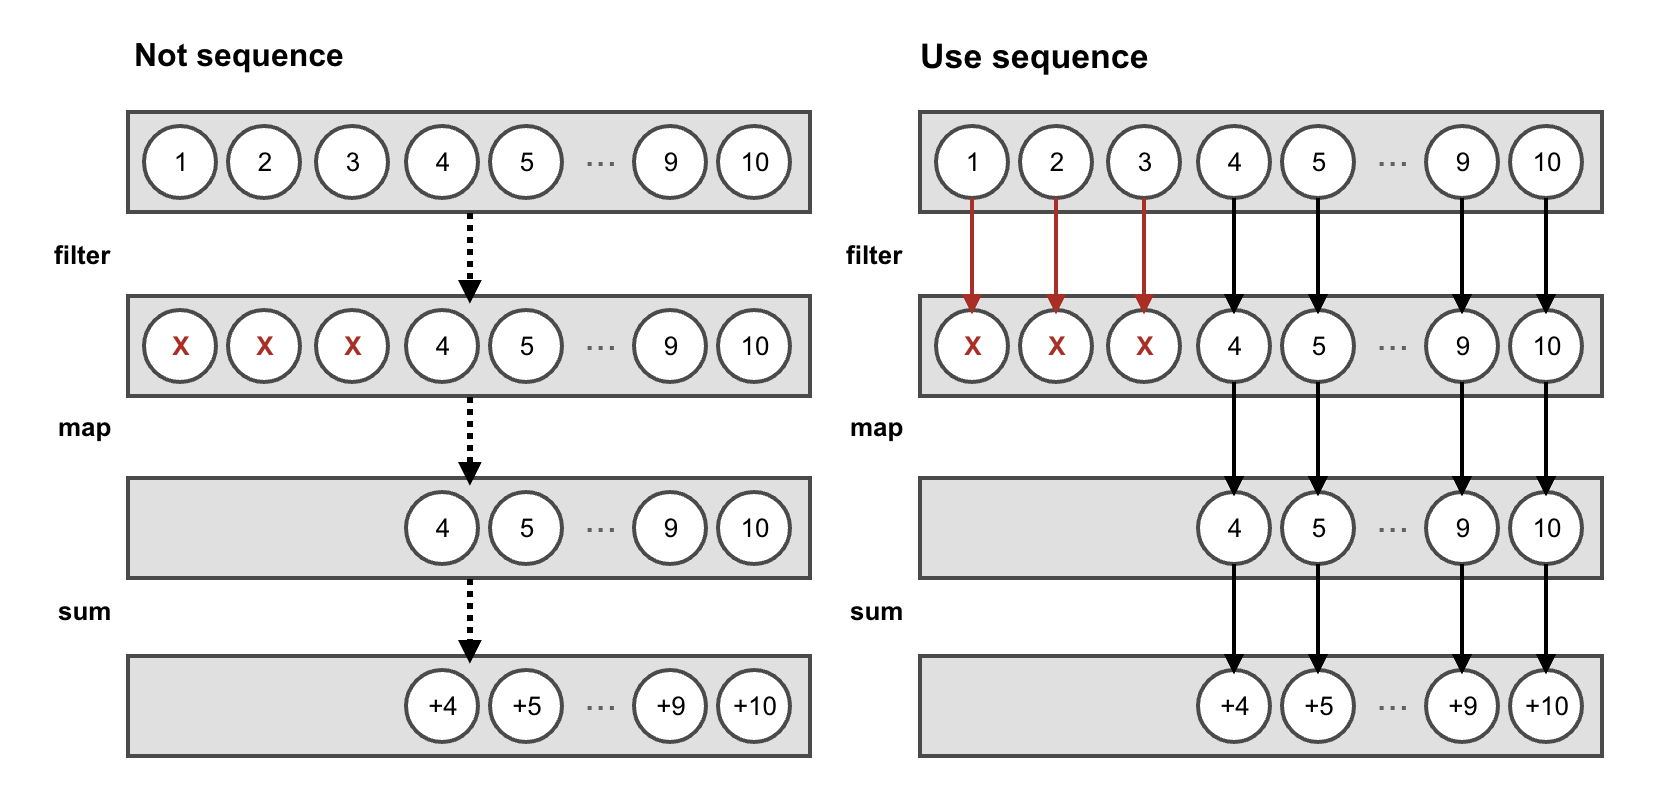
filter
조건에 맞는 값들을 필터링 한다.
take, drop
- take : 특정 앞의 N개 원소를 취득
- drop : 특정 앞의 N개 원소를 버리기
컬렉션 처리의 작동 방법
플로우의 데이터 연산의 내부는 모두 다음과 같다.
@PublishedApi
internal inline fun <T, R> Flow<T>.unsafeTransform(
    @BuilderInference crossinline transform: suspend FlowCollector<R>.(value: T) -> Unit
): Flow<R> = unsafeFlow { // Note: unsafe flow is used here, because unsafeTransform is only for internal use
    collect { value ->
        return@collect transform(value)
    }
}
내부적으로 flow를 하나더 열고 transform된 값을 emit하는 것을 동작한다.
@Test
fun main() = runTest {
   // 실제 소스
   flowOf('a', 'b')
        .map { it.uppercaseChar() }
        .collect { println(it) }

	// 구현 내부 소스
    flow map@{
        flow flowOf@{
            for (element in arrayOf('a', 'b', 'c')) {
                this@flowOf.emit(element)
            }
        }.collect { this@map.emit(it) }
    }.collect {
        println(it)
    }
}
merge, zip, combine
두 개 이상의 플로우를 하나의 플로우로 합칠 수도 있다.
merge
두개의 플로우에서 생성되는 원소들을 시간순으로 무지성 합치기
@Test
fun main() = runTest {
    val ints = flowOf(1, 2, 3)
    val doubles = flowOf(0.1, 0.2, 0.3)
    merge(ints,doubles).collect{
        println(it)
    }
}

// 출력 결과
1, 2, 3, 0.1, 0.2, 0.3
또는 이외의 순서
처리되는 시간순으로 머지됨으로 순서가 랜덤일 수도 있다. 따라서 여러 이벤트나 값들을 똑같은 방법으로 처리할 때 사용한다.
zip
두 플로우로부터 쌍을 만든다. 이는 한 플로우가 먼저와도 다른 플로우 쌍을 기다린다.
@Test
fun main() = runTest {
    val ints = flowOf(1, 2, 3)
        .onEach { delay(400L) }
    val longs = flowOf(1L, 2L, 3L)
        .onEach { delay(500L) }
    val doubles = flowOf(0.1, 0.2, 0.3)
        .onEach { delay(1000L) }

    ints.zip(doubles) { f1, f2 ->
        f1 to f2
    }.collect {
        println(it)
    }
}

// 출력 결과
1초 후
(1, 0.1)
1초 후
(2, 0.2)
1초 후
(3, 0.3)zip은 다음과 같이 2개의 플로우만 합칠 수 있도록 선언되어 있으므로
public fun <T1, T2, R> Flow<T1>.zip(other: Flow<T2>, transform: suspend (T1, T2) -> R): Flow<R> = zipImpl(this, other, transform)3개이상의 집을 합칠 때는 zip을 한번 더 쓸 수 있다.
fun main() = runBlocking {
    val flow1 = flowOf(1, 2, 3)
    val flow2 = flowOf("A", "B", "C")
    val flow3 = flowOf(10.0, 20.0, 30.0)

    // 세 개의 Flow를 합친다
    val combinedFlow = flow1.zip(flow2) { value1, value2 ->
        "Flow1: $value1, Flow2: $value2"
    }.zip(flow3) { previousResult, value3 ->
        "$previousResult, Flow3: $value3"
    }

    // 결과 출력
    combinedFlow.collect { result ->
        println(result)
    }
}
combine
combine은 첫 번째 원소까지는 zip과 동일하나 이후부터는 이전 원소를 새로운 원소가 대체하게 된다.
즉 최신성을 유지하고자 하는 UI에 사용하기에 적합하다.
val reportUiState = combine(
    _report, _reportContents, _selectedReportId
) { report, reportContents, selectedReportIdx ->
    ReviewReportUiState(
        reports = report,
        reportContents = reportContents,
        selectedReportId = selectedReportIdx
    )
}.stateIn(
    scope = viewModelScope,
    started = SharingStarted.WhileSubscribed(5000),
    initialValue = ReviewReportUiState()
)
fold, scan
fold는 각각의 값들을 하나로 합치는 연산을 수행한다.
@Test
fun main() = runTest {
    val ints = flowOf(1, 2, 3, 4, 5, 6)

    val result: Int = ints.fold(0) { acc, i -> acc + i }
    println(result)
}

// 출력 결과
21
컬렉션 연산의경우 fold, reduce로 나뉘어 초기값을 지정할 수 있다는 점이 다른데, flow의 fold에서는 초기값을 지정할 수 있다.
scan은 누적되는 과정의 모든 값을 생성한다.
@Test
fun main() = runTest {
    val ints = flowOf(1, 2, 3, 4, 5, 6)

    val result: List<Int> = ints.scan(0) { acc, i -> acc + i }.toList()
    println(result)
}

// 출력 결과
[0, 1, 3, 6, 10, 15, 21]
이는 이전 단계에서 값을 받은 즉시 새로운 값을 만들기 때문에 Flow에서 유용하게 사용된다.
구현 방식은 내부적으로 accumulator이라는 var변수를 선언해 저장하고, 이에 대한 값을 반환한다.
public fun <T, R> Flow<T>.runningFold(initial: R, @BuilderInference operation: suspend (accumulator: R, value: T) -> R): Flow<R> = flow {
    var accumulator: R = initial
    emit(accumulator)
    collect { value ->
        accumulator = operation(accumulator, value)
        emit(accumulator)
    }
}
flatMapConcat, flatMapMerge, flatMapLatest
컬렉션의 경우 flatMap은 맵과 비슷하지만 원소를 평탄화하여 반환한다.
예를 들어 학교 한 반의 학생 리스트를 반환하는 예제이다.
val students : List<Studnet> = classes.flatmapt { it.students }그렇다면 flatMap도 동일하게 평탄화된 원소를 반환해야한다. 라고 생각할 수 있지만, 알아둬야할 것은 원소가 나오는 시간이 다르다는 점이다.
따라서 동시성 처리를 지원하는 flatMapConcat, flatMapMerge, flatMapLatest 이 등장하게 되었다.
flatMapConcat
생성된 플로우를 하나씩 처리하지만, 첫 번째 플로우가 완료되었을 때 두번쨰 플로우가 수집되게 된다.
다음 예를 보자.
fun flowFrom(elem: String) = flowOf(1, 2, 3)
    .onEach { delay(1000L) }
    .map { "${it}_${elem}" }

@Test
fun main() = runTest {
    flowOf("A", "B", "C")
        .flatMapConcat(::flowFrom)
        .onEach { println(currentTime) }
        .collect { println(it) }
}

// 출력 결과
1000
1_A
2000
2_A
3000
3_A
4000
1_B
5000
2_B
6000
3_B
7000
1_C
8000
2_C
9000
3_C
따라서 모든 플로우가 수집되기까지 9초라는 시간이 걸리게 된다.
flatMapMerge
기존의 플로우의 merge처럼 오는대로 무지성으로 합쳐버린다.
fun flowFrom(elem: String) = flowOf(1, 2, 3)
    .onEach { delay(1000L) }
    .map { "${it}_${elem}" }

@Test
fun main() = runTest {
    flowOf("A", "B", "C")
        .flatMapMerge { flowFrom(it) }
        .onEach { println(currentTime) }
        .collect { println(it) }
}

// 출력 결과
1000
1_A
1000
1_B
1000
1_C
2000
2_A
2000
2_B
2000
2_C
3000
3_A
3000
3_B
3000
3_C
합쳐지는 것은
플로우단위 임을 유의하라
동시성 처리 수를 제한할 수 있다. (기본 값 16)
fun flowFrom(elem: String) = flowOf(1, 2, 3)
    .onEach { delay(1000L) }
    .map { "${it}_${elem}" }

@Test
fun main() = runTest {
    flowOf("A", "B", "C")
        .flatMapMerge(concurrency = 2) { flowFrom(it) }
        .onEach { println(currentTime) }
        .collect { println(it) }
}

// 출력 결과
1000
1_A
1000
1_B
2000
2_A
2000
2_B
3000
3_A
3000
3_B
4000
1_C
5000
2_C
6000
3_C
이는 플로우의 각 원소에 대한 데이터를 요청할 때 주로 사용된다.
주로 async, awaitAll을 활용하는 형태로 사용하고 있지만, flatMapMerge를 활용하면 다음과 같은 이점이 있다.
- 동시성 제어 가능 (밴드위드를 조절할 수 있다.)
- 데이터가 생성될 때 마다 Flow를 반환하여 데이터파이프라인을 이어갈 수 있다.
@FlowPreview
public fun <T> Flow<Flow<T>>.flattenMerge(concurrency: Int = DEFAULT_CONCURRENCY): Flow<T> {
    require(concurrency > 0) { "Expected positive concurrency level, but had $concurrency" }
    return if (concurrency == 1) flattenConcat() else ChannelFlowMerge(this, concurrency)
}

// In Channel
override fun create(context: CoroutineContext, capacity: Int, onBufferOverflow: BufferOverflow): ChannelFlow<T> =
        ChannelFlowMerge(flow, concurrency, context, capacity, onBufferOverflow)
이는 내부적으로 Channel을 생성하고 (64사이즈의 버퍼채널) 해당 채널에서 flow를 반환하는 형식으로 구현되어 있다. (concurrentcy는 채널의 동시 처리 개수를 정의)
flatMapLatest
이는 새로운 플로우가 나타나면 이전플로우를 잊어버린다.
fun flowFrom(elem: String) = flowOf(1, 2, 3)
    .onEach { delay(1000L) }
    .map { "${it}_${elem}" }

@Test
fun main() = runTest {
    flowOf("A", "B", "C")
        .onEach { delay(1200L) }
        .flatMapLatest { flowFrom(it) }
        .onEach { println(currentTime) }
        .collect { println(it) }
}

// 출력 결과
2200
1_A
3400
1_B
4600
1_C
5600
2_C
6600
3_C- A, B, C사이에 지연이 없으면 A, B에 대한 플로우는 출력되지 않는다.
이는 플로우가 지연이 없을 때 까지 최신 원소를 유지한다.
재시도(retry)
예외가 발생한 뒤 플로우는 중지되지만, 이전 단계에 대한 참조를 가지고있기에 플로우를 다시 시작할 수 있다.
사용예는 다음과 같다.
fun testFlows() = flowOf(1, 2, 3)
    .onEach { if(it==3) throw IllegalStateException("Test Error") }
    .map { "flow Emit ${it}" }

@Test
fun main() = runTest {
    testFlows()
        .retry(retries = 2) {
            println(it.message)
            true
        }
        .collect { println(it) }
}

// 출력 결과
flow Emit 1
flow Emit 2
Test Error
flow Emit 1
flow Emit 2
Test Error
flow Emit 1
flow Emit 2

(에러 반환)
Test Error
2번 까지는 재시도 하는 것을 알 수 있다. 또한 재시도할 때 콜드스트림임으로 처음부터 재시도함을 유의한다.
tryWhen을 활용해 좀 더 디테일하게 에러를 제어할 수 있다.
fun testFlows() = flowOf(1, 2, 3)
    .onEach { if(it==3) throw IllegalStateException("Test Error") }
    .map { "flow Emit ${it}" }

@Test
fun main() = runTest {
    testFlows()
        .retryWhen { e, attempt ->
            println(e.toString() + "tries : $attempt")
            e is IllegalStateException && attempt < 2
        }
        .collect { println(it) }
}

// 출력 결과
flow Emit 1
flow Emit 2
java.lang.IllegalStateException: Test Errortries : 0
flow Emit 1
flow Emit 2
java.lang.IllegalStateException: Test Errortries : 1
flow Emit 1
flow Emit 2
java.lang.IllegalStateException: Test Errortries : 2

(에러 반환)
Test Error
중복 제거 함수
원소가 동일하다고 판단되면 distinctUntilChanged를 활용해 제거할 수 있습니다.
distinctUntilChanged는 바로 이전의 원소와 동일한 원소만 제거합니다.
data class Student(
    val id: Int,
    val name: String,
)

@Test
fun main() = runTest {
    val students = flowOf(
        Student(1, "해찬"),
        Student(1, "해찬"),
        Student(2, "차민"),
        Student(3, "현섭"),
        Student(4, "보현"),
        Student(1, "해찬"),
    )
    students.distinctUntilChanged()
        .collect { println(it) }
}

// 출력 결과
Student(id=1, name=해찬)
Student(id=2, name=차민)
Student(id=3, name=현섭)
Student(id=4, name=보현)
Student(id=1, name=해찬)- 기본적으로
equals를 활용합니다.data class의equals오버라이딩을 활용할 수 있습니다. areEquivalent을 직접 구현하여distincUntilChagnedBy를 활용할 수 있습니다.
최종 연산
최종 연산을 위해서는 toList, collect, first, take, fold 등 다양한 연산을 제공합니다.
플로우가 더이상 아니게 되는 연산을 최종 연산이라고 합니다.
요약
플로우 처리를 지원하는 다양한 방법이 잇습니다. collect메서드와 flow빌더 정도만 확실하게 알고가도 충분합니다.
24장 공유플로우와 상태플로우
일반적인 플로우는 콜드 데이터이기 때문에 요청할 떄마다 값이 계산한다. 따라서 상태를 가지는 공유플로우도 생겨나게 됬다.
공유플로우
MutableSharedFLow로 생성할 수 있으며, 메시지를 emit하면 모든 코루틴이 수신하게 된다.
@Test
fun main() = runTest {

    val mutableSharedFlow = MutableSharedFlow<String>(replay = 0)

    launch {
        mutableSharedFlow.collect {
            println("#1 received $it")
        }
    }

    launch {
        mutableSharedFlow.collect {
            println("#2 received $it")
        }
    }

    delay(1000L)
    mutableSharedFlow.emit("Message1")
    mutableSharedFlow.emit("Message2")
}

// 출력
#1 received Message1
#2 received Message1
#1 received Message2
#2 received Message2
...(프로그램 안끝남)
위 프로그램은
runTest의 자식 코루틴이launch로 시작된 뒤MutableStateFlow를 감지하고 있는 상태임으로 종료되지 않음.MutalbeStateFlow를 종료할 방법은 없음으로, 전체 스코프를 취소하는 방법밖에 없음
생성자로 전달하는 reply는 캐시의 크기를 뜻한다. (default : 0 -> 상태를 안 가짐)
@Test
fun main() = runTest {

    val mutableSharedFlow = MutableSharedFlow<String>(replay = 2)

    mutableSharedFlow.emit("Message1")
    mutableSharedFlow.emit("Message2")
    mutableSharedFlow.emit("Message3")

 	println(mutableSharedFlow.replayCache) // [Message2, Message3]
    mutableSharedFlow.collect {
        println(it) // Message2 Message3
    }

    mutableSharedFlow.resetReplayCache()
    println(mutableSharedFlow.replayCache) // []
    this.cancel()
}MutableShardFlow는 수신자와 송신자를 구분되어 인터페이스를 구현합니다. (SendChannel, ReceiveChannel과 비슷하게)
따라서 SahredFlow, FlowCollector를 모두 상속합니다. 다음과 같이 백킹 프로퍼티를 정의하여 특정 인터페이스만 노출시킬 수 있습니다.
@Test
fun main() = runTest {

    val _mutableSharedFlow = MutableSharedFlow<String>(replay = 2)
    val sharedFlow: SharedFlow<String> = _mutableSharedFlow
    val collector: FlowCollector<String> = _mutableSharedFlow

    launch {
        sharedFlow.collect {
            println("#1 Collect $it")
        }
    }

    launch {
        _mutableSharedFlow.collect {
            println("#2 Collect $it")
        }
    }

    delay(1000L)
    _mutableSharedFlow.emit("Message1")
    collector.emit("Message1")
}

// 출력
#1 Collect Message1
#1 Collect Message1
#2 Collect Message1
#2 Collect Message1
shareIn
플로우는 관측 가능한 이벤트(액션)을 관측함으로써 변화에 대처할 때 사용합니다.
그러나 일반 flow도 상태를 가질 수 있도록 변환할 수 있습니다. sharedIn을 사용하면 됩니다.
@Test
fun main() = runTest {

    val flow = flowOf("A", "B", "C").onEach { delay(1000L) }

    val sharedFlow: SharedFlow<String> = flow.shareIn(
        scope = this,
        started = SharingStarted.Eagerly,
        replay = 0
    )

    delay(500L)
    launch {
        sharedFlow.collect {
            println("#1 Collect $it") // A, B, C
        }
    }
    delay(1000L)
    launch {
        sharedFlow.collect {
            println("#1 Collect $it") // B, C
        }
    }
    delay(1000L)
    launch {
        sharedFlow.collect {
            println("#1 Collect $it") // C
        }
    }
}

// 출력
#1 Collect A
#1 Collect B
#1 Collect B
#1 Collect C
#1 Collect C
#1 Collect Cstarted의 속성은 다음과 같습니다.
-
SharingStarted.Eagerly: 즉시 값을 감지하기 시작한다.replay값이 0 이라면 모든 값을 유실한다. (쓰는 이유 X)
-
SharingStarted.Lazily: 첫 번째 구독자가 나올 떄 감지하기 시작- 첫 번째 구독자는 모든 값을 수신하는 것이 보장
-
WhileSubscribed: 첫 번쨰 구독자가 나올 때 감지하기 시작하며, 마지막 구독자가 사라지면 플로우도 멈춤- 마지막 구독자가 사라진 후 몇 초 뒤에 플로우를 멈출지 설정 가능
WhileSubscribed(5000)
공유 플로우는 프로퍼티로 저장되어 사용되어야 함 -> 새로운 공유플로우를 만들면 안됨
상태 플로우
reply값이 1인 공유플로우와 비슷하게 작동한다.
이에 따라 초기값이 생성자를 통해 전달되어야 하며, 해당 값은 value인자를 통해 얻어올 수 있다.
@Test
fun main() = runTest {

    val mutableStateFlow = MutableStateFlow("A")

    launch {
        mutableStateFlow.collect {
            println("#1 Received $it")
        }
    }

    delay(1000L)
    mutableStateFlow.value = "B"

    launch {
        mutableStateFlow.collect {
            println("#2 Received $it")
        }
    }

    delay(1000L)
    mutableStateFlow.value = "C"
}

// 출력
#1 Received A
#1 Received B
#2 Received B
#1 Received C
#2 Received C
따라서 mutableStateFlow를 활용할 때는
collectLatest를 굳이 활용할 필요가 없다.
stateIn
stateIn은 Flow<T>를 StateFLow<T>로 변환하는 함수이다.
즉 플로우를 상태를 가진 플로우로 변환시켜준다. (reply = 1인 핫 플로우)
@Test
fun main() = runTest {

    val flow = flowOf("A", "B", "C")
        .onStart { delay(1000L) }
        .onEach { delay(1000L) }
        .onEach { println("Produced $it") }

    val stateFlow = flow.stateIn(
        scope = this,
        started = SharingStarted.WhileSubscribed(5000L),
        initialValue = "X"
    )

    stateFlow.collectLatest {
        println("Received $it")
    }
}

// 출력
Received X
Produced A
Received A
Produced B
Received B
Produced C
Received C
즉 stateIn에도 초기 값을 지정할 수 있습니다. (지정하지 않는다면 첫 번째 값을 기다림)
요약
안드로이드 개발자들에게 특히 중요한 상태를 가진 플로우이다.