1일 1 TIL를 지키지 않은 점에 대해 반성하며... 오늘은 fastify 간단한 사용법에 대해 알아보려고 한다. 지극히 개인적인 의견이 들어가 있으므로 100% 정확한 내용이 아니라는 점 참고하면서 봐주세요.
1. Fastify 서버 구축을 해보자
1.1 Fastify를 사용하려는 이유
- 음... 사실 fastify를 사용하려는 이유는 글쎄... 내가 자주 보는 velopert 유튜브 라이브코딩에서 사용하는걸 봐서가 솔직히 가장 크고...
- express가 가장 많이 사용되긴 하는데 요즘에는 좀 구식인거 같기도 하고.. (2년전 업데이트 이후로 끝인듯)
- nestjs를 사용하기에는 앵귤러 스타일이라서 마음에 안들고...
1.2 Fastify란? 장점은?
내가 fastify를 조금이나마 사용해본 결과, 다음과 같은 이점이 있었던거 같다
- 타입스크립트랑 호환이 좋았던거 같다
- express 보다 지원하는 기능(플러그인, 데코레이터, 타입 체킹 등)이 더 많은듯
- 조금은 어느정도 자율적인 방식으로 개발이 가능한거 같기도... (여러 스타일로 개발이 가능하다?)
공식사이트에서 설명하는(홍보하는) 내용은 다음과 같다.
- Fastify는 최소한의 오버헤드와 강력한 플러그인 아키텍처로 최고의 개발자 환경을 제공하는 데 중점을 둔 웹 프레임워크이다.
- 가장 빠르다는 것을 강조하고 있다..ㅎㅎ 이름에서도 그렇지만... (뭐 어디든 안 그렇겠냐만은)
1.3 Fastify 세팅을 해보자
음..fastify cli가 있긴한데 생각보다 사용률이 없는거 같아서 그냥 직접 설치해서 만들어보기로 함. ... 필자는 타입스크립트를 사용하지 않고 세팅하였다. 예시를 보면서 내게 맞는 방식을 찾아서 세팅함.
예시 : https://github.com/delvedor/fastify-example
예시2 : https://github.com/fastify/fastify-cli/tree/master/templates/app
예시3 : https://github.com/fastify/fastify-autoload
yarn add fastify fastify-autoload- fastify : fastify를 사용하려면 당연히 기본으로 설치해야하는거...
- fastify-autoload : 디렉터리에 있는 모든 플러그인을 로드하고 폴더 구조와 일치하는 경로를 자동으로 구성하는 Fastify용 Convenience Plugin입니다. (그니까 폴더 경로와 url 경로를 자동으로 일치시키는 거인듯?)
// package.json
{
  "name": "server",
  "version": "0.0.1",
  "main": "index.js",
  "license": "MIT",
  "type": "module",
  "scripts": {
    "start": "fastify start -l info app.js",
    "dev": "fastify start -w -l info -P app.js"
  },
  "dependencies": {
    "fastify": "^3.23.1",
    "fastify-autoload": "^3.9.0"
  }
}
scripts를 보면 fastify 관련 명령 옵션이 있는듯하다. (fasity-cli 보면 참고)
- -l log_level: 로그 레벨~
- -w : 변경사항이 있을때 자동 reload
- -P : prettiy log (로그 이쁘게 출력 ㅋㅋ)
// app.js
import AutoLoad from 'fastify-autoload'
import path from 'path'

const __dirname = path.resolve() // 이거 근데 나는 __dirname 자동으로 쓸 수 있을지 알았는데... 아닌가

export default async function (fastify, opts) {
  fastify.register(AutoLoad, {
    dir: path.join(__dirname, 'routes'),
    options: Object.assign({}, opts),
  })
}
// ./routes/example/index.js
export default async function example(fastify, opts) {
fastify.get('/', async function (request, reply) {
return 'this is an example'
})
}fastify-autoload를 사용하니까 폴더 경로가 example인 경우 localhost:3000/example로 접속하면 자동으로 매칭이 되는 것을 알 수 있었다. (이건 좀 편한듯하다)
2. fastify를 좀 더 알아보자
2.1 플러그인 사용하기(feat. addHook)
fastify 기능 중 주요한 기능 가운데 하나로 플러그인이라는게 있다.
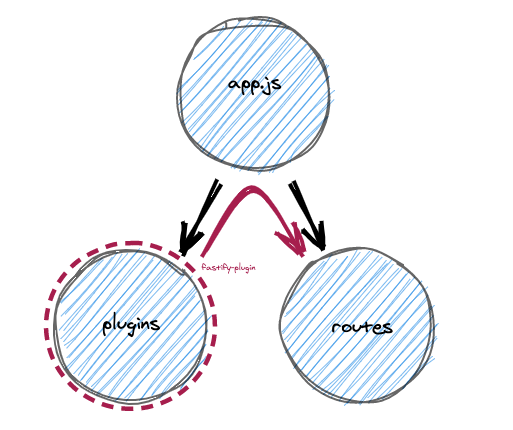
다음은 fastify example에서 설명하는 그림이다.
- plugins : 인증 및 속도 제한과 같이 전체 애플리케이션에서 공유해야 하는 모든 코드
- routes : 리디렉션 코드 및 관리 API와 같은 모든 비즈니스 로직이 포함
쉽게 말해 plugins란 routes와는 별개로 인터셉터, cors, 인증 등 공통 로직을 처리하기 위한 모듈이라고 보면 될듯하다. 사실 위에 routes 세팅하면서 fastify.register 쓴것도 플러그인인거임...
import fp from 'fastify-plugin'

async function authCallback(fastify, opts) {
  fastify.addHook('preHandler', async (request, reply) => {
    console.log('pre handler from request')
  })
}

export default fp(authCallback, {
  name: 'authPlugin',
})
이런식으로 addHook에 preHandler랑 같이 사용하면 인증로직 처리할때 편하다. hook 관련해서 종류는 많으니 공식문서 참고바람. 라이프사이클도 보면 좋을 듯하다