
Overview
react에서 인기있는 라이브러리라고 하면 여러분은 어떤게 떠오르시나요? 여러가지가 있겠지만 저는 그 중에서 React Hook Form 이 떠오릅니다. 그렇다면 궁금한 점이 한가지 생깁니다. 저 라이브러리는 뭐길래 저렇게 유명해져서 많이 사용되는 걸까요? 🤔
그래서 이번시간에는 React Hook Form이 무엇이고 왜 많이 사용되는건지 알아보도록 하겠습니다.
React Hook Form
공식 문서 소개
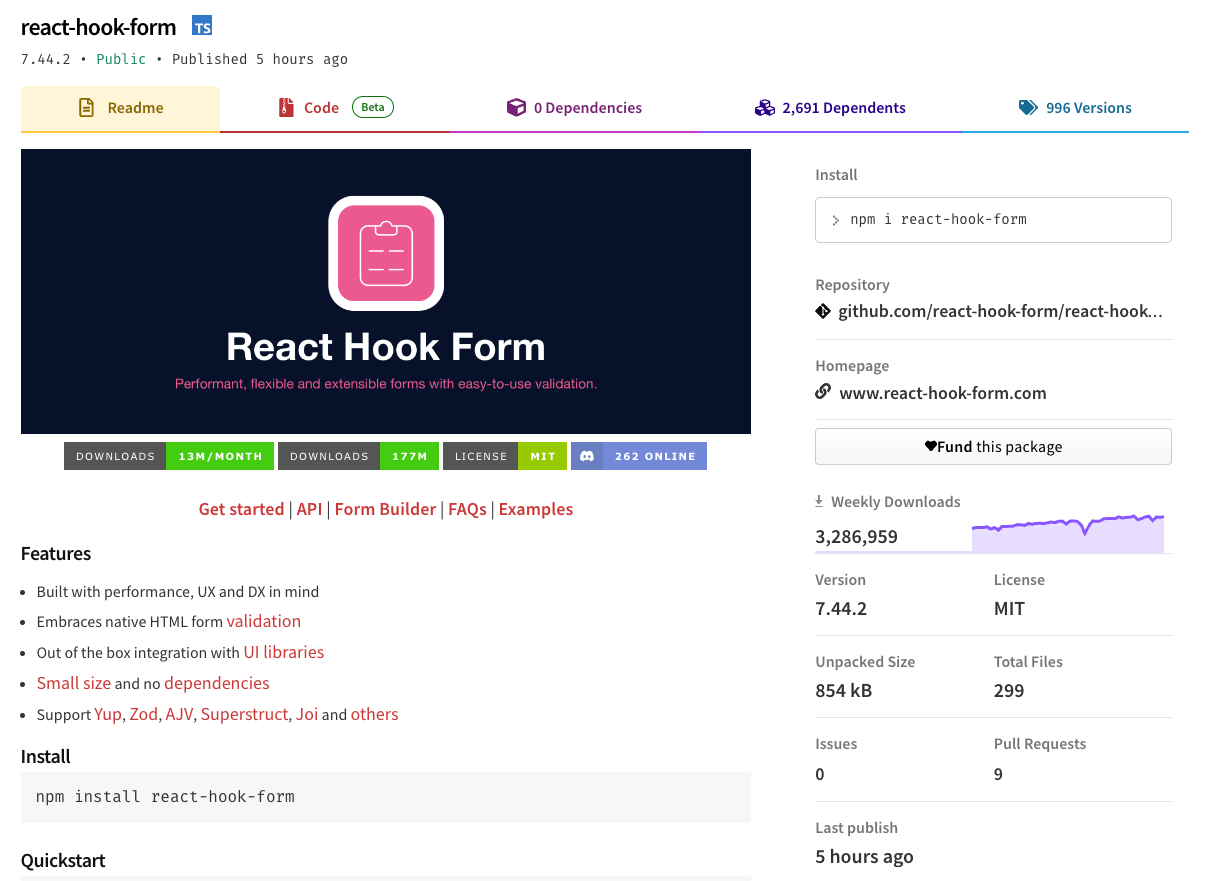
“Performant, flexible and extensible forms with easy-to-use validation.” - 공식문서
React Hook Form 공식문서 메인에서 "사용이 간편한 validation 기능을 갖춘 성능, 유연성 및 확장성이 뛰어난 form" 이라고 소개하고 있습니다.
그 밑에는 6가지 분류로 해당 라이브러리의 장점을 소개하고 있습니다.
- DX : Form을 만들 때 개발자에게 원활한 경험을 제공하는 직관적이고 기능이 완벽한 API.
- Performance : 리렌더 수를 최소화하고 유효성 계산을 최소화하며 마운트 속도를 높입니다.
- Super Light : 패키지 크기가 중요합니다. React Hook Form은 종속성이 없는 작은 라이브러리입니다.
- HTML 표준 : 기존 HTML 마크업을 활용하고 제약 조건 기반 Validation API로 form을 검증하십시오.
- Adoptable : Form state는 본질적으로 로컬이기 때문에 다른 의존성 없이 쉽게 채택될 수 있습니다.
- UX : 최상의 사용자 환경을 제공하고 일관된 Validation 전략을 제공하기 위해 노력합니다.
참고로 npm 다운로드 수가 300백만을 넘어가네요... 정말 대단한거 같습니다. 또한, 활발하게 이슈와 PR 에 대해서도 관리하는 거 같습니다. 업데이트도 활발하게 되는 것을 보니 어느정도 신뢰가 됩니다.
Less code. More performant
react-hook-form은 불필요한 리렌더를 제거하는 동시에 작성해야 하는 코드의 양을 줄입니다. 아래는 공식 문서 메인에 나오는 예시입니다.
한눈에 봐도 어떻게 사용하는지 알거 같습니다. 그만큼 처음 사용하기에 큰 거부감이 없었습니다.
import { useState } from "react";
import { useForm } from "react-hook-form"; // 18.68KB (7.32KB)
import Header from "./Header";

export function App() {
  const { register, handleSubmit } = useForm();
  const [data, setData] = useState("");

  return (
	/* "handleSubmit" will validate your inputs before invoking "onSubmit" */
    <form onSubmit={handleSubmit((data) => setData(JSON.stringify(data)))}>
      <Header />
	  {/* register your input into the hook by invoking the "register" function */}
      <input {...register("firstName")} placeholder="First name" />
      <select {...register("category", { required: true })}>
        <option value="">Select...</option>
        <option value="A">Option A</option>
        <option value="B">Option B</option>
      </select>
      <textarea {...register("aboutYou")} placeholder="About you" />
      <p>{data}</p>
      <input type="submit" />
    </form>
  );
}- register : React Hook Form의 주요 개념 중 하나는 컴포넌트를 Hook에 등록하는 것입니다. 이렇게 하면 Form 유효성 검사와 Submit 모두에 해당 값을 사용할 수 있습니다. 참고: 각 필드에는 registration 프로세스의 키로 이름이 있어야 합니다.
- handleSubmit : 최종적으로 form에 onSubmit 이벤트 발생시 실행되는 함수. onSubmit이 실행되기 전에 validation 을 수행합니다.
Isolate Re-renders
컴포넌트 리렌더를 분리하여 페이지 또는 앱의 성능을 향상시킬 수 있습니다.

그니까 그냥 Controlled Form을 사용했을 때와 비교해서 React Hook Form을 사용하면 리렌더링이 거의 발생하지 않는다는 것을 강조하는 듯 합니다.
React Hook Form 실습
- 실습 : https://github.com/ckstn0777/react-hook-form-practice
- 테스트 URL : https://ckstn0777.github.io/react-hook-form-practice/
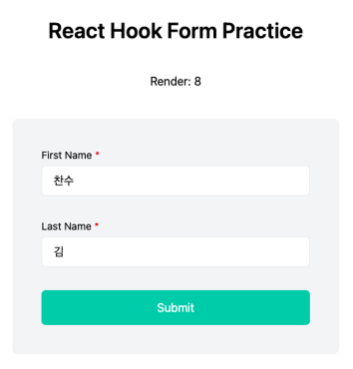
React Hook Form을 통해 간단히 테스트를 진행해볼 겸 예시를 만들어봤습니다.
import { useForm } from "react-hook-form";

let counter = 0;

function App() {
  const { register, handleSubmit } = useForm();
  const onSubmit = (data: any) => alert(JSON.stringify(data));

  return (
    <main className="w-screen h-screen flex justify-center items-center flex-col">
      <h2 className="text-3xl font-semibold mb-10">React Hook Form Practice</h2>

      <p className="mb-10">
        Render: <span>{counter++}</span>
      </p>

      <form
        onSubmit={handleSubmit(onSubmit)}
        className="w-1/3 p-10 flex flex-col bg-[#f2f4f6] rounded-lg gap-8"
      >
        <label className="flex flex-col">
          <span className="text-sm mb-1">First Name</span>
          <input
            {...register("firstName")}
            className="px-4 py-2 border border-[#eaecee] rounded-[6px] focus:border-[#535961]"
          />
        </label>
        <label className="flex flex-col">
          <span className="text-sm mb-1">Last Name</span>
          <input
            {...register("lastName")}
            className="px-4 py-2 border border-[#eaecee] rounded-[6px] focus:border-[#535961]"
          />
        </label>

        <button
          type="submit"
          className="bg-[#00CCAA] text-white rounded-[6px] px-4 py-3"
        >
          Submit
        </button>
      </form>
    </main>
  );
}

export default App;
확실히 input값이 바뀌더라도 리렌더링이 발생하지 않습니다. 그리고 submit을 하면 해당 값이 제대로 나타나는데요. 만약 React Hook Form을 사용하지 않았다면 어땠을까요?
React Hook Form을 사용하지 않고 실습
보통은 아래처럼 구현하는 것이 일반적입니다. useState를 통해 상태를 관리하고 handleChange를 통해 매번 상태를 업데이트한 후 handleSubmit을 통해 submit 이벤트가 발생한다면 해당 상태를 보여주는 것이죠.
import { useState } from "react";

let counter = 0;

export default function ReactForm() {
  const [values, setValues] = useState({ firstName: "", lastName: "" });

  const handleChange = (e: React.ChangeEvent<HTMLInputElement>) => {
    const { name, value } = e.target;
    setValues({ ...values, [name]: value });
  };

  const handleSubmit = (e: React.FormEvent<HTMLFormElement>) => {
    e.preventDefault();
    alert(JSON.stringify(values));
  };

  return (
    <main className="w-screen h-screen flex justify-center items-center flex-col">
      <h2 className="text-3xl font-semibold mb-10">React Hook Form Practice</h2>

      <p className="mb-10">
        Render: <span>{counter++}</span>
      </p>

      <form
        className="w-[450px] p-10 flex flex-col bg-[#f2f4f6] rounded-lg gap-8"
        onSubmit={handleSubmit}
      >
        <label className="flex flex-col">
          <div className="mb-1 flex text-sm">
            <span>First Name</span>
            <span className="text-[#e50000] ml-1">*</span>
          </div>

          <input
            name="firstName"
            className="px-4 py-2 border border-[#eaecee] rounded-[6px] focus:border-[#535961]"
            value={values.firstName}
            onChange={handleChange}
          />
        </label>
        <label className="flex flex-col">
          <div className="mb-1 flex text-sm">
            <span>Last Name</span>
            <span className="text-[#e50000] ml-1">*</span>
          </div>
          <input
            name="lastName"
            className="px-4 py-2 border border-[#eaecee] rounded-[6px] focus:border-[#535961]"
            value={values.lastName}
            onChange={handleChange}
          />
        </label>

        <button
          type="submit"
          className="bg-[#00CCAA] text-white rounded-[6px] px-4 py-3"
        >
          Submit
        </button>
      </form>
    </main>
  );
}
하지만 이는 많은 리렌더링을 유발시키게 됩니다. 매번 입력을 할 때마다 리렌더링 되는 것을 볼 수 있습니다.
비제어 컴포넌트 (Uncontrolled Components)
React Hook Form의 핵심은 비제어 컴포넌트
참고 : https://ko.legacy.reactjs.org/docs/uncontrolled-components.html
사실 React Hook Form의 핵심은 비제어 컴포넌트에 있습니다.
먼저 제어 컴포넌트에 대해 살펴보자면 상태를 기반으로 입력값을 관리하는 방법입니다. 대부분 경우에 form을 구현하는데 제어 컴포넌트를 사용하는 것이 좋습니다. "React Hook Form을 사용하지 않고 실습"에서 구현한 코드가 제어 컴포넌트 방식입니다.
반면, 비제어 컴포넌트는 javascript로 element 요소에 값에 직접 접근하는 방식입니다. 모든 state 업데이트에 대한 이벤트 핸들러를 작성하는 대신 ref를 통해 DOM에서 form 요소를 접근해 값을 가져오는 방법입니다. 이렇게 했을 때 장점으로는 리렌더링을 최소화할 수 있습니다.
비제어 컴포넌트 방식으로 구현하기
비제어 컴포넌트 방식을 사용하기 위해 Form에 있는 elements라는 프로퍼티를 알아야 합니다.
참고 : https://developer.mozilla.org/en-US/docs/Web/API/HTMLFormElement/elements
- HTMLFormElement elements 프로퍼티는 form element에 포함된 모든 form controls 리스트인 HTMLFormControlsCollection를 리턴합니다.
- 인덱스 또는 element의 이름, id 속성을 통해 특정 form controls에 액세스할 수 있다.
- 이것은 실시간 컬렉션입니다. 양식 컨트롤이 양식에 추가되거나 양식에서 제거되면 변경 내용을 반영하도록 이 컬렉션이 업데이트됩니다.
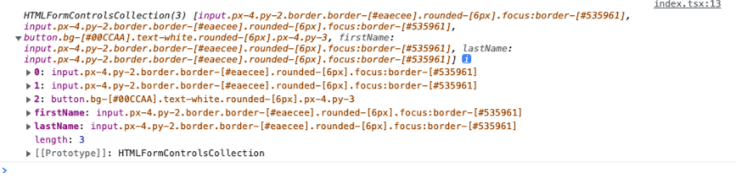
이를 활용해 비제어 컴포넌트 방식으로 구현한 결과입니다.
import { useRef } from "react";
let counter = 0;
export default function UncontrolledForm() {
const formRef = useRef<HTMLFormElement>(null);
const handleSubmit = (e: React.FormEvent<HTMLFormElement>) => {
e.preventDefault();
if (!formRef.current) return;
// console.log(formRef.current.elements);
const elements = formRef.current.elements;
const values: { [key: string]: string } = {};
for (let i = 0; i < elements.length; i++) {
const element = elements[i] as HTMLInputElement;
if (element.type === "text") {
values[element.name] = element.value;
}
}
alert(JSON.stringify(values));
};
return (
<main className="w-screen h-screen flex justify-center items-center flex-col">
<h2 className="text-3xl font-semibold mb-10">React Hook Form Practice</h2>
<p className="mb-10">
Render: <span>{counter++}</span>
</p>
<form
className="w-[450px] p-10 flex flex-col bg-[#f2f4f6] rounded-lg gap-8"
ref={formRef}
onSubmit={handleSubmit}
>
<label className="flex flex-col">
<div className="mb-1 flex text-sm">
<span>First Name</span>
<span className="text-[#e50000] ml-1">*</span>
</div>
<input
name="firstName"
className="px-4 py-2 border border-[#eaecee] rounded-[6px] focus:border-[#535961]"
/>
</label>
<label className="flex flex-col">
<div className="mb-1 flex text-sm">
<span>Last Name</span>
<span className="text-[#e50000] ml-1">*</span>
</div>
<input
name="lastName"
className="px-4 py-2 border border-[#eaecee] rounded-[6px] focus:border-[#535961]"
/>
</label>
<button
type="submit"
className="bg-[#00CCAA] text-white rounded-[6px] px-4 py-3"
>
Submit
</button>
</form>
</main>
);
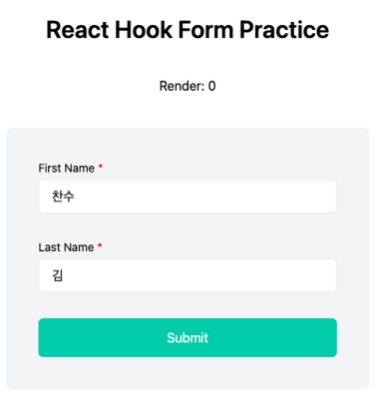
}확실히 React Hook Form을 사용했을 때와 동일하게 리렌더링이 되지 않는 것을 알 수 있습니다.
비제어 컴포넌트가 무조건 좋은 것은 아닙니다
참고 : https://goshacmd.com/controlled-vs-uncontrolled-inputs-react/
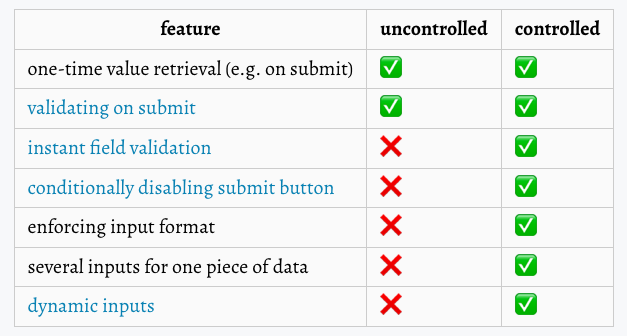
그렇다고 비제어 컴포넌트가 무조건 좋은 것은 아닙니다. 공식문서에서도 일반적인 경우라면 제어 컴포넌트를 사용하는게 좋다고 강조하고 있습니다.
그렇게 말하는 이유는 아래 표를 보면 알 수 있을 거 같네요. 비제어 컴포넌트는 제약이 많습니다. 그에 비해 제어 컴포넌트는 확실히 동적입니다.
React Hook Form validation 기능 사용해보기
React Hook Form은 비제어 컴포넌트 이면서도 충분히 동적으로 행동하고 있는거 같습니다. 한가지 예시로 validation 기능을 사용해보겠습니다.
기본적으로 submit을 해야 validation이 되는 구조입니다.
import { useForm } from "react-hook-form";

let counter = 0;

export default function ReactHookFormBasic() {
  const {
    register,
    handleSubmit,
    formState: { errors },
  } = useForm();
  const onSubmit = (data: any) => alert(JSON.stringify(data));

  return (
    <main className="w-screen h-screen flex justify-center items-center flex-col">
      <h2 className="text-3xl font-semibold mb-10">React Hook Form Practice</h2>

      <p className="mb-10">
        Render: <span>{counter++}</span>
      </p>

      <form
        onSubmit={handleSubmit(onSubmit)}
        className="w-[450px] p-10 flex flex-col bg-[#f2f4f6] rounded-lg gap-8"
      >
        <label className="flex flex-col">
          <div className="mb-1 flex text-sm">
            <span>First Name</span>
            <span className="text-[#e50000] ml-1">*</span>
          </div>

          <input
            {...register("firstName", { required: true, minLength: 3 })}
            className="px-4 py-2 border border-[#eaecee] rounded-[6px] focus:border-[#535961]"
          />

          {errors.firstName && (
            <span className="text-[#e50000] ml-1 text-sm">
              x This field is required
            </span>
          )}
        </label>
        <label className="flex flex-col">
          <div className="mb-1 flex text-sm">
            <span>Last Name</span>
            <span className="text-[#e50000] ml-1">*</span>
          </div>
          <input
            {...register("lastName", { required: true })}
            className="px-4 py-2 border border-[#eaecee] rounded-[6px] focus:border-[#535961]"
          />
          {errors.lastName && (
            <span className="text-[#e50000] ml-1 text-sm">
              x This field is required
            </span>
          )}
        </label>

        <button
          type="submit"
          className="bg-[#00CCAA] text-white rounded-[6px] px-4 py-3"
        >
          Submit
        </button>
      </form>
    </main>
  );
}
submit 이후에 validation을 통해 에러를 보여준 다음, 해당 input이 제대로 입력이 되면 동적으로 에러 표시가 사라지네요. 확실히 이 때는 리렌더링이 발생하게 됩니다.
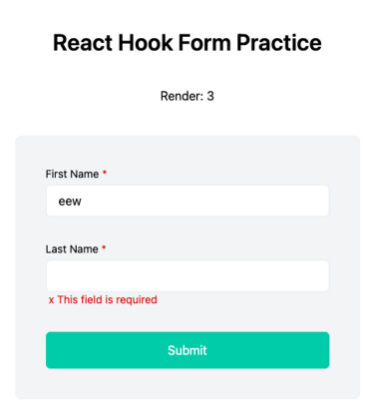
하지만 정말 필요한 부분에 대해서만 리렌더링이 발생하고 그 외에는 최적화가 잘 되어있는 것을 확인 할 수 있었습니다.
마치면서
이번 시간에는 React Hook Form이 왜 많이 사용되는지 조금이나마 알게 되었던 거 같습니다.
특히, 인프랩 랠릿에 대한 개발블로그를 보면서 확실히 이력서/채용 서비스는 Form Control 도 다양하고 개수도 많아서 최적화가 굉장히 중요할텐데 이런 부분에 있어서 어떤 식으로 개발하면 좋을지 생각하고 고민하는 모습을 볼 수 있어서 도움이 많이 되었습니다. 아... 간단한 프로젝트로 이와 유사한 서비스를 만들어보는 것도 재미있겠네요...😂
그 외에도 React Hook Form은 최적화가 잘 되어있는것 뿐만 아니라 지원되는 기능도 다양한거 같으니 Form 서비스가 중요하다면 사용을 고려해볼 필요가 있을 거 같습니다.
참고 자료
- https://tech.inflab.com/202207-rallit-form-refactoring/colocation/
- https://ko.legacy.reactjs.org/docs/uncontrolled-components.html
- https://tech.inflab.com/202207-rallit-form-refactoring/react-hook-form/
- https://dealicious-inc.github.io/2022/07/25/ss-studio.html
- https://www.daleseo.com/react-forms-with-hooks/
- https://developer.mozilla.org/en-US/docs/Web/API/HTMLFormElement/elements
- https://goshacmd.com/controlled-vs-uncontrolled-inputs-react/