
Section 5. Java I/O
Chapter 1. Java I/O 종류

- 데코레이터 패턴
- 하나의 클래스를 장식하는 것처럼 생성자에 감싸서 새로운 기능을 계속 추가할 수 있도록
클래스를 만드는 방식 - Java I/O의 특징이다
- 하나의 클래스를 장식하는 것처럼 생성자에 감싸서 새로운 기능을 계속 추가할 수 있도록
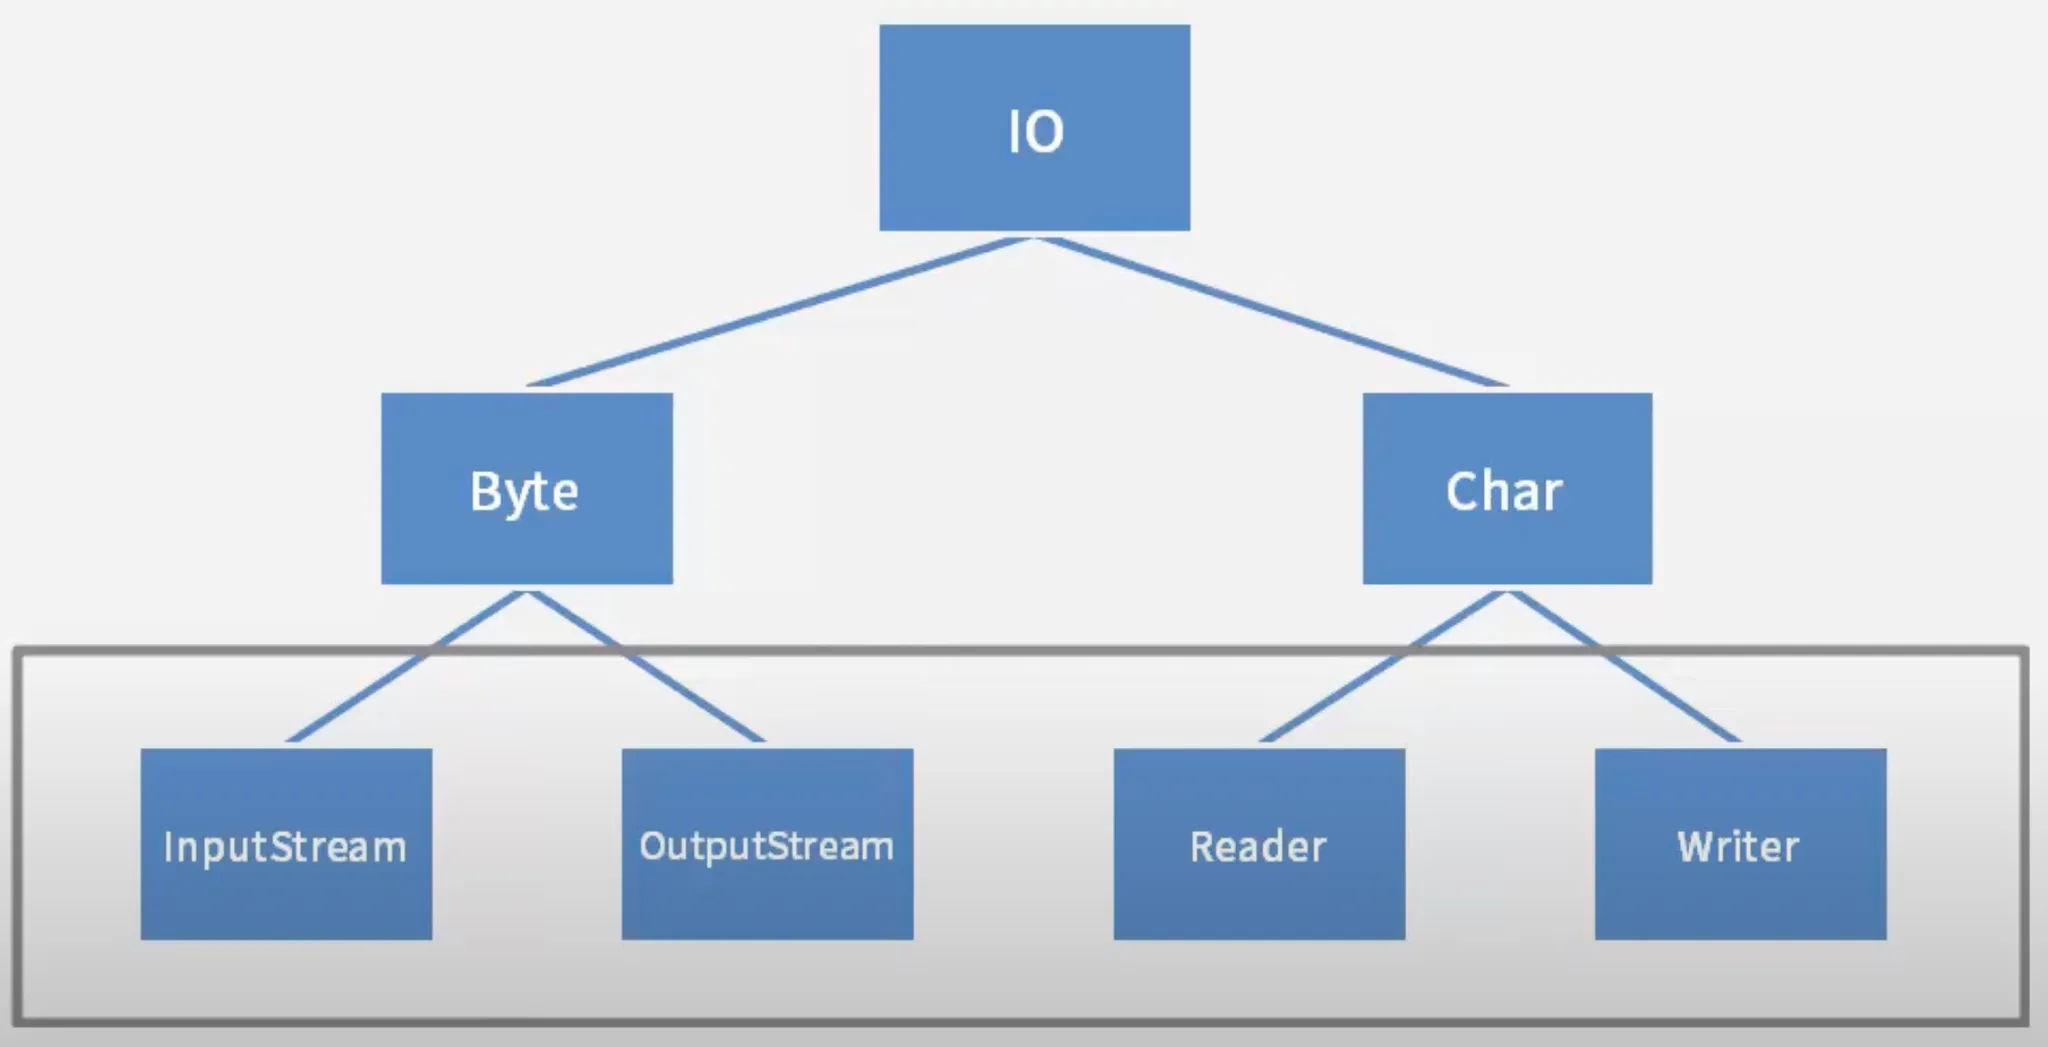
- byte 단위의 입출력 클래스는 ~InputStream, ~OutputStream으로 끝난다.
- Char 단위의 입출력 클래스는 ~Reader, ~Writer로 끝난다.
Chapter 2. Byte 단위의 I/O
- 예시 코드
package javaIO; import java.io.FileInputStream; import java.io.FileOutputStream; import java.io.IOException; public class JavaIO1 { public static void main(String[] args) { FileInputStream fis = null; // finally에서 fis, fos를 닫기위해 현재 scope 에서 선언 FileOutputStream fos = null; try { fis = new FileInputStream("src/javaIO/text1.txt"); //FileNotFoundException 처리 필요 fos = new FileOutputStream("src/javaIo/text2.txt"); //FileNotFoundException 처리 필요 int readData = 0; while((readData = fis.read())!=-1){ //IOException 처리 필요 fos.write(readData); //IOException 처리 필요 } }catch (Exception e) { throw new RuntimeException(e); }finally { try { fis.close(); //IOException 처리 필요 } catch (IOException e) { throw new RuntimeException(e); } try { fos.close(); //IOException 처리 필요 } catch (IOException e) { throw new RuntimeException(e); } //fis.close()와 fos.closse()를 따로 예외처리 하는 이유는 //try 문에 두 개의 close가 있을 때, 더 위에있는 close에서 예외가 발생되면 //그 밑에 있는 close가 작동하지 못하기 때문입니다. } } }FileInputStream- 인자값으로 들어온 경로에 위치한 File을 읽는 객체
FileOutputStream- 인자값으로 들어온 경로에 위치한 File에 쓰는 객체 (기존 내용에 덮어 쓴다)
- 경로에 File이 위치하지 않는다면 새로 만든다.
read()- 읽어올 File의 데이터를 1byte 단위로 읽어서 int 타입으로 반환한다.
- 우리가 알고있는 자료형 별 byte 단위를 어떻게 끊어 읽냐의 차이.
- 예시
- “aa” → “97 97”
- “a”는 1byte로 표현되기에 한번에 한 글자를 읽습니다.
- “차차” → “236 176 168 236 176 168”
- “차”는 3byte로 표현되기에 3번에 걸쳐 한 글자를 읽습니다.
- “aa” → “97 97”
- 더 이상 읽어올 데이터가 없다면 -1을 반환한다.
- 읽어올 File의 데이터를 1byte 단위로 읽어서 int 타입으로 반환한다.
write()- read()가 Byte 단위로 읽어온 데이터를 Byte 단위로 File에 작성한다.
close()- 파일 입출력의 객체를 닫습니다.
- close()로 닫아야 하는 이유
- 자원 해제
- 파일을 열면 시스템 자원(메모리, 파일 핸들 등)이 할당됩니다. 파일 작업이 끝난 후 close() 메서드를 호출하여 파일을 닫으면 이러한 자원을 해제할 수 있습니다. 이를 통해 메모리 누수나 자원 고갈을 방지할 수 있습니다.
- 데이터 일관성
- 출력 스트림을 사용할 때, 데이터를 버퍼에 저장하고 나중에 파일에 기록하는 경우가 많습니다. close() 메서드를 호출하면 버퍼에 있는 모든 데이터가 파일에 제대로 기록됩니다. 이를 통해 데이터 손실이나 불일치 문제를 방지할 수 있습니다.
- 파일 잠금 해제
- 파일을 열면 해당 파일에 대한 잠금이 발생할 수 있습니다. 파일을 닫지 않으면 다른 프로세스가 해당 파일에 접근하지 못할 수 있습니다. close()를 호출함으로써 파일 잠금을 해제하여 다른 프로세스가 파일에 접근할 수 있도록 합니다.
- 예외 처리
- 파일 작업 중 예외가 발생할 수 있습니다. close() 메서드는 일반적으로 try-with-resources 구문이나 finally 블록에서 호출되어야 하며, 이를 통해 예외가 발생하더라도 자원을 적절히 해제할 수 있습니다.
- 자원 해제
- try-with-resources
- 사용한 자원을 자동으로 종료 시켜주는 기능
- fis, fos처럼 파일 입출력 객체를 생성할 때, try 옆의 소괄호에서 선언 및 초기화해주면 된다.
- finally 부분에서 각 파일 입출력 객체들을 close()로 닫지 않아줘도 된다.
- 예시 코드
// 기존
FileInputStream fis = null; // finally에서 fis, fos를 닫기위해 현재 scope 에서 선언
FileOutputStream fos = null;

try{
	fis = new FileInputStream("src/javaIO/text1.txt");
	fos = new FileOutputStream("src/javaIo/text2.txt");
} catch(Exception e){
	// ...
} final{

	try{
		fis.close();
	}catch(IOException e){
		//...
	}

	try{
		fos.close();
	}catch(IOException e){
		//...
	}
}
// try-with-resources 적용 try( FileInputStream fis = new FileInputStream("src/javaIO/text1.txt"); FileOutputStream fos = new FileOutputStream("src/javaIo/text2.txt"); ){ //... } catch(Exception e){ // ... }- 확실히 코드가 간결해 진다!
⭐ Java의 파일 입출력
- 사실 Java의 경우 파일을 읽고 쓸 때, 기본적으로 512byte 단위로 진행한다.
그래서 파일 입출력 시, 데이터를 관리할 512byte 단위 크기의 버퍼를 사용하면 더 효율적이다.
- 예시 코드```java package javaIO; import java.io.FileInputStream; import java.io.FileOutputStream; import java.io.IOException; public class JavaIo512 { public static void main(String[] args) { long startTime = System.currentTimeMillis(); // 현재 시간을 밀리초로 저장할 수 있다. FileInputStream fis = null; FileOutputStream fos = null; try { fis = new FileInputStream("src/javaIO/text1.txt"); fos = new FileOutputStream("src/javaIo/text2.txt"); int readCount = 0; byte[] buffer = new byte[512]; //한번에 입력받을 File의 데이터를 저장할 버퍼 while((readCount = fis.read(buffer))!=-1){ //매개변수로 받은 버퍼에 File 데이터를 읽어옵니다. fos.write(buffer, 0, readCount); //데이터가 담긴 버퍼의 값을 0 부터 읽어온 byte 크기만큼 File에 출력합니다. } }catch (Exception e) { throw new RuntimeException(e); }finally { try { fis.close(); } catch (IOException e) { throw new RuntimeException(e); } try { fos.close(); //IOException 처리 필요 } catch (IOException e) { throw new RuntimeException(e); } } long endTime = System.currentTimeMillis(); System.out.println(endTime - startTime); } } /* 애국가 전체 가사 복붙 실험 1 byte 씩 진행 : 6 밀리초 소요 512 byte 씩 진행 : 1 밀리초 이하 소요 */ ``` - 추가로 1byte로 읽어들어올 때와 512byte로 읽어들어올 때의 소요시간을 비교해보면 버퍼가 클수록 빨리 읽고 쓰는것을 확인할 수 있다.
Chapter 3. 다양한 타입의 입출력
-
예시 코드
package javaIO; import java.io.DataInputStream; import java.io.DataOutputStream; import java.io.FileInputStream; import java.io.FileOutputStream; public class JavaIOVarious { public static void main(String[] args) { try ( //try-with-resources 적용 DataOutputStream dos = new DataOutputStream(new FileOutputStream("src/javaIO/variousText.txt")); DataInputStream dis = new DataInputStream(new FileInputStream("src/javaIO/variousText.txt")); //다양한 타입을 입출력하기 위한 DataInputStream / DataOutputStream 객체 -> 데코레이터 패턴 ) { // DataOutputStream 메서드 dos.writeInt(100); dos.writeBoolean(false); dos.writeDouble(10.25); // DataIntputStream 메서드 int disInt = dis.readInt(); boolean disBoo = dis.readBoolean(); double disDou = dis.readDouble(); System.out.println(disInt); System.out.println(disBoo); System.out.println(disDou); } catch (Exception e) { throw new RuntimeException(); } } } /* 실행 결과 100 false 10.25 */- variousText.txt 파일에는 DataOutputStream을 통해 우리가 읽을 수 없는 값으로 작성된다.

- 하지만 DataInputStream으로 다양한 타입의 데이터를 잘 읽어올 수 있다.
- variousText.txt 파일에는 DataOutputStream을 통해 우리가 읽을 수 없는 값으로 작성된다.
Chapter 4. Char 단위 입출력
- 예시 코드
import java.io.BufferedReader;
import java.io.FileReader;
import java.io.FileWriter;
import java.io.IOException;
import java.io.PrintWriter;
public class CharIOExam02 {
    public static void main(String[] args) {
				BufferedReader keyBr = new BufferedReader(new InputStreamReader(System.in));
        //키보드로 입력받은 문자열을 저장하기 위해 line변수를 선언
        String line = null; //try-catch 밖에서도 사용하기 위해 현재 scope에서 선언
	        try {
	            line = keyBr.readLine()
	        } catch (IOException e) {
	            e.printStackTrace();
	        }
        //콘솔에 출력
        System.out.println(line);

//---------------------------------------------------------------

        BufferedReader br = null;
        PrintWriter pw = null;
        try{
            br = new BufferedReader(new FileReader("src/javaIO/exam/CharIOExam02.java"));
            pw = new PrintWriter(new FileWriter("test.txt"));
            String line = null;
            while((line = br.readLine())!= null){
                pw.println(line);
            }
        }catch(Exception e){
            e.printStackTrace();
        }finally {
            pw.close();
            try {
                br.close();
            } catch (IOException e) {
                e.printStackTrace();
            }
        }
    }
}
BufferedReader keyBr = new BufferedReader(new InputStreamReader(System.in));- 여기에서 데이터를 한 줄씩 읽기 위해선 BufferedReader를 사용해야 한다.
- BufferedReader는 Reader 타입의 매개변수를 사용한다
- 키보드로부터 데이터를 읽는 System.in은 InputStream 타입이기에 Reader로 변환이 필요하다
- InputStreamReader를 통해 InputStream 타입을 Reader로 변환할 수 있다.
- 위와 System.in을 BufferedReader로 감싸서 추가적인 기능으로 사용할 수 있게 해주는 형태가
데코레이터 패턴이다.
readLine()- 파일에 더 이상 읽을 데이터가 없다면
null을 반환한다.
- 파일에 더 이상 읽을 데이터가 없다면
br.close()파일을 닫아주지 않으면 새로 출력한 파일을 읽을 수 없다.→ 라고 하셨지만, 찾아보니 현재 Java에서는 출력이 완료된 파일입출력 객체를 자동으로 닫아준다.
Section 6. Thread
Chapter 1. Thread란?
- 우리가 사용하는 OS에서는 여러개의 프로세스가 동시에 작동되고 있다.
- 프로세스 == 현재 실행중인 프로그램
- 프로세스 중에 우리가 개발을 위해 사용하는 InteliJ 가 있다.
- InteliJ 프로세스 안에서도 Java로 Thread 라는 것을 만들고 사용하면 여러가지 작업을 동시에 할 수 있게 할 수 있다.
- Thread를 만드는 방법에는 크게 2가지가 있다.
-
extends Thread
-
implements Runnable
다음 챕터에서 확인해보도록 하자
-
Chapter 2. Thread 만들기 - extends Thread
- 동시에 작업할 코드를 가진 클래스에
Thread클래스를 상속 받는다. Thread의run()메서드를 오버라이딩 합니다.run(): Thread 실행 시, 작동할 코드를 가지고 있는 메서드
- 예시 코드
package thread1;

public class MyThread extends Thread{
	String str;

	public MyThread(String str){
		this.str = str;
	}

	@Override
	public void run(){ // Thread 실행 시, 작동하는 메서드
		for(int i = 0; i<10; i++){
			try {
				System.out.println(str);
				Thread.sleep((int)(Math.random() * 1000)); // 연산속도가 너무 빠르기에 sleep으로 지연을 건다.
			} catch (InterruptedException e) {
				e.printStackTrace();
			}
		}
	}
}
package thread1; public class ThreadMain { public static void main(String[] args) { MyThread myThread1 = new MyThread("*"); MyThread myThread2 = new MyThread("-"); myThread1.start(); // Thread 준비 및 호출자의 run()을 실행 myThread2.start(); System.out.println("main 메서드 끝!!"); } } /* 실행 결과 * main 메서드 끝!! - - * - * - - * * */- Thread 실행하기
- Thread 변수를 선언한다
- Thread를 시작하기 위해서는 Thread의 메서드인
start()로 시작해야 한다. start()를 호출하면- Java에서 호출한 Thread 변수를 실행할 준비를 하고,
- 호출한 Thread 변수의
run()을 실행한다.
- 지금까지 프로그램을 실행하면,
main()메서드가 제일 먼저 실행되었다.- 이것을 main Thread 라고 한다.
- 이제 우리는 직접 추가적인 Thread를 만들어 주었다.
- 프로그램은 모든 Thread가 종료된 다음에 종료된다.
- 따라서 기존처럼 main Thread가 종료된다고 해서 프로그램이 종료되는게 아니라
다른 Thread들이 아직 실행 중이라면, 남은 Thread 들이 모두 종료되어야 프로그램이 종료된다.
- 따라서 기존처럼 main Thread가 종료된다고 해서 프로그램이 종료되는게 아니라
- 예시 코드의 실행 결과를 보자
- main 메서드는 Thread 변수 선언 및
start()호출만 하고 바로 끝났지만 myThread1과myThread2은sleep()을 걸어두었기에 반복문이 끝날때까지 시간이 걸린다.*과-가 섞여서 출력되는 것을 통해myThread1과myThread2가 동시에 실행되고
있음을 알 수 있다.
myThread1과myThread2의 반복문이 모두 끝나면, 그제서야 프로그램이 종료된다.
- main 메서드는 Thread 변수 선언 및
- Thread 실행하기
Chapter 3. Thread 만들기 - implements Runnable
- 구현을 통해서도 Thread를 만들 수 있다.
- Java에서는 단일 상속만 지원하기에, 이미 상속을 받고 있는 클래스라면 Thread로 만들 수 없다.
그래서 인터페이스를 제공하여 상속관계인 클래스도 Thread로 만들 수 있게 되어있다. - 동시에 작업할 코드를 가진 클래스를
Runnable인터페이스로 구현한다. Runnable의run()메서드를 오버라이딩 합니다.run(): Thread 실행 시, 작동할 코드를 가지고 있는 메서드
- 예시 코드
package thread1;

public class RunnableThread implements Runnable{

	String str = null;

	public RunnableThread(String str){
		this.str = str;
	}

	@Override
	public void run(){
		for(int i = 0; i<5; i++){
			System.out.println(str);
			try {
				Thread.sleep((int)(Math.random()*500));
			} catch (InterruptedException e) {
				throw new RuntimeException(e);
			}
		}
	}
}
package thread1; public class RunnableThreadMain { public static void main(String[] args) { RunnableThread runnableThread1 = new RunnableThread("*"); RunnableThread runnableThread2 = new RunnableThread("-"); Thread thread1 = new Thread(runnableThread1); Thread thread2 = new Thread(runnableThread2); thread1.start(); thread2.start(); System.out.println("main 메서드는 종료!"); } } /* 실행 결과 main 메서드는 종료! - * * * - * - * - - */Runnable로 구현한 클래스의 경우, Thread 클래스를 상속 받은게 아니기 때문에
Thread의start()메서드를 사용할 수 없다.- 그래서 Thread 객체를 생성하고, 초기화 할 때 매개변수로 Runnable 구현체를 넣어준다
- 이제 기존처럼
start()로 Thread를 준비하고 실행시키면 된다.
Chapter 4. Thread와 공유객체
- 하나의 객체를 여러 개의 Thread가 사용한다는 것을 의미한다.
- 예시 코드
public class MusicBox {
    //신나는 음악!!! 이란 메시지가 1초이하로 쉬면서 5번 반복출력
    public void playMusicA(){
        for(int i = 0; i < 5; i ++){
            System.out.println("신나는 음악!!!");
            try {
                Thread.sleep((int)(Math.random() * 500));
            } catch (InterruptedException e) {
                e.printStackTrace();
            }
        }
    }

    //슬픈 음악!!!이란 메시지가 1초이하로 쉬면서 5번 반복출력
    public void playMusicB(){
        for(int i = 0; i < 5; i ++){
            System.out.println("슬픈 음악!!!");
            try {
                Thread.sleep((int)(Math.random() * 500));
            } catch (InterruptedException e) {
                e.printStackTrace();
            }
        }
    }
}
public class MusicPlayer extends Thread{ int type; MusicBox musicBox; // 생성자로 부터 musicBox와 정수를 하나 받아들여서 필드를 초기화 public MusicPlayer(int type, MusicBox musicBox){ this.type = type; this.musicBox = musicBox; } // type이 무엇이냐에 따라서 musicBox가 가지고 있는 메소드가 다르게 호출 public void run(){ switch(type){ case 1 : musicBox.playMusicA(); break; case 2 : musicBox.playMusicB(); break; } }public class MusicBoxMain { public static void main(String[] args) { // MusicBox 인스턴스 MusicBox box = new MusicBox(); MusicPlayer kim = new MusicPlayer(1, box); MusicPlayer lee = new MusicPlayer(2, box); // MusicPlayer쓰레드를 실행합니다. kim.start(); lee.start(); } } /* 실행 결과 신나는 음악!!! 슬픈 음악!!! 슬픈 음악!!! 신나는 음악!!! 슬픈 음악!!! 슬픈 음악!!! 신나는 음악!!! 신나는 음악!!! 신나는 음악!!! 슬픈 음악!!! */- MusicBox라는 객체를 MusicPlayer Thread가 공유하여 사용하고 있다.
Chpater 5. Thread 동기화 - synchronized
- 여러 Thread가 공유 객체를 사용할 때, 공유 객체 메서드가 동시에 실행될 경우 문제가 발생할 수 있는 경우가 있다.
- 이를 위해서 synchronized 키워드를 사용하여 먼저 실행되는 Thread가 객체 사용권(Monitoring Lock)을 얻고, 다른 Thread를 대기상태로 둘 수 있다. → 공유 객체의 메서드 또는 코드를 동기화한다!
- 예시 코드
// 공유 객체
package syncthread;

public class Cal {
	private int num=5;

	public synchronized int plusNum1(){ // 객체 사용권(Monitoring Lock) 영향을 받는 메서드
		for(int i = 0; i < 5; i++){
			num += 1;
			System.out.println("plus 1 : " + num);

			try {
				Thread.sleep((int)(Math.random()*1000));
			} catch (InterruptedException e) {
				throw new RuntimeException(e);
			}
		}
		return num;
	}

	public int plusNum2(){
		// i. 코드
		int pn2Num = 0; //plusNum1의 작업과는 관계없는 작업은 먼저 실행
		for(int j = 0; j < 10000; j++){
			pn2Num ++;
		}
		// ii. 코드
		try {
			Thread.sleep(1000);
			System.out.println("plusNum2 선작업 완료!");
		} catch (InterruptedException e) {
			throw new RuntimeException(e);
		}

		// iii. 코드
		synchronized (this) { //plusNum1의 결과값을 활용해야하는 부분은 synchronized로 감싸서 Monitoring Lock 해제 대기하기
			num = this.num + pn2Num;

			for (int i = 0; i < 5; i++) {
				num += 2;
				System.out.println("plus 2 : " + num);
				try {
					Thread.sleep((int)(Math.random() * 500));
				} catch (InterruptedException e) {
					throw new RuntimeException(e);
				}
			}
		}
		return num;
	}
}
package syncthread; public class CalPlayer extends Thread{ private Cal cal; private int type; public CalPlayer(int type, Cal cal) { this.type = type; this.cal = cal; } @Override public void run(){ switch(type){ case 1 : cal.plusNum1(); break; case 2 : cal.plusNum2(); break; } } }package syncthread; public class CalMain { public static void main(String[] args) { Cal cal = new Cal(); CalPlayer cp1 = new CalPlayer(1, cal); CalPlayer cp2 = new CalPlayer(2, cal); cp1.start(); cp2.start(); } } /* 실행 결과 plus 1 : 6 plus 1 : 7 plus 1 : 8 plusNum2 선작업 완료! plus 1 : 9 plus 1 : 10 plus 2 : 10012 plus 2 : 10014 plus 2 : 10016 plus 2 : 10018 plus 2 : 10020 */- Monitoring Lock으로 제어가 필요한 메서드 또는 코드 부분에
synchronized키워드를 사용해야 한다. - Monitoring Lock의 영향이 필요한 메서드 또는 코드에는 모두
synchronized키워드를 사용해야 한다. - 메서드 전체 뿐만 아니라, 메서드 내부에 특정 부분도
synchronized키워드로 감싸줄 수 있다. - 먼저 실행되는 Thread가 Monitoring Lock을 가지게 된다.
- 코드 실행 흐름
cp1.start()가 먼저 실행되기에 cp1가 Monitoring Lock을 가진다.- 다음에
cp2.start()도 실행된다. cp1이 먼저 실행 되었기 때문에, 공유 객체에서cp1이 사용하는 메서드인plusNum1메서드가 끝날때까지cp2가 공유 객체에서 사용하는 코드 중에 객체 사용권의 영향을 받는 코드는 대기해야 한다.- 따라서 cp2 Thread가 공유객체에서 사용하는 코드를 보면 다음과 같다.
pn2Num을 10000번 더하는 for문sleep으로 1초 지연 후, "plusNum2 선작업 완료!" 출력하는 try-catch 문sleep으로 랜덤하게 지연되며 2를 5번 더하는 for문
- [iii 코드]의 경우
synchronized로 감싸져있기에 Monitoring Lock의 해제를 기다려야한다.
- 따라서 cp2 Thread가 공유객체에서 사용하는 코드를 보면 다음과 같다.
plusNum1메서드가 끝나고나서 공유객체cal의num필드는 10이 된다.plusNum2메서드에서pn2Num은 Monitoring Lock의 영향을 받지 않아cp1Thread와 동시에 실행되어 10000이 되있는 상태고,cal의num필드는 10인 상태로cp2코드가 진행된다.plusNum2메서드의 나머지 코드에서는 10010에 2씩 5번 더한다.- 최종
num필드는 10020이 된다.
- Monitoring Lock으로 제어가 필요한 메서드 또는 코드 부분에
Chapter 6. Thread의 상태 제어
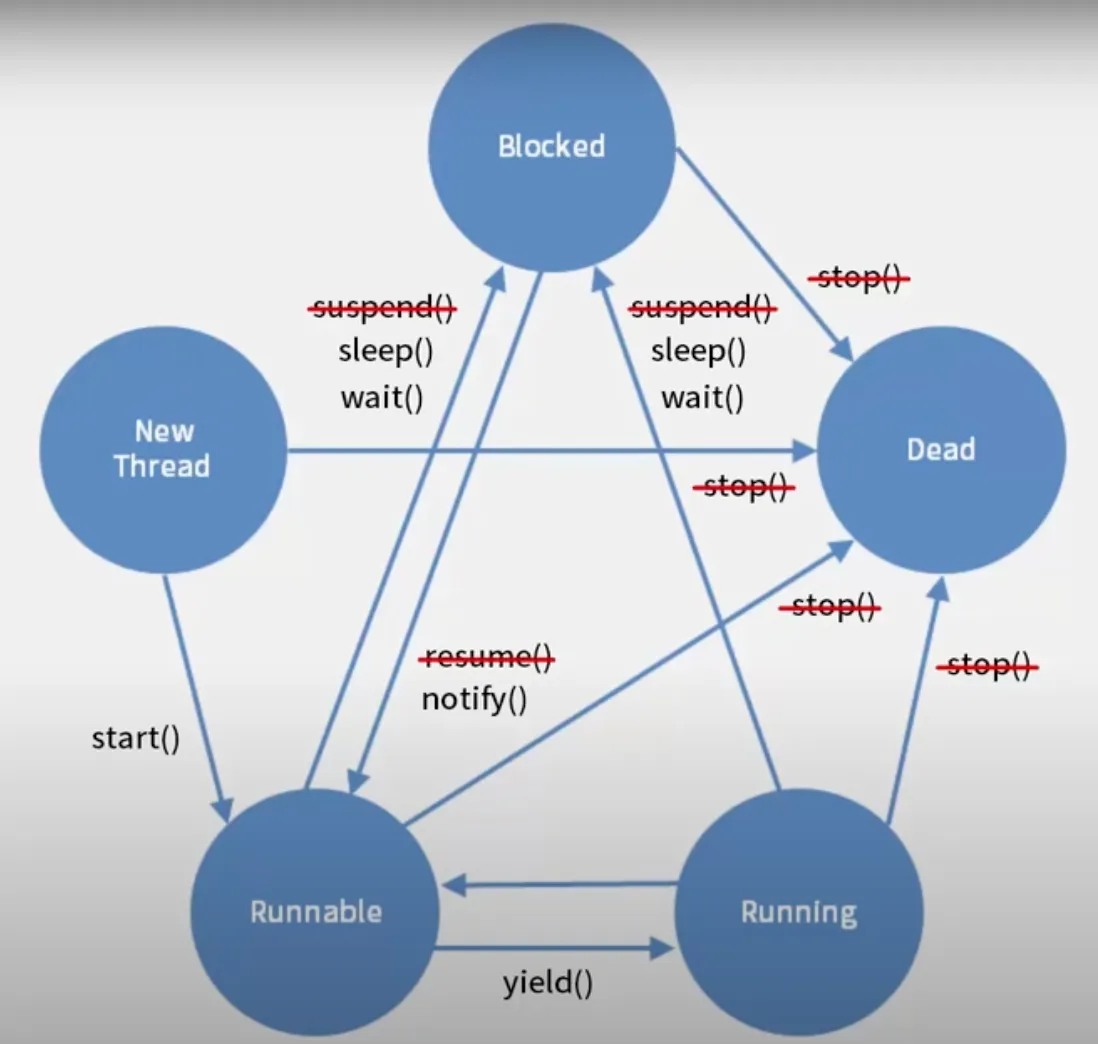
- Thread는 start() 된 후에, Runnable 상태 또는 Running 상태가 된다.
sleep()- 지연 시간 동안은 Blocked 상태가 되며
- 지연 시간이 끝나면 스스로 Blocked을 빠져나와 Runnable이나 Running 상태가 된다.
wait()|notify()- wait()이 호출되면 Blocked 상태가 되며 객체 사용권(Monitoring Lock)도 해제되어
다른 메서드가 실행된다. - notify()를 호출해야 Runnable 상태가 된다.
- wait()이 호출되면 Blocked 상태가 되며 객체 사용권(Monitoring Lock)도 해제되어
run()- Thread의 오버라이딩된 run()이 끝나면 Dead 상태가 된다.
yield()- 다른 Thread에게 자원을 양보한다
join()- Thread가 가지고 있는
join()을 호출하게 되면 해당 쓰레드의run()이 종료될 때까지 대기합니다.
- Thread가 가지고 있는
Chapter 7. Thread - join()
- 호출자 Thread의
run()이 끝날때까지 현재 메서드를 대기시킨다. - 예시 코드
public class MyThread5 extends Thread{
    @Override
    public void run(){
        for(int i = 0; i < 5; i++){
            System.out.println("MyThread5 : "+ i);
            try {
                Thread.sleep(500);
            } catch (InterruptedException e) {
                e.printStackTrace();
            }
        }
    }
}
public class JoinExam { public static void main(String[] args) { MyThread5 thread5 = new MyThread5(); // Thread 시작 thread5.start(); System.out.println("thread5가 종료될때까지 기다립니다."); try { // join()을 만나기 전까지는 thread5는 계속 실행되고 있다. thread5.join(); // 쓰레드 thread5의 run()이 끝날때 까지 현재 Thread 대기 } catch (InterruptedException e) { e.printStackTrace(); } System.out.println("thread5가 종료되었습니다."); } } /* 실행 결과 thread5가 종료될때까지 기다립니다. MyThread5 : 0 MyThread5 : 1 MyThread5 : 2 MyThread5 : 3 MyThread5 : 4 thread5가 종료되었습니다. */
Chapter 8. Thread - wait(), notify()
wait()과notify()는 동기화 관계에서만 사용 가능합니다.- 현재 Thread에서 다른 Thread 객체의 wait() 메소드를 호출했다면
현재 Thread는 wait()을 호출한 Thread가 끝날때까지 대기(Blocked)합니다. - wait()을 호출한 Thread에서는
notify()로 끝났음을 알립니다. - 대기하고 있던 Thread가 이어서 진행됩니다.
- 예시 코드
package syncthread.waitnotify;

public class ThreadA extends Thread{

	@Override
	public void run(){

		synchronized (this){
			for(int i = 5; i > 0; i--){
				System.out.println("ThreadA : 카운트다운 : " + i);

				try {
					Thread.sleep(300);
				} catch (InterruptedException e) {
					throw new RuntimeException(e);
				}
			}
			notify(); // ThreadB에게 Monitoring Lock을 넘긴다
		}
	}
}
package syncthread.waitnotify; import java.util.TreeMap; public class ThreadB extends Thread{ ThreadA a; //synchronized에 인자로 넣어주기 위해 wait()을 호출하는 Thread를 필드로 가지고 있어야 한다. public ThreadB(ThreadA a){ this.a = a; } @Override public void run(){ synchronized (a){ // wait을 호출하는 Thread의 변수를 인자값으로 넣어야 한다. try { System.out.println("ThreadB : 현재 ThreadB가 실행중입니다."); Thread.sleep(500); System.out.println("ThreadB : 아 잠시 장비 점검을 하겠다고 하네요"); Thread.sleep(500); a.wait(); //Monitoring Lock이 ThreadB에서 ThreadA로 넘어가며 ThreadA 실행. // ThreadB는 notify()를 기다린다. System.out.println("ThreadB : 점검이 끝났다고 하네요."); Thread.sleep(500); System.out.println("ThreadB : 다시 이어가보겠습니다."); Thread.sleep(500); } catch (InterruptedException e) { throw new RuntimeException(e); } } } }package syncthread.waitnotify; public class WaitNotifyMain { public static void main(String[] args) { ThreadA a = new ThreadA(); ThreadB b = new ThreadB(a); b.start(); //ThreadB가 먼저 실행되었기에 객체사용권(Monitoring Lock)을 가진다 a.start(); //ThreadB가 객체사용권을 가지고 있기에 작동하지 않는다. } } /* 실행 결과 ThreadB : 현재 ThreadB가 실행중입니다. ThreadB : 아 잠시 장비 점검을 하겠다고 하네요 ThreadA : 카운트다운 : 5 ThreadA : 카운트다운 : 4 ThreadA : 카운트다운 : 3 ThreadA : 카운트다운 : 2 ThreadA : 카운트다운 : 1 ThreadB : 점검이 끝났다고 하네요. ThreadB : 다시 이어가보겠습니다. */- 예시 코드 설명
- ThreadB가 먼저 실행 되었다.
- ThreadB는 Monitoring Lock을 가진다
- ThreadB에서 ThreadA의 wati() 메서드가 호출되었다.
- Monitoring Lock은 ThreadA에게 넘겨진다.
- ThreadA가 할 일을 마치고 notify()를 호출한다.
- Monitoring Lock이 ThreadB에게 넘겨진다.
- ThreadB는 wait() 이후의 코드를 마저 진행한다.
- ThreadB가 먼저 실행 되었다.
- 예시 코드 설명
🔥
wait()과join()의 차이
wait()|noftify()
- 공유 자원에 대한 접근을 제어하고, 특정 조건이 충족될 때까지 대기하는 데 사용됩니다.
- 반드시 synchronized 블록 내에서 사용해야 합니다.
- 동기화되어 있기에 객체사용권(Monitoring Lock) 영향을 받으며 작동한다.
join()
- 특정 스레드가 종료될 때까지 대기하는 데 사용됩니다.
- 동기화 되어 있지 않기에, join()을 호출하기 전까지는 join()을 호출하는 Thread나 현재 Thread나 모두 동시에 실행된다.
Chapter 9. 데몬 쓰레드 (Daemon Thread)
- 데몬(Daemon)이란 보통 리눅스와 같은 유닉스계열의 운영체제에서 백그라운드로 동작하는 프로그램이다.
- 일반 쓰레드들이 모두 종료되면 데몬쓰레드는 백그라운드에서 작동하다가 강제로 종료된다.
- Thread를
start()로 실행하기 전에.setDaemon(true)메서드로 설정 가능하다 - 예시 코드
  // Runnable을 구현하는 DaemonThread클래스를 작성해 보았다.
    public class DaemonThread implements Runnable {

        // 무한루프안에서 0.3초씩 쉬면서 데몬쓰레드가 실행중입니다를 출력하도록 run()메소드를 작성
        @Override
        public void run() {
            while (true) {
                System.out.println("데몬 쓰레드가 실행중입니다.");

                try {
                    Thread.sleep(300);

                } catch (InterruptedException e) {
                    e.printStackTrace();
                    break; //Exception발생시 while 문 빠찌도록
                }
            }
        }

        public static void main(String[] args) {
            // Runnable을 구현하는 DaemonThread를 실행하기 위하여 Thread 생성
            Thread th = new Thread(new DaemonThread());
            // 데몬쓰레드로 설정
            th.setDaemon(true);
            // 쓰레드를 실행
            th.start();

            // 메인 쓰레드가 1초뒤에 종료되도록 설정.
            // 데몬쓰레드는 다른 쓰레드가 모두 종료되면 자동종료.
            try {
                Thread.sleep(1000);
            } catch (InterruptedException e) {
                e.printStackTrace();
            }
            System.out.println("메인 쓰레드가 종료됩니다. ");
        }
    }

/* 실행 결과
데몬 쓰레드가 실행중입니다.
데몬 쓰레드가 실행중입니다.
데몬 쓰레드가 실행중입니다.
데몬 쓰레드가 실행중입니다.
메인 쓰레드가 종료됩니다.
*/

Develop what? and why?