Cloud Native 란?
Cloud Native
클라우드 규모와 크기 조정 및 성능에 최적화되어있는 애플리케이션을 개발하기 위한 접근방식과 기술
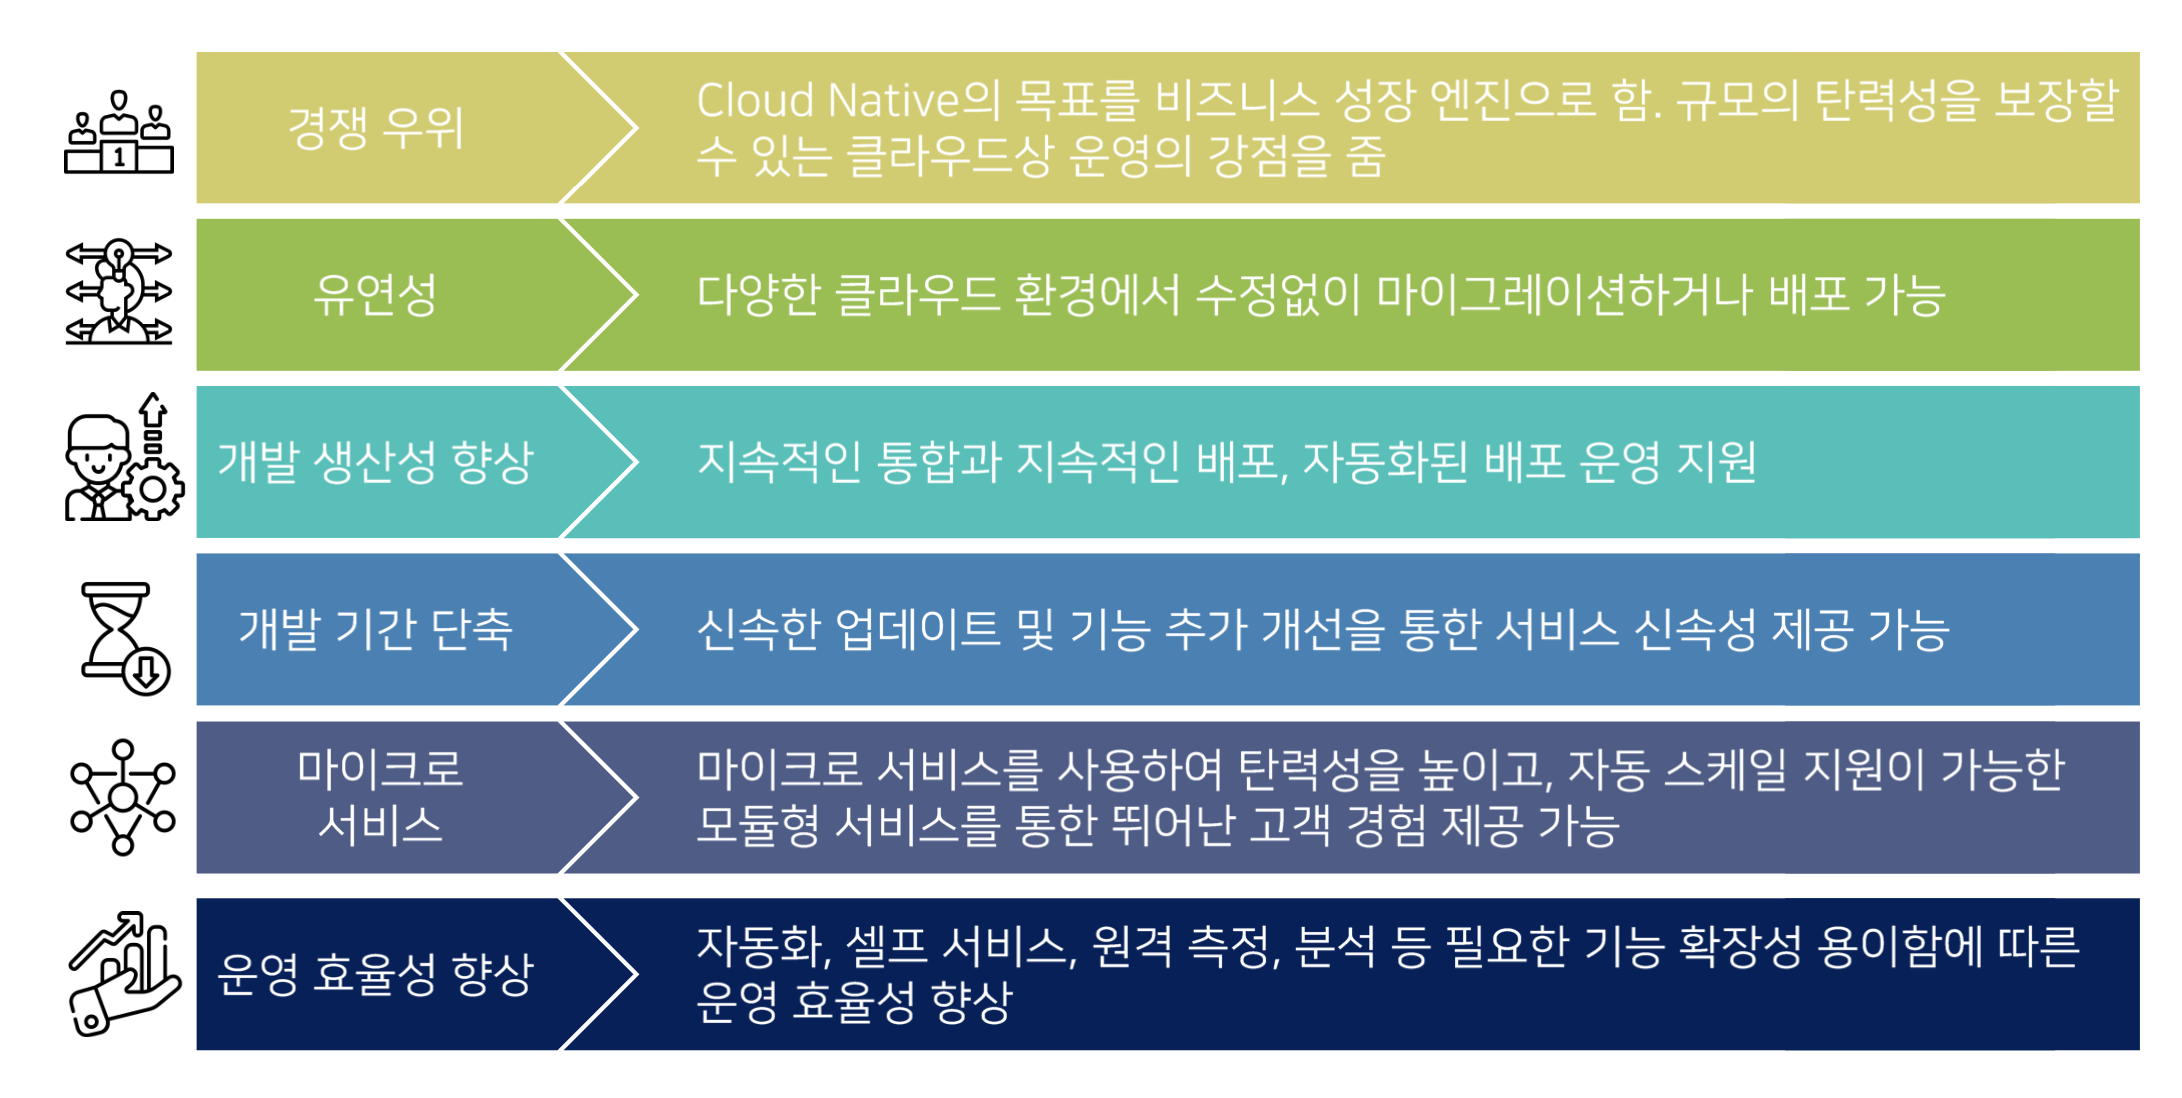
Cloud Native 장점
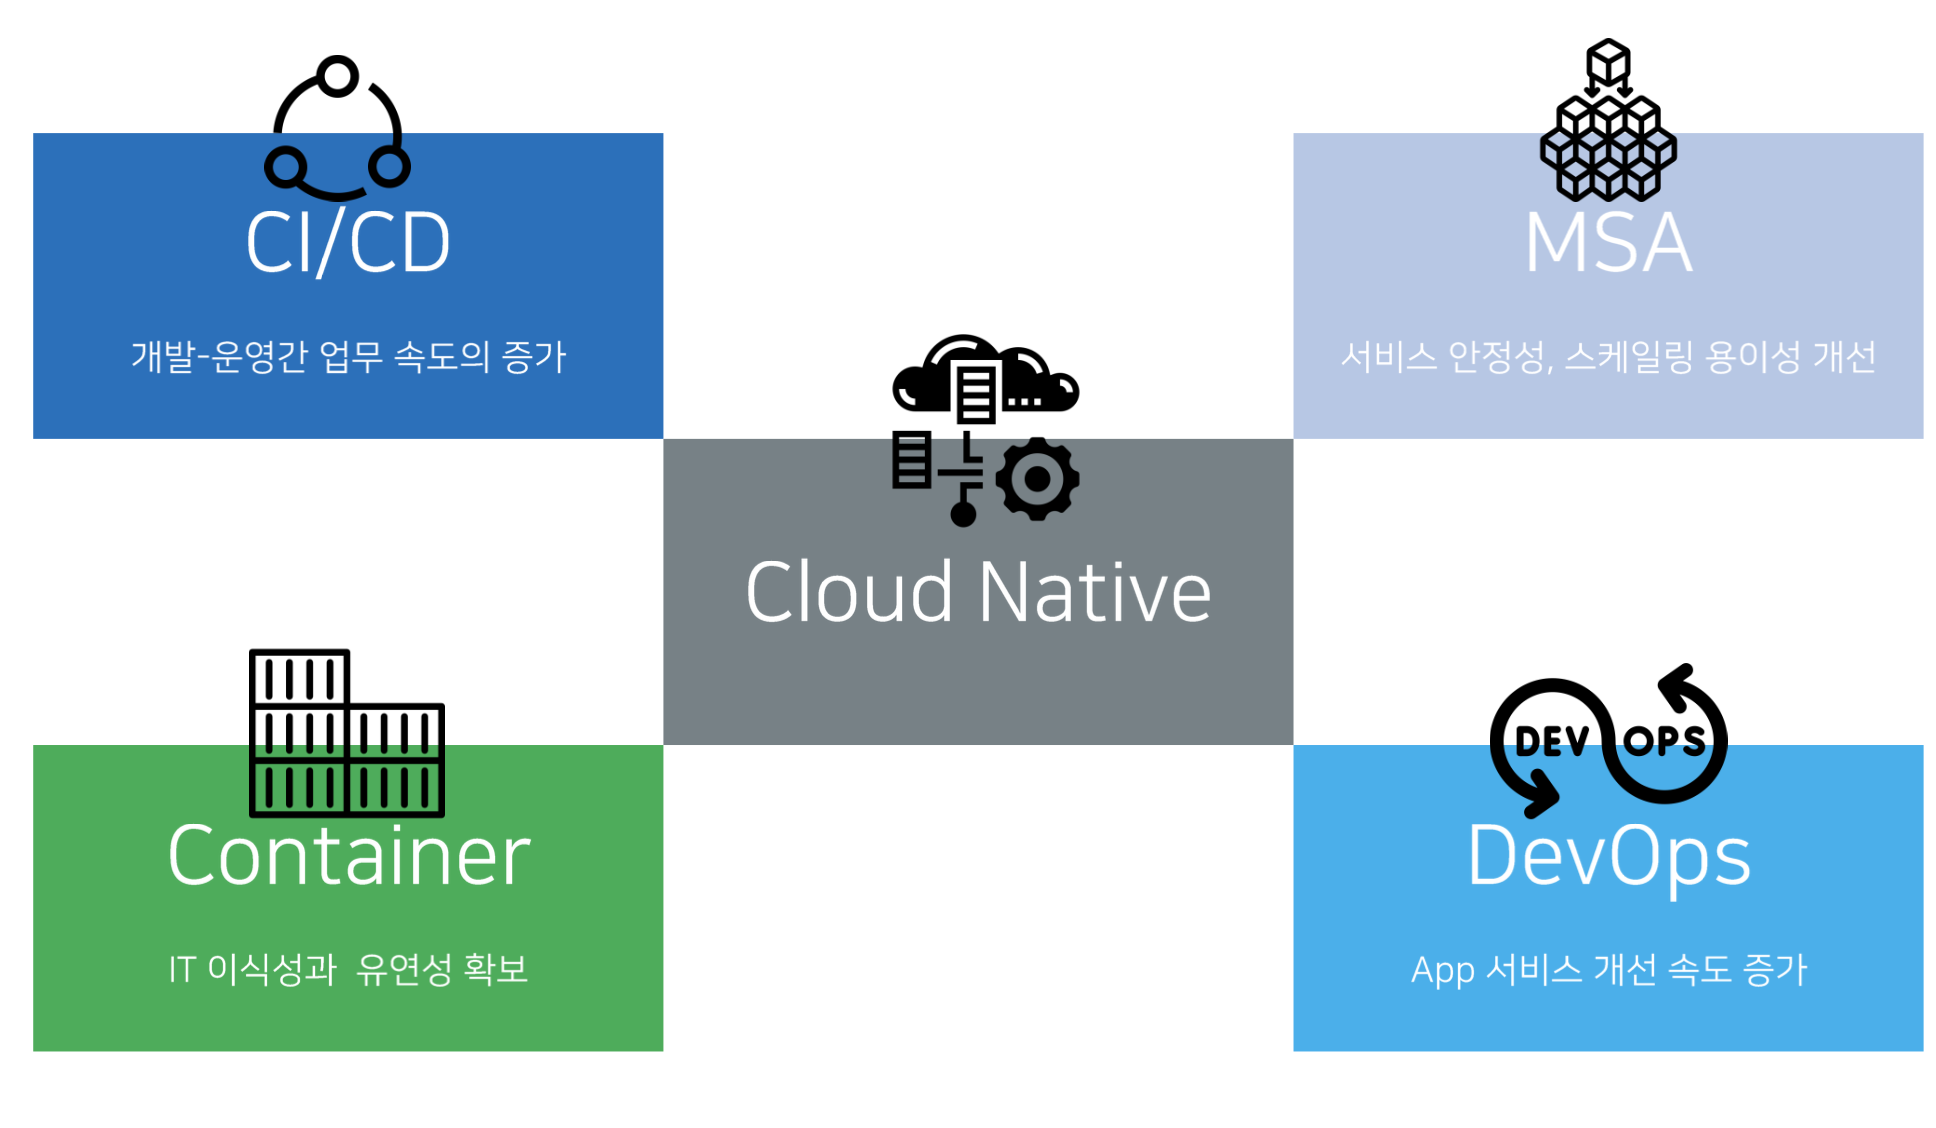
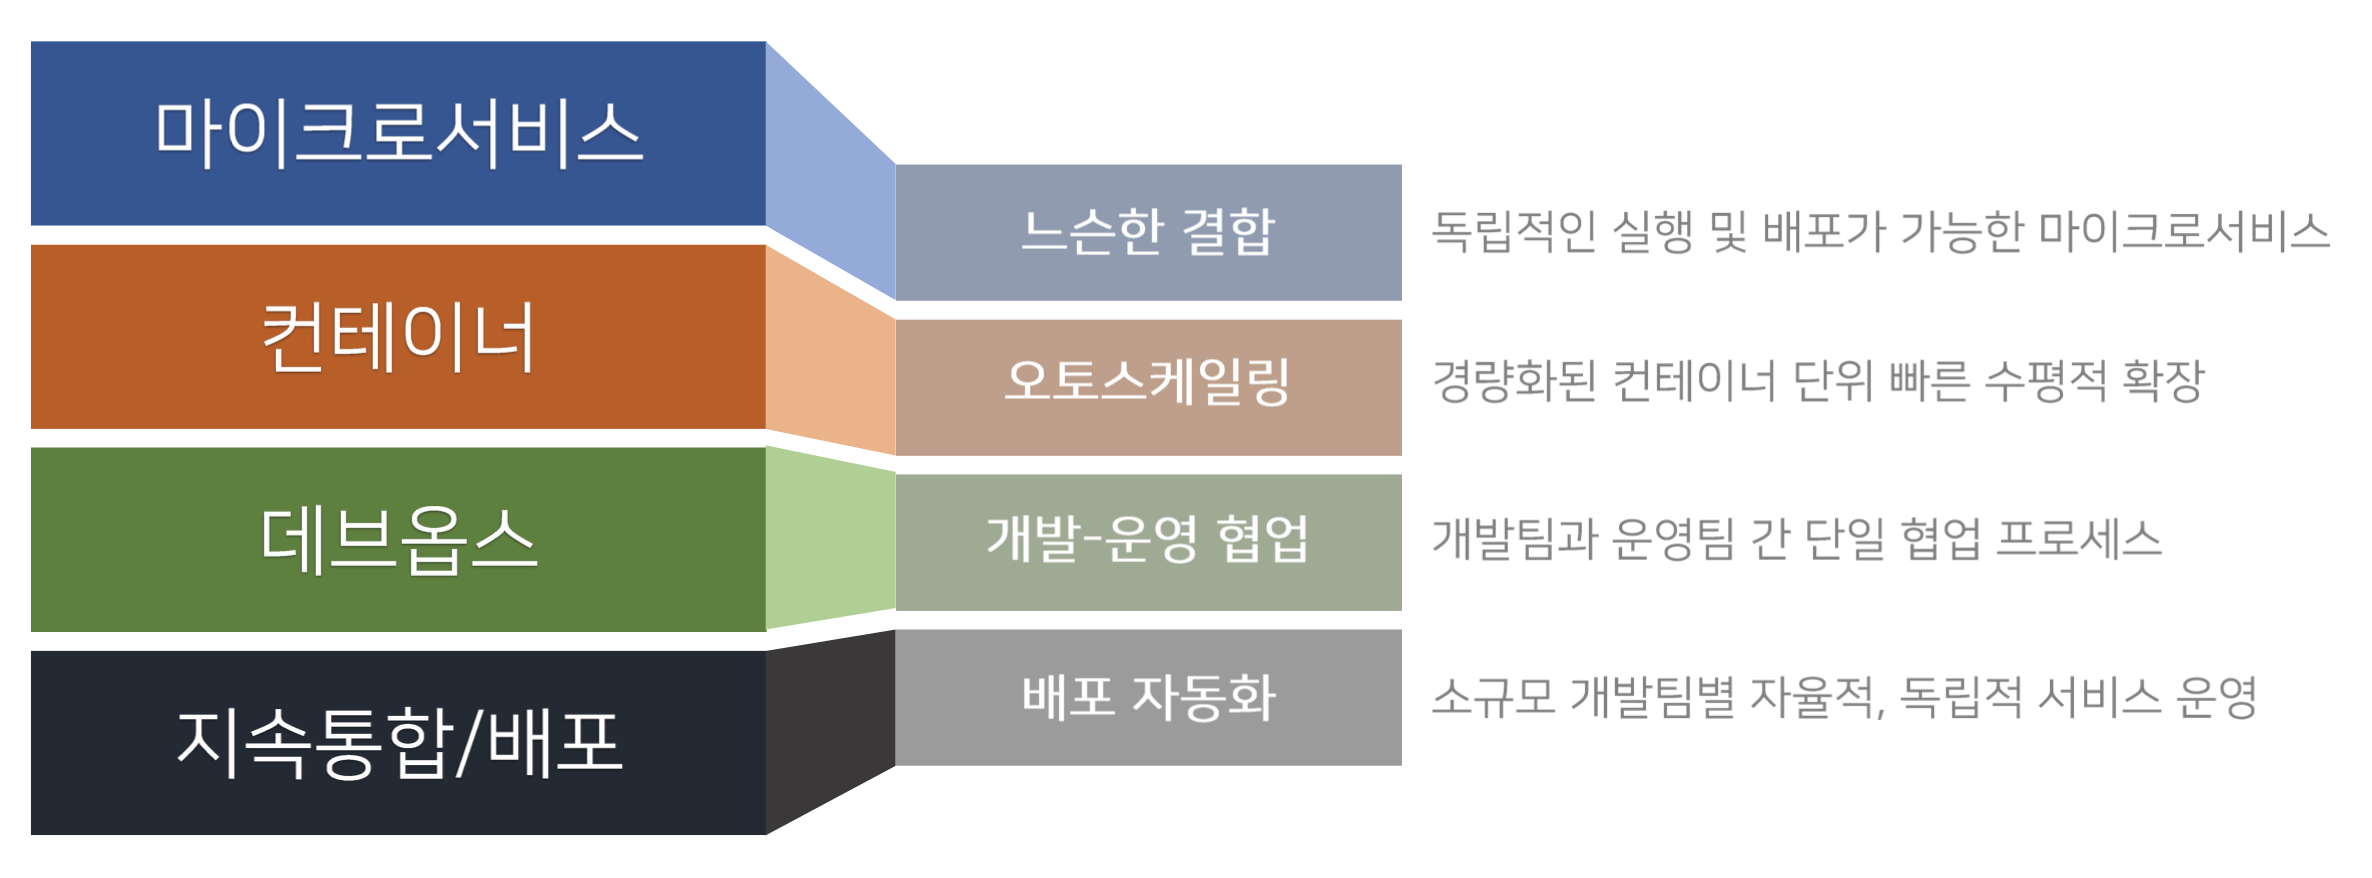
Cloud Native 요소
Cloud Native를 위한 NHN Service
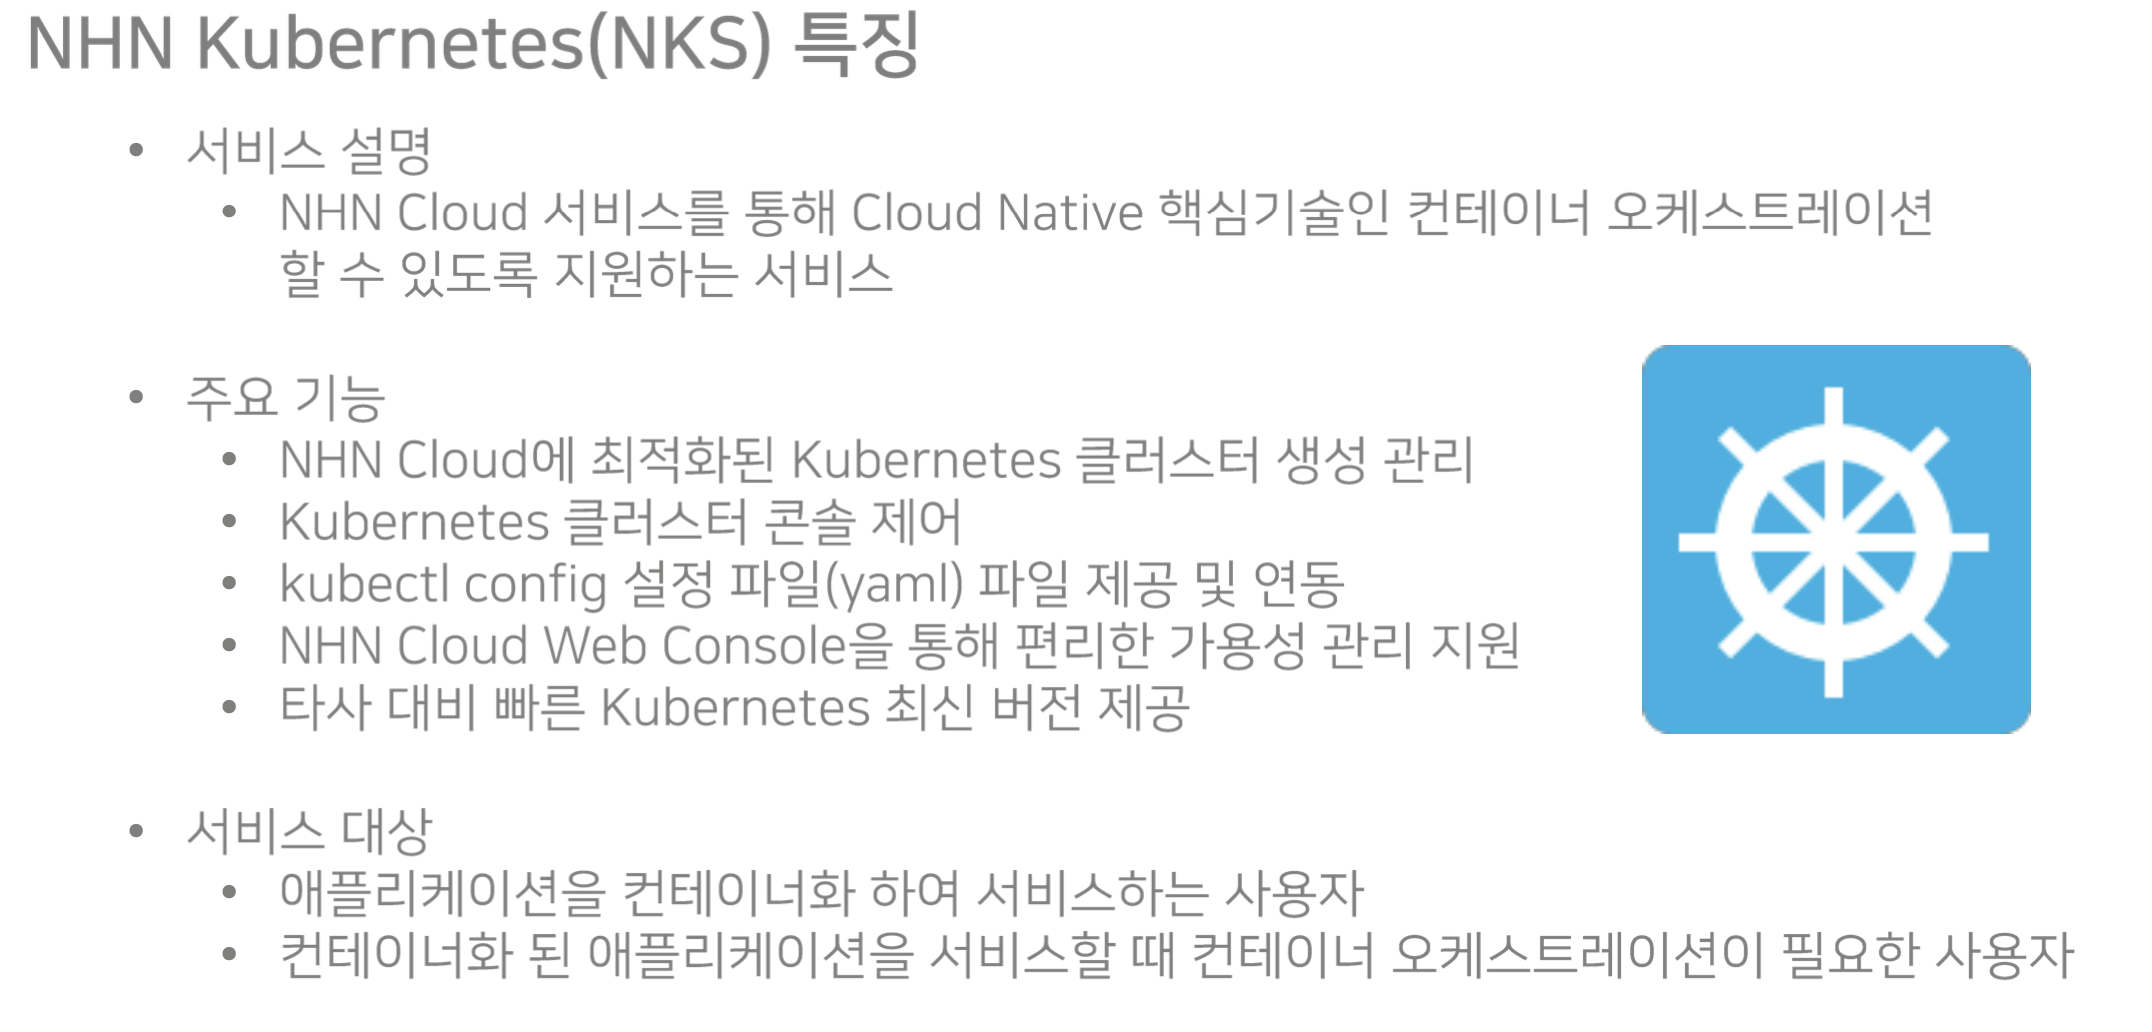
1) NHN Kubernetes Service ( NKS )
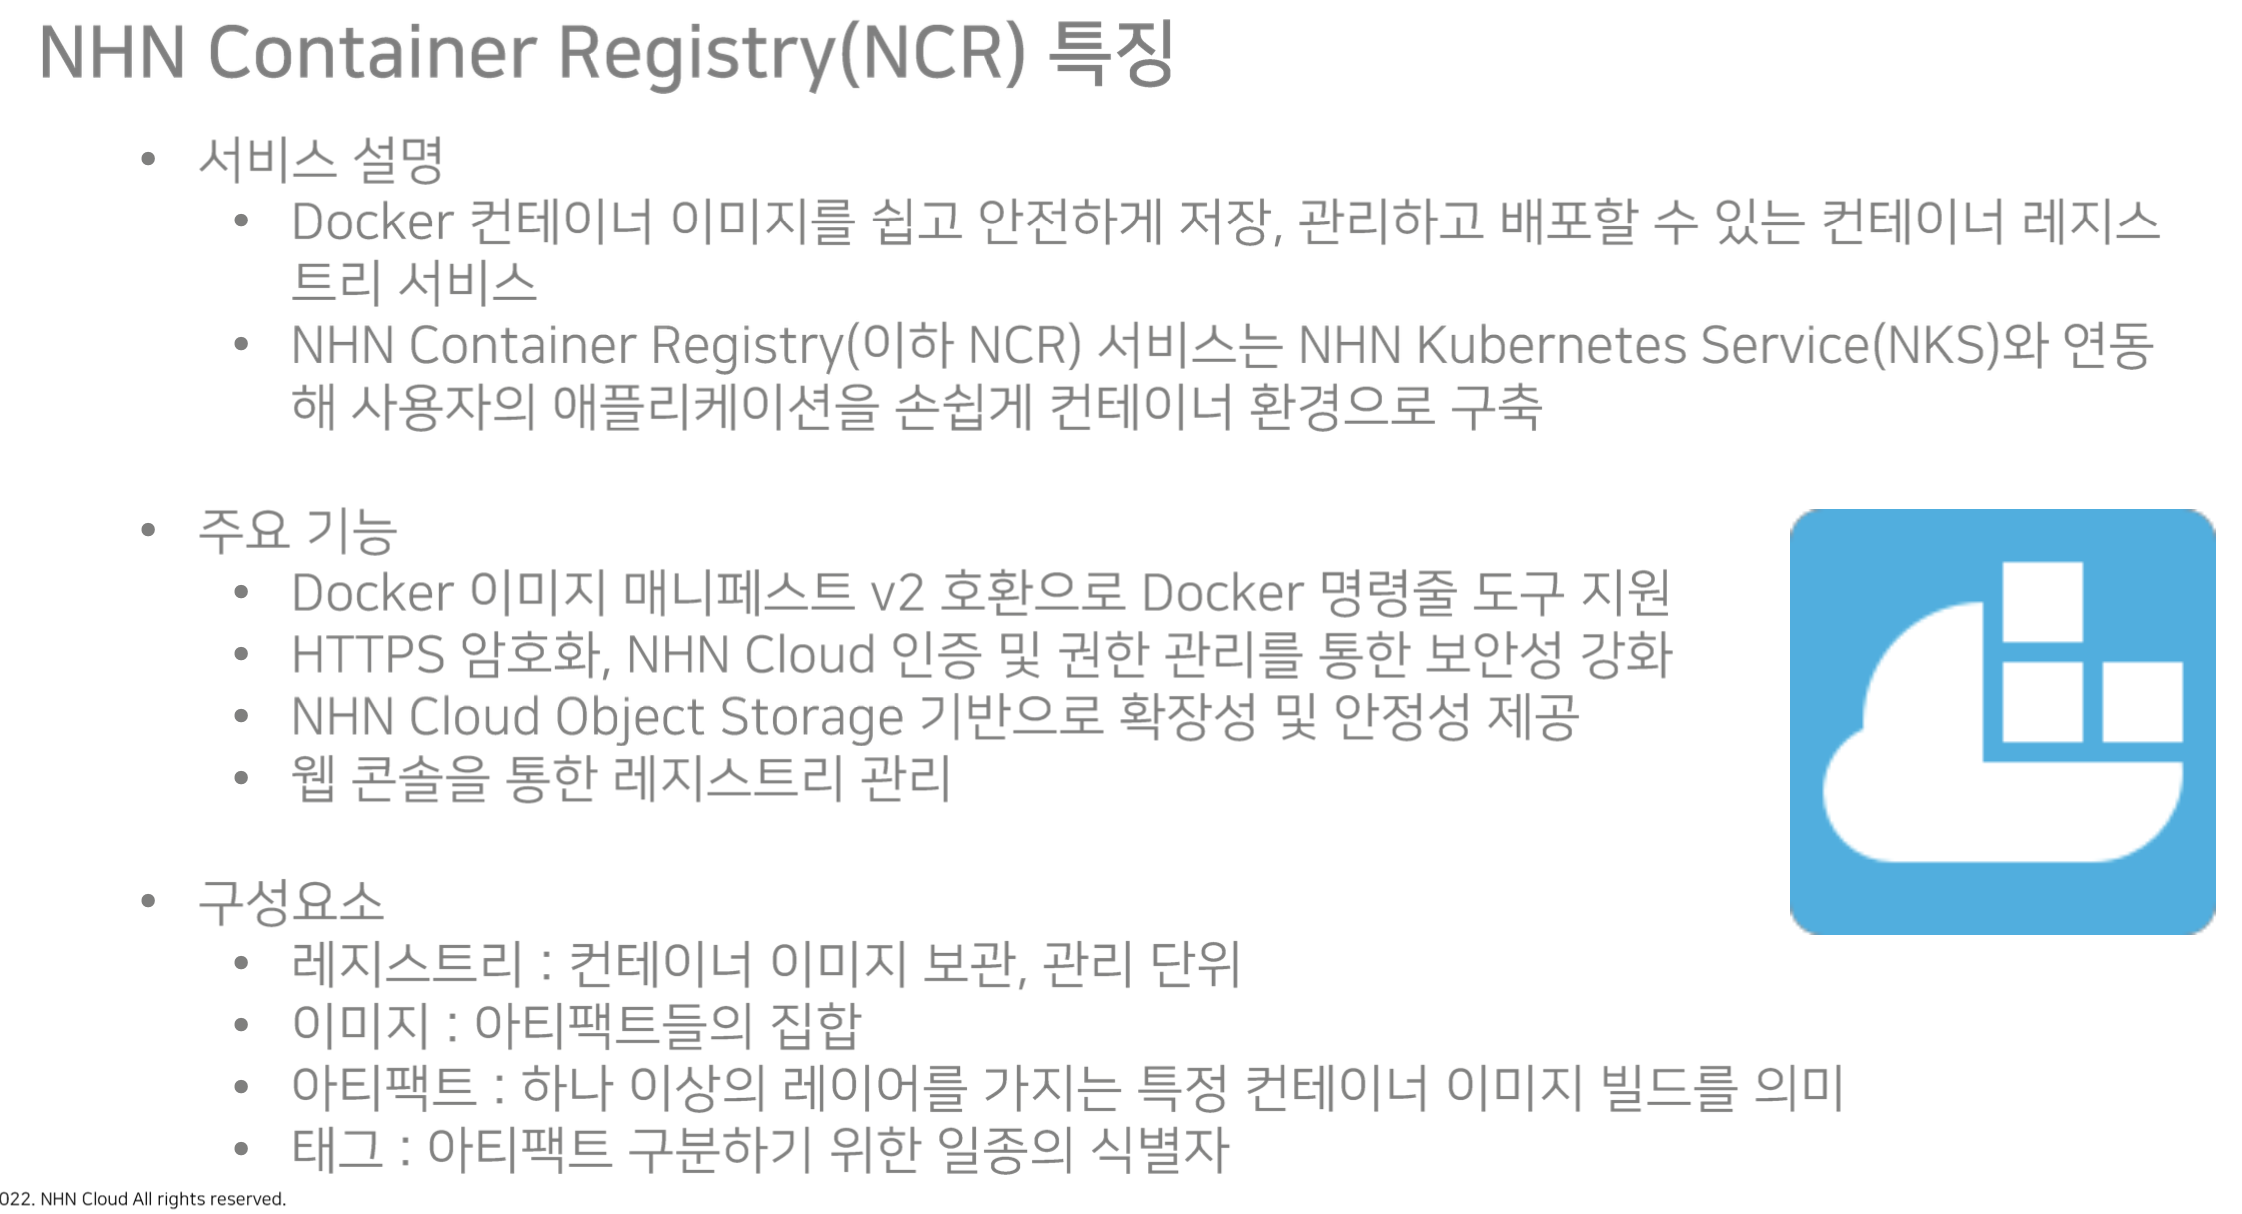
2) NHN Container Registry ( NCR )
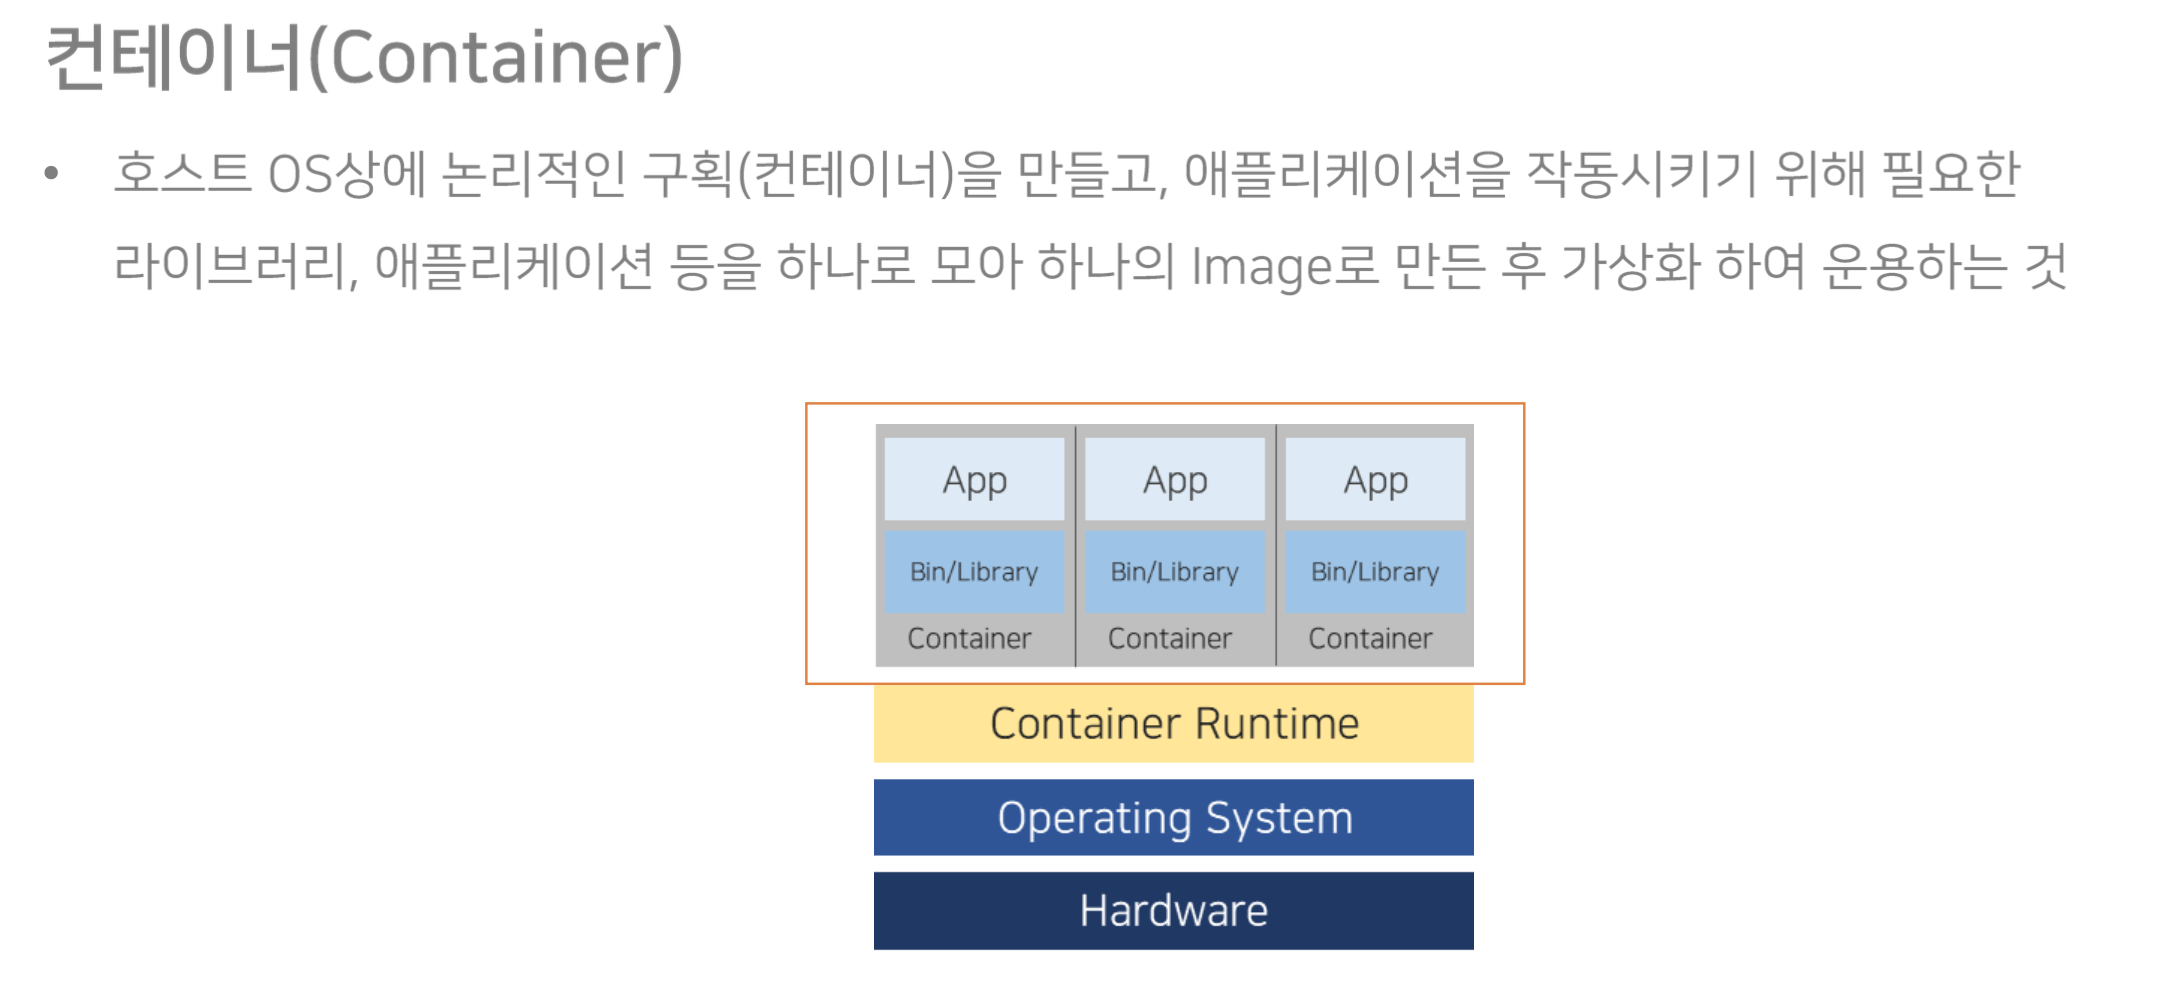
컨테이너 기술
컨테이너 개념
컨테이너와 쿠버네티스
컨테이너 운영의 고민
- 배포관리
- 제어 및 모니터링
- 스케일링
- 모니터링
컨테이너 운영의 현실적인 해결방안은 '컨테이너 오케스트레이션'
컨테이너 오케스트레이션이란, 대규머 컨테이너들이 안정적으로 운영될 수 있도록 관리 복잡성을 줄여주고 자동화하는 것
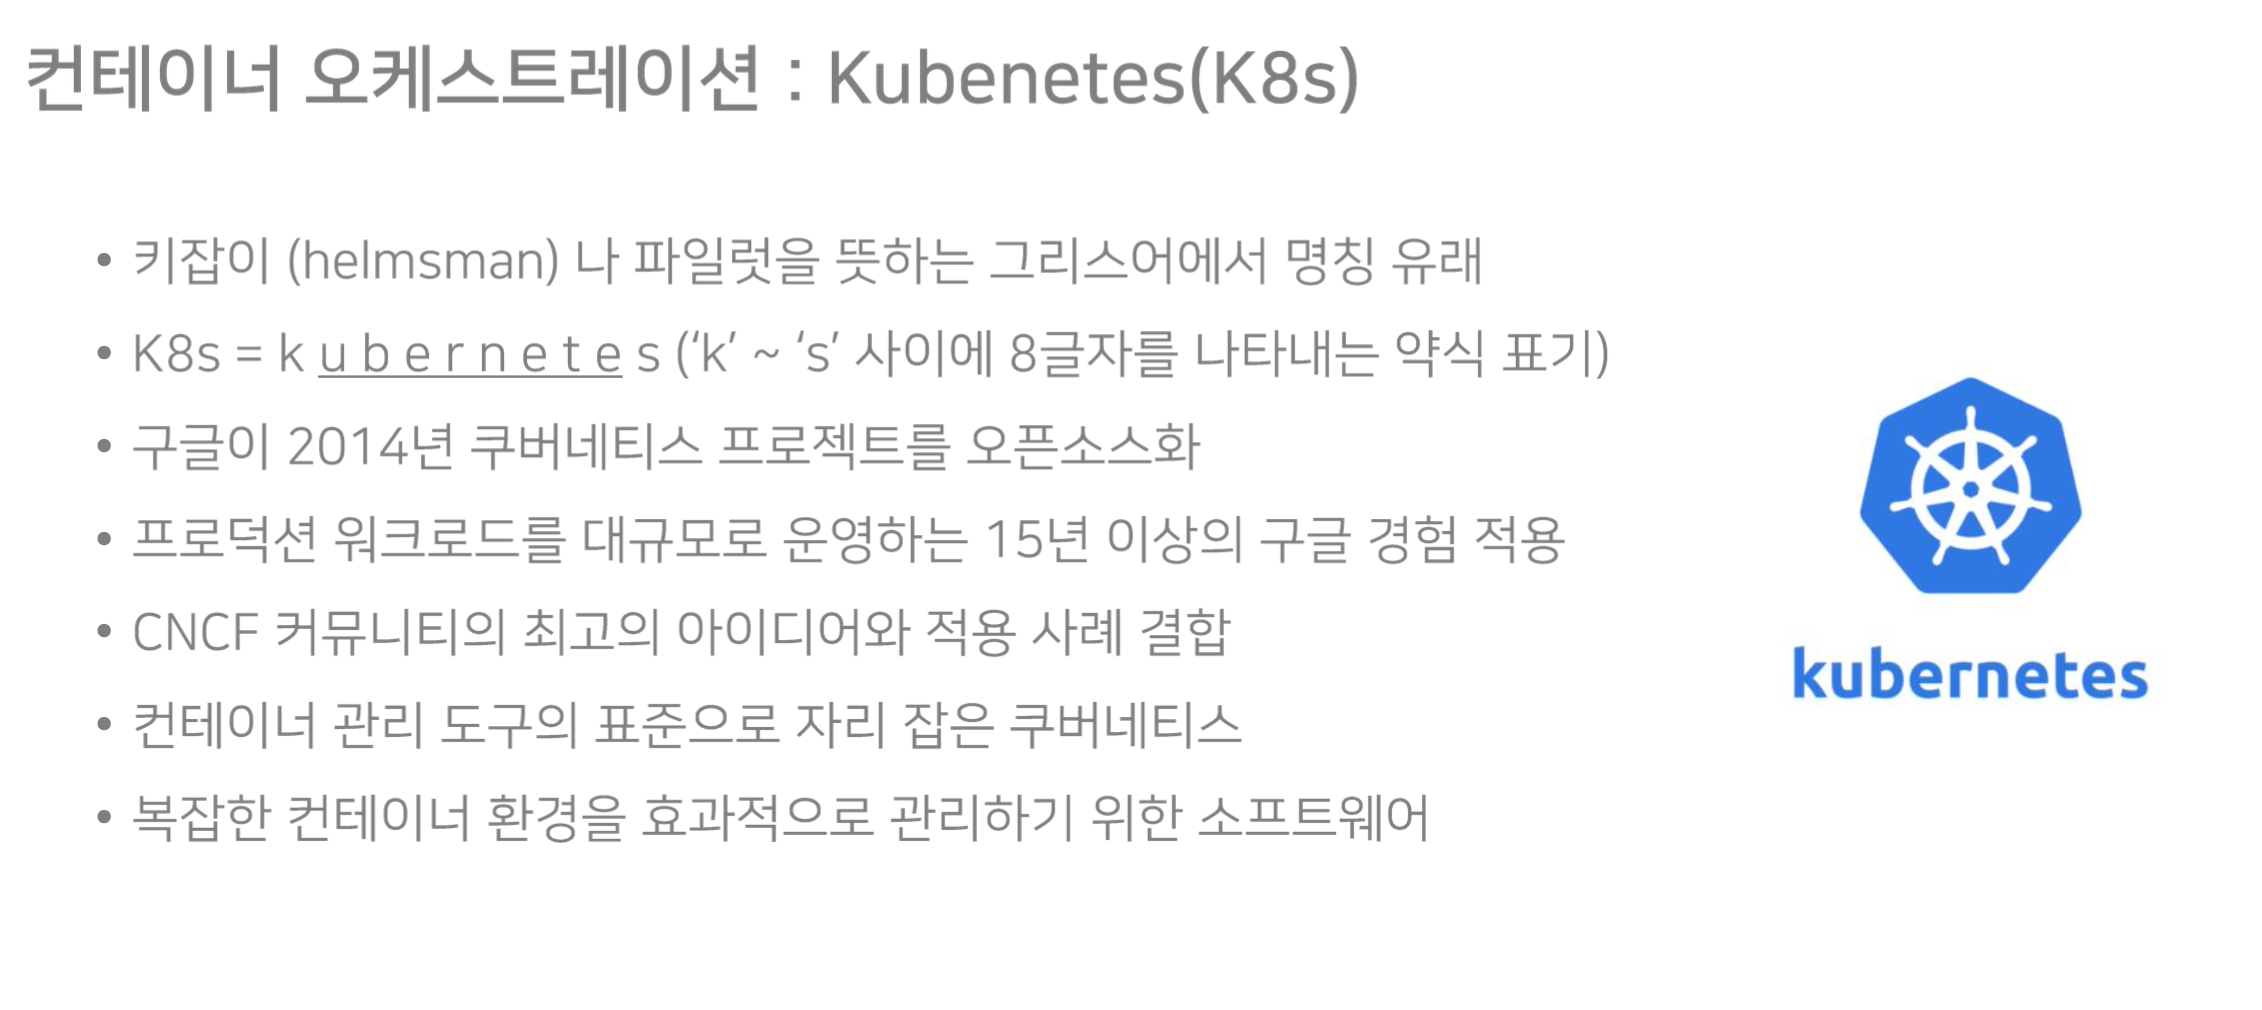
그, 컨테이너 오케스트레이션이 바로 쿠버네티스(Kubernetes)
쿠버네티스 핵심용어
- Cluster
- 노드라고 불리는 머신들의 집합
- 컨테이너화된 애플리케이션을 기동
- Master Node + Worker Node
- Node
- 쿠버네티스의 실제동작머신(VM)
- 노드는 Pod들을 구동하기 위해 필요한 서비스들을 가짐
- Master Node에 의해 관리됨
- Control Plane -> Master Node
- 쿠버네티스 운영과 관련 있는 컴포넌트 집합 세트
- 클러스터 상태를 컨트롤
- Cluster Node -> Worker Node
- Master Node에 의해 관리되는 실제 Container 실행 기능 담당
- Cloud Controller Manager
- 쿠버네티스와 Cloud Provider API와 연동하기 위한 컨트롤러를 생성하고 이를 각 노드에 배포하며 관리하는 역할
- etcd
- 모든 클러스터 데이터를 담는 쿠버네티스 운영 저장소
- Kube-controller-manager
- 컨트롤러를 생성하고 이를 각 노드에 배포하며 관리하는 역할
- Kube-apiserver
- 쿠버네티스의 모든 명령과 통시을 위한 API 서버
- Pod
- 쿠버네티스의 최소 단위 객체
실습
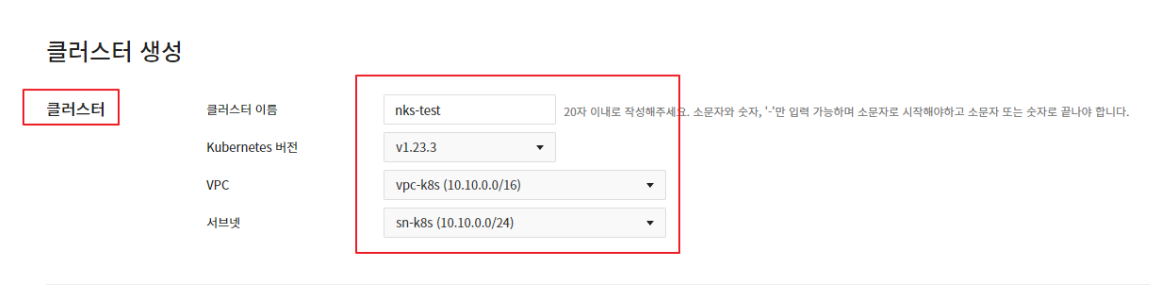
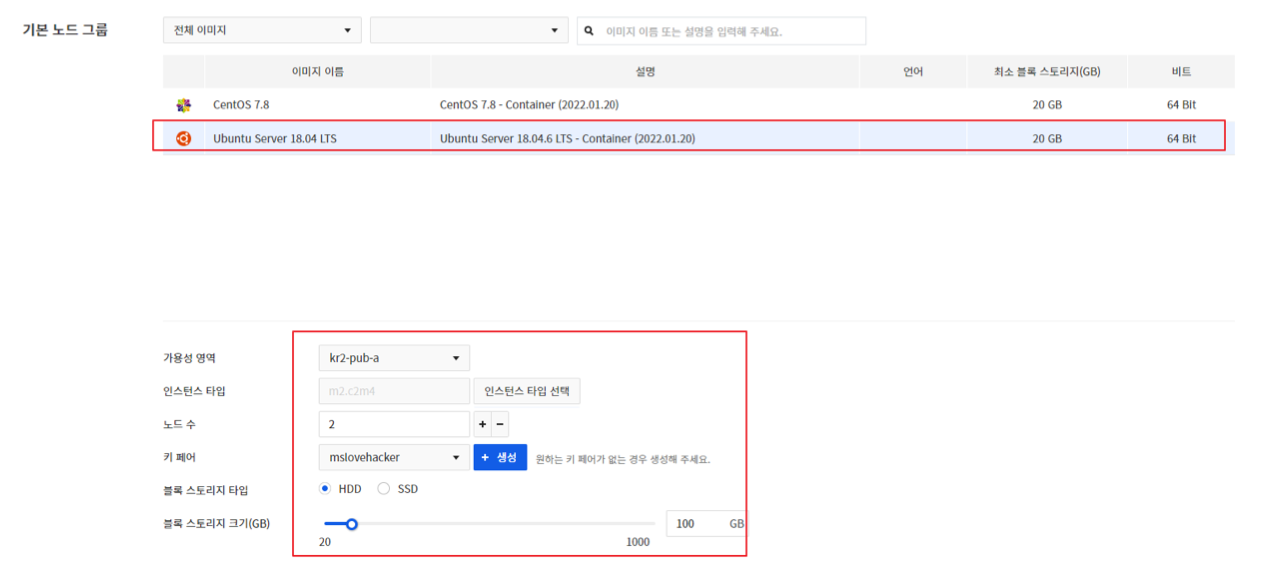
1. NKS 서비스 활성화
콘솔 > Container > NKS > 클러스터 생성 >
2. NCR 서비스 확성화
콘솔 > Container > NCR > 레지스트리 생성 > nhn-ncr 생성
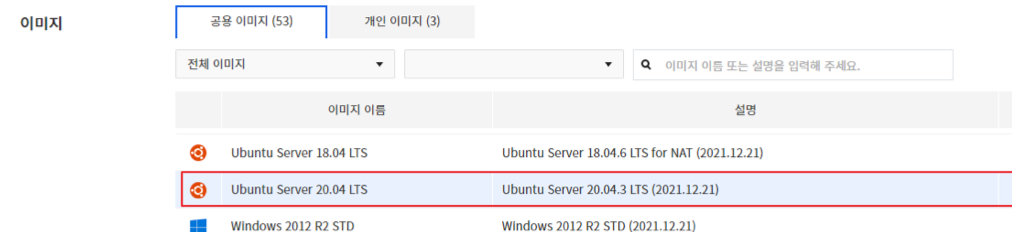
3. NKS 클러스터 관리용 인스턴스 생성
콘솔 > Instance > 인스턴스 생성 >
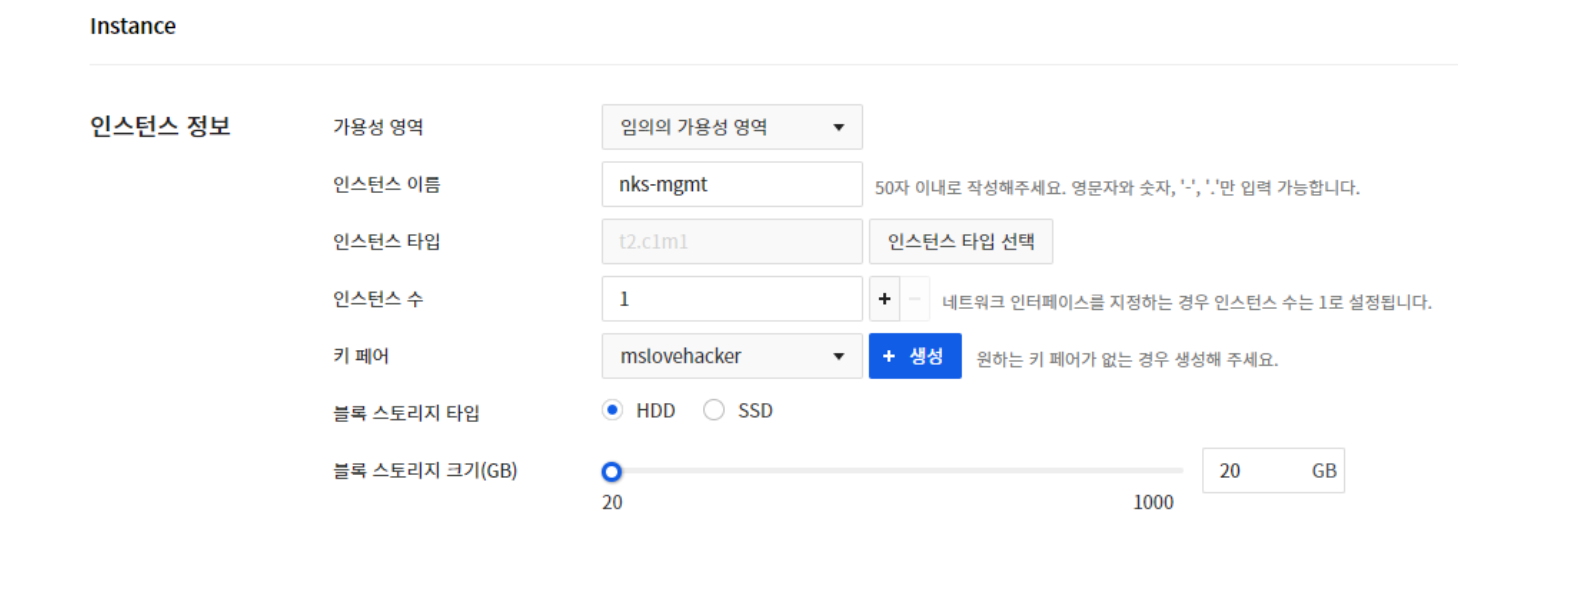
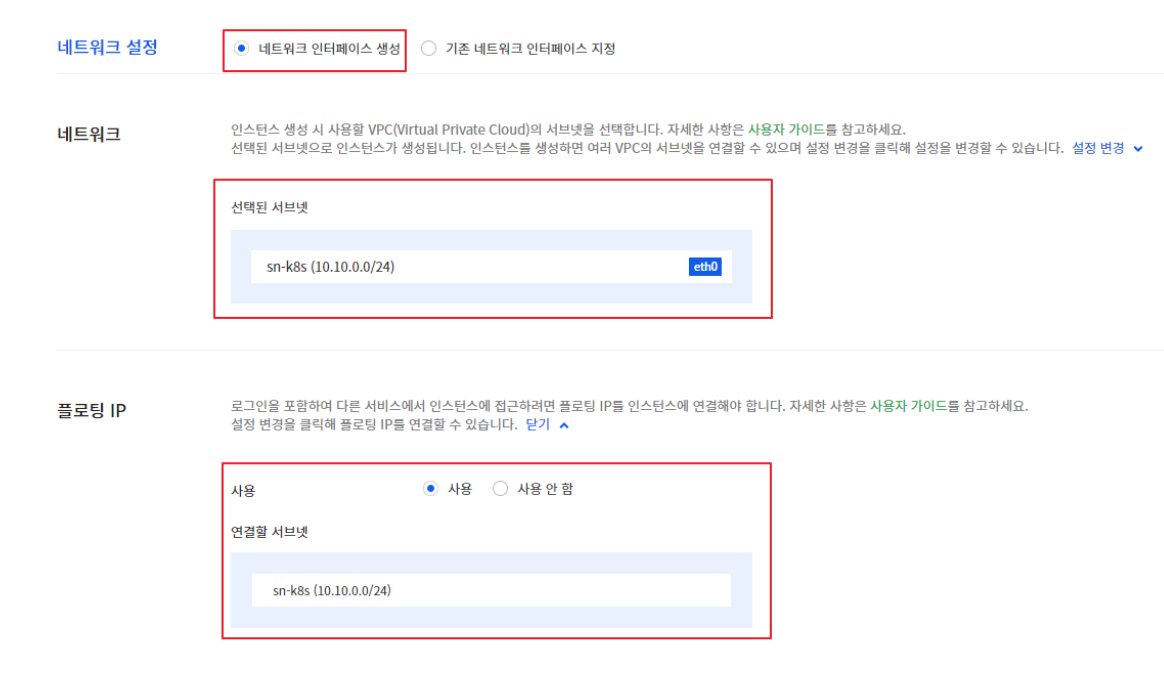
이후 접속 확인
4. 컨테이너 런타임(Docker) 설치
NKS 클러스터 관리용 인스턴스 접속 > docker 설치
sudo su
apt-get update -y

apt-get install ca-certificates curl gnupg lsb-release -y

mkdir -p /etc/apt/keyrings
curl -fsSL https://download.docker.com/linux/ubuntu/gpg | sudo gpg --dearmor -o /etc/apt/keyrings/docker.gpg

echo \
  "deb [arch=$(dpkg --print-architecture) signed-by=/etc/apt/keyrings/docker.gpg] https://download.docker.com/linux/ubuntu \
  $(lsb_release -cs) stable" | sudo tee /etc/apt/sources.list.d/docker.list > /dev/null

apt-get update -y
apt-get install docker-ce docker-ce-cli containerd.io docker-compose-plugin -y

systemctl start docker
docker version
4. kubectl 설치
(NKS 클러스터 관리용 인스턴스 접속된 상태) > kubectl 설치
apt-get update -y
apt-get install -y apt-transport-https ca-certificates curl
curl -fsSLo /usr/share/keyrings/kubernetes-archive-keyring.gpg https://packages.cloud.google.com/apt/doc/apt-key.gpg
echo "deb [signed-by=/usr/share/keyrings/kubernetes-archive-keyring.gpg] https://apt.kubernetes.io/ kubernetes-xenial main" | sudo tee /etc/apt/sources.list.d/kubernetes.list
apt-get update -y
apt-get install -y kubectl
apt-mark hold kubectl
systemctl daemon-reload
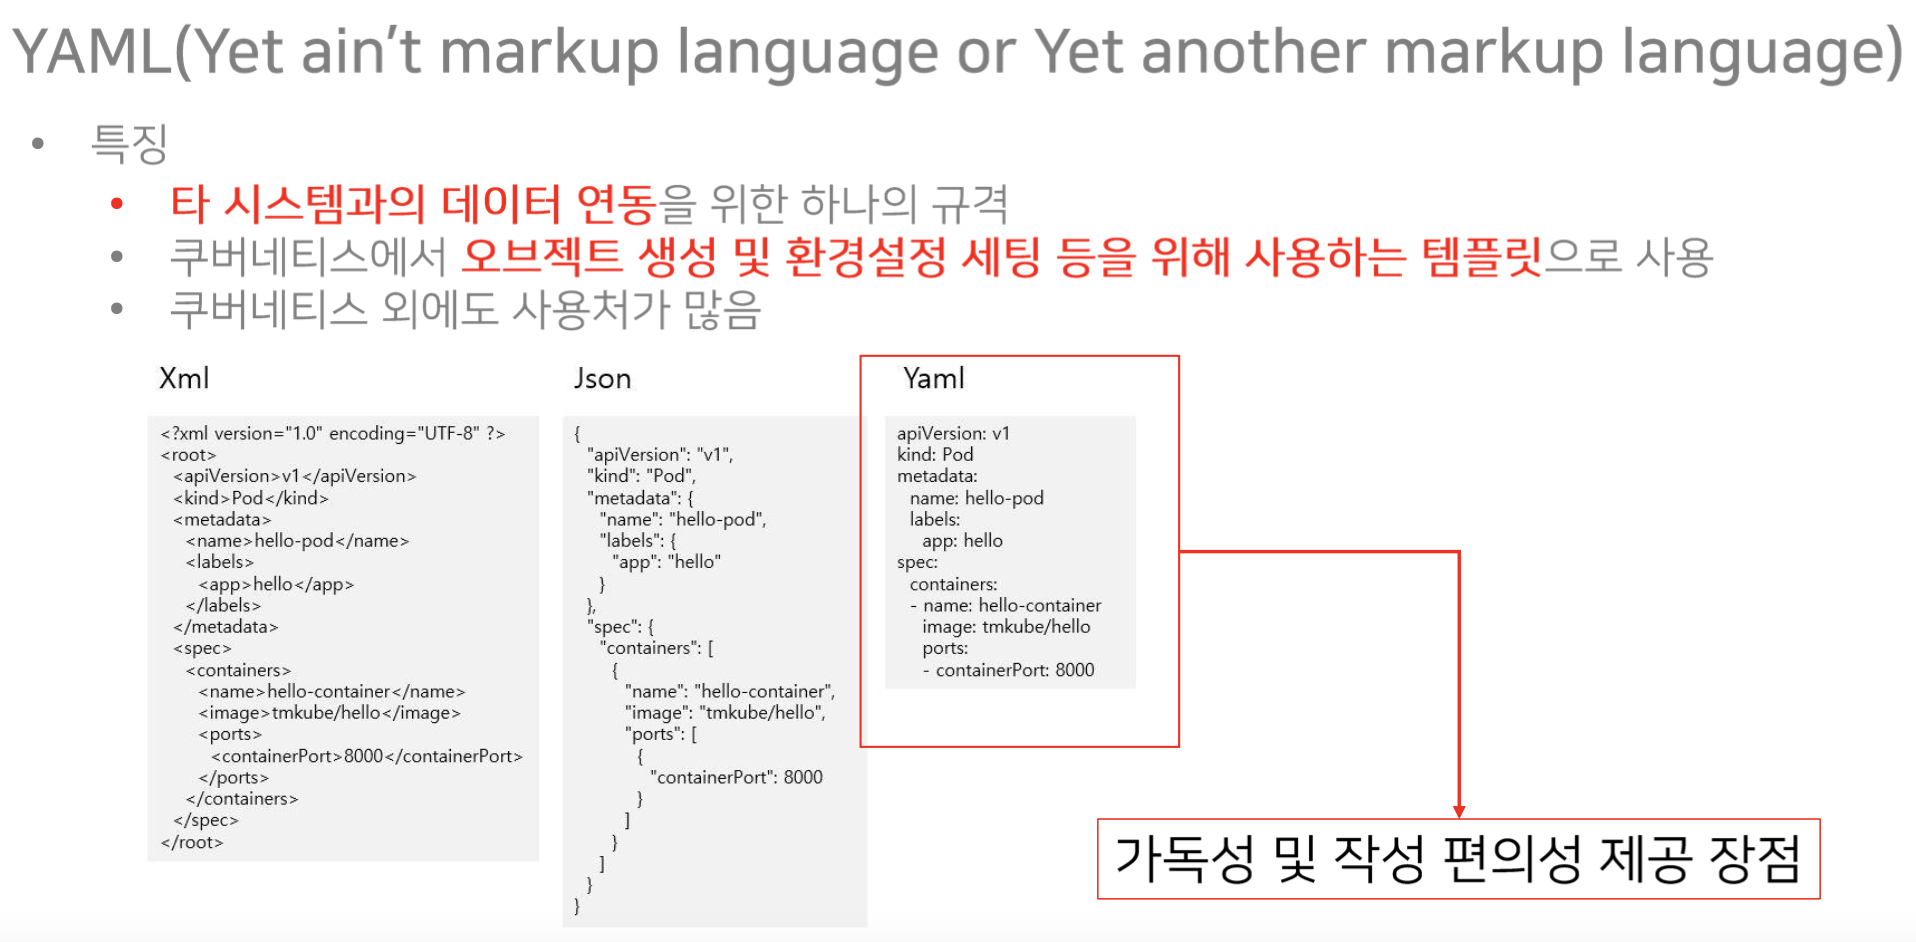
kubectl version --output=yaml --clientYAML 이란?
5. 생성된 NKS 클러스터 관리용 인스턴스에 적용하기
nhn cloud console > NKS 클러스터 > NKS 클러스터 kubeconfig 다운로드
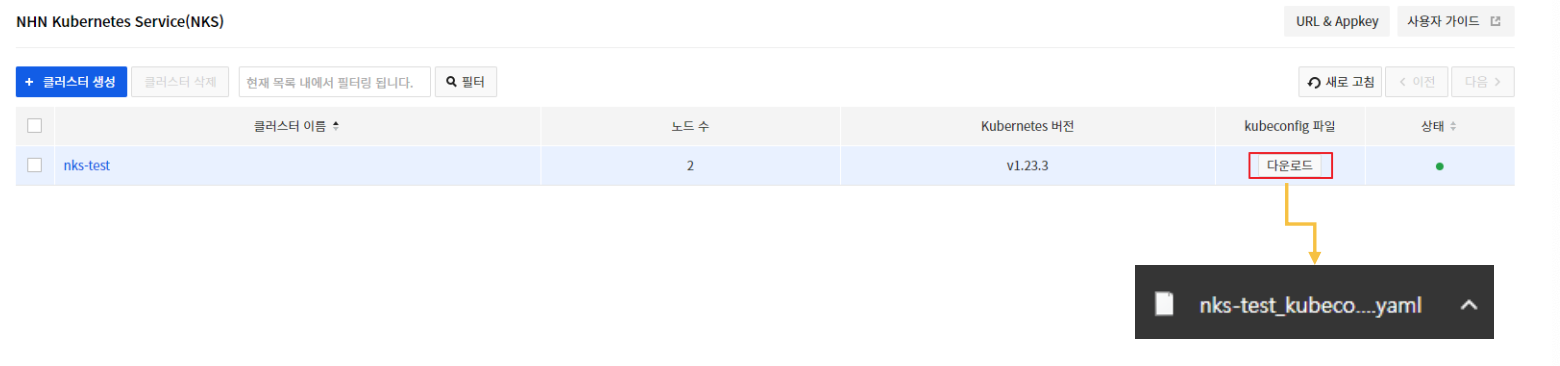
관리용 인스턴스에 이 yaml 파일 추가
이후,
$ sudo su
$ mkdir ~./kube
$ cp 만든yaml파일.yaml ~./kube/config
6. 명령어 자동완성 기능 추가
apt-get install bash-completion -y

source /usr/share/bash-completion/bash_completion

source <(kubectl completion bash)
echo "source <(kubectl completion bash)" >> ~/.bashrc
7. NCR에 사용자 컨테이너 이미지 저장
1) Access Key ID 생성
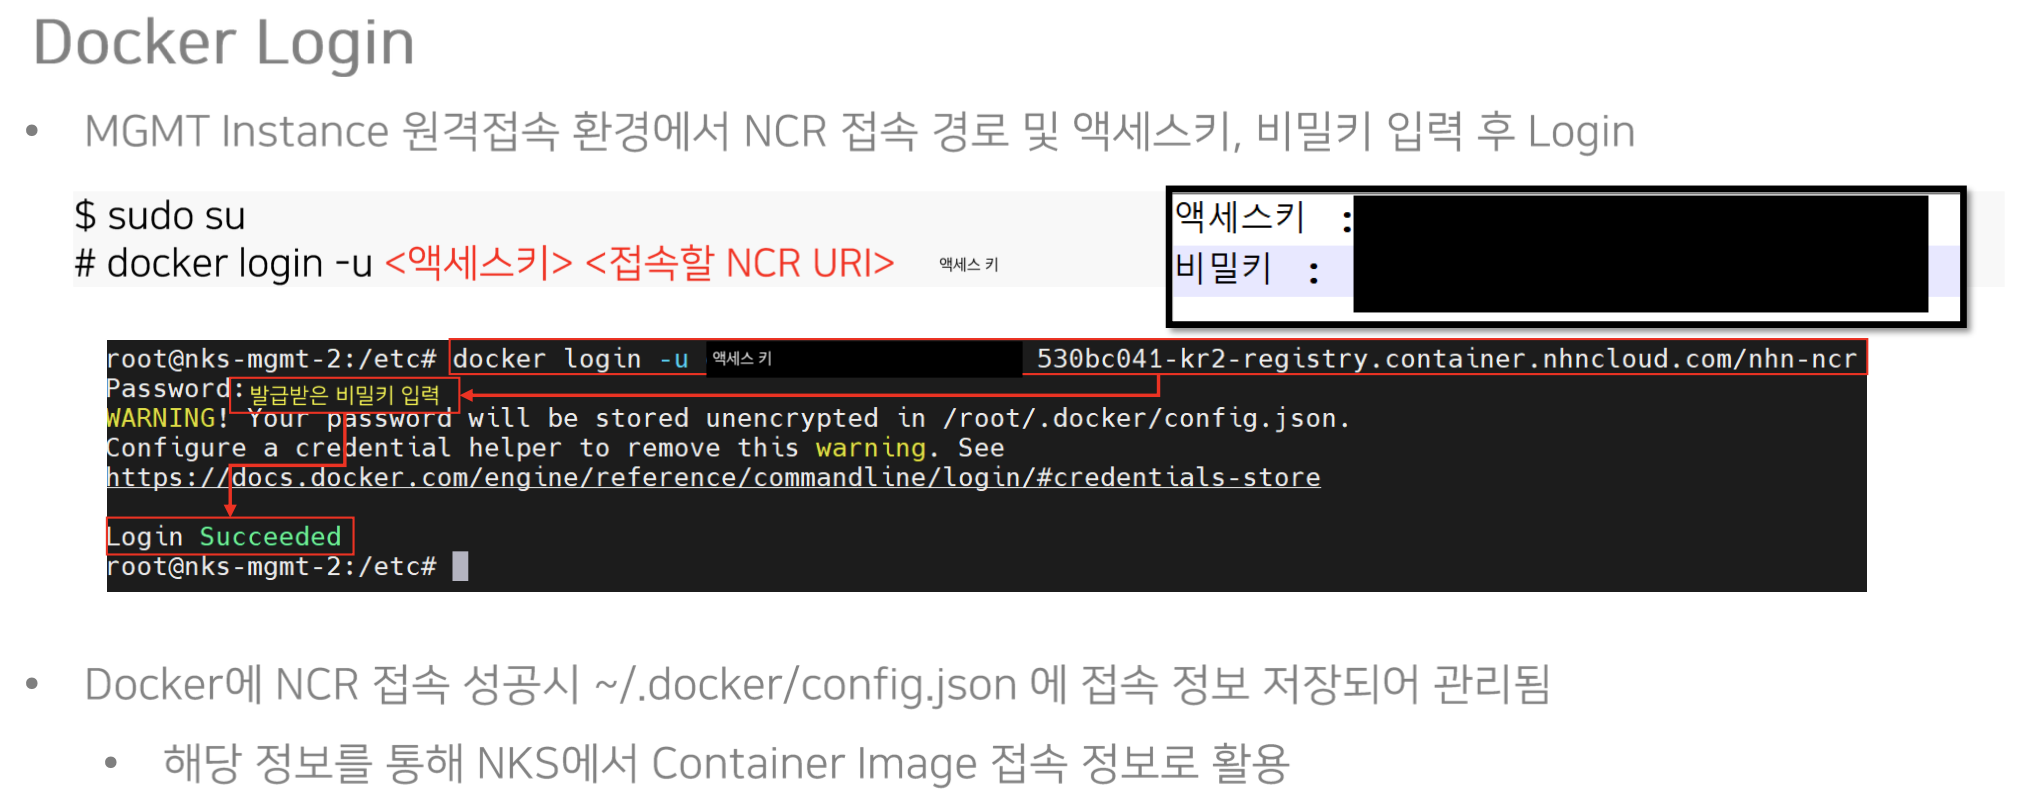
2) docker에 ncr 연결
3) docker 명령어로 ngnix image 다운로드
$ sudo su
$ docker pull nginx
4) nginx container 실행
$ sudo su
$ docker run --name=nginx nginx
5) docker nginx container 구동 image index.html 수정
$ docker cp nginx:/usr/share/nginx/html/index.html index.html
$ vi index.html
# nginx -> nhn 수정!
$ curl [컨테이너 ip] 로 확인가능
6) 수정된 image NCR 업로드
# 이름 변경하고 집어넣기
$ docker commit nginx nhn-nginx
$ docker tag nhn-nginx:latest [사용자 ncr url]/nhn-nginx:0.1
# docker push [사용자 ncr url]/nhn-nginx:0.1
7) NHN CLOUD의 NCR을 보면 이미지 업로드된 것 확인 가능
8. NKS/NCR 활용 웹서버 구동하기
1) private registry 이미지 받기 위한 인증 secret 생성
kubectl create secret generic regcred --from-file=.dockerconfigjson=/root/.docker/config.json --type=kubernetes.io/dockerconfigjson2) private-reg-pod.yaml 파일 생성
apiVersion: apps/v1
kind: Deployment
metadata:
  name: nhn-nginx-deployment
  labels:
    app: nhn-nginx
spec:
  replicas: 3
  selector:
    matchLabels:
      app: nhn-nginx
  template:
    metadata:
      labels:
        app: nhn-nginx
    spec:
      containers:
      - name: nhn-webserver
        image: [사용자 ncr url]/nhn-nginx:0.1
        ports:
        - containerPort: 80
      imagePullSecrets:
      - name: regcred
3) kubectl 로 yaml 적용해서 pods 생성 및 구동
kubectl apply -f private-reg-pod.yaml
# 확인
kubectl get pods -o wide
4) nginx pod 로드밸런서 서비스 추가 (NKS 웹서비스 pod 외부사용자 접속)
nhn cloud 의 로드밸런서가 생성됩니다.
kubectl expose deployment nhn-nginx-deployment --port=80 --target-port=80 --type=LoadBalancer5) 웹 브라우저 접속 테스트
$ sudo su
$ kubectl get service -o wide
# 해당 loadbalancer external -ip 주소 복사해서 브라우저에 붙여넣기