1 Atomic Design 이란?
회사에서 react로 마이그레이션을 진행하기 위해 storybook를 공부하면서
기존 container-component구조가 아닌 Atomic Design을 적용하기 위해 공부하는 글 입니다.
개념
디자인 요소들을 나누어 파악하고 요소를 조합하는 과정을 통해 디자인을 구성하는 방식입니다.
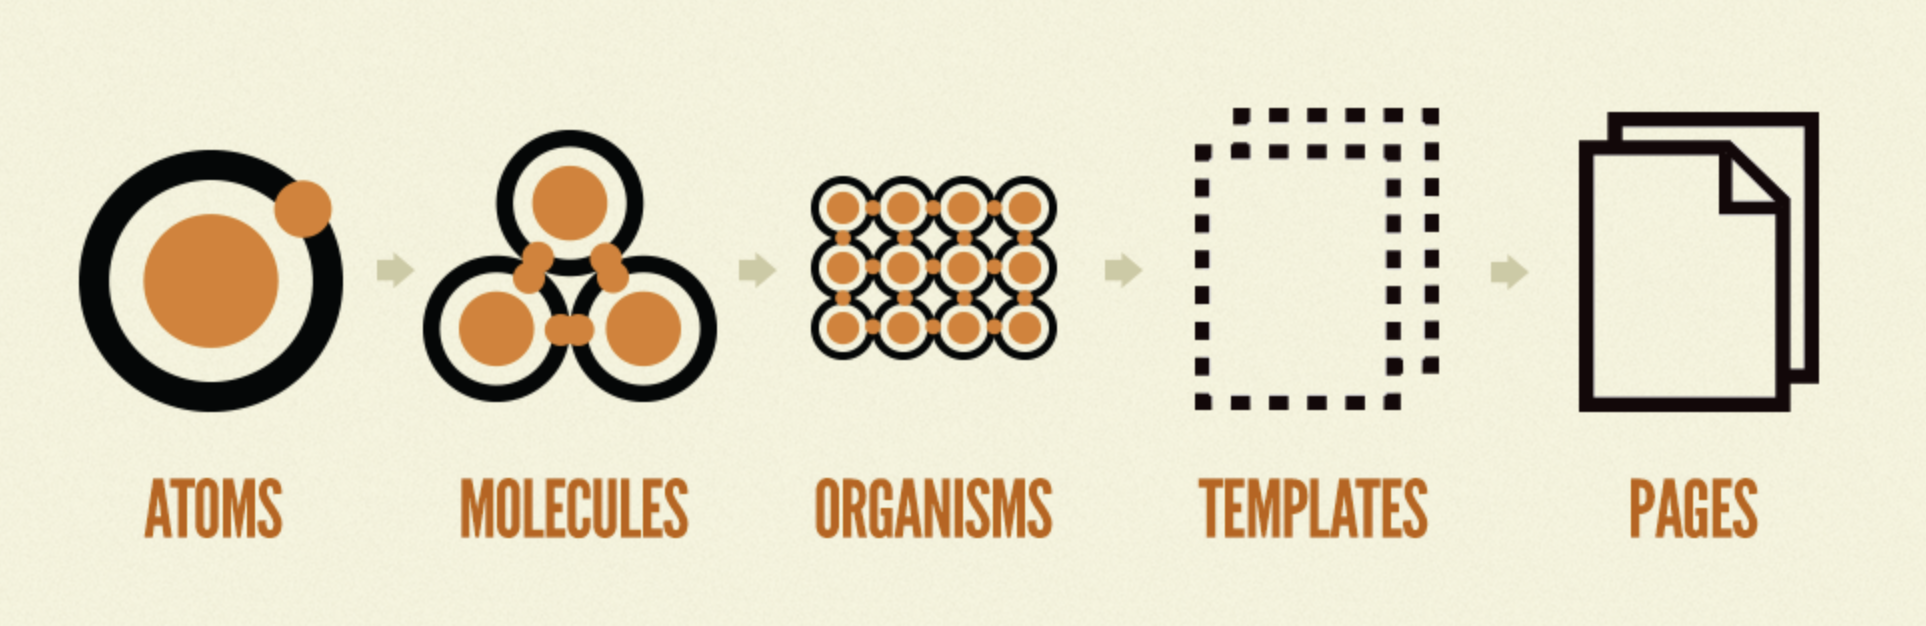
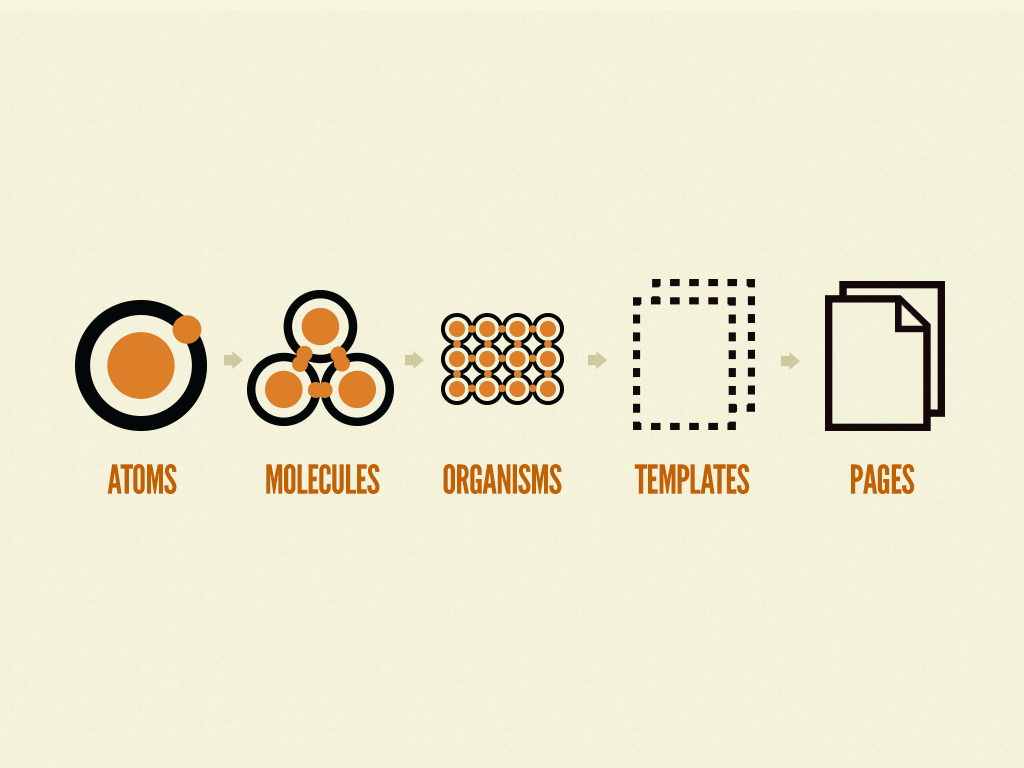
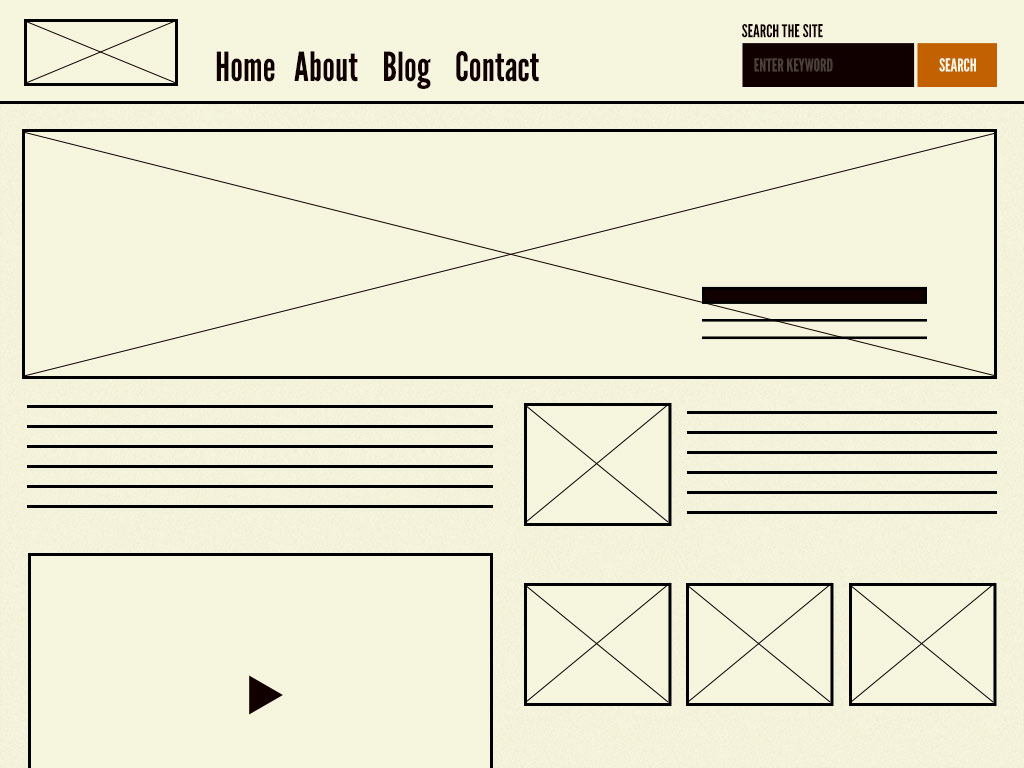
위의 그림과 같이 Atomic Design은 5단계로 되어있습니다.
- Atoms(원자)
- Molecules(분자)
- Organisms(유기체)
- Templates
- Pages
작은단위인 Atoms부터 만들고 결합하여 Pages를 만드는 디자인 시스템입니다.
이때 간단히 구분하는 방법을 알아보자면
-
컴포넌트에 로직이 있나요?
-
YES => organism Header, From, NavigationBar 등
-
NO => 컴포넌트 안 다른 컴포넌트가 있나요?
- YES => molucule : LoginInput(Input + Button)
- NO => atom : HTML의 태그 객체로 Input, Button 등
-
Atoms
- Atomic Design의 최소 설계
- 보통 from, input, button 같은 HTML의 태그나 최소의 기능을 가진 기능의 커스텀 태그 컴포넌트
- 설계에 따라 속성에 따른 스타일 주입이 들어갈 수 있습니다.
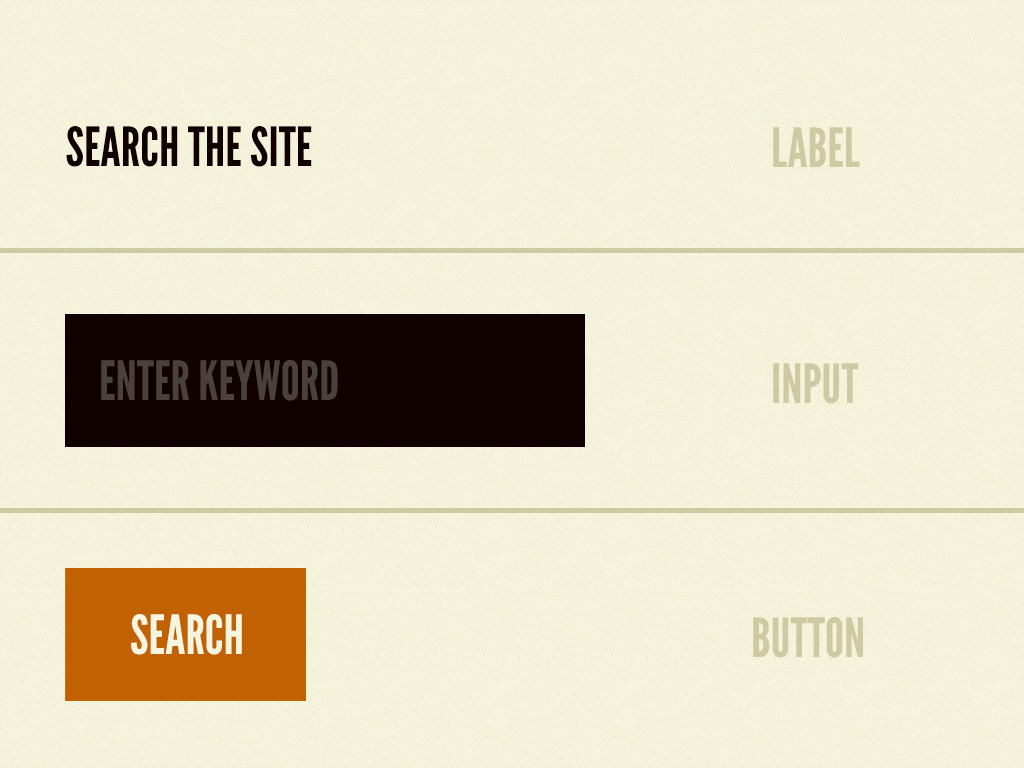
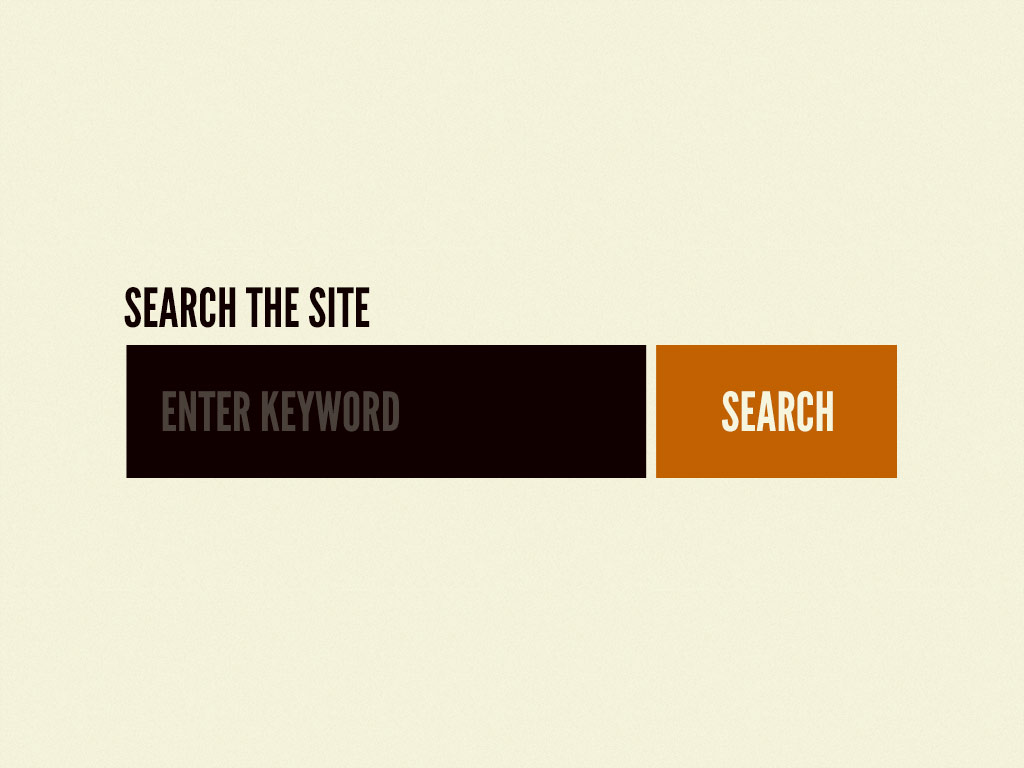
Molecules
- Atom들을 최소의 역할을 수행할 수 있게 합한 그룹
- 예를들어 로그인 입력창같은 경우 Input 2개와 Button 1개가 필요합니다.
Organisns
- 배치를 위한 layout 단위로 하나의 인터페이스를 형성하는 그룹
- 예를 들어 Header, Navigatioon, Footer 등 시맨틱태그들을 생각하면 편합니다.

Templates
- Oragnisms를 조합하여 하나의 페이지를 구성합니다.
- 하지만 데이터가 들어가지 않고 데이터의 흐름이나 레이아웃 등만 보여줍니다.
- 객체지향의 class와 비슷합니다.
Pages
- 정의된 Template에 데이터를 넣어 뷰를 완성시키는 단계입니다.
- 즉 class를 상속받아서 동작시키는 것과 같습니다.

2 프로젝트 분석하기
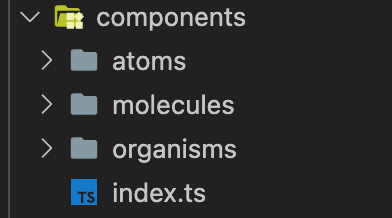
폴더 구조
2. 파일 구조
Atoms
components/atoms/Input입니다. 하지만 props로 Input의 속성을 받아서 설정을 해줍니다.
import React from 'react';
import * as S from './style';

export interface Props {
  inputName: string;
  invalid?: boolean;
  disabled?: boolean;
  defaultValue?: string;
  placeholder?: string;
  value?: string | number;
  onChange?: (e: React.ChangeEvent<HTMLInputElement>) => void;
  onFocusOut?: (e: React.FocusEvent<HTMLInputElement>) => void;
}

function Input({ inputName, ...props }: Props): React.ReactElement {
  return <S.Input name={inputName} {...props} autoComplete="off" />;
}

export default Input;
Molecules
위에서 알아본 Input을 사용하는 components/molecules/FormInput입니다.
import React from 'react';
import * as S from './style';
import Label, { Props as LabelProps } from 'components/atoms/Label';

export interface Props {
  inputName: string;
  invalid?: boolean;
  disabled?: boolean;
  defaultValue?: string;
  placeholder?: string;
  value?: string;
  onChange?: (e: React.ChangeEvent<HTMLInputElement>) => void;
  onFocusOut?: (e: React.FocusEvent<HTMLInputElement>) => void;
  captionContent?: string;
  labelProps: LabelProps;
}

function FormInput({
  captionContent,
  invalid = false,
  labelProps,
  ...props
}: Props): React.ReactElement {
  const { name } = labelProps;
  return (
    <S.FormInputContainer>
      <Label name={name} {...labelProps} />
      <S.FormInput invalid={invalid} {...props} />
      <S.FormCaption invalid={invalid} data-testid={'formcaption'}>
        {captionContent}
      </S.FormCaption>
    </S.FormInputContainer>
  );
}

export default FormInput;
Organisms
Atorms와 Molecules를 조합해서 만든 components/organisms/SignUpForm Organisms입니다.
import React from 'react';
import * as S from './style';
import FormInput, {
  Props as FormInputProps,
} from 'components/molecules/FormInput';
import Btn, { Props as BtnProps } from 'components/atoms/Btn';

export interface Props {
  FormInputs: {
    email: FormInputProps;
    lastName: FormInputProps;
    firstName: FormInputProps;
    phoneNumber: FormInputProps;
  };
  Button: BtnProps;
}

function SignUpForm({ FormInputs, Button }: Props): React.ReactElement {
  return (
    <S.SignUpFormContainer>
      <FormInput {...FormInputs.email} />
      <S.NameContainer>
        <FormInput
          {...FormInputs.lastName}
          data-testid={'signupform-lastname'}
        />
        <FormInput
          {...FormInputs.firstName}
          data-testid={'signupform-firstname'}
        />
      </S.NameContainer>
      <FormInput
        {...FormInputs.phoneNumber}
        data-testid={'signupform-phonenumber'}
      />
      <S.BtnWrapper>
        <Btn {...Button} data-testid={'signupform-submit'} />
      </S.BtnWrapper>
    </S.SignUpFormContainer>
  );
}

export default SignUpForm;
template
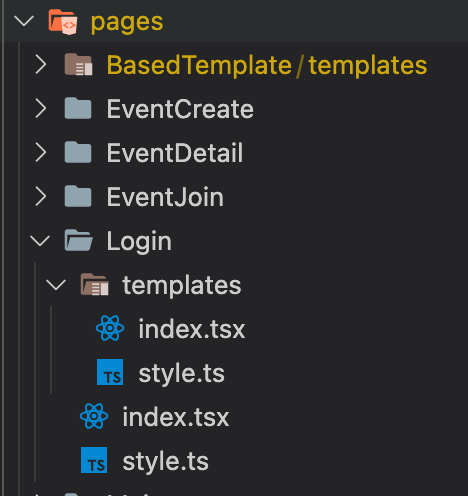
pages/SignUp/template입니다. 여기서는 크게 추가하는거 없이 Header과 Footer을 추가해줍니다.
import React from 'react';
import * as S from './style';

interface Props {
  header: React.ReactNode;
  content: React.ReactNode;
}

function SignUpTemplate({ header, content }: Props): React.ReactElement {
  return (
    <S.ContainerWrapper>
      <S.Container>
        <S.Header>{header}</S.Header>
        <S.Content>{content}</S.Content>
      </S.Container>
    </S.ContainerWrapper>
  );
}
export default SignUpTemplate;
Pages
여기서는 props를 관리하기 위해 context를 사용했기 때문에 view와 context를 나눴습니다.
redux를 사용했다면 따로 나눌 필요 없이 hooks를 사용해 한 페이지에서 처리해도 됩니다.
아래의 코드를 보면 view와 store로 나눴습니다.
import React from 'react';

import StoreProvider from './store';
import View from './view';

function SignUpPage(): React.ReactElement {
  return (
    <StoreProvider>
      <View />
    </StoreProvider>
  );
}

export default SignUpPage;
view.tsx
...
return (
  <SignUpTemplate
    header={
      <ImgBtn
        to={ROUTES.HOME}
        alt={'Logo'}
        src={logo}
        data-testid={'signup-logo'}
        />
    }
    content={<SignUpForm FormInputs={FormInputs} Button={Button} />}
  />
);
...
나머지는 로직이므로 각각에 따라 달라질테고 확인해보면 view를 확인해보면 SignUpTemplate에 header에는 ImgBtn을 content에는 SignUpForm에 데이터를 넘겨줍니다.
SignUpForm에 넘겨주는 FormInput을 잠시 살펴보면 어떠한 값이 들어가는지 확인해보고 다시 atomic로 올라가면서 어떻게 값을 넘겨주는지 살펴봅시다.
  const FormInputs = {
    email: {
      inputName: 'email',
      captionContent: SIGNUP_VALIDATION_EMAIL,
      disabled: true,
      value: email || '',
      labelProps: {
        name: SIGNUP_EMAIL,
        required: false,
      },
    },
    firstName: { ... },
    lastName: { ... },
    phoneNumber: { ... },
  };
출처
- https://velog.io/@thsoon/%EC%93%B8%EB%95%8C%EC%97%86%EC%9D%B4-%EA%B3%A0%ED%80%84%EC%9D%B8-%ED%88%AC%EB%91%90%EB%A6%AC%EC%8A%A4%ED%8A%B8-%EB%A7%8C%EB%93%A4%EA%B8%B0-FE-2.-%EB%B7%B0-%EC%84%A4%EA%B3%84
- https://github.com/connect-foundation/2019-12/tree/develop
- https://bradfrost.com/blog/post/atomic-web-design/