import torch
import torch.nn.functional as F
import matplotlib.pyplot as plt

from torch import nn
from torch import Tensor
from PIL import Image
from torchvision.transforms import Compose, Resize, ToTensor
from einops import rearrange, reduce, repeat
from einops.layers.torch import Rearrange, Reduce
from torchsummary import summary
코드를 실행하기 위해 필요한 라이브러리와 프레임워크이다.
Patch Embedding
이미지를 패치로 쪼개 Embedding한다. 이 때, class token과 positional embedding을 추가한다.
그러므로, 처음으로 해야만 하는 단계는 이미지를 여러 패치로 쪼개어 flatten하는 것이다. 논문에서는 다음과 같이 쓰여 있다.
To handle 2D images, we reshape the image into a sequence of flattened 2D patches , where is the resolution of the original image, is the number of channels, is the resolution of each image patch, and is the resulting number of patches, which also serves as the effective input sequence length for the Transformer.
배치 사이즈는 8, 채널 3, h,w = (224,224)를 갖는 랜덤텐서를 사용한다. batch c H W 형태를 갖는 이미지를 batch N (P P C) 벡터로 임베딩해준다. 이 때, P는 패치 사이즈, N은 패치의 개수 (HW/(PP)) 이다. 이렇게 만들기 위해 einops의 rearrange를 사용한다. rearrange를 통해 을 형태로 바꿀 수 있다.
patch_size = 16 # 16 pixels
patches = rearrange(x, 'b c (h s1) (w s2) -> b (h w) (s1 s2 c)', s1 =patch_size, s2 = patch_size)
그 후, 선형 층을 이용해 투영한다.
PatchEmbedding을 클래스로 구현하면 다음과 같다.
class PatchEmbedding(nn.Module):
	def __init__(self, in_channels: int = 3, patch_size : int = 16, emb_size: int = 768, img_size: int = 224):
		self.patch_size = patch_size
		super().__init__()
		self.projection = nn.Sequential(
			# 이미지를 s1 x s2 패치로 쪼개고 flatten.
			Rearrange('b c (h s1) (w s2) -> b (h w) (s1 s2 c)', s1 = patch_size, s2 = patch_size),
			nn.Linear(patch_size * patch_size * in_channels, emb_size)
		)
		# cls_token 정의
		self.cls_token = nn.Parameter(torch.randn(1,1,emb_size))
		# position Parameter 정의
		self.positions = nn.Parameter(torch.randn((img_size // patch_size) **2 + 1, emb_size)

	def forward(self, x: Tensor) -> Tensor:
		b, _, _, _ = x.shape
		x = self.projection(x)
		# cls_token을 반복해, 배치 사이즈와 크기 맞춰줌
		cls_tokens = repeat(self.cls_token, '() n e -> b n e', b=b)

		# cls_tokens과 projection을 concatenate
		x = torch.cat([cls_tokens, x], dim=1)

		# position encoding을 더해줌.
		x += self.positions
		return x
patch_size = 16, in_channels = 3, emb_size = 768일 때, x를 패치로 나누고 flatten하면, (8,196,768) 형태의 텐서가 된다. 그 후, (1,1,emb_size)=(1,1,768)의 cls_token 패러미터를 생성한다. 생성된 cls_token 패러미터를 repeat을 통해 반복해, (batch_size=8만큼) (8,1,768)로 확장한다. 그 후, dim=1 방향으로 cls_tokens과 projection을 concatenate한다. 그 결과, (8,197,768) 사이즈가 된다. 그 후, (197,768) 사이즈로 맞추었기 때문에, position encoding을 더한다.
Multi Head Attention(MHA)
attention은 3개의 입력을 받는다. : queries, keys and values
ViT의 MultiHead Attention은 3개입력이 같은 텐서로 입력된다. : Q, K, V
입력 텐서는 3개의 linear projection을 통해 임베딩되고, 여러 Head로 나뉜 후, 각각에 대해 Scaled Dot-Product Attention을 진행한다.
1) Linear Projection
emb_size = 768
num_heads = 8

keys = nn.Linear(emb_size, emb_size)
queries = nn.Linear(emb_size, emb_size)
values = nn.Linear(emb_size, emb_size)
#임베딩된 입력텐서 3개를 받아, Linear Projection하는 레이어 만들기,
#입력텐서를 각각 Q,K,V로 만들기.
2) Multi-Head
queries = rearrange(queries(x), "b n (h d) -> b h n d", h=num_heads)
keys = rearrange(keys(x),"b n (h d) -> b h n d", h=num_heads)
values = rearrange(values(x), "b n (h d) -> b h n d", h=num_heads)
3) Scaled Dot-Product Attention
Scaled Dot-Product Attention은 다음과 같다.
# Queries * Keys
energy = torch.einsum('bhqd, bhkd -> bhqk', queries, keys)

# Get Attention Score
scaling = emb_size ** (1/2)
att = F.softmax(energy, dim=1) / scaling

# Attention Score * values
out = torch.einsum('bhal, bhlv -> bhav', att, values)

# Rearrange to emb_size
out = rearrange(out, "b h n d -> b n (h d)")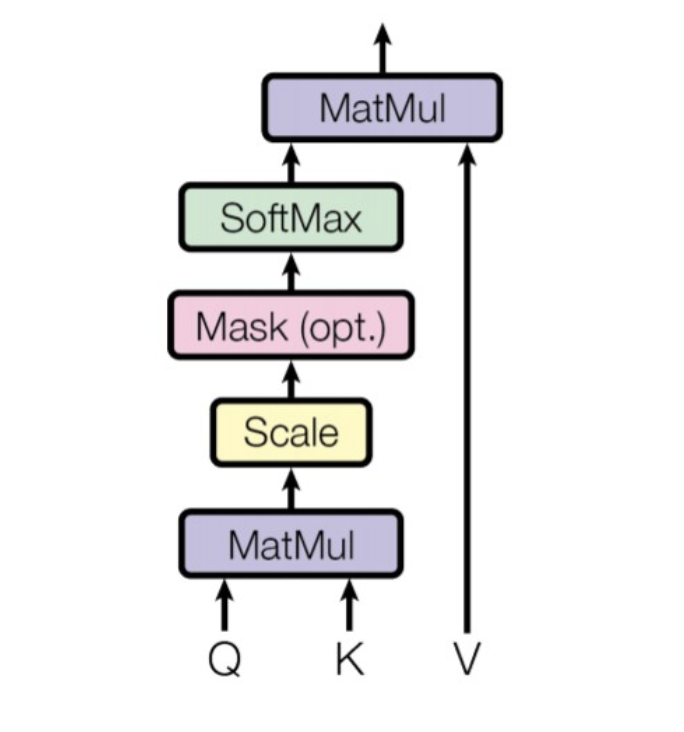
(1) Q와 K를 행렬곱하기.
(2) 행렬곱을 scaling하기.
(3) 그 결과로 얻은 attention score와 V를 행렬곱하기.
(4) emb_size로 rearrange
위의 과정을 클래스로 구현하면,
class MultiHeadAttention(nn.Module):
	def __init__(self, emb_size : int = 768, num_heads : int = 8, dropout : float = 0):
		super().__init__()
		self.emb_size = emb_size
		self.num_heads = num_heads

		#QKV
		self.qkv = nn.Linear(emb_size, emb_size * 3)
		self.att_drop = nn.Dropout(dropout)

		#Linear Projection
		self.projection = nn.Linear(emb_size, emb_size)

	def forward(self, x : Tensor, mask : Tensor = None) -> Tensor:
		qkv = rearrange(self.qkv(x), "b n (h d qkv) -> (qkv) b h n d", h = self.num_heads, qkv = 3)
		queries = qkv[0]
		keys = qkv[1]
		values = qkv[2]

		#sum
		energy = torch.einsum('bhqd, bhkd -> bhqk', queries, keys)
		if mask is not None:
			fill_value = torch.finfo(torch.float32)
			energy.mask_fill(~mask, fill_value)
		scaling = self.emb_size ** (1/2)
		att = F.softmax(energy, dim=1)/scaling
		att = self.att_drop(att)

		out = torch.einsum('bhal, bhlv -> bhav ', att,values)
		out = rearrange(out, "b h n d -> b n (h d)")
		out = self.projection(out)
		return out
코드 리뷰(2)로 이어집니다.
