OAuth2 구현
지난 포스트에선 OAuth2 의 개념과 설정을 완료하였다. 이번엔 구현을 해보자.
CustomOAuth2UserService
package com.hello.hello.oauth;

import lombok.RequiredArgsConstructor;
import org.springframework.security.oauth2.client.userinfo.OAuth2UserRequest;
import org.springframework.security.oauth2.client.userinfo.OAuth2UserService;
import org.springframework.security.oauth2.core.OAuth2AuthenticationException;
import org.springframework.security.oauth2.core.user.OAuth2User;
import org.springframework.stereotype.Service;

@Service
@RequiredArgsConstructor
public class CustomOAuth2UserService implements OAuth2UserService<OAuth2UserRequest, OAuth2User> {
    @Override
    public OAuth2User loadUser(OAuth2UserRequest userRequest) throws OAuth2AuthenticationException {
        return null;
    }
}
oauth2 디렉토리를 만들고 CustomOAuth2UserService 를 만들었다.
OAuth2UserRequest 를 받아 로직 처리후 OAuth2User 객체를 반환해줄것이다.
OAuth2UserService
/*
 * Copyright 2002-2020 the original author or authors.
 *
 * Licensed under the Apache License, Version 2.0 (the "License");
 * you may not use this file except in compliance with the License.
 * You may obtain a copy of the License at
 *
 *      https://www.apache.org/licenses/LICENSE-2.0
 *
 * Unless required by applicable law or agreed to in writing, software
 * distributed under the License is distributed on an "AS IS" BASIS,
 * WITHOUT WARRANTIES OR CONDITIONS OF ANY KIND, either express or implied.
 * See the License for the specific language governing permissions and
 * limitations under the License.
 */

package org.springframework.security.oauth2.client.userinfo;

import org.springframework.security.core.AuthenticatedPrincipal;
import org.springframework.security.oauth2.core.OAuth2AuthenticationException;
import org.springframework.security.oauth2.core.user.OAuth2User;

/**
 * Implementations of this interface are responsible for obtaining the user attributes of
 * the End-User (Resource Owner) from the UserInfo Endpoint using the
 * {@link OAuth2UserRequest#getAccessToken() Access Token} granted to the
 * {@link OAuth2UserRequest#getClientRegistration() Client} and returning an
 * {@link AuthenticatedPrincipal} in the form of an {@link OAuth2User}.
 *
 * @param <R> The type of OAuth 2.0 User Request
 * @param <U> The type of OAuth 2.0 User
 * @author Joe Grandja
 * @since 5.0
 * @see OAuth2UserRequest
 * @see OAuth2User
 * @see AuthenticatedPrincipal
 */
@FunctionalInterface
public interface OAuth2UserService<R extends OAuth2UserRequest, U extends OAuth2User> {

	/**
	 * Returns an {@link OAuth2User} after obtaining the user attributes of the End-User
	 * from the UserInfo Endpoint.
	 * @param userRequest the user request
	 * @return an {@link OAuth2User}
	 * @throws OAuth2AuthenticationException if an error occurs while attempting to obtain
	 * the user attributes from the UserInfo Endpoint
	 */
	U loadUser(R userRequest) throws OAuth2AuthenticationException;

}
이렇게 이미 만들어진 클래스 또는 인터페이스 들을 보면 제네릭을 활용하여 코드의 재사용성을 높인다는게 어떤말인지 잘 느끼지 못했는데 이거구나 하고 조금은 알것같다.
또 그냥 사용하는 것이 아닌 직접 위 코드를 살펴보고 어떻게 만들어져있는지 확인하는건 새로운 재미가 있다. 그리고 하나하나 내가 직접 구현했어야할 것들이 이미 만들어져 있음에 너무 감사하다!
OAuth2UserRequest
public class OAuth2UserRequest {

	private final ClientRegistration clientRegistration;

	private final OAuth2AccessToken accessToken;

	private final Map<String, Object> additionalParameters;

	/**
	 * Constructs an {@code OAuth2UserRequest} using the provided parameters.
	 * @param clientRegistration the client registration
	 * @param accessToken the access token
	 */
	public OAuth2UserRequest(ClientRegistration clientRegistration, OAuth2AccessToken accessToken) {
		this(clientRegistration, accessToken, Collections.emptyMap());
	}

	/**
	 * Constructs an {@code OAuth2UserRequest} using the provided parameters.
	 * @param clientRegistration the client registration
	 * @param accessToken the access token
	 * @param additionalParameters the additional parameters, may be empty
	 * @since 5.1
	 */
	public OAuth2UserRequest(ClientRegistration clientRegistration, OAuth2AccessToken accessToken,
			Map<String, Object> additionalParameters) {
		Assert.notNull(clientRegistration, "clientRegistration cannot be null");
		Assert.notNull(accessToken, "accessToken cannot be null");
		this.clientRegistration = clientRegistration;
		this.accessToken = accessToken;
		this.additionalParameters = Collections.unmodifiableMap(CollectionUtils.isEmpty(additionalParameters)
				? Collections.emptyMap() : new LinkedHashMap<>(additionalParameters));
	}

	/**
	 * Returns the {@link ClientRegistration client registration}.
	 * @return the {@link ClientRegistration}
	 */
	public ClientRegistration getClientRegistration() {
		return this.clientRegistration;
	}

	/**
	 * Returns the {@link OAuth2AccessToken access token}.
	 * @return the {@link OAuth2AccessToken}
	 */
	public OAuth2AccessToken getAccessToken() {
		return this.accessToken;
	}

	/**
	 * Returns the additional parameters that may be used in the request.
	 * @return a {@code Map} of the additional parameters, may be empty.
	 * @since 5.1
	 */
	public Map<String, Object> getAdditionalParameters() {
		return this.additionalParameters;
	}

}
private final ClientRegistration clientRegistration;
private final OAuth2AccessToken accessToken;
private final Map<String, Object> additionalParameters;
세가지 필드를 가지고있고 오버로딩을 활용해 인자가 다른 두개의 생성자를 가지고 있고 각 필드에 대한 Getter 메서드로 이루어져있다.
unmodifiableMap()은 수정할수 없는 Map 객체로 수정하려고 할시 UnsupportedOperationException 이 발생하며 Map 객체를 참조하여 데이터를 읽을수는 있지만 수정을 방지하고 싶을때 사용한다.
OAuth2User
OAuth2User interface 는 OAuth2AuthenticatedPrincipal 의 자식클래스이다
따라서 OAuth2AuthenticatedPrincipal 를 살펴보자.
OAuth2AuthenticatedPrincipal
/*
 * Copyright 2002-2019 the original author or authors.
 *
 * Licensed under the Apache License, Version 2.0 (the "License");
 * you may not use this file except in compliance with the License.
 * You may obtain a copy of the License at
 *
 *      https://www.apache.org/licenses/LICENSE-2.0
 *
 * Unless required by applicable law or agreed to in writing, software
 * distributed under the License is distributed on an "AS IS" BASIS,
 * WITHOUT WARRANTIES OR CONDITIONS OF ANY KIND, either express or implied.
 * See the License for the specific language governing permissions and
 * limitations under the License.
 */

package org.springframework.security.oauth2.core;

import java.util.Collection;
import java.util.Map;

import org.springframework.lang.Nullable;
import org.springframework.security.core.AuthenticatedPrincipal;
import org.springframework.security.core.GrantedAuthority;

/**
 * An {@link AuthenticatedPrincipal} that represents the principal associated with an
 * OAuth 2.0 token.
 *
 * @author Josh Cummings
 * @since 5.2
 */
public interface OAuth2AuthenticatedPrincipal extends AuthenticatedPrincipal {

	/**
	 * Get the OAuth 2.0 token attribute by name
	 * @param name the name of the attribute
	 * @param <A> the type of the attribute
	 * @return the attribute or {@code null} otherwise
	 */
	@Nullable
	@SuppressWarnings("unchecked")
	default <A> A getAttribute(String name) {
		return (A) getAttributes().get(name);
	}

	/**
	 * Get the OAuth 2.0 token attributes
	 * @return the OAuth 2.0 token attributes
	 */
	Map<String, Object> getAttributes();

	/**
	 * Get the {@link Collection} of {@link GrantedAuthority}s associated with this OAuth
	 * 2.0 token
	 * @return the OAuth 2.0 token authorities
	 */
	Collection<? extends GrantedAuthority> getAuthorities();

}
getAttributes() 메서드로 OAuth2 토큰의 attributes 를 반환하며 이는 Map<String,Obejct> 형태이다.
getAttribute(String name) 메서드 로는 name 에 해당하는 attributes 의 속성을 반환한다.
getAuthorities() 메서드는 토큰과 연관된 권한을 반환한다.
loadUser()
loadUser() 메서드를 구현하여 OAuth2 인증을 처리하고 사용자 정보를 가져오는 내용을 추가해야한다.
1. OAuth2 토큰을 사용하여 인증 서버로부터 사용자 정보를 요청한다.
2. 받아온 사용자 정보를 활용하여 애플리케이션의 사용자 모델에 맞게 가공한다.
3. 필요한 경우 정보를 DB에 저장하거나 업데이트 한다.
4. OAuth2 사용자 정보를 담은 OAuth2User 객체를 생성하여 반환한다.
package com.hello.hello.oauth;

import com.hello.hello.domain.Authority;
import com.hello.hello.domain.entity.Member;
import com.hello.hello.repository.MemberJpaRepository;
import java.util.Collections;
import java.util.HashSet;
import java.util.Map;
import java.util.Optional;
import java.util.Set;
import lombok.RequiredArgsConstructor;
import org.springframework.security.core.authority.SimpleGrantedAuthority;
import org.springframework.security.oauth2.client.userinfo.DefaultOAuth2UserService;
import org.springframework.security.oauth2.client.userinfo.OAuth2UserRequest;
import org.springframework.security.oauth2.client.userinfo.OAuth2UserService;
import org.springframework.security.oauth2.core.OAuth2AuthenticationException;
import org.springframework.security.oauth2.core.user.DefaultOAuth2User;
import org.springframework.security.oauth2.core.user.OAuth2User;
import org.springframework.stereotype.Service;

@Service
@RequiredArgsConstructor
public class CustomOAuth2UserService implements OAuth2UserService<OAuth2UserRequest, OAuth2User> {

    private final MemberJpaRepository memberJpaRepository;

    @Override
    public OAuth2User loadUser(OAuth2UserRequest userRequest) throws OAuth2AuthenticationException {

        OAuth2UserService<OAuth2UserRequest,OAuth2User> delegate= new DefaultOAuth2UserService();
        OAuth2User oAuth2User = delegate.loadUser(userRequest);

        String registrationId = userRequest.getClientRegistration().getRegistrationId();
        String userNameAttributeName = userRequest.getClientRegistration().getProviderDetails().getUserInfoEndpoint().getUserNameAttributeName();

        Map<String, Object> attributes = oAuth2User.getAttributes();

        String email = (String) attributes.get("email");
        String name = (String) attributes.get("name");

        Optional<Member> byEmail = memberJpaRepository.findByEmail(email);

        if (byEmail.isPresent()) {

            Member member = byEmail.get();

            return new DefaultOAuth2User(
                    Collections.singleton(new SimpleGrantedAuthority(member.getRoles().toString())),
                    attributes,
                    userNameAttributeName
            );
        } else {
            Set<Authority> roles = new HashSet<>();
            roles.add(Authority.ROLE_GUEST);
            roles.add(Authority.ROLE_USER);

            Member member = Member.builder().email(email).name(name).roles(roles).build();

            memberJpaRepository.save(member);
        }

        return oAuth2User;
    }
}
OAuth2 공급자로부터 사용자 정보를 받아 만약 존재하는 이메일일경우 그 정보를 찾아 반환하고
존재하지 않는 이메일일 경우 권한설정을 하고 DB에 저장한후 반환해준다.
OAuth2UserService<OAuth2UserRequest,OAuth2User> delegate= new DefaultOAuth2UserService();
스프링 시큐리티 에서 제공하는 인터페이스와 구현체로 OAuth2 공급자로부터 사용자 정보를 가져오는 역할을 담당한다.
delegate 객체를 생성하고 delegate.loadUser(userRequest) 를 호출함으로써 OAuth2 공급자로부터 사용자 정보를 가져오고 반환된 OAuth2User 객체를 oAuth2User 변수에 할당하고있다.
문제
현재 우리는 api 만을 만들고 있다. View 에 대해선 신경쓰지 않았는데 postman 으로 아무리 입력해보아도
구글 로그인 화면은 나오지 않는다.
간단한 index.html 화면을 만들어 구글 로그인이 성공하는지 테스트 해보자.
index.html
<!DOCTYPE html>
<html lang="ko">
<head>
    <meta charset="UTF-8">
    <title>OAuth2 Login</title>
    <!-- Bootstrap CSS -->
    <link rel="stylesheet" href="https://stackpath.bootstrapcdn.com/bootstrap/4.5.2/css/bootstrap.min.css">
    <style>
        /* 추가적인 스타일링을 적용할 수 있습니다. */
        body {
            padding: 20px;
        }
    </style>
</head>
<body>
<div class="container">
    <h1>OAuth2 Login</h1>
    <a href="/oauth2/authorization/google" class="btn btn-primary">Google 로그인</a>
</div>

<!-- Bootstrap JS -->
<script src="https://code.jquery.com/jquery-3.5.1.slim.min.js"></script>
<script src="https://cdn.jsdelivr.net/npm/@popperjs/core@2.5.3/dist/umd/popper.min.js"></script>
<script src="https://stackpath.bootstrapcdn.com/bootstrap/4.5.2/js/bootstrap.min.js"></script>
</body>
</html>
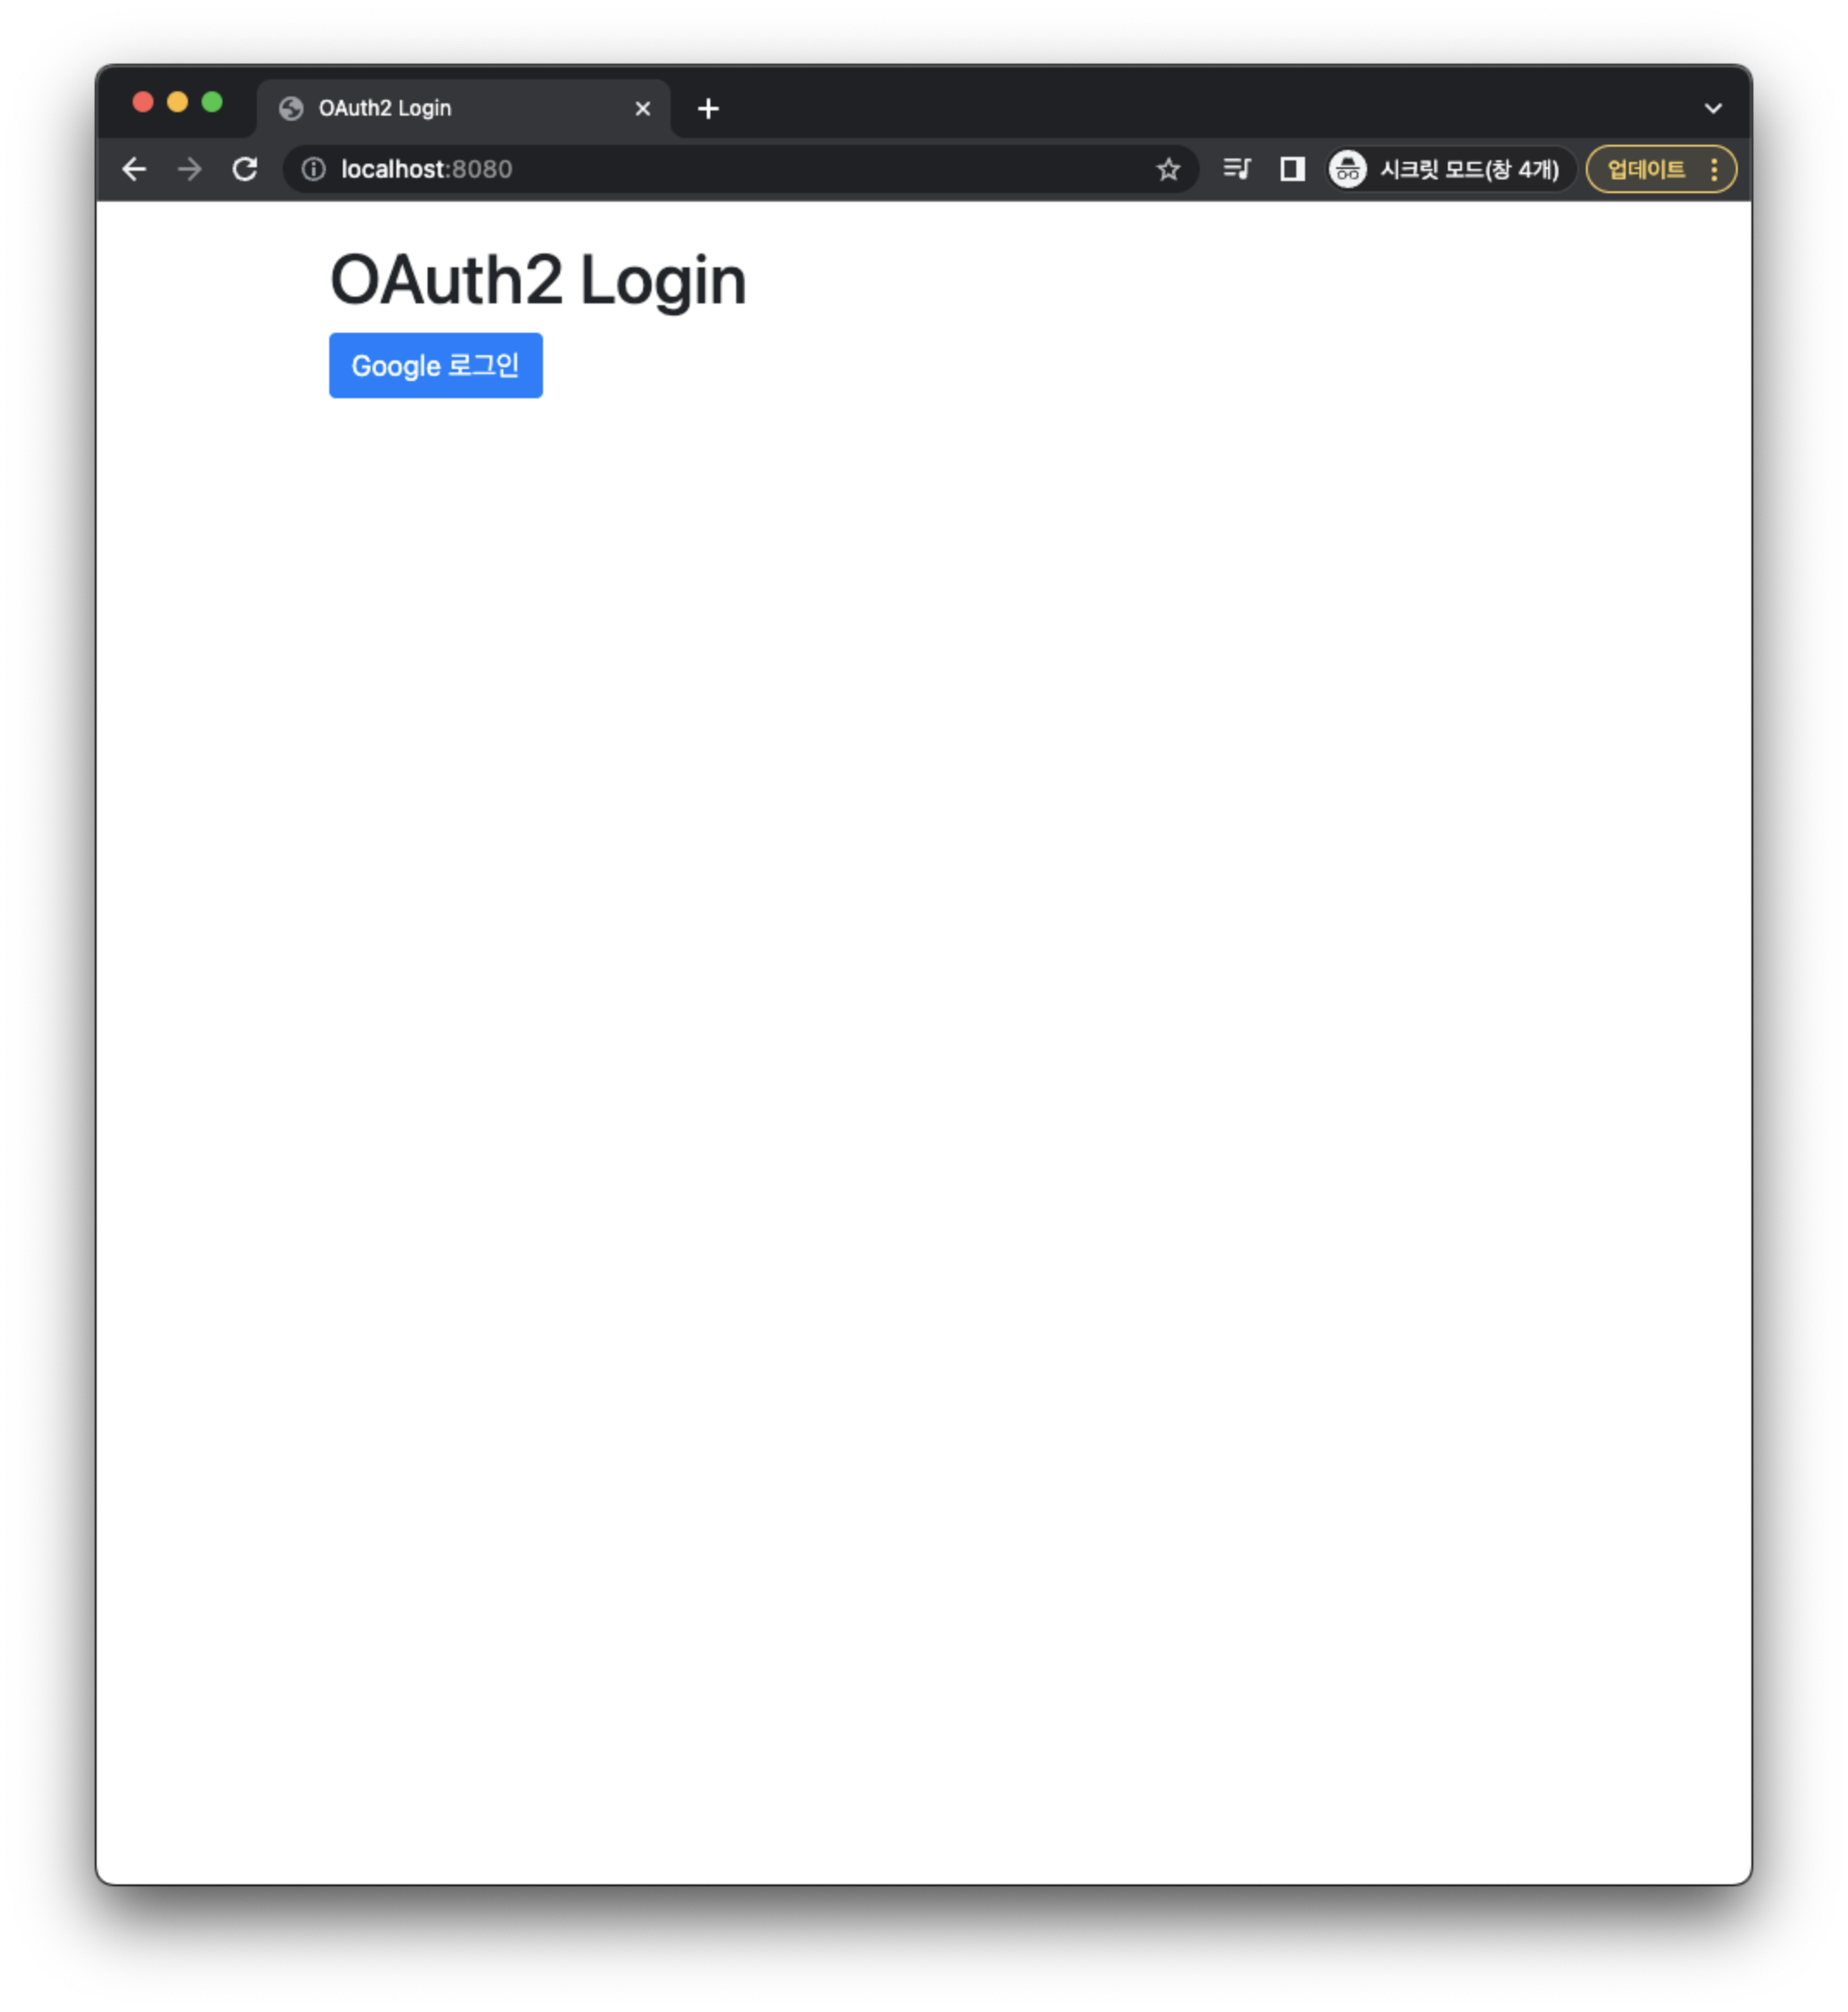
정말 매우매우매우매우 간단하게 만들었다.
저 구글 로그인 버튼을 누르면 /ouath2/authorzation/google 로 Get 요청을 보내면서 로그인 화면이 나오게 된다.
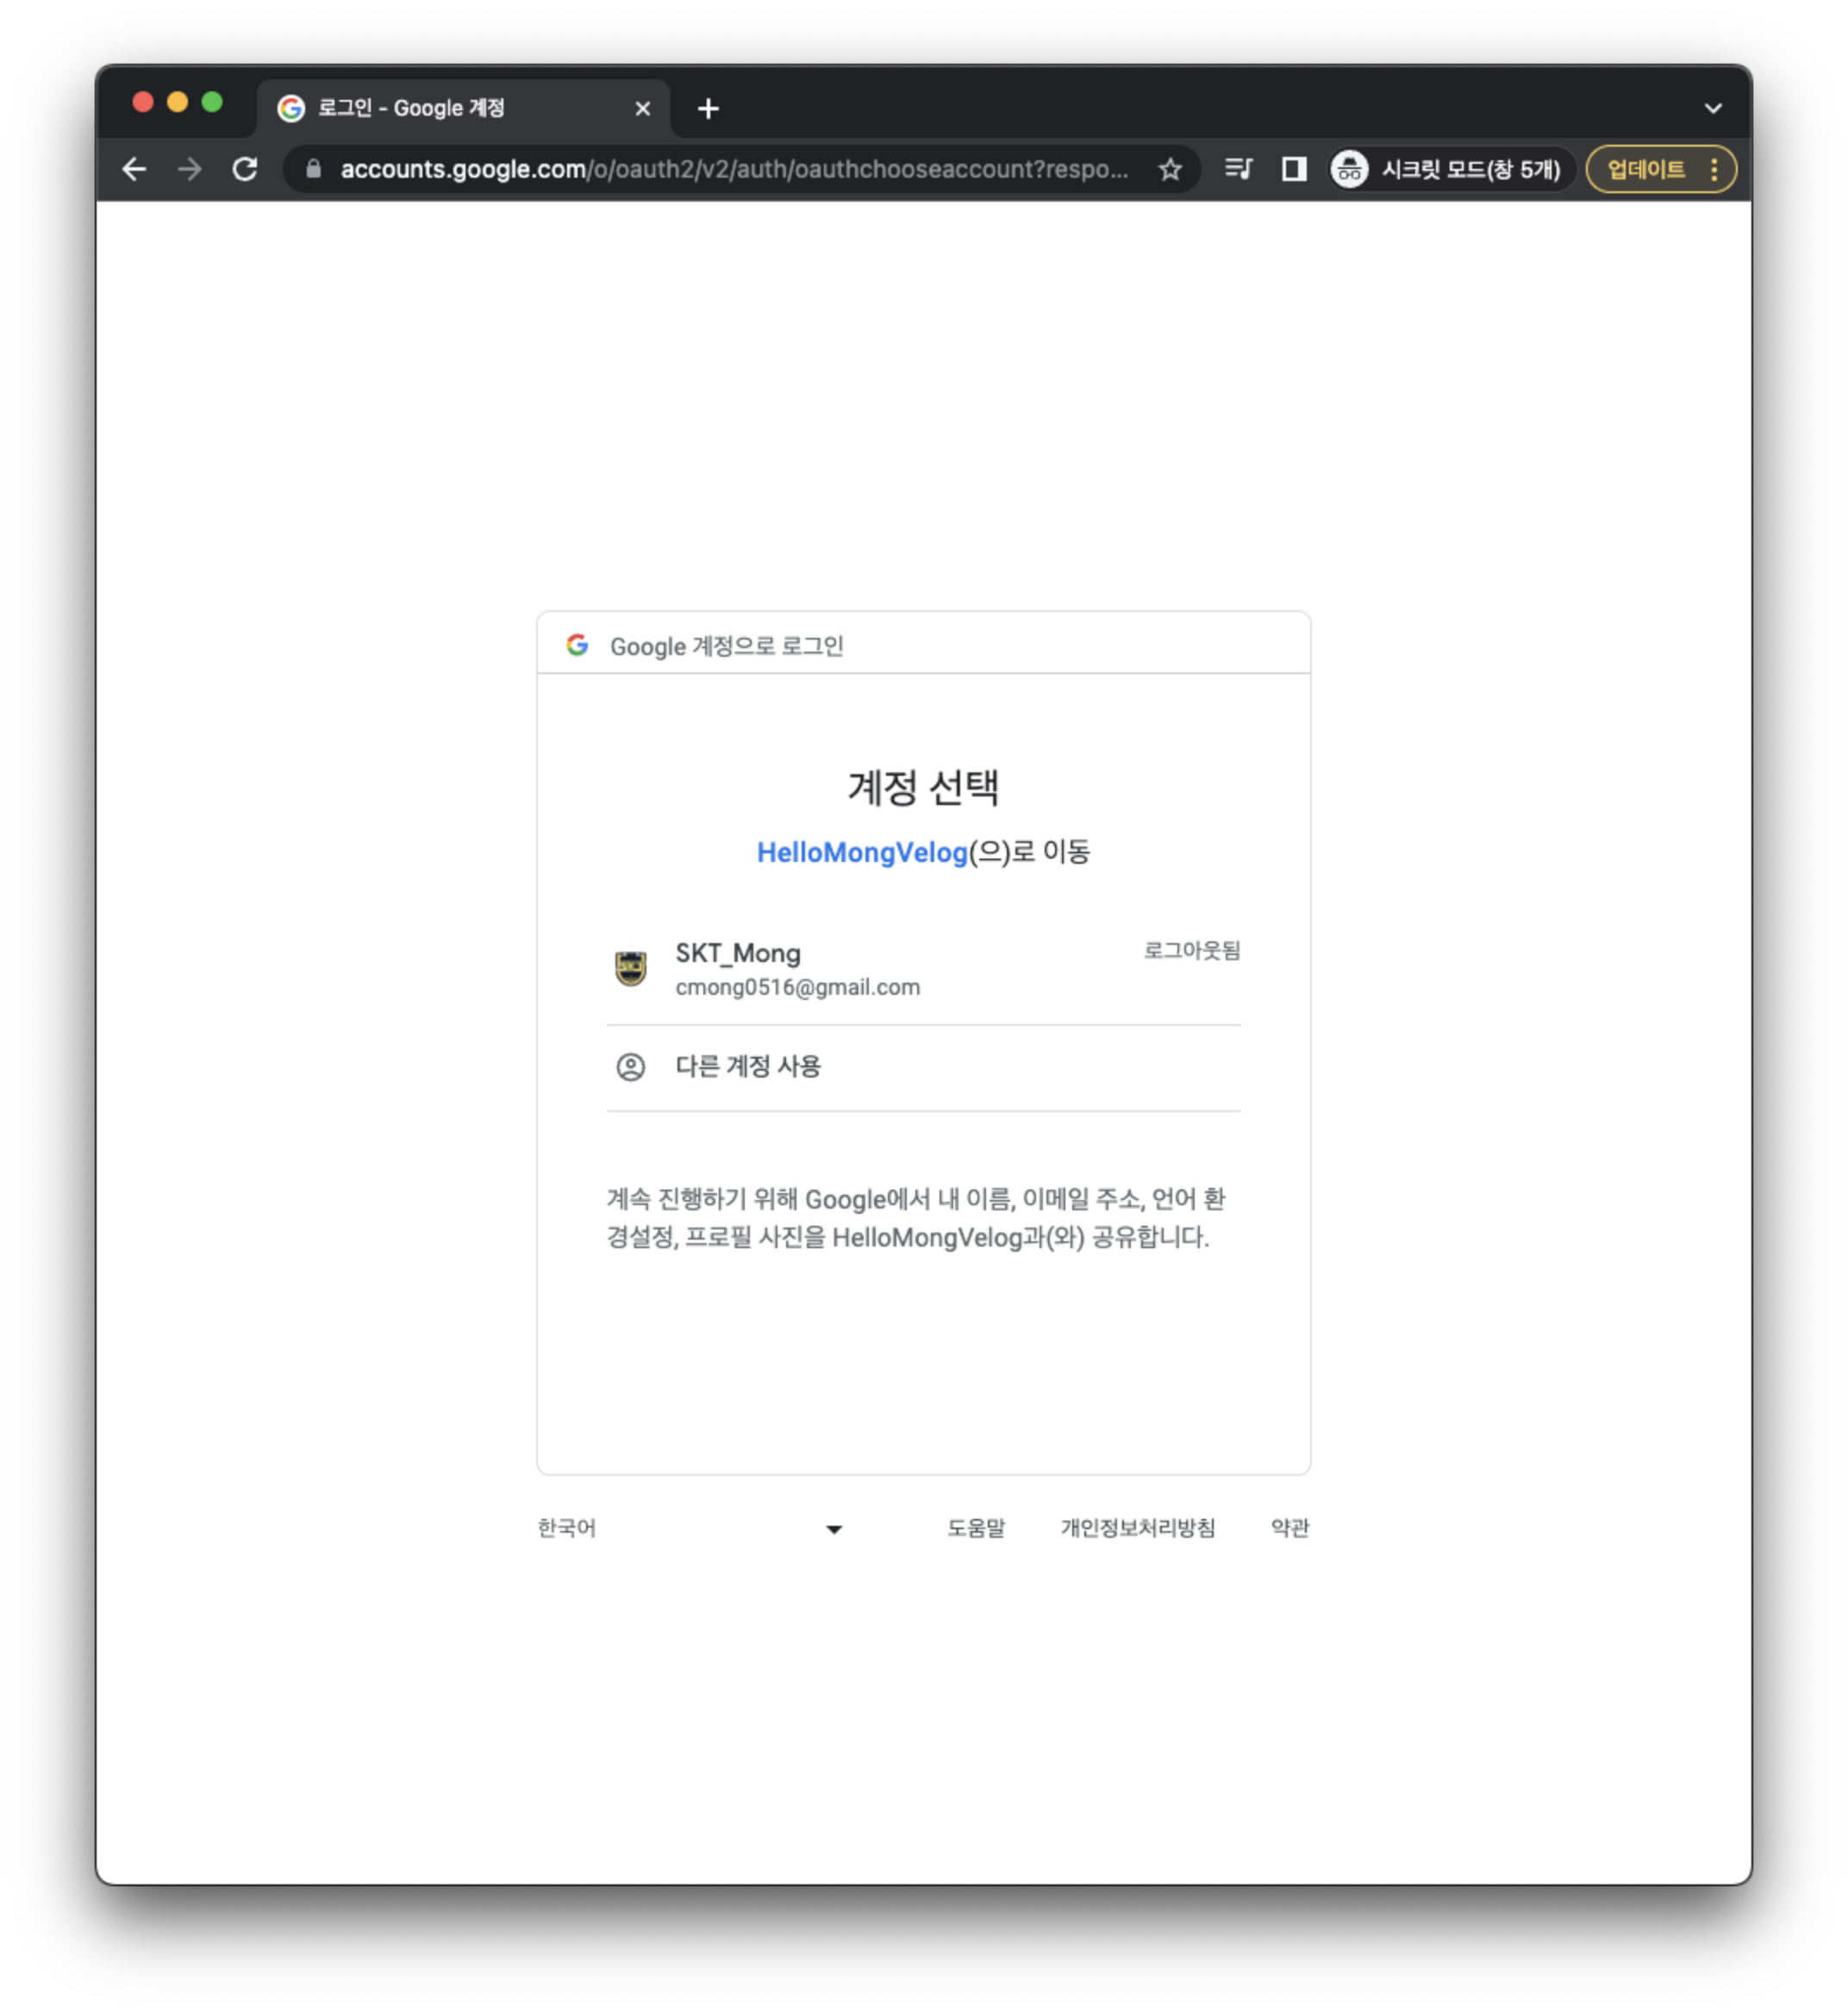
짠~
전에 공부할땐 thymeleaf 와 mustache 두가지 템플릿을 활용하여
로그인 상태가 아닐경우 회원가입 , 로그인 버튼이 보이게 하고
로그인 상태인 경우 사용자의 attributes 를 이용하여 "Hello" + 로그인한사용자 이름 과 로그아웃 버튼이 보이게 했었다.
사실 view 없는 api 자체만을 만들면서 소셜로그인을 따로 구현할 필요가 있을까 싶었지만
새로운 고민거리가 생기게 되었다.
바로 내가 만든 회원가입 시스템의 유저와 소셜 로그인을 통한 유저의 관리를 어떻게 해야할까 이다.
해결안
1. 일반 회원가입과 소셜 로그인으로 가입한 사용자를 통합하여 하나의 회원 테이블에 저장하고 관리한다.
2. 소셜 로그인으로 가입한 사용자를 별도의 테이블로 관리한다.
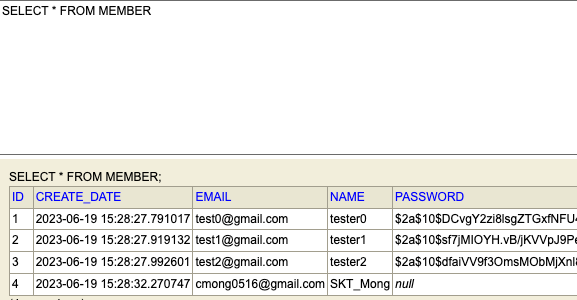
구글 로그인 성공시 Member 테이블에 내 구글 이메일과 Name 이 추가되었다.