1. 기존 코드 분석
기존 자바 프로젝트의 build.gradle를 확인해보니 Apache HttpClient를 직접적으로 사용하여 HTTP API를 호출하는 방식으로 구현되어 있었다.
dependencies {
    implementation 'com.google.code.gson:gson:2.8.6'
    implementation 'com.squareup.okhttp3:okhttp:4.12.0'
    implementation 'com.squareup.okhttp3:logging-interceptor:4.12.0'
    implementation group: 'org.apache.httpcomponents', name: 'httpclient', version: '4.5.13'
    implementation 'com.googlecode.json-simple:json-simple:1.1.1'
    implementation 'com.fasterxml.jackson.datatype:jackson-datatype-jsr310:2.17.1'
}
Apache HttpClient를 사용하여 HTTP API를 호출하는 코드는 다음과 같다.
public class SearchHTTP {


    Gson gson = new Gson();

    /**
     * Store 이름 + 위치 검색 메소드
     *
     * @param store (name, location1, location2)
     * @return ArrayList<Store> store
     * @throws IOException
     * @author 김남주
     */
    public ArrayList<StoreDTO> searchStoreByNameWithLocation(StoreDTO store) throws IOException {
        // URL 생성
        CloseableHttpClient Client = HttpClientBuilder.create().build();
        String baseURL = SingleTon.getBaseURL() + "/store/search-name";

        // 파라메터 설정
        HttpGet httpget = new HttpGet(baseURL);
        try {
            URI uri = new URIBuilder(httpget.getURI())
                    .addParameter("location1", store.getLocation1())
                    .addParameter("location2", store.getLocation2()) //콤보박스로 지역 수정할 수 있게
                    .addParameter("name", store.getName()).build();
            httpget.setURI(uri);
        } catch (URISyntaxException t) {
        }

        // HTTP GET method 실행
        HttpResponse response = Client.execute(httpget);

        // 객체화
        if (response.getStatusLine().getStatusCode() == 200) {
            HttpEntity entity = response.getEntity();
            String responseBody = EntityUtils.toString(entity);
            ArrayList<StoreDTO> results = gson.fromJson(responseBody, new TypeToken<ArrayList<StoreDTO>>() {
            }.getType());
            System.out.println(results);
            return results;
        } else {
            return null;
        }
    }
}
코드를 보면, HTTP API 호출을 위한 코드가 매우 복잡하고 가독성이 떨어지는 문제가 있었다.
- API 호출 마다 Client 객체 생성 (높은 비용)
- try-catch등 예외 처리
- 반환값 String 변환 및 gson을 통한 객체 변환
- 위 행위들이 API마다 반복되어 많은 보일러코드 생성
따라서 해당 코드를 안드로이드에서 자주 사용하는 Retrofit2라이브러리를 사용하여 리팩토링하고자 한다.
2. Retrofit2 라이브러리 추가
Retrofit2 라이브러리를 사용하기 위해 build.gradle에 의존성을 추가한다.
dependencies {
    // RESTful API
    implementation 'com.squareup.retrofit2:retrofit:2.11.0'
    implementation 'com.squareup.retrofit2:converter-gson:2.11.0'

    implementation 'com.squareup.okhttp3:okhttp:4.12.0'
    implementation 'com.squareup.okhttp3:logging-interceptor:4.12.0'
}
레트로핏 같은 경우에는 JPA와 유사하게 인터페이스를 통해 API를 추상화하며 구현은 구현체(Okhttp)를 통해 구현하게 된다
또한, response를 받을 DTO 클래스로 변환하기 위해 converter-gson 라이브러리를 추가해야 한다.
gson이외에도 jackson, moshi 등 다양한 라이브러리를 사용할 수 있다.
3. Retrofit2 인터페이스 생성
iconfig.me API를 사용하여 IP 정보를 조회하는 예제
Retrofit2를 사용하기 위해 API 호출 메소드를 정의하는 인터페이스를 생성한다.
반환값으로 Call이 사용되는데, call.enqueue() 를 사용하면 비동기, call.execute() 메소들를 활용하면 동기 호출을 사용하게 됩니다.
import restaurant.DTO.Ifconfig
import retrofit2.Call
import retrofit2.http.GET

/**
 * 위치 정보를 관리하는 Repository
 */
interface LocationRepository {
    /**
     * IP 정보 조회(위치 정보 조회)
     */
    @GET("/json")
    fun getIp(): Call<Ifconfig>
}
위와 같이 인터페이스를 생성하고, API 호출 메소드를 정의한다.
파라메터나 헤더를 사용할 경우 @Query, @Path, @Header 등의 어노테이션을 사용하여 정의할 수 있다.
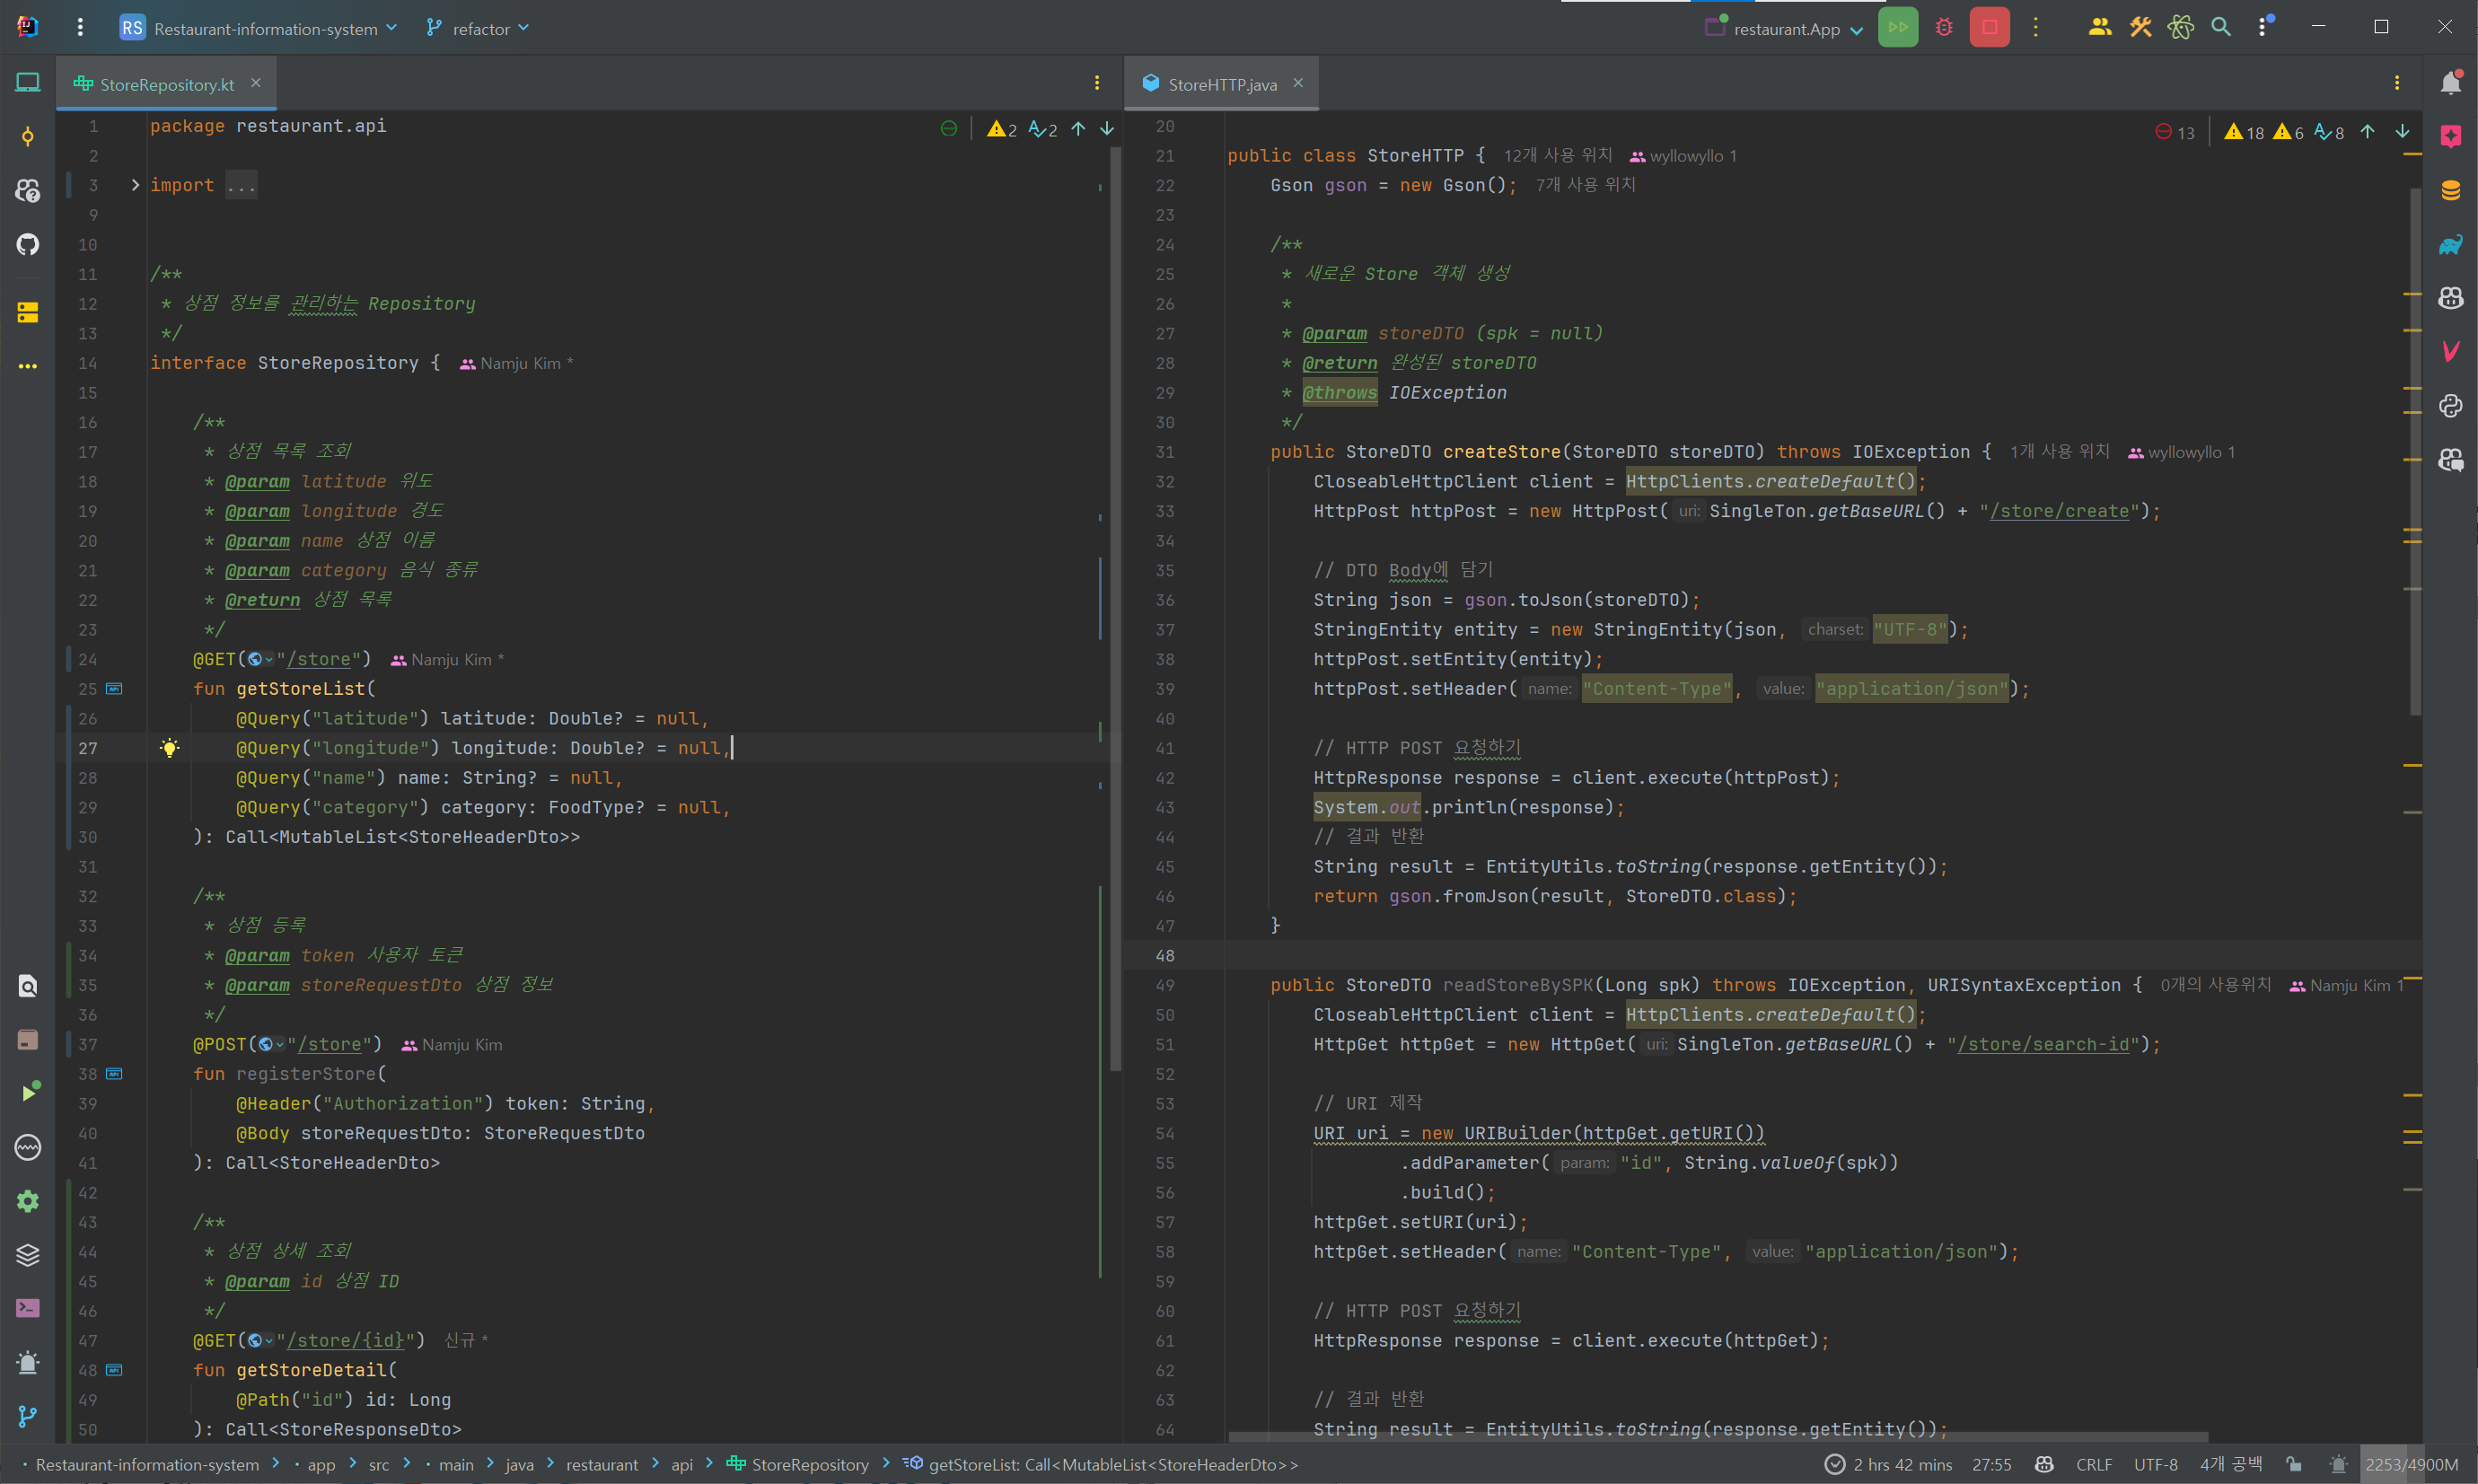
아래는 파라메터를 사용한 예제이다.(리팩토링 프로젝트중 일부 코드)
Retrofit2를 사용하면 좋은점이 파라메터를 사용할 때 Null 체크를 하지 않아도 된다.
null이 들어오면 자동으로 해당 파라메터를 제외하고 호출한다.
/**
    * 상점 목록 조회
    * @param latitude 위도
    * @param longitude 경도
    * @param name 상점 이름
    * @param category 음식 종류
    * @return 상점 목록
    */
@GET("/store")
fun getStoreList(
    @Query("latitude") latitude: Double? = null,
    @Query("longitude") longitude: Double? = null,
    @Query("name") name: String? = null,
    @Query("category") category: FoodType? = null,
): Call<MutableList<StoreHeaderDto>>
아래는 헤더를 사용한 예제이다.
/**
    * 상점 등록
    * @param token 사용자 토큰
    * @param storeRequestDto 상점 정보
    */
@POST("/store")
fun registerStore(
    @Header("Authorization") token: String,
    @Body storeRequestDto: StoreRequestDto
): Call<StoreHeaderDto>
위와 같이 인터페이스를 생성하고 API 호출 메소드를 정의한다.
API 호출 메소드를 정의할 때, DTO 클래스를 생성하여 response를 받을 수 있다.
Json 형태의 response를 받기 위해 DTO 클래스를 생성한다.
Json to Kotlin Class 사이트를 이용하면 Json 형태의 데이터를 편리하게 DTO 클래스로 변환할 수 있다.
import com.fasterxml.jackson.annotation.JsonProperty

data class Ifconfig(
    val ip: String,
    @JsonProperty("ip_decimal")
    val ipDecimal: Long,
    val country: String,
    @JsonProperty("country_iso")
    val countryIso: String,
    @JsonProperty("country_eu")
    val countryEu: Boolean,
    @JsonProperty("region_name")
    val regionName: String,
    @JsonProperty("region_code")
    val regionCode: String,
    @JsonProperty("zip_code")
    val zipCode: String,
    val city: String,
    val latitude: Double,
    val longitude: Double,
    @JsonProperty("time_zone")
    val timeZone: String,
    val asn: String,
    @JsonProperty("asn_org")
    val asnOrg: String,
    @JsonProperty("user_agent")
    val userAgent: UserAgent,
)

data class UserAgent(
    val product: String,
    val version: String,
    val comment: String,
    @JsonProperty("raw_value")
    val rawValue: String,
)
위와 같이 인터페이스와 DTO 클래스를 생성한다.
4. Retrofit2 객체 생성
Retrfit2 객체를 생성하여 API 호출 메소드를 사용할 수 있도록 한다.
Retrofit을 사용하기 위해 싱글턴을 사용하면 좋은데 코틀린의 object 키워드를 사용하여 싱글턴 객체를 생성한다.
Retrofit을 싱글턴으로 사용하는 이유는 객체를 여러번 생성하지 않고 한번 생성한 객체를 계속 사용하기 위함이다.
import restaurant.api.LocationRepository
import restaurant.api.StoreRepository
import restaurant.api.UserRepository
import retrofit2.Retrofit
import retrofit2.converter.gson.GsonConverterFactory


object RetrofitProvider {

    private fun locationServer(): Retrofit {
        return Retrofit.Builder()
            .baseUrl("https://ifconfig.co/")
            .addConverterFactory(GsonConverterFactory.create())
            .build()
    }

    val locationRepository: LocationRepository = locationServer().create(LocationRepository::class.java)
}
5. Retrofit2 사용
위에서 생성한 RetrofitProvider를 사용하여 API 호출 메소드를 사용할 수 있다.
@Slf4j
public class App {
    public static void main(String[] args) throws IOException {
        LocationRepository locationRepository = RetrofitProvider.INSTANCE.getLocationRepository();
        Auth.INSTANCE.setLocation(locationRepository.getIp().execute().body());
        log.info("IP : {}", Auth.INSTANCE.getLocation().getIp());
        log.info("Contry : {}", Auth.INSTANCE.getLocation().getCountry());
        log.info("Latitude : {}", Auth.INSTANCE.getLocation().getLatitude());
        log.info("Longitude : {}", Auth.INSTANCE.getLocation().getLongitude());
    }
}
위와 같이 RetrofitProvider를 사용하여 API 호출 메소드를 사용할 수 있다.
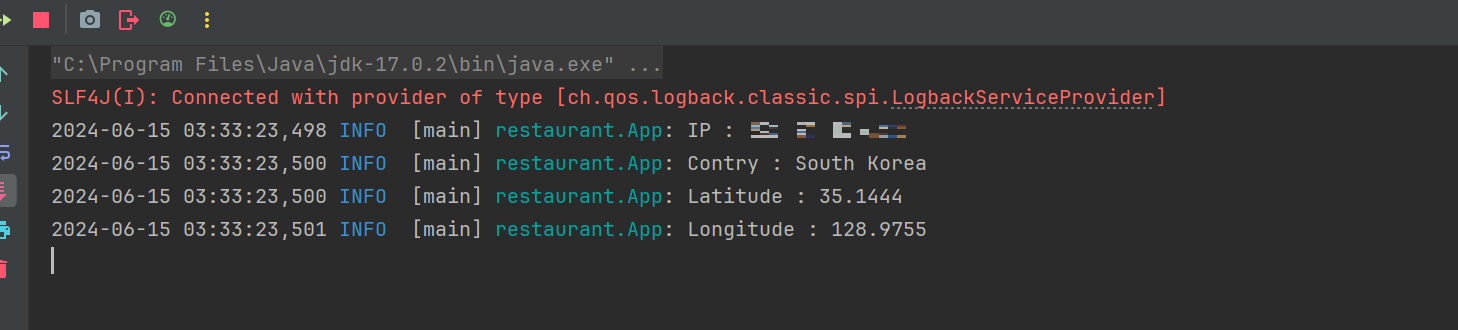
IP는 블러 처리하였습니다.
자세한 사용법은 Retrofit2 사용법 에 작성해두었으니 참고하면 좋을듯 합니다.
정리
Retrofit2 라이브러리를 사용하여 HTTP API 호출을 쉽게 할 수 있었습니다.
특히 기존에 사용하던 Apache HttpClient를 사용하는 방식보다 코드가 간결해지고 가독성이 좋아졌습니다.
또한, 파라메터나 헤더를 사용할 때 Null 체크를 하지 않아도 되는 장점이 있습니다.