JSON
데이터를 문자열의 형태로 주고 받도록 만들어진 JS의 내장객체.
키:값의 쌍들로 이루어졌다.
다음과 같은 객체가 있다고 하자.
const student = {
            name: 'it',
            age: 28
        }
JSON.stringify()
js 객체를 문자열로 바꿔준다.
let stringStudent = JSON.stringify(student);
console.log(stringStudent); //{"name":"it","age":28}
JSON.parse()
json문자열을 js객체로 바꿔준다.
let objStudent = JSON.parse(stringStudent);
console.log(objStudent); //typeof(objStudent) == object
주의사항!!
JSON으로 바꾸기 전, 객체 내부의 속성, 값의 문자열은 큰 따옴표로 이루어져야함!!!
let data1= "{\"name\" : \"it\"}"; //JSON 변환 가능
let data2= "{'name':'it'}"; // JSON 변환 불가
let data3 = '{"name":"it"}'; //JSON 변환 가능
서버에 데이터를 요청하는 법
XMLHttpRequest
XML을 이용해서 Http에 요청을 보내기 위해 사용되는 객체.
즉, 서버에 데이터를 요청하기 위해 사용하는 메서드이다.
XHR을 이용해서 데이터를 보내는 데에는 3단계가 필요하다 .
1. XHR 객체 생성
var xhr = new XMLHttpRequest();2. 비동기 데이터 요청
xhr.open("GET","https://jsonplaceholder.typicode.com/users"); //해당 서버로 GET 요청을 하고자 함
xhr.send(); //요청을 보낸다
3. 응답
xhr 개체의 메서드인 onreadystatechange를 통해 서버로 보낸 요청에 대한 응답을 받았을 때 어떤 동작을 할 것인지 메서드를 정의한다.
일단 resolve 메서드가 호출될 대 어떤 동작을 할 것인지만 정의하자.
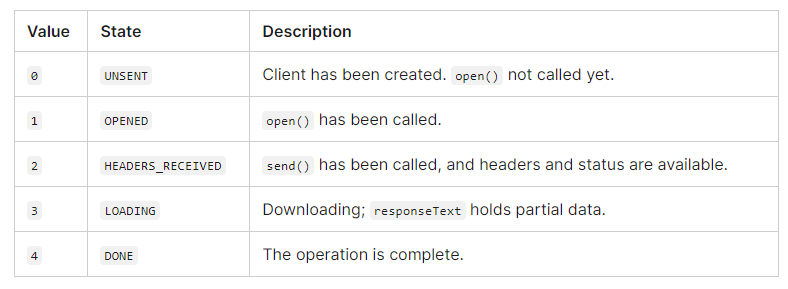
xhr 객체의 readyState프로퍼티 값은 다음과 같다.
xhr 객체의 status 프로퍼티 값
https://developer.mozilla.org/ko/docs/Web/HTTP/Status
// step03 : 응답
xhr.onreadystatechange = function(){
  if(this.readyState == 4 && this.status ==200){ //응답에 성공했을 경우
    //오류일때에는 else문으로 console.log(this.response);
    console.log(JSON.parse(this.response));
  }
완성 코드는 다음과 같다.
function xhrTest(){
            //step01 : xhr 객체 생성
            var xhr = new XMLHttpRequest();

            // step03 : 응답
            xhr.onreadystatechange = function(){
                if(this.readyState == 4 && this.status ==200){
                    //console.log(this.response);
                    console.log(JSON.parse(this.response));
                }

            }

            //step02: 비동기 데이터 요청
            //https://jsonplaceholder.typicode.com/users
            xhr.open("GET","https://jsonplaceholder.typicode.com/users"); //데이터가 조회되는 상태에서
            xhr.send();
        }
        xhrTest();
하지만... 너무 길지 않은가? 응답도 실패,성공의 경우 어떤 동작을 할지 일일이 지정해줘야한다.
fetch
그래서 위 일련의 과정들을 fetch 함수를 통해 축약할 수 있다.
function fetchTest(){
            return fetch("https://jsonplaceholder.typicode.com/users"); //promise 개체 리턴
        }
fetch는 catch를 사용할 필요가 없다!!!데이터를 얻는 데 실패하면 알아서 오류처리를 해준다.
fetchTest()
    .then(v => console.log(v))
    //.catch(e => console.log(e));
console.log가 아니라, 객체 값을 반환받고 싶다면 다음과 같이 JSON화를 시켜야 한다.
fetchTest()
	.then(res=> res.json())
	.catch(data=>console.log(data));
데이터 형식
서버에는 문자열을 요청해야하고, 서버로부터 문자열 데이터를 받는다.
즉, 요청 시에는 stringify를, 받을 시에는 .json()을 이용하자..
HTTP 옵션과 함께 요청 보내기
HTTP에 대한 글은 이전에 적어놨다. https://velog.io/@cocoa389/%EB%84%A4%ED%8A%B8%EC%9B%8C%ED%81%AC-HTTP
fetch함수에 요청에 대한 옵션과 함께 서버에 요청을 보낼 수 있다.
GET : 클라이언트가 서버에 특정 데이터 요청
GET은 method를 지정 안해도 된다.
let url = "https://jsonplaceholder.typicode.com/users";

        fetch(fetchUrl)
        .then(response => response.json())
        .then(data=>console.log(data));
POST : 클라이언트가 서버에 특정 데이터 생성
GET방식과 달리 headers에 콘텐트 타입, body를 담아 요청을 보내야 한다.
특정 데이터를 보내줘야하는 PUT,PATCH는 비슷하게 method만 바꾸면 된다.
fetch(fetchUrl,{
            method:"POST",
            headers:{
                "Content-Type":"application/json" //MDN Mime-type을 지키자!
            },
            body:JSON.stringify({
                id:1,
                userId:1,
                title: "title1",
                body:"body1"
            })
        }).then(res=>res.json())
        .then(data=>console.log(data));
참고로 MDN의 MIME TYPE은 여기서 확인할 수 있다.
https://developer.mozilla.org/ko/docs/Web/HTTP/Basics_of_HTTP/MIME_types/Common_types
DELETE : 클라이언트가 서버에 특정 데이터 삭제 요청
참고로 ! 서버마다 메서드마다 요청을 보내는 Url이 다르다.
(이 부분은 백엔드 개발자와 협의를 해야 한다.)
예제로 살펴봤던 사이트의 라우팅 가이드는 다음과 같다.

만약 id 1번의 데이터를 삭제하고 싶다면
fetchData(fetchUrl+'/1',{
	method:"DELETE"
})
	.then(res=>res.json())
	.then(data=>console.log(data));
이렇게 하면 된다.
PUT,PATCH :클라이언트가 서버에 특정 데이터 수정 요청
앞서 말했다시피, PATCH는 전체 수정, PATCH는 일부 수정이다.
얘네들도 body에 무언가를 담아야 하므로, header를 작성해줘야한다.
fetch(fetchUrl+'/52',{
            method:"PATCH",
            headers:{
                "Content-Type":"application/json"
            },
            body:JSON.stringify({
                title:"put test" //method가 PUT일경우, 객체 프로퍼티가 title밖에 안남는다.
            })
        }).then(res=>res.json())
        .then(data=>console.log(data));