Tree란

root를 기준으로 나뭇가지가 뻗어나가듯이 퍼지는 자료구조
기본 트리 구조를 JS로 구현해보자.
class Tree{
  constructor(value){
    this.root = new Node(value);
  }
}
class Node{
  children = [];
  constructor(value) {
    this.value = value;
  }

  push(value){
    this.children.push(new Node(value));
  }
}

const tree = new Tree(50);
tree.root.push(3)
이진트리의 종류
Full
자식이 0 아니면 2
Perfect
leaf들이 모두 같은 level을 갖고 있다.
삼각형 모양일 수 밖에 없다.
Complete
어떤 트리든 간에 왼쪽부터 채웠다면 Complete Tree라고 한다.
Degenerate
자식의 개수가 하나인 Tree (왼쪽 자식이든 오른쪽 자식이든 같다.) (연결리스트)
Balanced
depth (왼쪽 height와 오른쪽 height의 차이)가 0이거나 1인 것
이진 탐색 트리
모든 노드에서 작은 값은 왼쪽 자식, 큰 값은 오른쪽 자식에 들어있는 트리
조회, 삭제, 삽입 모두 O(logn) (Balanced Tree의 경우)
root부터 시작하는 나뭇가지가 펼쳐져 있는 데이터 구조
흔하게 쓰이는데 예를 들면 html 자체, 폴더의 구조 등이 트리의 구조를 갖고 있다.
모든 노드의 자식이 두개 이하인 트리를 Binary Tree(이진 트리)라고 한다.
JS로 구현해보자.
// 기본 트리 코드
class BinarySearchTree {
root = null;
length = 0;
// 재귀를 위한 private method
// length 리턴하게
#insert(node, value) {
// 중복되면 그냥 length를 리턴
if (node.value === value){
return this.length;
}
// 왼쪽 트리에 넣는 경우
if (node.value > value) {
// 왼쪽 트리가 비어있지 않다면 재귀
if (node.left !== null) {
return this.#insert(node.left, value);
} else {
// 왼쪽 트리가 비어있다면 length를 더하고 리턴 length
node.left = new Node(value);
return ++this.length;
}
// 오른쪽 트리에 넣는 경우
} else {
// 오른쪽 트리가 비어있지 않다면 재귀
if (node.right !== null) {
return this.#insert(node.right, value);
} else {
// 오른쪽 트리가 비어있다면 length를 더하고 리턴 length
node.right = new Node(value);
return ++this.length;
}
}
}
insert(value) {
if (!this.root) {
return (this.root = new Node(value));
}
return this.#insert(this.root, value);
}
// search는 insert와 비슷하지만 length 처리와
// 발견했을때 작동 방식이 다르다.
#search(node, value) {
if (value === node.value) {
return node;
} else if (value > node.value) {
if (node.right) {
return this.#search(node.right, value);
} else {
return null;
}
} else {
if (node.left) {
return this.#search(node.left, value);
} else {
return null;
}
}
}
search(value) {
if (!this.root) {
return null;
}
return this.#search(this.root, value);
}
#remove(node, value) {
// 4가지 경우의 수
// 1. Leaf인 경우 => leaf 삭제
// 2. 오른쪽 child만 있는 경우 => 오른쪽 child를 부모와 바꾸기
// 3. 왼쪽 child만 있는 경우 => 왼쪽 child를 부모와 바꾸기
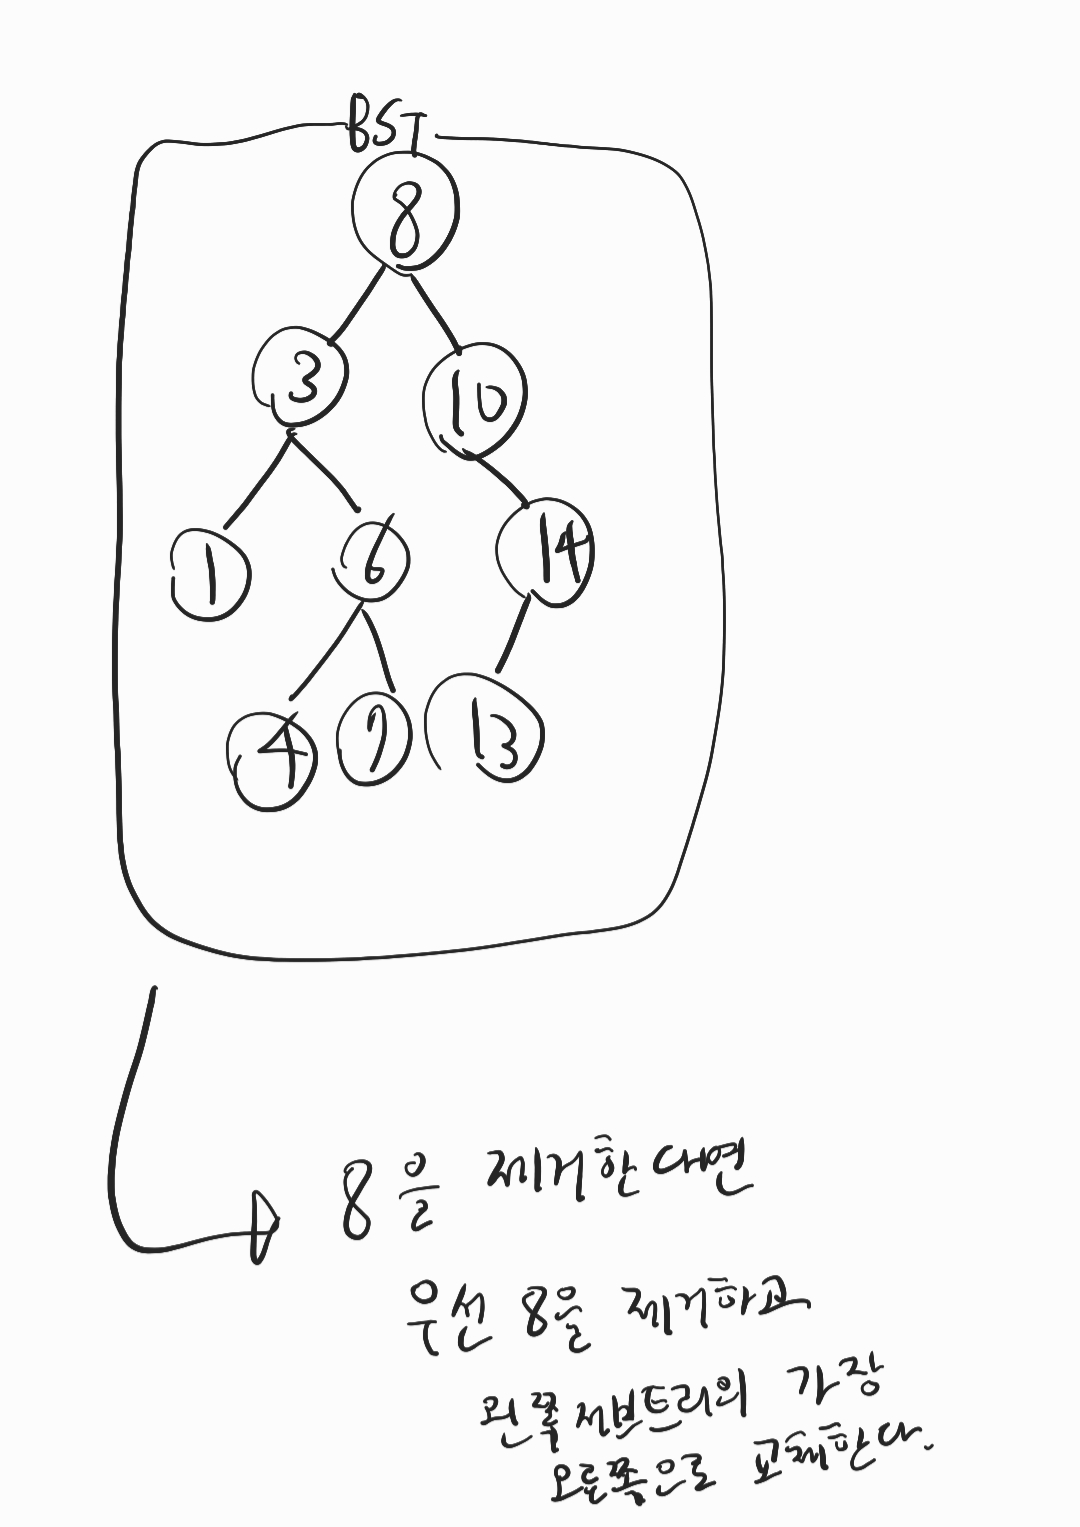
// 4. 양쪽 다 있는 경우 => 왼쪽 서브트리에서 가장 큰 애랑 바꾸고 삭제
// > 얘도 결국에는 1번으로 이동되서 처리되는 형식이다.
// 1, 2, 3 모두 리턴 시에 length처리를 해주면 된다.
if (!node) {
return null;
}
if (node.value === value) {
if (!node.left && !node.right) {
this.length--;
return null; // 둘다 없는 경우
} else if (!node.left) {
this.length--;
return node.right; // 오른쪽 서브트리만 존재하는 경우
} else if (!node.right) {
this.length--;
return node.left; // 왼쪽 서브트리만 존재하는 경우
} else {
let exchange = node.left;
while (exchange.right) {
exchange = exchange.right;
}
node.value = exchange.value;
node.left = this.#remove(node.left, exchange.value);
return node;
}
} else {
if (node.value > value) {
node.left = this.#remove(node.left, value);
return node;
} else {
node.right = this.#remove(node.right, value);
return node;
}
}
}
remove(value) {
// node는 root의 값이 바뀔 때만 null이 아니게 된다.
this.root = this.#remove(this.root, value);
return this.length;
}
}
class Node {
left = null;
right = null;
constructor(value) {
this.value = value;
}
}
const bst = new BinarySearchTree();
console.log(bst.insert(8));
console.log(bst.insert(10));
console.log(bst.insert(3));
console.log(bst.insert(1));
console.log(bst.insert(14));
console.log(bst.insert(6));
console.log(bst.insert(7));
console.log(bst.insert(4));
console.log(bst.insert(13));
console.log(bst.insert(13));
bst.search(7);
bst.search(5);
bst.remove(8);
console.log(bst.remove(15));
console.log(bst.remove(4));
// 전체와 부분이 똑같은 알고리즘을 적용할 수 있으면 재귀를 사용하는 것이 좋다.아래는 remove에 적혀 있는 4번째 경우를 이해하기 위한 필기입니다.

Reference
인프런 - 비전공자의 전공자 따라잡기 (제로초)
C언어로 쉽게 풀어쓴 자료구조 - 천인국,공용해,하상호

https://github.com/codefug