css
https://www.w3schools.com/css/css_howto.asp
external, internal, inline css

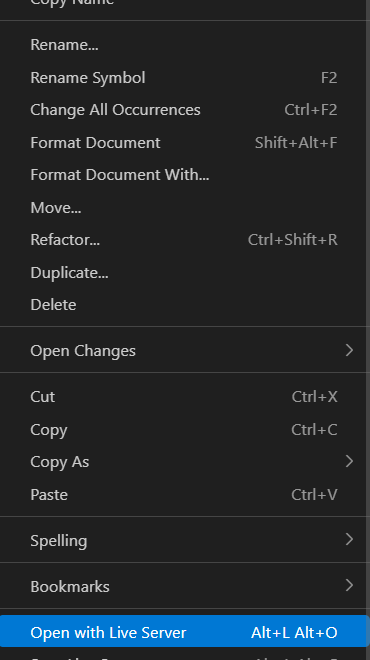
live server로 html 실행시키기 - open with live server
margin
https://www.w3schools.com/css/css_margin.asp
Margin Collapse - 마진이 겹쳐지면 더 큰 쪽으로 합쳐져서 마진이 생김
padding
내부로 생김
height, width
block 항목에만 적용(inline-block 포함)
max, min을 사용하면 커지거나 줄어들면 자동으로 약간 줄어듦
box model
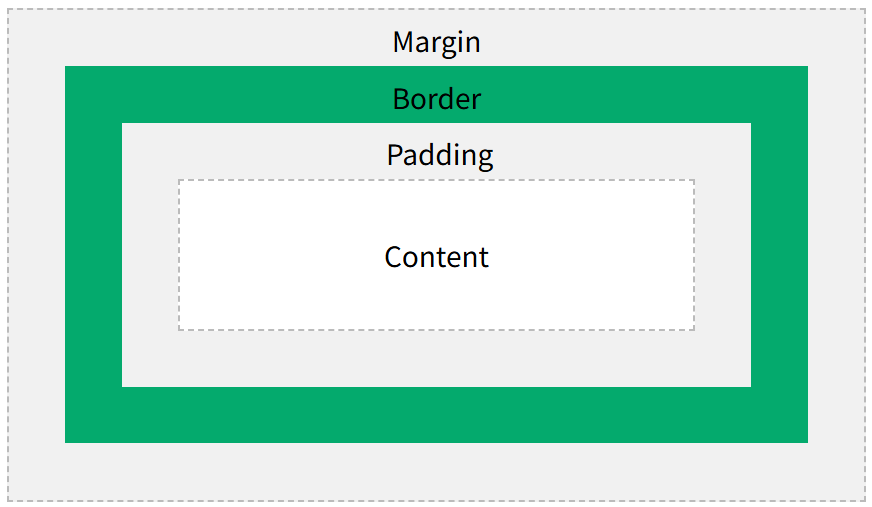
Box Sizing
https://www.w3schools.com/css/css3_box-sizing.asp
text
color
background color
alignment
decoration
transformation
spacing
shadow
font
https://fonts.google.com/ 로 구글 폰트 선택하여 사용도 가능
* 를 넣으면 전체 글자가 변형됨
<!DOCTYPE html>
<html lang="en">
    <head>
        <meta charset="UTF-8" />
        <meta name="viewport" content="width=device-width, initial-scale=1.0" />
        <link rel="preconnect" href="https://fonts.googleapis.com" />
        <link rel="preconnect" href="https://fonts.gstatic.com" crossorigin />
        <link href="https://fonts.googleapis.com/css2?family=Nanum+Pen+Script&family=Noto+Sans+KR:wght@100..900&display=swap" rel="stylesheet" />
        <style>
            * {
                font-family: "Nanum Pen Script", cursive;
                font-weight: 400;
                font-style: normal;
            }
        </style>
        <title>Document</title>
    </head>
    <body>
        <p>아무 글이나 적어봅니다. 다시 아무 글이나 적어봅니다.</p>
    <div>아무 글이나 또 적어봅디다.</div>
    </body>
</html>
아이콘, 이모티콘, 이모지 차이
아이콘 - 작은 그림 ex. https://fontawesome.com/icons
이모티콘 - 감정과 아이콘의 합성어 ex. :)
이모지 - 일본이 시작하여 유니코드라는 국제 표준으로 등록되어 있음 ex. 😀
https://getbootstrap.com/docs/5.3/getting-started/introduction/
<!doctype html>
<html lang="en">
  <head>
    <meta charset="utf-8">
    <meta name="viewport" content="width=device-width, initial-scale=1">
    <title>Bootstrap demo</title>
        <link rel="stylesheet" href="https://cdn.jsdelivr.net/npm/bootstrap-icons@1.11.0/font/bootstrap-icons.css">
  </head>
  <body>
    <h1>Hello, world!</h1>
    <i class="bi bi-arrow-left-circle-fill"></i>

  </body>
</html>
table
https://www.w3schools.com/css/css_table_style.asp
Padding
Horizontal Dividers
Hoverable
Zebra-striped 가 먼저오고 Hoverable를 실행시켜야 함
display
none - 안보임
inline - 일자로 쭉 이어짐
a -> bloack - 한 줄씩 나옴
position
static
relative
fixed
absolute - 부모랑 같이 움직임
sticky

z-index
overflow
<!DOCTYPE html>
<html>
<head>
<style>
#overflowTest {
  background: #04AA6D;
  color: black; /* white면 배경과 색이 동일해서
                visible가 작동이 안되는 거 처럼 보임 */
  padding: 15px;
  width: 90%;
  height: 100px;
  overflow: visible;
  border: 1px solid #ccc;
}
</style>
</head>
<body>

<h2>CSS overflow Property</h2>

<p>The overflow property controls what happens to content that is too big to fit into an area.</p>

<p>Here, scrollbars are added on overflow:</p>

<div id="overflowTest">Lorem ipsum dolor sit amet, consectetuer adipiscing elit, sed diam nonummy nibh euismod tincidunt ut laoreet dolore magna aliquam erat volutpat. Ut wisi enim ad minim veniam, quis nostrud exerci tation ullamcorper suscipit lobortis nisl ut aliquip ex ea commodo consequat. Duis autem vel eum iriure dolor in hendrerit in vulputate velit esse molestie consequat, vel illum dolore eu feugiat nulla facilisis at vero eros et accumsan et iusto odio dignissim qui blandit praesent luptatum zzril delenit augue duis dolore te feugait nulla facilisi. Nam liber tempor cum soluta nobis eleifend option congue nihil imperdiet doming id quod mazim placerat facer possim assum. Typi non habent claritatem insitam; est usus legentis in iis qui facit eorum claritatem.</div>

</body>
</html>
float
사진 넣을때 사용
inline block
<!DOCTYPE html>
<html lang="en">
<head>
    <meta charset="UTF-8">
    <meta name="viewport" content="width=device-width, initial-scale=1.0">
    <title>Document</title>
    <style>
        div {
            border: 1px solid salmon;
        }
        span {
            display: inline-block;
            border: 1px solid lightseagreen;
            /* width: 100px;
            height: 30px; */
        }
    </style>
</head>
<body>
    <div>안녕하세요</div>
    <div>안녕하세요</div>
    <span>안녕하세요.</span>
    <span>안녕하세요.</span><span>안녕하세요.</span><span>안녕하세요.</span><span>안녕하세요.</span><span>안녕하세요.</span><span>안녕하세요.</span><span>안녕하세요.</span><span>안녕하세요.</span><span>안녕하세요.</span><span>안녕하세요.</span>
</body>
</html>
aligin
margin: auto
https://css-tricks.com/snippets/css/a-guide-to-flexbox/
정렬 문제를 flex box로 해결
Opacity
none을 하면 없어져서 밑에 칸도 늘었다 줄었다 변화가 생김
Opacity를 0으로 하면 안보여도 다른 객체들 움직임 변화가 없음
!important
덮어쓰지 말라는 의미
Media Queries
https://www.w3schools.com/css/css3_mediaqueries.asp
데스크탑, 태블릿, 폰에 따라 사이즈가 달라질 수 있음
https://www.w3schools.com/css/css_rwd_intro.asp
js
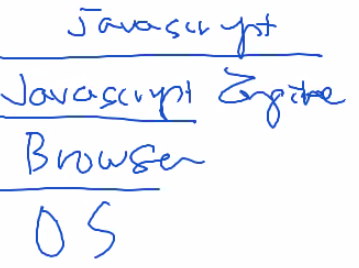
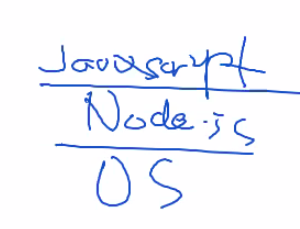
script 태그 활용
alert, console.log
디버깅용으로 많이 사용
alert - 실행되다가 멈춤. 화면에 뜸
console - 계속 진행됨. 브라우저 콘솔에서 확인해야 함.
button
?
1.함수 선언식
funnction add_1(a,b){
	return a+b;
}
console.log(add(3,5));
2.변수에 저장
const add_2 = function(a,b){
	return a+b;
}
console.log(add(3,5));
3.function 생성자 함수
잘 사용하지는 않음
const add_3 = new Function("a","b","return a+b");

console.log(add(3,5));
4.파라미터로 function 전달
function add_4(a,b, func){
	return func(a,b);
}
console.log(add_4(3,5, add_2)); // 8
5.return으로 function 전달
function myFunc{
	return function(a,b){
		return a+b;
	}
}
const addFunc = myFunc();
console.log(addFunc(3,5)); // 8
함수
변수, 파라미터, return = 일급 객체
var, let, const
var let const - scope 구분
var a;
console.log(a); // undefined

var b = null;
console.log(b); // null - 값이 비어있음 명시적 표현

console.log(a == b); // 값만 비교, 둘 다 비어있음 - true
console.log(a === b); // 값과 타입 모두 비교 - false

console.log(typeof a); // undefined
console.log(typeof b); // object
var는 동일한 scope에서 재선언 허용, let이나 const는 재선언 불가 하지만 하위 scope에서는 사용 가능
object{}, array[]
<script>
  let student = {name:"hong", age:20, grade:3};
  console.log(student);
  console.log(student.name);
  console.log(student["age"]);
  studnet.phone = "010-1234-5678";
</script><script>
let fruits = ["apple","bananna","orange"];
console.log(fruits);
let nums = [10,20,30,40,50];
console.log(nums);
let student = [
{name:"hong", age:20, grade:3},
{name:"kim", age:22, grade:4},
{name:"lee", age:29, grade:2}
];
console.log(student);
console.log(student[1]);
console.log(student[0].name);
student.push({name:"park", age:21, grade:3});
console.log(student);
let obj = student.pop();
console.log(obj);
console.log(student);
</script>to JSON
전부 ""로 바뀜
<script>
  // object{}
  let student = {name:"hong", age:20, grade:3};
  console.log(student);
  let jsonS = JSON.stringify(student) // objecct -> JSON string
  console.log(jsonS);
  let S2 = JSON.parse(jsonS) // objecct <- JSON string
  console.log(S2);

  // array[]
  let students = [
  	{name:"hong", age:20, grade:3},
  	{name:"kim", age:22, grade:4},
  	{name:"lee", age:29, grade:2}
  ];
  console.log(students);
  let jsonStudents = JSON.stringify(students) // array of objecct -> JSON string
  console.log(jsonStudents);
  let students2 = JSON.parse(jsonStudents) // array of objecct <- JSON string
  console.log(students2);
</script>
arrow function
this로 자신 객체를 못 가르킴 - window 객체를 가지기 때문
====
workshop
1. 어제 작성한 개인별 자기소개 페이지를 조별로 통합해서 조 프로젝트(조 소개)로 전환
2. 조 소개 페이지에 "우리 조에 함께 할래?" 신청 페이지를 추가
- 신청 페이지는 form 의 다양한 입력 element로 구성
- 입력 내용을 출력
- github.com 리파지토리 생성 - 협업 진행
- netlify 사이트에 올리고(수동) 조별 채널에 링크 공유
- github.com action 을 이용해서 netlify 자동 배포 (선택)
- 각 조별 채널에 netlify 링크 공유