lombok 설치
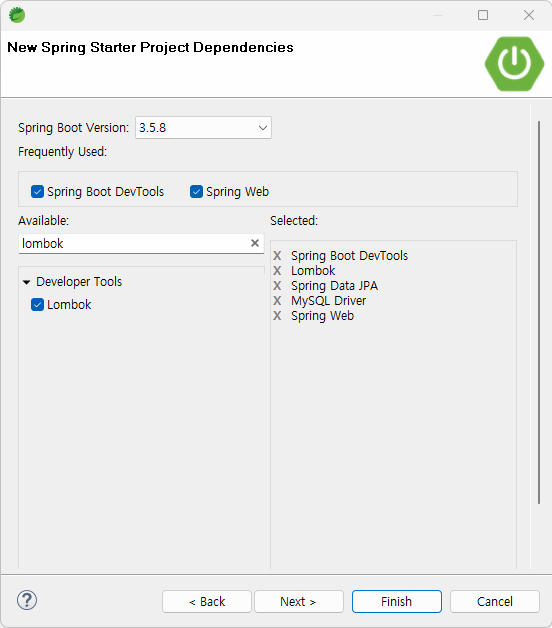
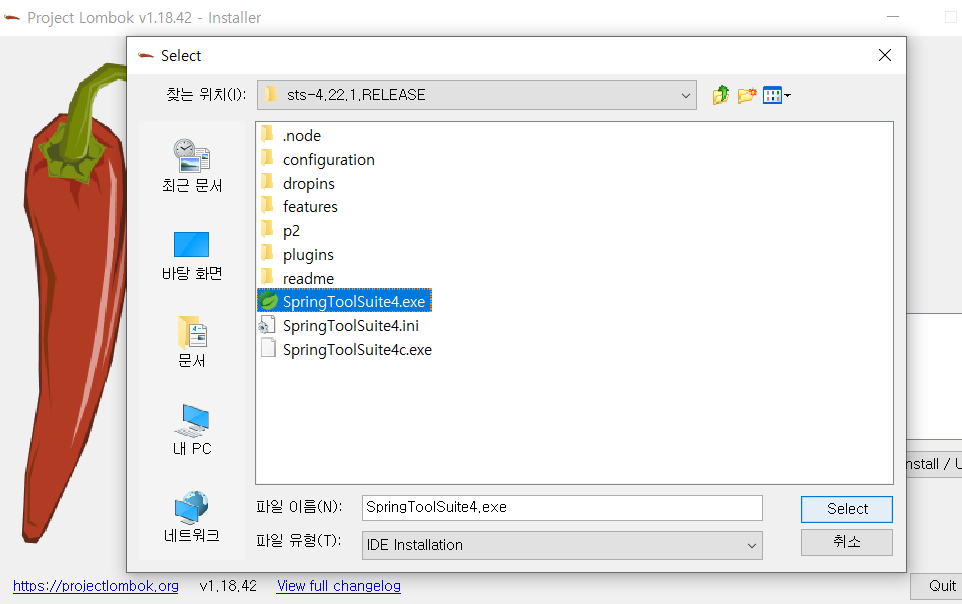
lombok설정
끄고 다시 실행이 안된다면, 파일 경로에 한글이 들어가서 그렇다. ini에 들어가서 제일 하단에 가서 -javaagent:한글 경로 포함\lombok.jar을
-javaagent:lombok.jar로 수정하면 된다
실습
package com.mycom.myapp.lombok;

import lombok.AllArgsConstructor;
import lombok.Data;
import lombok.EqualsAndHashCode;
import lombok.Getter;
import lombok.NoArgsConstructor;
import lombok.RequiredArgsConstructor;
import lombok.Setter;
import lombok.ToString;

//@Setter
//@Getter
//@ToString
//@EqualsAndHashCode
//@RequiredArgsConstructor // 초기화가 반드시 필요한 필드를 채우는 생성자 만들 수 있음
@Data // 위 5개를 다 합친 버전
@AllArgsConstructor
//@NoArgsConstructor // 기본 생성자
public class EmpDto {
	private int employeeId;
	private String firstName;
	private String lastName;
	private String email;
	private String hireDate;
	// 기본 생성자만 컴파일러기 추가해줌 => final 필드 초기화 x
//	private final String departmentId;
}
package com.mycom.myapp.lombok;
public class Test {
public static void main(String[] args) {
// lombok을 통한 생성자를 통해 객체 생성할 경우, 필드 순서 변경되면 자동으로 lombok에 의해 생성자 변경
// => 이전의 기존 생성자를 사용했던 코드들에 문제 발생 가능
// 생성자 코드가 눈에 보이지 않기 때문. 타입도 같으면 찾기 어려울 수 있음
// lombok 생성자를 통해 객체를 생성하지말고 꼭 필요한 생성자를 builder pattern으로 객체 생성하자
EmpDto empDto = new EmpDto(1,"gildong","hong","hong@gildong.com","2015-11-25");
System.out.println(empDto);
}
}디자인 패턴
GoF - 23가지
실제 회의때도 많이 사용한다고 함
Singleton
package com.mycom.myapp.pattern.singleton;

// Singleton
// JVM에서 객체가 단 1개 만들어지도록 패턴 적용

//#Logger1
//public class Logger {
//	public void log(String message) {
//		System.out.println("Log:"+message);
//	}
//}

//#Logger2 - Singleton pattern이 적용된 클래스
// 생성자를 private
// 자신과 동일한 타입 필드 필요(private)
// 자신과 같은 타입을 return 하는 static method 필요(public)
public class Logger {
	// eager loading
	private static Logger instance = new Logger();
	public static Logger getInstance() {
		return instance;
	}
	// lazy loading
	private static Logger instance2;
	public static Logger getInstance2() {
		if(instance2 == null) {
			instance2 = new Logger();
		}
		return instance2;
	}

	private Logger() {}

	public void log(String message) {
		System.out.println("Log:"+message);
	}
}
package com.mycom.myapp.pattern.singleton;
public class Test {
public static void main(String[] args) {
// #Logger1
// 기본 생성자(public)를 통해서 객체를 여러개 만들 수 있음
// Logger logger1 = new Logger();
// Logger logger2 = new Logger();
// logger1.log("hello");
// logger2.log("world");
// System.out.println(logger1);
// System.out.println(logger2);
//#Logger2 - Singleton pattern이 적용된 클래스
// 생성 불가
Logger logger1 = Logger.getInstance();
Logger logger2 = Logger.getInstance();
logger1.log("hello");
logger2.log("world");
System.out.println(logger1);
System.out.println(logger2);
}
}method chain
package com.mycom.myapp.pattern.methodchain;

public class Calculator {
	private int first;
	private int second;

	// #1 method chain 없이
//	public void setFirst(int first) {
//		this.first = first;
//	}
//
//	public void setSecond(int second) {
//		this.second = second;
//	}
//
//	public void showAdd() {
//		System.out.println("Add "+this.first+"and"+this.second+"="+(this.first+this.second));
//	}
//
//	public void showSub() {
//		System.out.println("Sub "+this.first+"and"+this.second+"="+(this.first-this.second));
//	}

	// #2 method chain pattern
	public Calculator setFirst(int first) {
		this.first = first;
		return this;
	}

	public Calculator setSecond(int second) {
		this.second = second;
		return this;
	}

	public Calculator showAdd() {
		System.out.println("Add "+this.first+"and"+this.second+"="+(this.first+this.second));
		return this;
	}

	public Calculator showSub() {
		System.out.println("Sub "+this.first+"and"+this.second+"="+(this.first-this.second));
		return this;
	}
}
package com.mycom.myapp.pattern.methodchain;
public class Test {
public static void main(String[] args) {
// #1 method chain 없이
// 연속적인 변수 변경 및 계산 출력
// => 객체 참소 변수를 계속 사용
// Calculator calculator = new Calculator();
// calculator.setFirst(3);
// calculator.setSecond(5);
// calculator.showAdd();
// calculator.setFirst(7);
// calculator.showSub();
// #2 method chain pattern
Calculator calculator = new Calculator();
calculator.setFirst(3)
.setSecond(5)
.showAdd()
.setFirst(7)
.showSub();
}
}builder
생성자를 대신하며 setter 역할도 함
어차피 다 작성해야 하는 것은 동일해야 해서 무슨 차이가 있나 찾아보니 가독성, 불변성, 일관성으로 사용하는 것을 알 수 있었다.
package com.mycom.myapp.pattern.builder;

// builder 간단 버전
public class Book {
	private String isbn;
	private String title;
	private String author;
	private String description;
	private int price;

	private Book() {}

	// public 생성자 대체
	public static Book builder() {
		return new Book();
	}

	// public setter 대체
	// field를 이름으로 하는 메소드, 자기 자신 return
	public Book isbn(String isbn) {
		this.isbn = isbn;
		return this;
	}
	public Book title(String title) {
		this.title = title;
		return this;
	}
	public Book author(String author) {
		this.author = author;
		return this;
	}
	public Book description(String description) {
		this.description = description;
		return this;
	}
	public Book price(int price) {
		this.price = price;
		return this;
	}

	@Override
	public String toString() {
		return "Book [isbn=" + isbn + ", title=" + title + ", author=" + author + ", description=" + description
				+ ", price=" + price + "]";
	}

}
inner class
package com.mycom.myapp.pattern.builder;

//builder inner class 버전
public class Board {
	private final String title;
	private final String content;
	private final String category;

	Board(Builder builder){
		// 추가 작업 가능
		this.title = builder.title;
		this.content = builder.content;
		this.category = builder.category;
	}

	public static class Builder{
		private String title;
		private String content;
		private String category;

		public Builder title(String title) {
			this.title=title;
			return this;
		}
		public Builder content(String content) {
			this.content=content;
			return this;
		}
		public Builder category(String category) {
			this.category=category;
			return this;
		}

		public Board build() {
			// 추가 작업 가능
			return new Board(this);
		}
	}

	@Override
	public String toString() {
		return "Board [title=" + title + ", content=" + content + ", category=" + category + "]";
	}

}
package com.mycom.myapp.pattern.builder;
public class Test {
public static void main(String[] args) {
// builder 간단 버전
Book book = Book
.builder() // method, 객체가 먼저 생성
.isbn("123")
.title("title")
.author("author")
.description("description")
.price(5000);
System.out.println(book);
//builder inner class 버전
Board board = new Board.Builder() // inner class 생성자 호출
.title("title")
.content("content")
.category("category")
.build(); // 객체 생성
System.out.println(board);
}
}=> @Builder로 다 작성안하고 가능
JPA
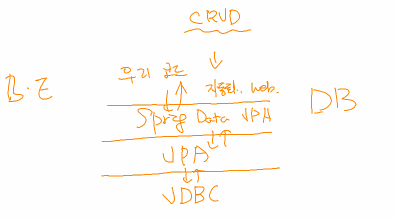
https://docs.spring.io/spring-data/jpa/reference/jpa.html
package com.mycom.myapp.entity;

import jakarta.persistence.Entity;
import jakarta.persistence.GeneratedValue;
import jakarta.persistence.GenerationType;
import jakarta.persistence.Id;
import lombok.Data;
import lombok.Setter;

@Data
@Entity
public class Student {
	@Id
	@GeneratedValue(strategy=GenerationType.IDENTITY)
	private int id;
	private String name;
	private String email;
	private String phone;
}
Repository
package com.mycom.myapp.repository;

import org.springframework.data.jpa.repository.JpaRepository;

import com.mycom.myapp.entity.Student;

// spring data jpa의 시작은 제공되는 interface를 상속받는 것
// 이를 통해 student 에 대한 기본적인 CRUD 는 자동화 처리
// 이 interface 를 구현하는 클래스를 생성 X <= Spring Data Jpa 가 자동으로 생성
public interface StudentRepository extends JpaRepository<Student, Integer>{

}
service
package com.mycom.myapp.service;

import java.util.List;
import java.util.Optional;

import com.mycom.myapp.entity.Student;

// 사용법만 알아보기위해 dto 생략함
// 리턴 타입은 학습 목적으로 StudentRepository 메소드 리턴과 동일하게 구현
public interface StudentServiceCrud {
	// 목록, 상세
	List<Student> listStudent();
	Optional<Student> detailStudent(int id); // 없을 수도 있기에 Optional, id 일치하지 않으면 null 리턴 대비
	// 등록 수정 삭제
	Student insertStudent(Student student); // 영속화된 객체 리턴
	Optional<Student> updateStudent(Student student);
	void deleteStudent(int id); // 영속화된 객체 리턴 없음

	// 전체 건수, 페이징
	long countStudent();
	List<Student> listStudent(int pageNumber, int pageSize);
}
serviceImpl
package com.mycom.myapp.service;

import java.util.List;
import java.util.Optional;

import org.springframework.data.domain.Page;
import org.springframework.data.domain.PageRequest;
import org.springframework.data.domain.Pageable;
import org.springframework.stereotype.Service;

import com.mycom.myapp.entity.Student;
import com.mycom.myapp.repository.StudentRepository;

import lombok.RequiredArgsConstructor;

@Service
@RequiredArgsConstructor
public class StudentServiceCrudImpl implements StudentServiceCrud{

	// studentRepository DI
	private final StudentRepository studentRepository;

	@Override
	public List<Student> listStudent() {
		return studentRepository.findAll();
	}

	@Override
	public Optional<Student> detailStudent(int id) {
		return studentRepository.findById(id);
	}

	// save() = 전달되는 엔티티 객체 id가 있으면 update, 없으면 insert
	@Override
	public Student insertStudent(Student student) {
		return studentRepository.save(student);
	}

	@Override
	public Optional<Student> updateStudent(Student student) {
//		Optional<Student> existingStudent = studentRepository.findById(student.getId());
//		if(existingStudent.isPresent()) {
//			return Optional.of(studentRepository.save(student));
//		}
//		return Optional.empty();

		// 체크 안하고 save 호출 -> id가 없으면, insert와 동일한 결과
		return Optional.of(studentRepository.save(student));
	}

	@Override
	public void deleteStudent(int id) {
		studentRepository.deleteById(id);
	}

	@Override
	public long countStudent() {
		return studentRepository.count();
	}

	// 마지막 페이지에 대한 요청을 제외하고, 페이지 요청을 하면 항상 count()를 통해서 page 객체 구성
	@Override
	public List<Student> listStudent(int pageNumber, int pageSize) {
		Pageable pageable = PageRequest.of(pageNumber, pageSize);
		Page<Student> page = studentRepository.findAll(pageable);
		return page.toList();
	}

}
controller
package com.mycom.myapp.controller;

import java.util.List;
import java.util.Optional;

import org.springframework.web.bind.annotation.GetMapping;
import org.springframework.web.bind.annotation.PathVariable;
import org.springframework.web.bind.annotation.PostMapping;
import org.springframework.web.bind.annotation.RequestMapping;
import org.springframework.web.bind.annotation.RequestParam;
import org.springframework.web.bind.annotation.RestController;

import com.mycom.myapp.entity.Student;
import com.mycom.myapp.service.StudentServiceCrud;

import lombok.RequiredArgsConstructor;

@RestController
@RequestMapping("/students")
@RequiredArgsConstructor
// 일반적으로 프론트의 응답(json)에 entity(student)를 직접 사용하지 않는다
// 대신 Dto, ApiResponse에 Dto를 포함해서 보낸다
// 교육 목적상 간단하게 하기 위해 현재는 entity 직접 사용
public class StudentControllerCrud {
	// studentServiceCrud DI
	private final StudentServiceCrud studentServiceCrud;

	@GetMapping("/list")
	public List<Student> listStudent(){
		return studentServiceCrud.listStudent();
	}

	@GetMapping("/detail/{id}")
	public Optional<Student> detailStudent(@PathVariable("id") Integer id){
		return studentServiceCrud.detailStudent(id);
	}

	@PostMapping("/insert")
	public Student insertStudent(Student student){
		return studentServiceCrud.insertStudent(student);
	}

	@PostMapping("/update")
	public Optional<Student> updateStudent(Student student){
		return studentServiceCrud.updateStudent(student);
	}

	@GetMapping("/delete/{id}")
	public void deleteStudent(@PathVariable("id") Integer id){
		studentServiceCrud.deleteStudent(id);
	}

	@GetMapping("/count")
	public long countStudent() {
		return studentServiceCrud.countStudent();
	}
	@GetMapping("/page")
	public List<Student> listStudent(
			@RequestParam("pageNumber") int pageNumber,
			@RequestParam("pageSize") int pageSize) {
		return studentServiceCrud.listStudent(pageNumber, pageSize);
	}

}
설정
spring.application.name=SpringBootJpaCrudFindLombok

# datasource
spring.datasource.driver-class-name=com.mysql.cj.jdbc.Driver
spring.datasource.url=jdbc:mysql://localhost:3306/jpa_basic_crud_find
spring.datasource.username=이름
spring.datasource.password=비번

# session persistence
server.servlet.session.persistent=false
#spring.jpa.open-in-view is enabled by default. warn 해결
spring.jap.open-in-view=false

# jpa
spring.jpa.hibernate.ddl-auto=update
spring.jpa.show-sql=true