[Spring Framework]IntelliJ로 Spring Framework 프로젝트 만들기
IntelliJ를 이용하여 Spring Framework Project를 만드는 과정입니다. 관련 설명은 없고 과정을 주로 나열하였습니다.
1. File-New-Project 선택
2. New Project 설정 화면
1. Name 은 프로젝트 이름이자 PC에 생성될 폴더명. Location 부분 하단에 생성될 폴더 확인
2. JDK 선택
3. Archetype에서 제일 하단에 있는 webapp 으로 끝나는 항목 선택
4. Create 클릭하여 프로젝트 생성 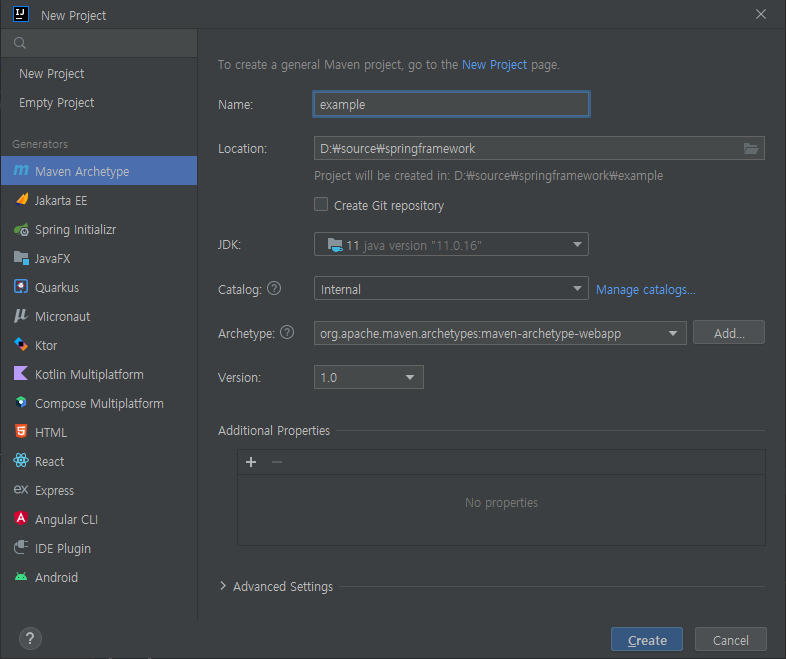
3. Spring Framework 프로젝트로 전환
1. 프로젝트 이름에서 우클릭 후 Add Framework Support 클릭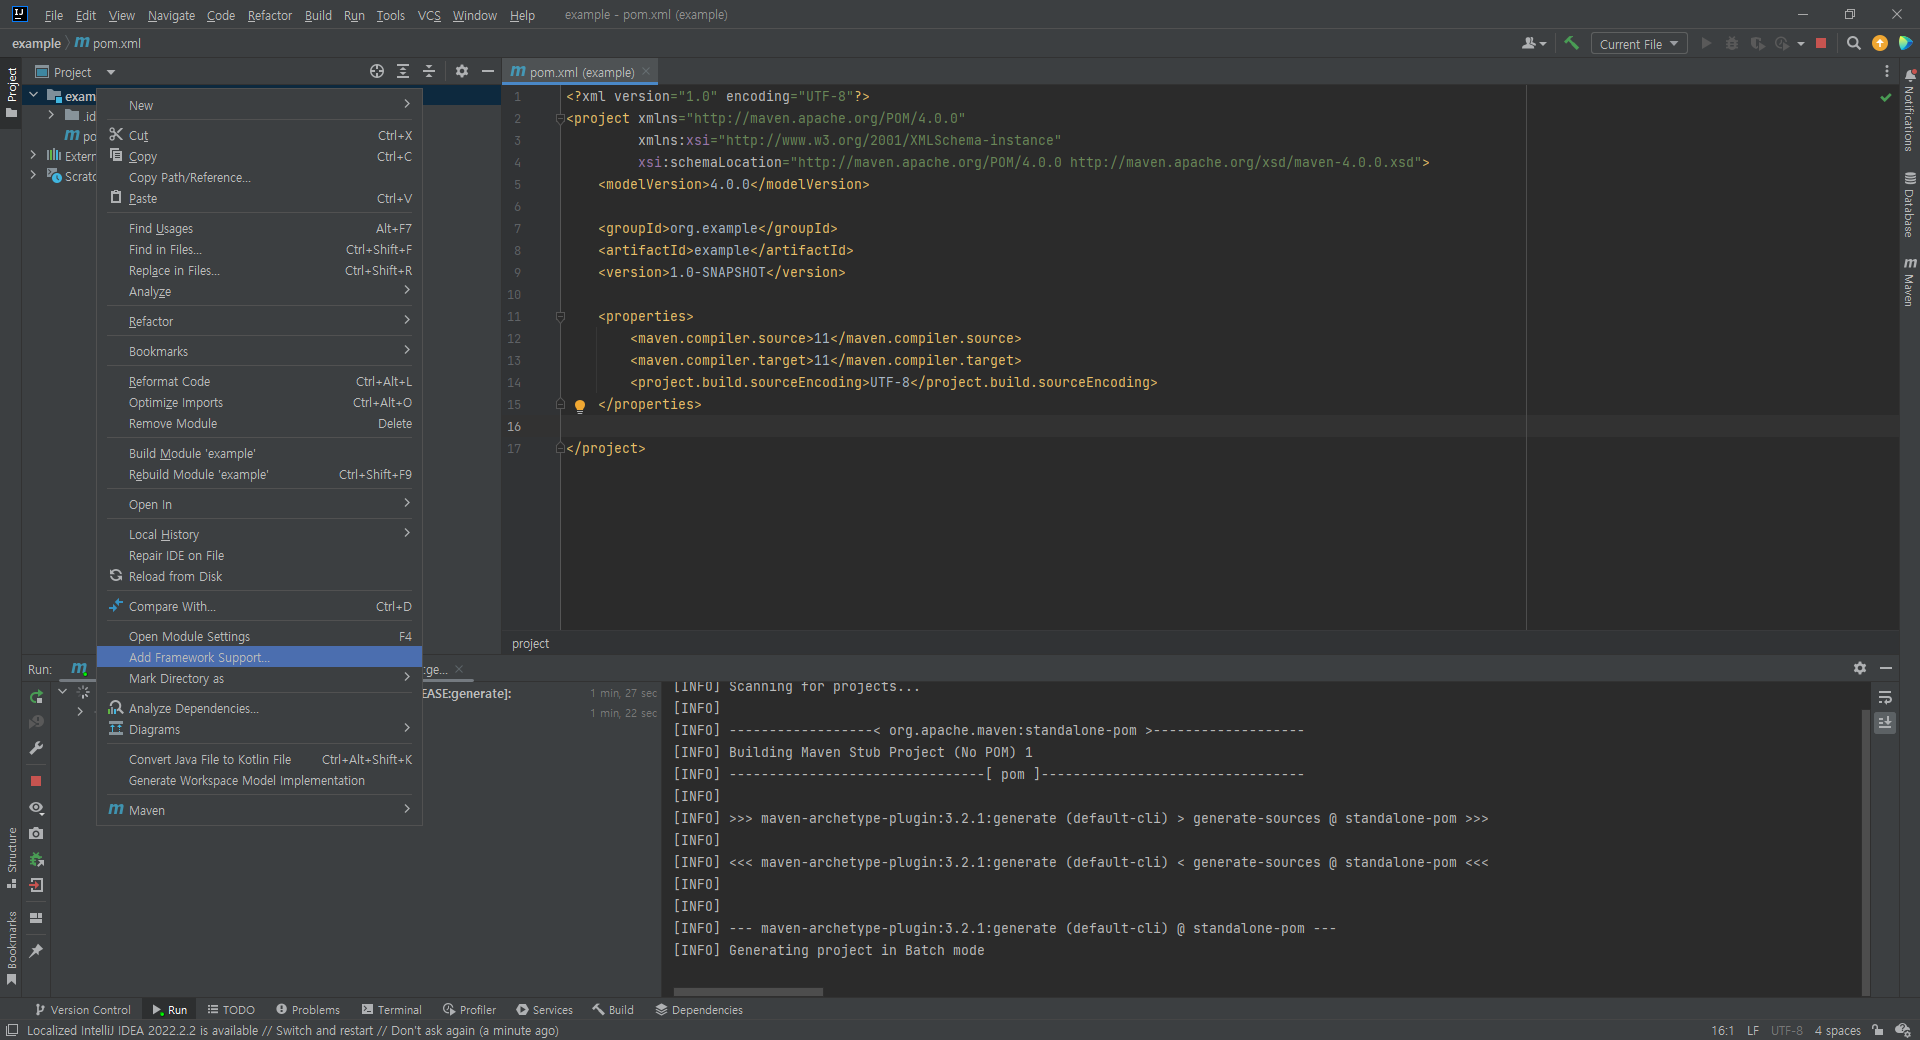
2. 왼쪽 목록에서 Spring MVC 선택
3. Download 선택된 상태에서 OK 클릭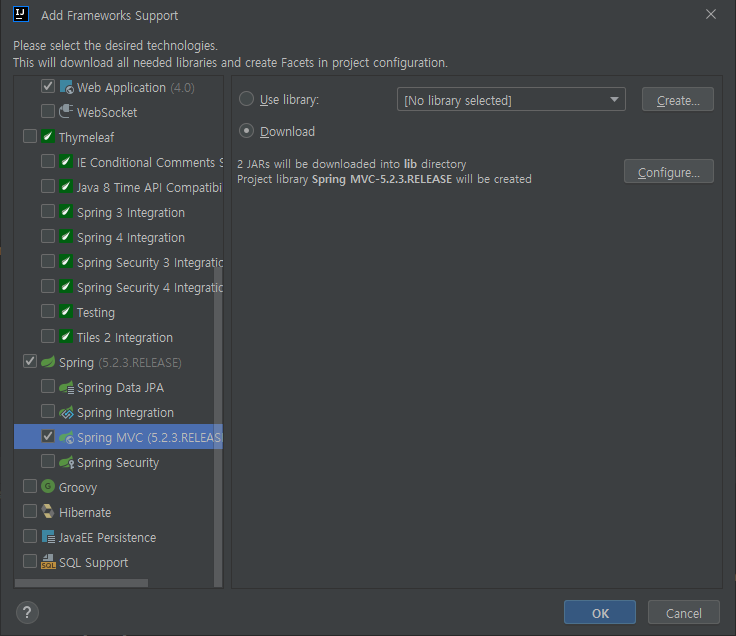
4. Spring 관련 라이브러리 다운로드에 시간이 다소 걸림 (아래 화면 참고)
5. 프로젝트 생성 후 폴더 구조 및 파일
    1. main 폴더: java, jsp, xml 파일 등 작업하는 파일
    2. main-resources: db 연동을 위한 설정파일
    3. WEB-INF: 프로젝트 설정파일
    4. index.jsp: 첫 페이지용 jsp 이지만 삭제 예정
5. pom.xml: 메이븐을 활용한 라이브러리, 빌드 관리 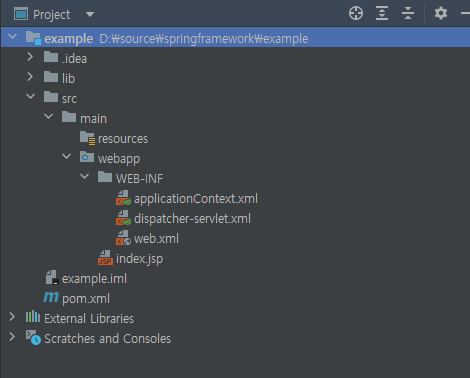
6. 필요한 폴더 생성
    1. main 폴더에서 우클릭 후 new-Directory에서 java 폴더 추가
    2. main-webapp 우클릭 후 new-Directory에서 resources 폴더 추가
    3. main-webapp-WEB-INF 우클릭 후 new-Directory에서 views 폴더 추가
    4. 폴더 추가된 구조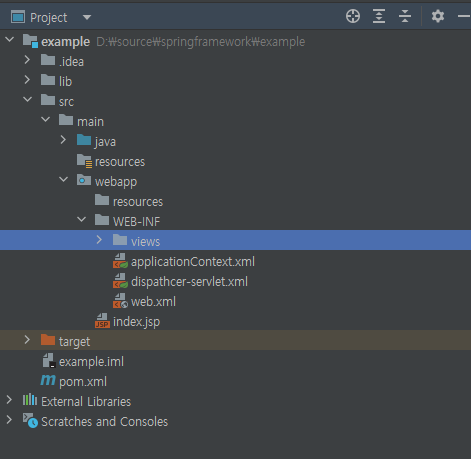
7. xml 파일 설정
    1. 기존 applicationContext.xml, dispatcher-servlet.xml 파일 삭제
        1. 삭제 하지 않고 내용만 바꿔도 되지만 일반적으로 쓰는 파일명으로 하기 위해 삭제 후 새로운 파일 생성하여 작업
    2. WEB-INF 폴더에서 우클릭 후 new-File에서 servlet-context.xml, root-context.xml 파일 생성
        1. 두 개의 파일 각각 아래의 내용으로 복사 및 붙여 넣기
        2. servlet-context.xml
<?xml version="1.0" encoding="UTF-8"?>
<beans:beans xmlns="http://www.springframework.org/schema/mvc"
xmlns:xsi="http://www.w3.org/2001/XMLSchema-instance"
xmlns:beans="http://www.springframework.org/schema/beans"
xmlns:context="http://www.springframework.org/schema/context"
xmlns:mvc="http://www.springframework.org/schema/mvc"
xsi:schemaLocation="http://www.springframework.org/schema/mvc http://www.springframework.org/schema/mvc/spring-mvc.xsd
http://www.springframework.org/schema/beans http://www.springframework.org/schema/beans/spring-beans.xsd
http://www.springframework.org/schema/context http://www.springframework.org/schema/context/spring-context.xsd">
<annotation-driven />
<!-- Handles HTTP GET requests for /resources/** by efficiently serving up static resources in the ${webappRoot}/resources directory -->
<resources mapping="/resources/**" location="/resources/"/>
<!-- Resolves views selected for rendering by @Controllers to .jsp resources in the /WEB-INF/views directory -->
<beans:bean class="org.springframework.web.servlet.view.InternalResourceViewResolver">
<beans:property name="prefix" value="/WEB-INF/views/" />
<beans:property name="suffix" value=".jsp" />
</beans:bean>
<!-- 프로젝트 패키지이름 확인 -->
<context:component-scan base-package="com.codingrecipe.ex" />
</beans:beans> 3. root-context.xml
                <?xml version="1.0" encoding="UTF-8"?>
                <beans xmlns="http://www.springframework.org/schema/beans"
                       xmlns:xsi="http://www.w3.org/2001/XMLSchema-instance"
                       xmlns:jdbc="http://www.springframework.org/schema/jdbc"
                       xmlns:tx="http://www.springframework.org/schema/tx"
                       xmlns:aop="http://www.springframework.org/schema/aop"
                       xsi:schemaLocation="http://www.springframework.org/schema/jdbc http://www.springframework.org/schema/jdbc/spring-jdbc.xsd
                		http://www.springframework.org/schema/beans http://www.springframework.org/schema/beans/spring-beans.xsd
                		http://www.springframework.org/schema/aop http://www.springframework.org/schema/aop/spring-aop.xsd
                		http://www.springframework.org/schema/tx http://www.springframework.org/schema/tx/spring-tx.xsd">

                </beans>
3. web.xml, pom.xml 파일도 아래와 같은 내용으로 기존 내용 바꾸기
1. web.xml
                <?xml version="1.0" encoding="UTF-8"?>
                <web-app xmlns:xsi="http://www.w3.org/2001/XMLSchema-instance"
                         xmlns="http://xmlns.jcp.org/xml/ns/javaee"
                         xsi:schemaLocation="http://xmlns.jcp.org/xml/ns/javaee http://xmlns.jcp.org/xml/ns/javaee/web-app_3_1.xsd"
                         version="3.1">

                    <context-param>
                        <param-name>contextConfigLocation</param-name>
                        <param-value>
                            /WEB-INF/root-context.xml
                        </param-value>
                    </context-param>

                    <listener>
                        <listener-class>org.springframework.web.context.ContextLoaderListener</listener-class>
                    </listener>

                    <servlet>
                        <servlet-name>appServlet</servlet-name>
                        <servlet-class>org.springframework.web.servlet.DispatcherServlet</servlet-class>
                        <init-param>
                            <param-name>contextConfigLocation</param-name>
                            <param-value>/WEB-INF/servlet-context.xml</param-value>
                        </init-param>
                        <load-on-startup>1</load-on-startup>
                    </servlet>

                    <servlet-mapping>
                        <servlet-name>appServlet</servlet-name>
                        <url-pattern>/</url-pattern>
                    </servlet-mapping>

                    <filter>
                        <filter-name>encodingFilter</filter-name>
                        <filter-class>org.springframework.web.filter.CharacterEncodingFilter</filter-class>
                        <init-param>
                            <param-name>encoding</param-name>
                            <param-value>UTF-8</param-value>
                        </init-param>
                    </filter>

                    <filter-mapping>
                        <filter-name>encodingFilter</filter-name>
                        <url-pattern>/*</url-pattern>
                    </filter-mapping>

                </web-app>
2. pom.xml(아래 순서를 지켜서 작업)
1. 기존 pom.xml 파일의 <dependencies> 시작 태그부터 내용 삭제
2. 아래 내용의 <!-- 여기서부터 복사 시작 --> 주석 부터 끝까지 복사
3. 프로젝트 pom.xml 의 </url> 종료 태그 아래 줄에 붙여넣기
                    <?xml version="1.0" encoding="UTF-8"?>

                    <project xmlns="http://maven.apache.org/POM/4.0.0" xmlns:xsi="http://www.w3.org/2001/XMLSchema-instance"
                      xsi:schemaLocation="http://maven.apache.org/POM/4.0.0 http://maven.apache.org/xsd/maven-4.0.0.xsd">
                      <modelVersion>4.0.0</modelVersion>

                      <groupId>org.exmaple</groupId>
                      <artifactId>example</artifactId>
                      <version>1.0-SNAPSHOT</version>
                      <packaging>war</packaging>

                      <name>mvc_test Maven Webapp</name>
                      <!-- FIXME change it to the project's website -->
                      <url>http://www.example.com</url>

                    <!-- 여기서부터 복사 시작 -->

                      <properties>
                        <project.build.sourceEncoding>UTF-8</project.build.sourceEncoding>
                        <maven.compiler.source>1.7</maven.compiler.source>
                        <maven.compiler.target>1.7</maven.compiler.target>
                        <java-version>11</java-version>
                        <org.springframework-version>5.2.9.RELEASE</org.springframework-version>
                        <org.aspectj-version>1.8.10</org.aspectj-version>
                        <org.slf4j-version>1.7.25</org.slf4j-version>
                      </properties>

                      <dependencies>
                        <!-- Spring -->
                        <dependency>
                          <groupId>org.springframework</groupId>
                          <artifactId>spring-context</artifactId>
                          <version>${org.springframework-version}</version>
                          <exclusions>
                            <!-- Exclude Commons Logging in favor of SLF4j -->
                            <exclusion>
                              <groupId>commons-logging</groupId>
                              <artifactId>commons-logging</artifactId>
                            </exclusion>
                          </exclusions>
                        </dependency>
                        <dependency>
                          <groupId>org.springframework</groupId>
                          <artifactId>spring-webmvc</artifactId>
                          <version>${org.springframework-version}</version>
                        </dependency>

                        <!-- Logging -->
                        <dependency>
                          <groupId>org.slf4j</groupId>
                          <artifactId>slf4j-api</artifactId>
                          <version>${org.slf4j-version}</version>
                        </dependency>
                        <dependency>
                          <groupId>org.slf4j</groupId>
                          <artifactId>jcl-over-slf4j</artifactId>
                          <version>${org.slf4j-version}</version>
                          <scope>runtime</scope>
                        </dependency>

                        <!-- @Inject -->
                        <dependency>
                          <groupId>javax.inject</groupId>
                          <artifactId>javax.inject</artifactId>
                          <version>1</version>
                        </dependency>

                        <!-- javax.servlet-api -->
                        <dependency>
                          <groupId>javax.servlet</groupId>
                          <artifactId>javax.servlet-api</artifactId>
                          <version>3.1.0</version>
                          <scope>provided</scope>
                        </dependency>
                        <dependency>
                          <groupId>javax.servlet.jsp</groupId>
                          <artifactId>jsp-api</artifactId>
                          <version>2.1</version>
                          <scope>provided</scope>
                        </dependency>
                        <dependency>
                          <groupId>javax.servlet</groupId>
                          <artifactId>jstl</artifactId>
                          <version>1.2</version>
                        </dependency>

                        <!-- data base -->
                        <dependency>
                          <groupId>mysql</groupId>
                          <artifactId>mysql-connector-java</artifactId>
                          <version>8.0.22</version>
                        </dependency>
                        <dependency>
                          <groupId>org.mybatis</groupId>
                          <artifactId>mybatis</artifactId>
                          <version>3.5.6</version>
                        </dependency>
                        <dependency>
                          <groupId>org.mybatis</groupId>
                          <artifactId>mybatis-spring</artifactId>
                          <version>1.3.2</version>
                        </dependency>
                        <dependency>
                          <groupId>org.springframework</groupId>
                          <artifactId>spring-jdbc</artifactId>
                          <version>${org.springframework-version}</version>
                        </dependency>
                        <dependency>
                          <groupId>org.apache.tomcat</groupId>
                          <artifactId>tomcat-dbcp</artifactId>
                          <version>9.0.31</version>
                        </dependency>

                        <!-- fileupload -->
                        <dependency>
                          <groupId>commons-fileupload</groupId>
                          <artifactId>commons-fileupload</artifactId>
                          <version>1.3.1</version>
                        </dependency>

                        <!-- Lombok -->
                        <dependency>
                          <groupId>org.projectlombok</groupId>
                          <artifactId>lombok</artifactId>
                          <version>1.18.12</version>
                          <scope>provided</scope>
                        </dependency>

                        <!-- json -->
                        <dependency>
                          <groupId>com.googlecode.json-simple</groupId>
                          <artifactId>json-simple</artifactId>
                          <version>1.1.1</version>
                        </dependency>
                        <dependency>
                          <groupId>com.google.code.gson</groupId>
                          <artifactId>gson</artifactId>
                          <version>2.8.2</version>
                        </dependency>
                        <!-- jackson-core -->
                        <dependency>
                          <groupId>com.fasterxml.jackson.core</groupId>
                          <artifactId>jackson-core</artifactId>
                          <version>2.9.2</version>
                        </dependency>
                        <dependency>
                          <groupId>junit</groupId>
                          <artifactId>junit</artifactId>
                          <version>4.11</version>
                          <scope>test</scope>
                        </dependency>
                      </dependencies>

                      <!-- 여기까지 복사 -->

                      <build>
                        <finalName>mvc_test</finalName>
                        <pluginManagement><!-- lock down plugins versions to avoid using Maven defaults (may be moved to parent pom) -->
                          <plugins>
                            <plugin>
                              <artifactId>maven-clean-plugin</artifactId>
                              <version>3.1.0</version>
                            </plugin>
                            <!-- see http://maven.apache.org/ref/current/maven-core/default-bindings.html#Plugin_bindings_for_war_packaging -->
                            <plugin>
                              <artifactId>maven-resources-plugin</artifactId>
                              <version>3.0.2</version>
                            </plugin>
                            <plugin>
                              <artifactId>maven-compiler-plugin</artifactId>
                              <version>3.8.0</version>
                            </plugin>
                            <plugin>
                              <artifactId>maven-surefire-plugin</artifactId>
                              <version>2.22.1</version>
                            </plugin>
                            <plugin>
                              <artifactId>maven-war-plugin</artifactId>
                              <version>3.2.2</version>
                            </plugin>
                            <plugin>
                              <artifactId>maven-install-plugin</artifactId>
                              <version>2.5.2</version>
                            </plugin>
                            <plugin>
                              <artifactId>maven-deploy-plugin</artifactId>
                              <version>2.8.2</version>
                            </plugin>
                          </plugins>
                        </pluginManagement>
                      </build>
                    </project>
4. 붙여넣기 후 화면 우측 상단에 보면 아래 그림과 같은 아이콘이 생기는데 클릭하여 라이브러리 업데이트 진행.(초반 설정시 라이브러리를 다운로드 해야해서 시간이 조금 걸림)4. java package 생성
1. src-main-java 에서 우클릭 후 New-Package 선택 
2. package 이름은 [com.xxx.xxx](http://com.xxx.xxx) 형태로 만들어 줌.
1. package 구조를 계층 형태로 보려면 아래 그림과 같이 설정 버튼 클릭 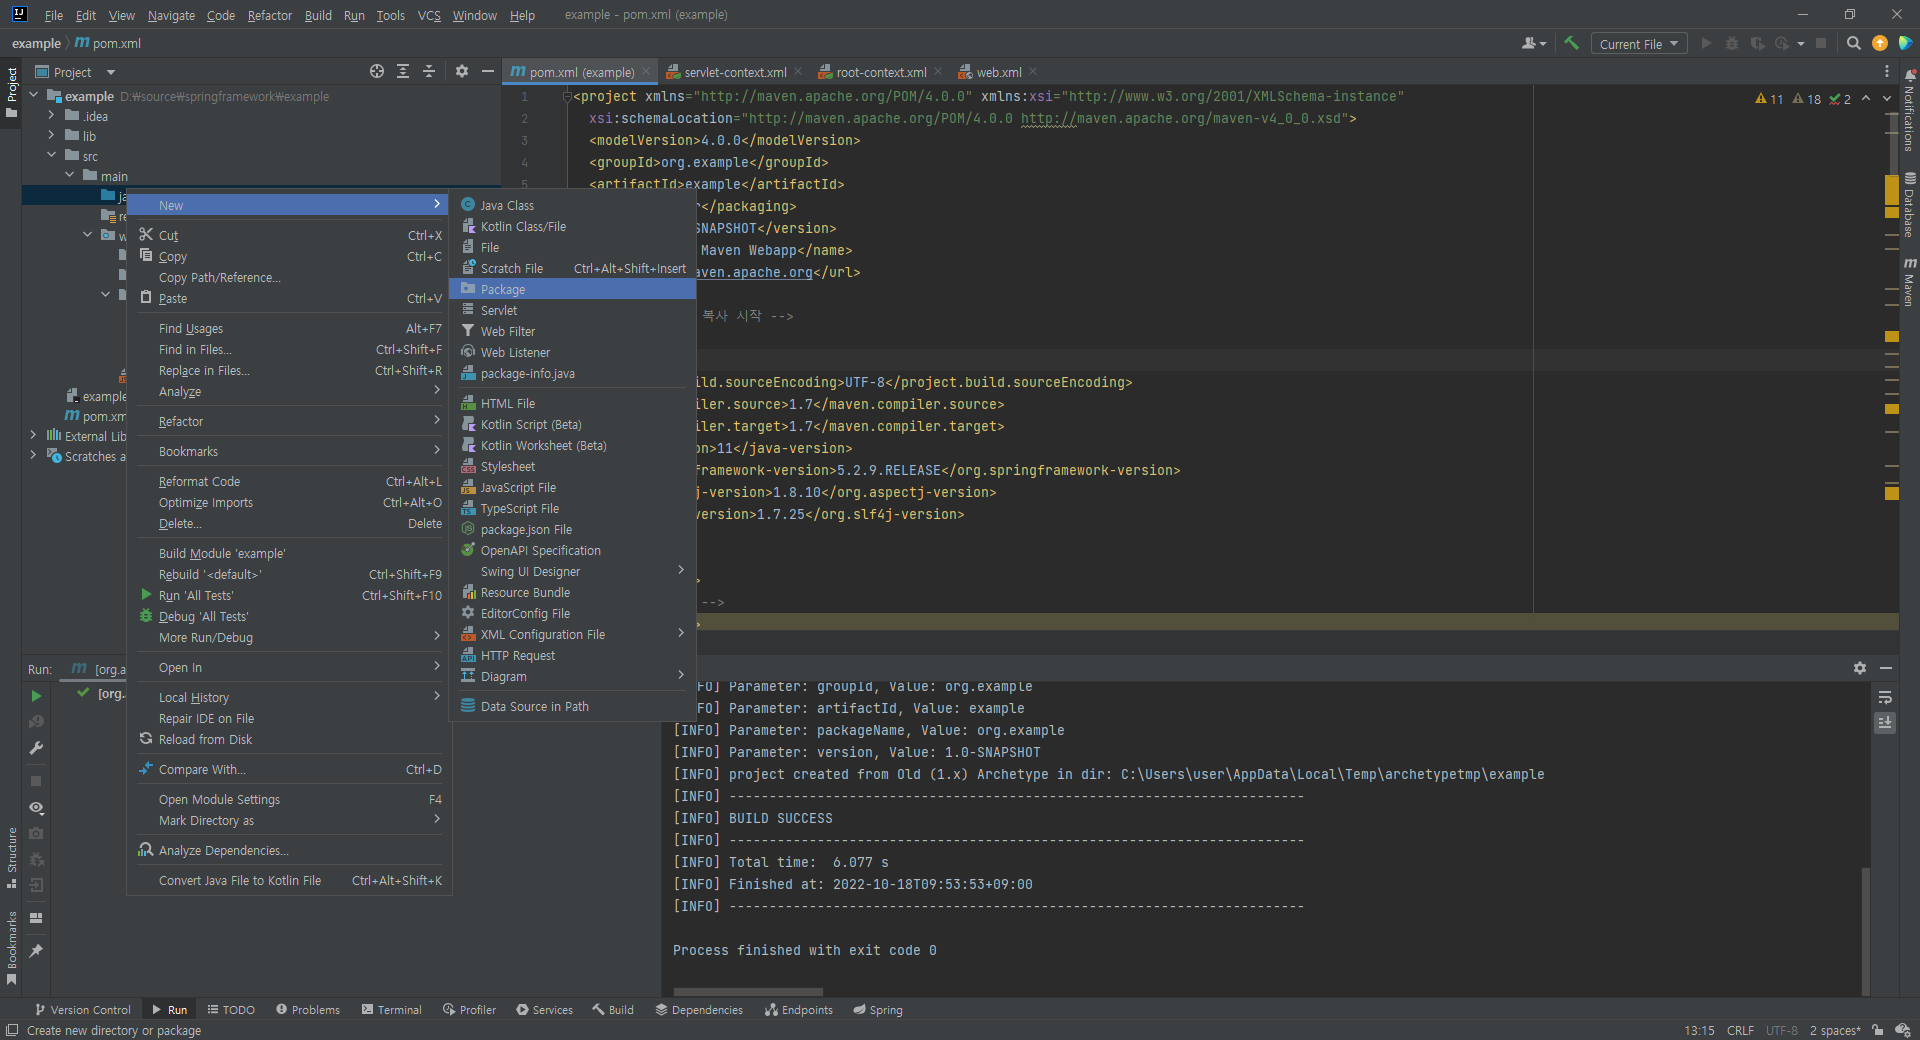
2. Tree Appearance에서 Flatten Packages 체크 해제 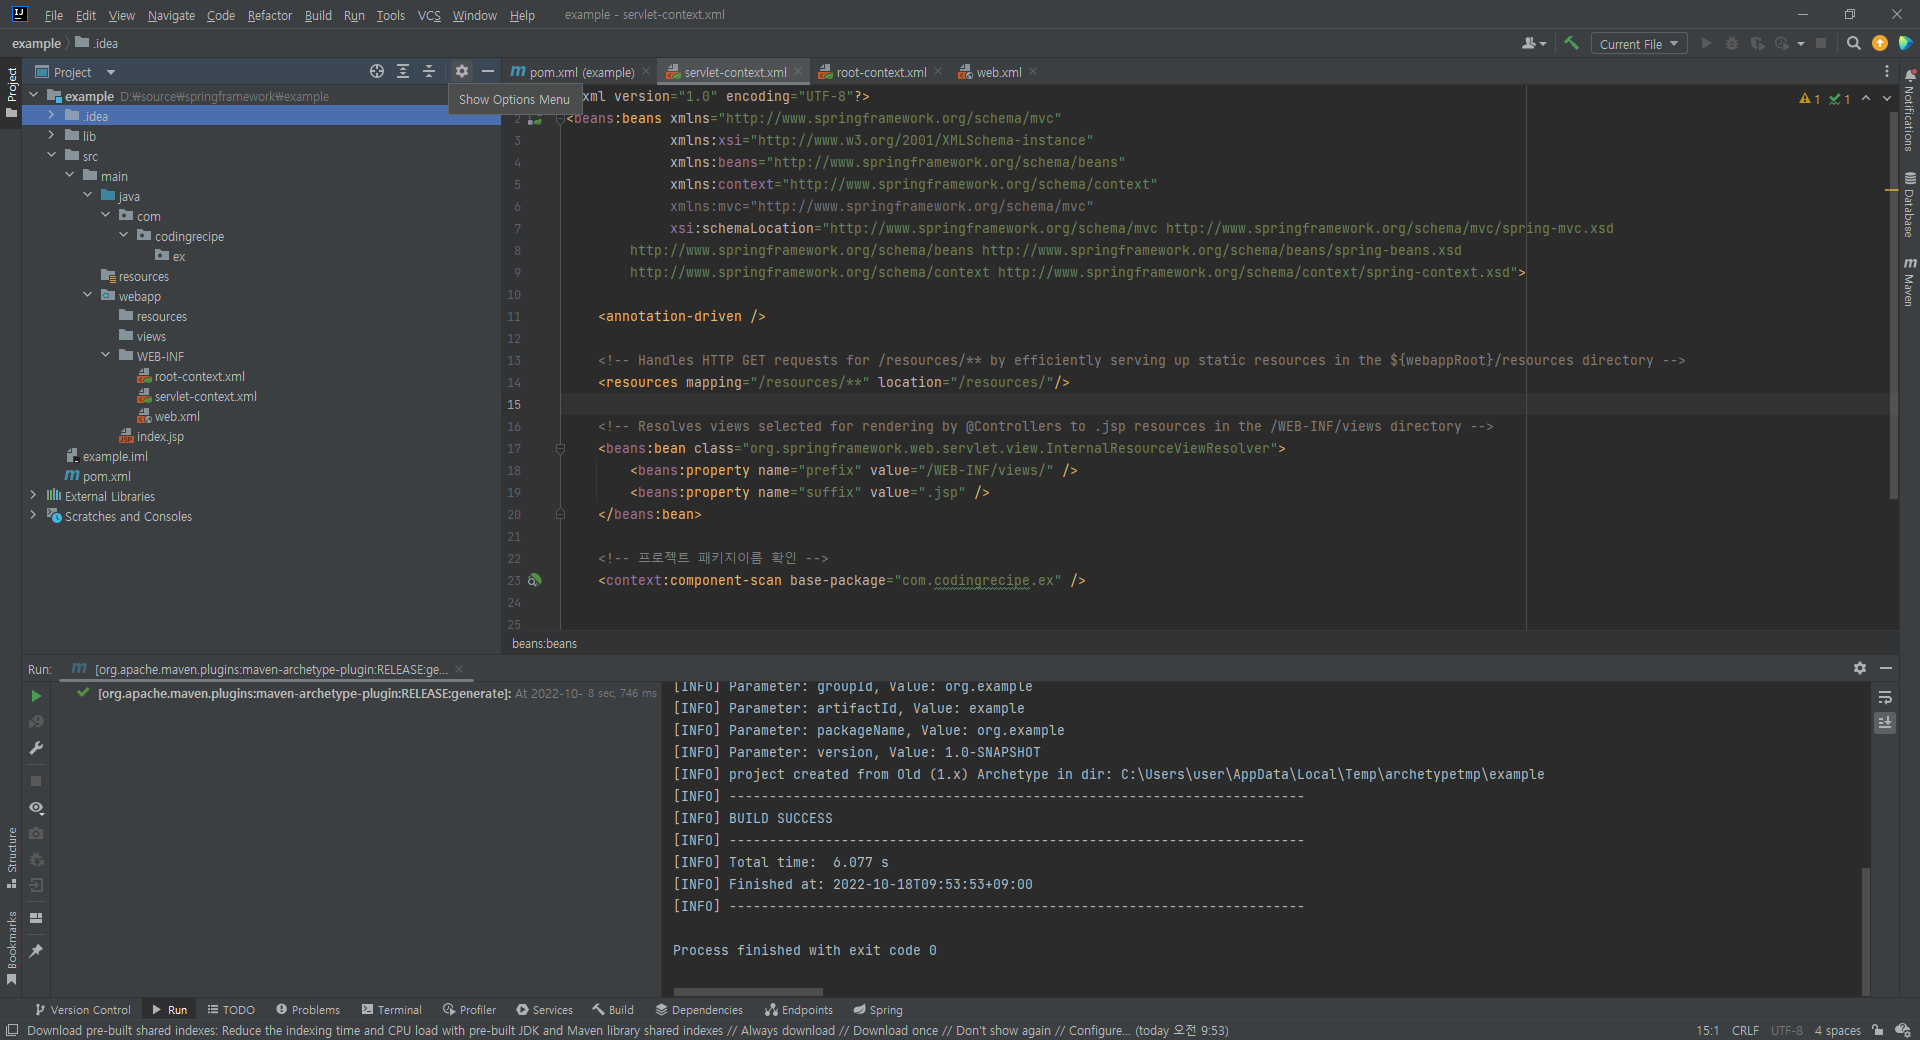
3. ex 패키지에서 우클릭 후 controller 패키지 생성
4. controller 패키지에서 우클릭 후 New-Java Class에서 HomeController 클래스 생성
1. 패키지 및 클래스 추가 완료 화면 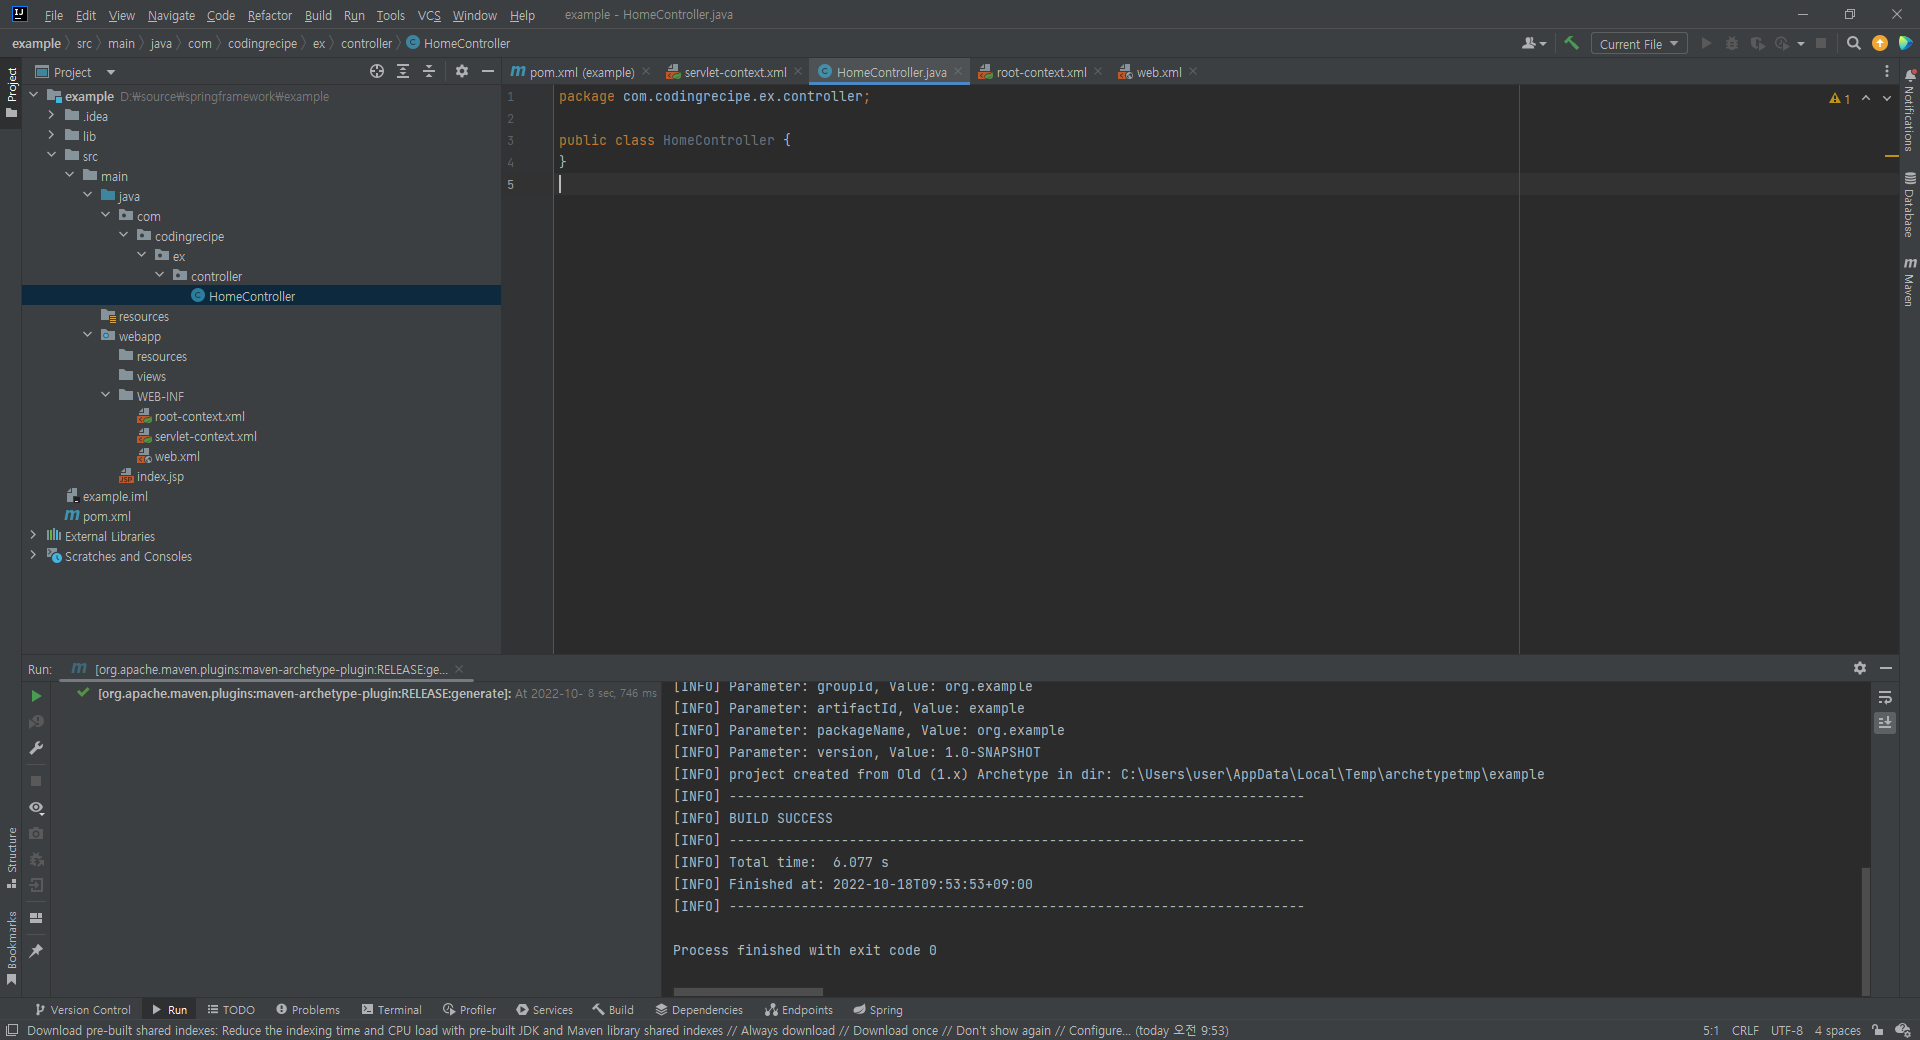
5. Tomcat Server 설정하기
1. Tomcat Server 설정을 위해선 PC에 Tomcat 9.0 이상이 설치되어 있어야 함.
2. 우측 상단 셀렉트 박스 클릭 후 Edit Configuration 클릭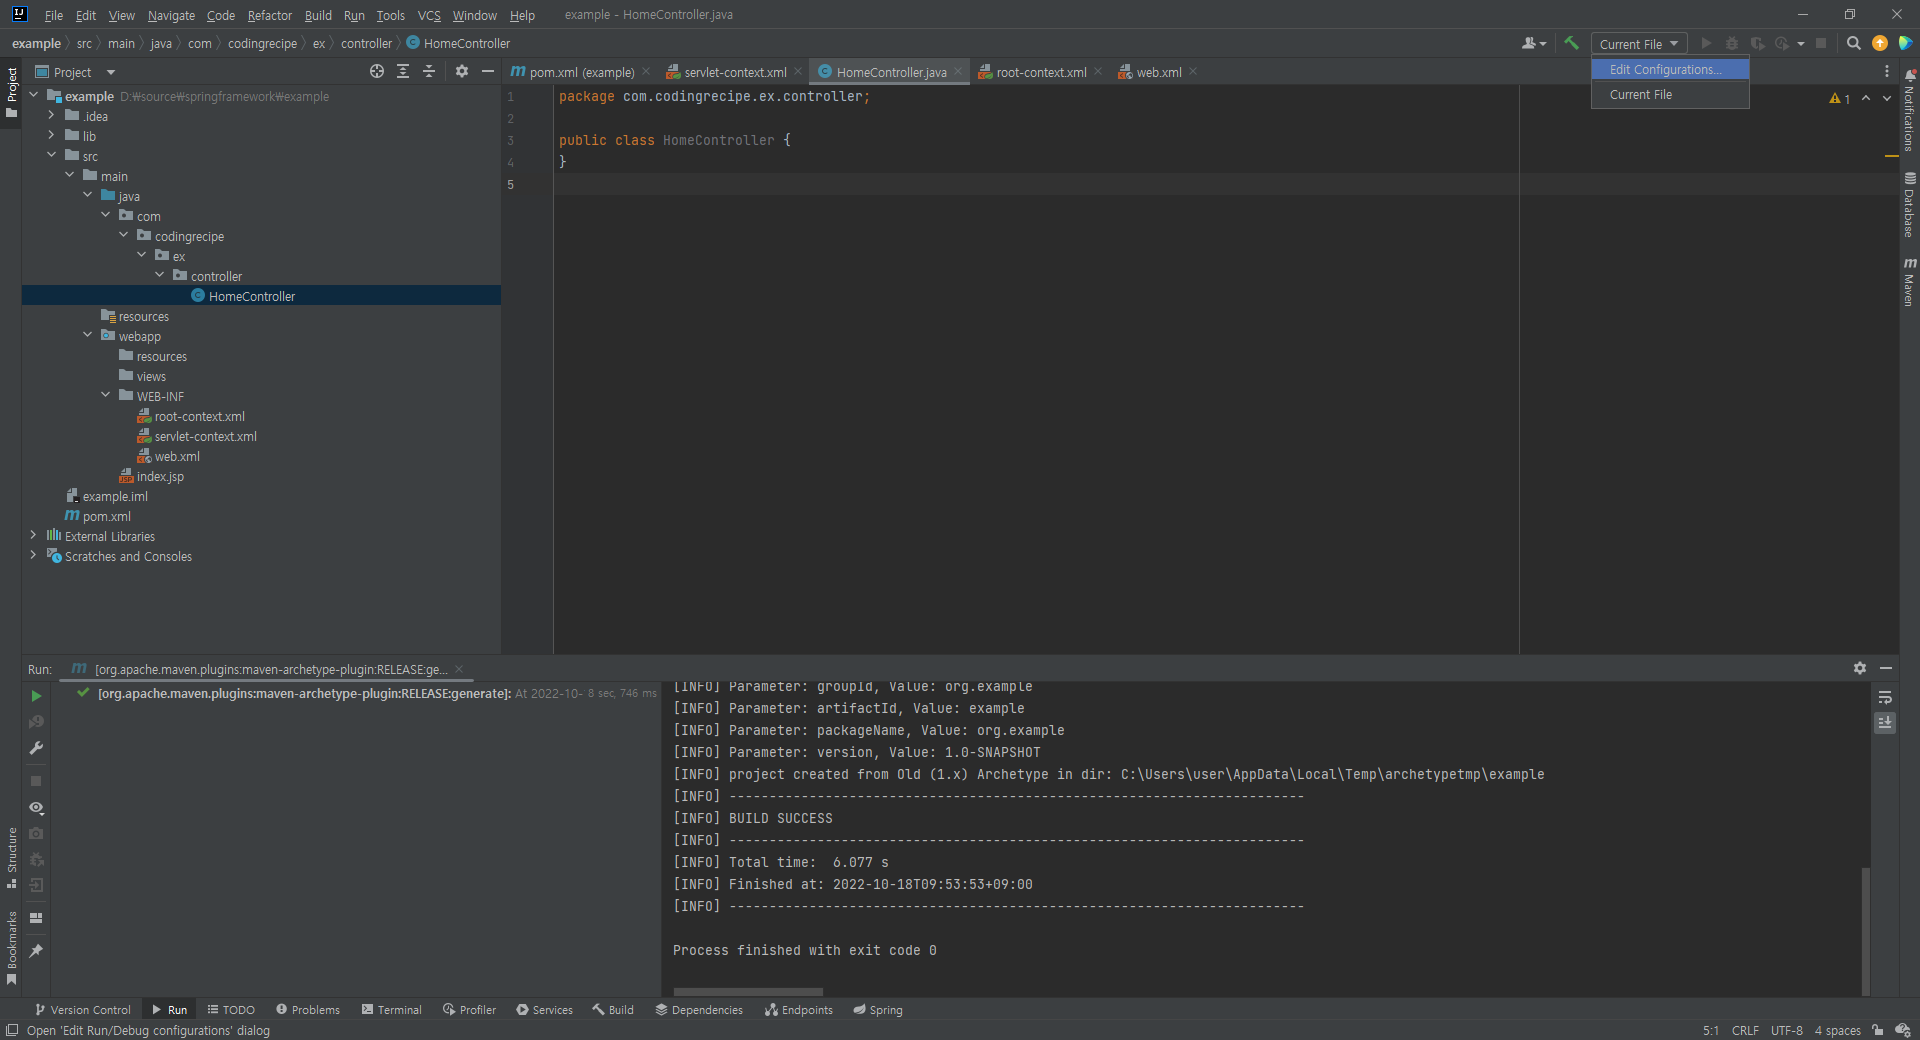
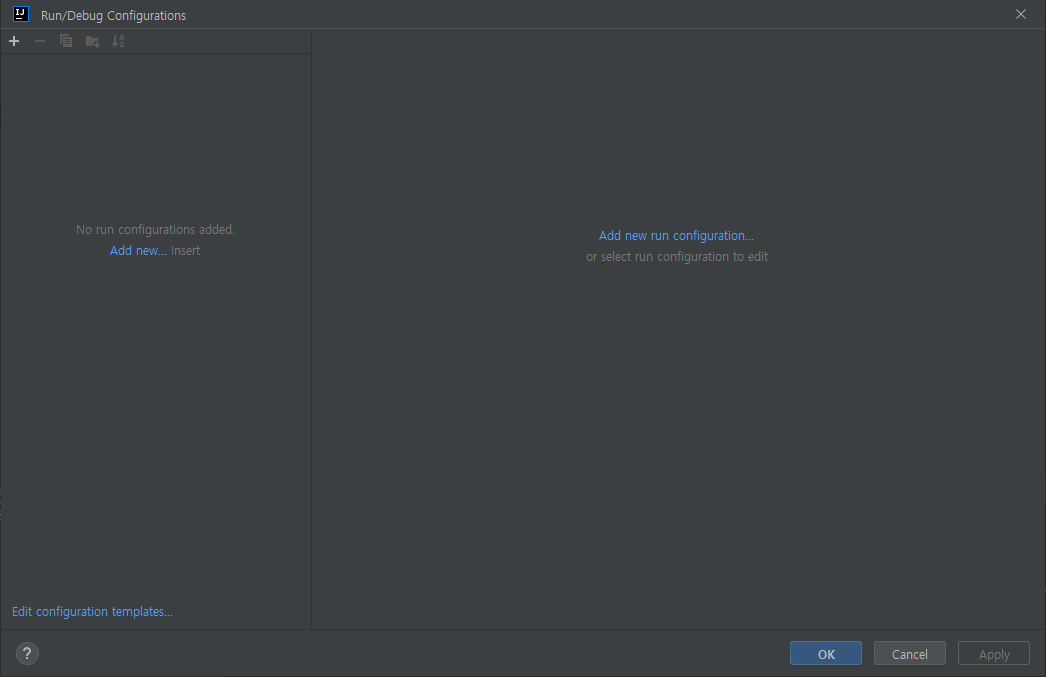
3. Add new run configuration 클릭 후 Tomcat Server-Local 선택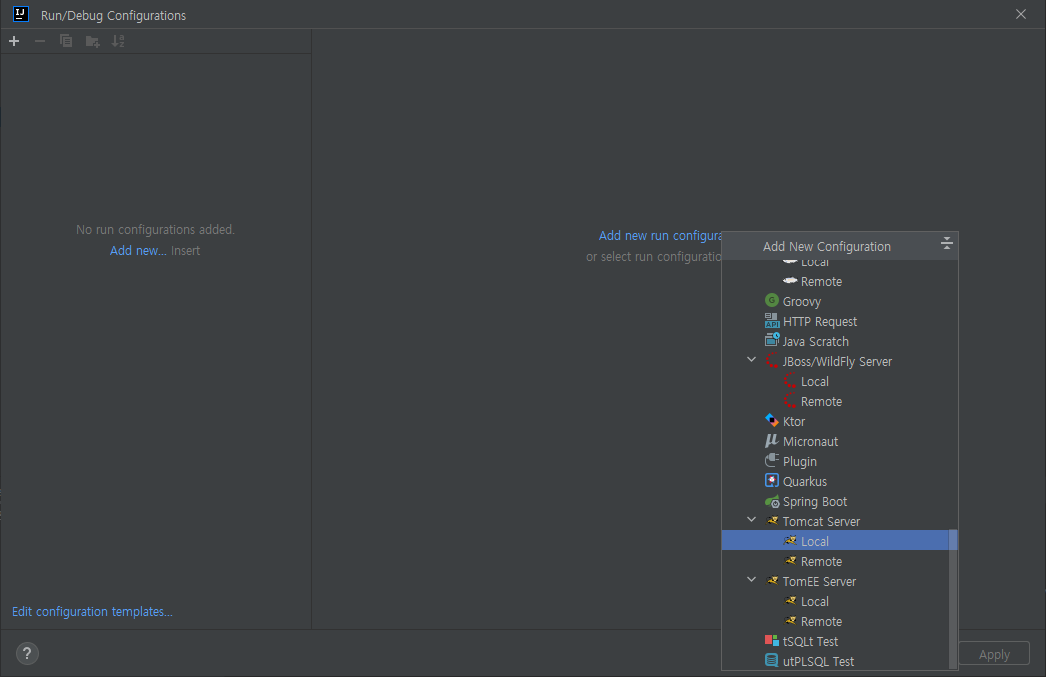
4. Tomcat 설정 화면
    1. Name 은 Tomcat으로
    2. Application server 우측 Configure 버튼 클릭하여 Tomcat 설치 경로 지정
    3. 아래 그림에서 Tomcat Home 부분을 설치경로로 지정해야하고 폴더버튼 클릭하여 경로를 찾아서 지정함.
1. Tomcat 설치시 별도 경로를 따로 지정하지 않았다면 보통 C:\Program Files\Apache Software Foundation\Tomcat 9.0 에 설치되어 있음. 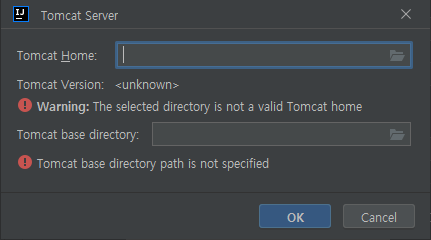
2. 해당 경로 지정 후 OK 클릭. 아래 그림과 같이 Tomcat9.0 이하 하위 폴더가 보이지 않는다면 윈도우 탐색기에서 Tomcat9.0 폴더를 열어줘야 함. (접근 허용 해주면 됨)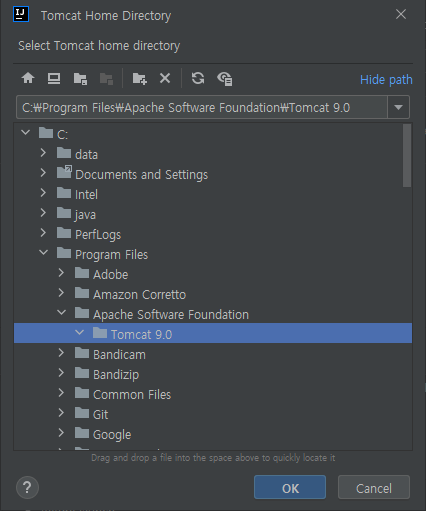
3. 접근 허용 후 보이는 화면 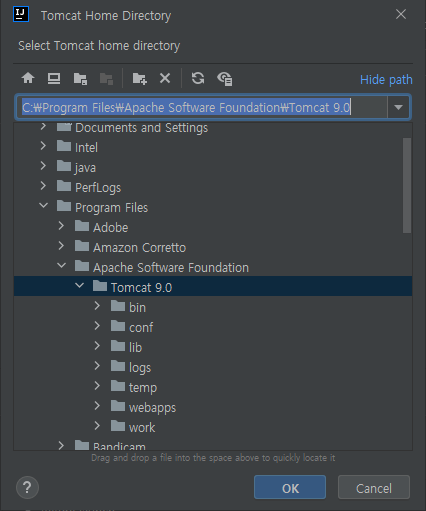
    4. 한글 깨짐 방지 작업
        1. VM options 에 아래 내용을 작성
-Dfile.encoding=UTF-8 5. JRE는 PC에 설치된 JDK 버전과 동일하게 선택(본 예제에서는 11버전)
6. Name 입력하는 부분 아래 보면 여러 탭이 있는데 Deployment 탭 선택 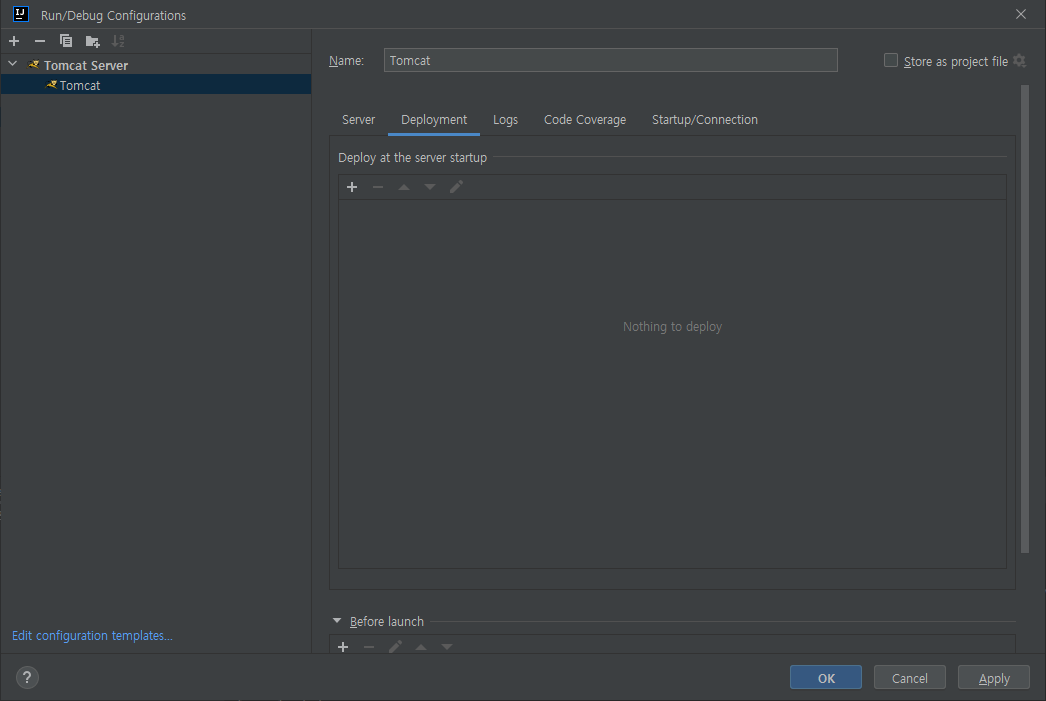
        1. + 버튼 클릭 후 Artifact 선택
2. exploded가 있는 항목 선택 
3. 하단에 Application context 에 /만 남기고 나머지 내용은 삭제 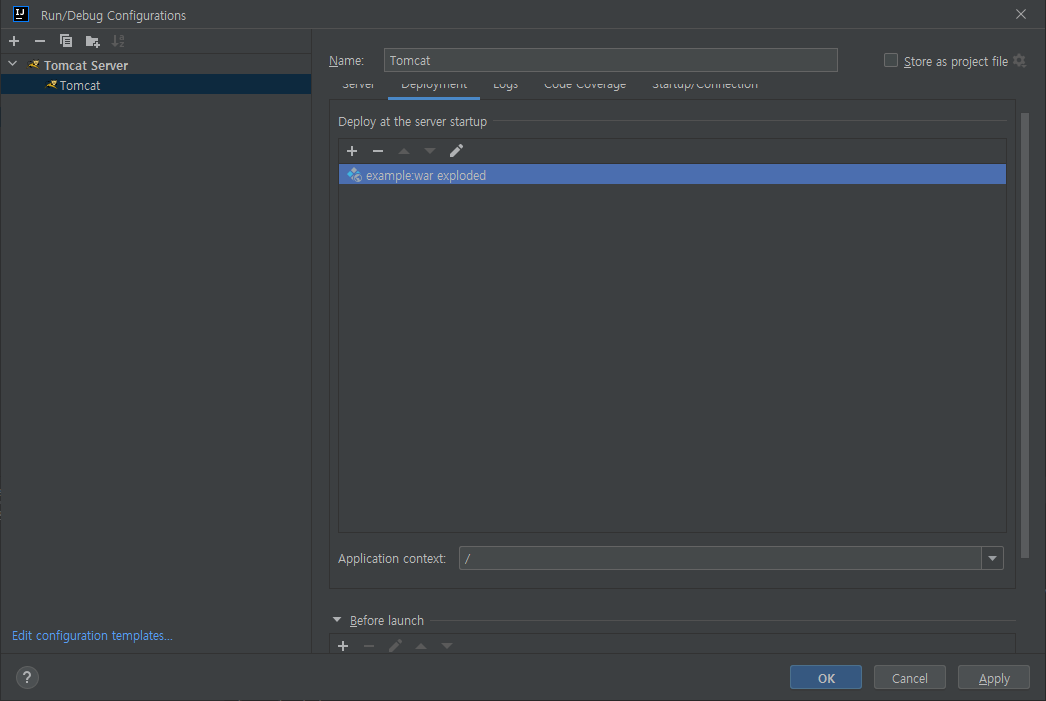
7. 모든 설정이 끝났으면 OK 클릭6. 설정
1. annotation processor 설정
    1. File-Settings 클릭
    2. Build, Execution, Deployment-Compiler-Annotation Processors 선택
    3. Enable annotation processing 체크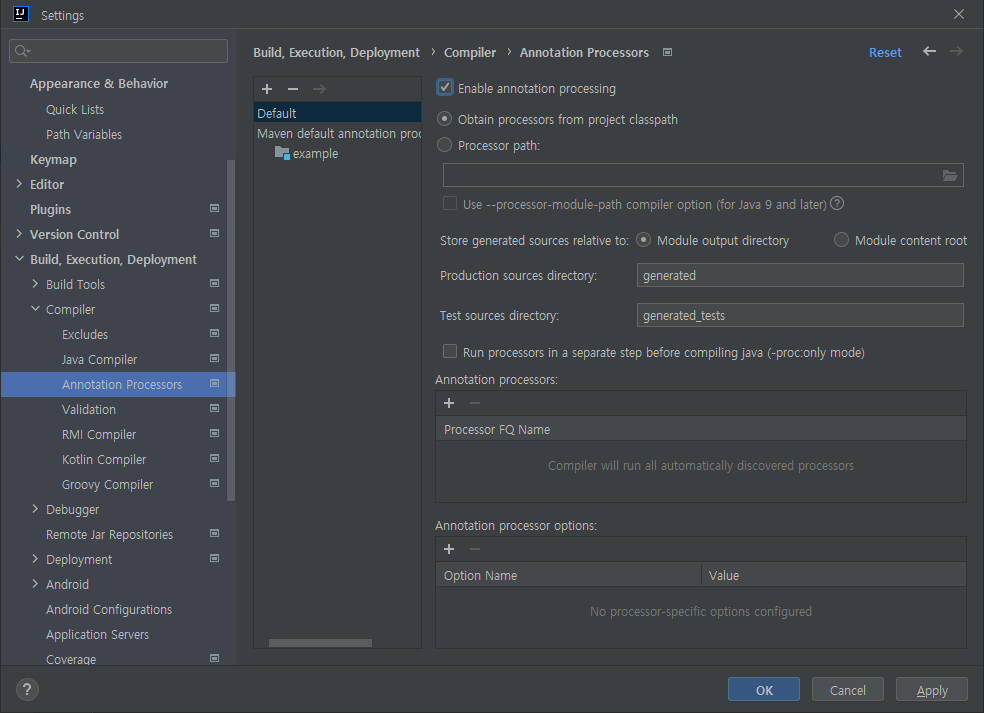
2. UTF-8 설정
    1. File-Settings 클릭
    2. Editor-File Encodings 선택
    3. 아래 그림과 같이 UTF-8 선택하고 OK 클릭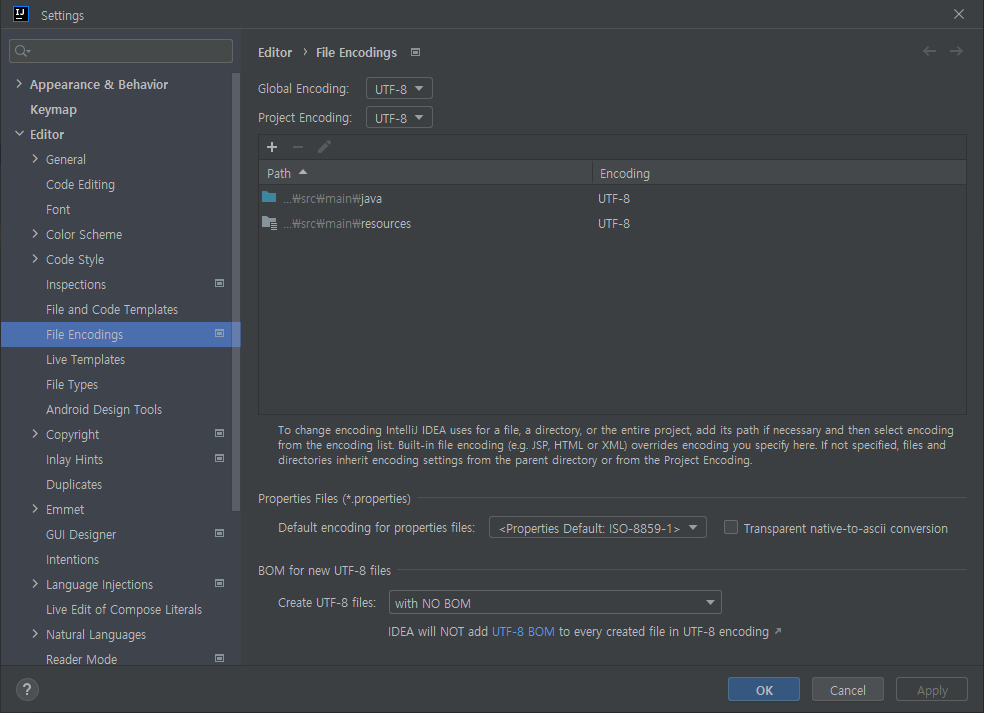
    4. Help-Edit Custom VM Options 선택
        1. 아래와 같은 내용 작성 후 저장
                -Dfile.encoding=UTF-8
                -Dconsole.encoding=UTF-8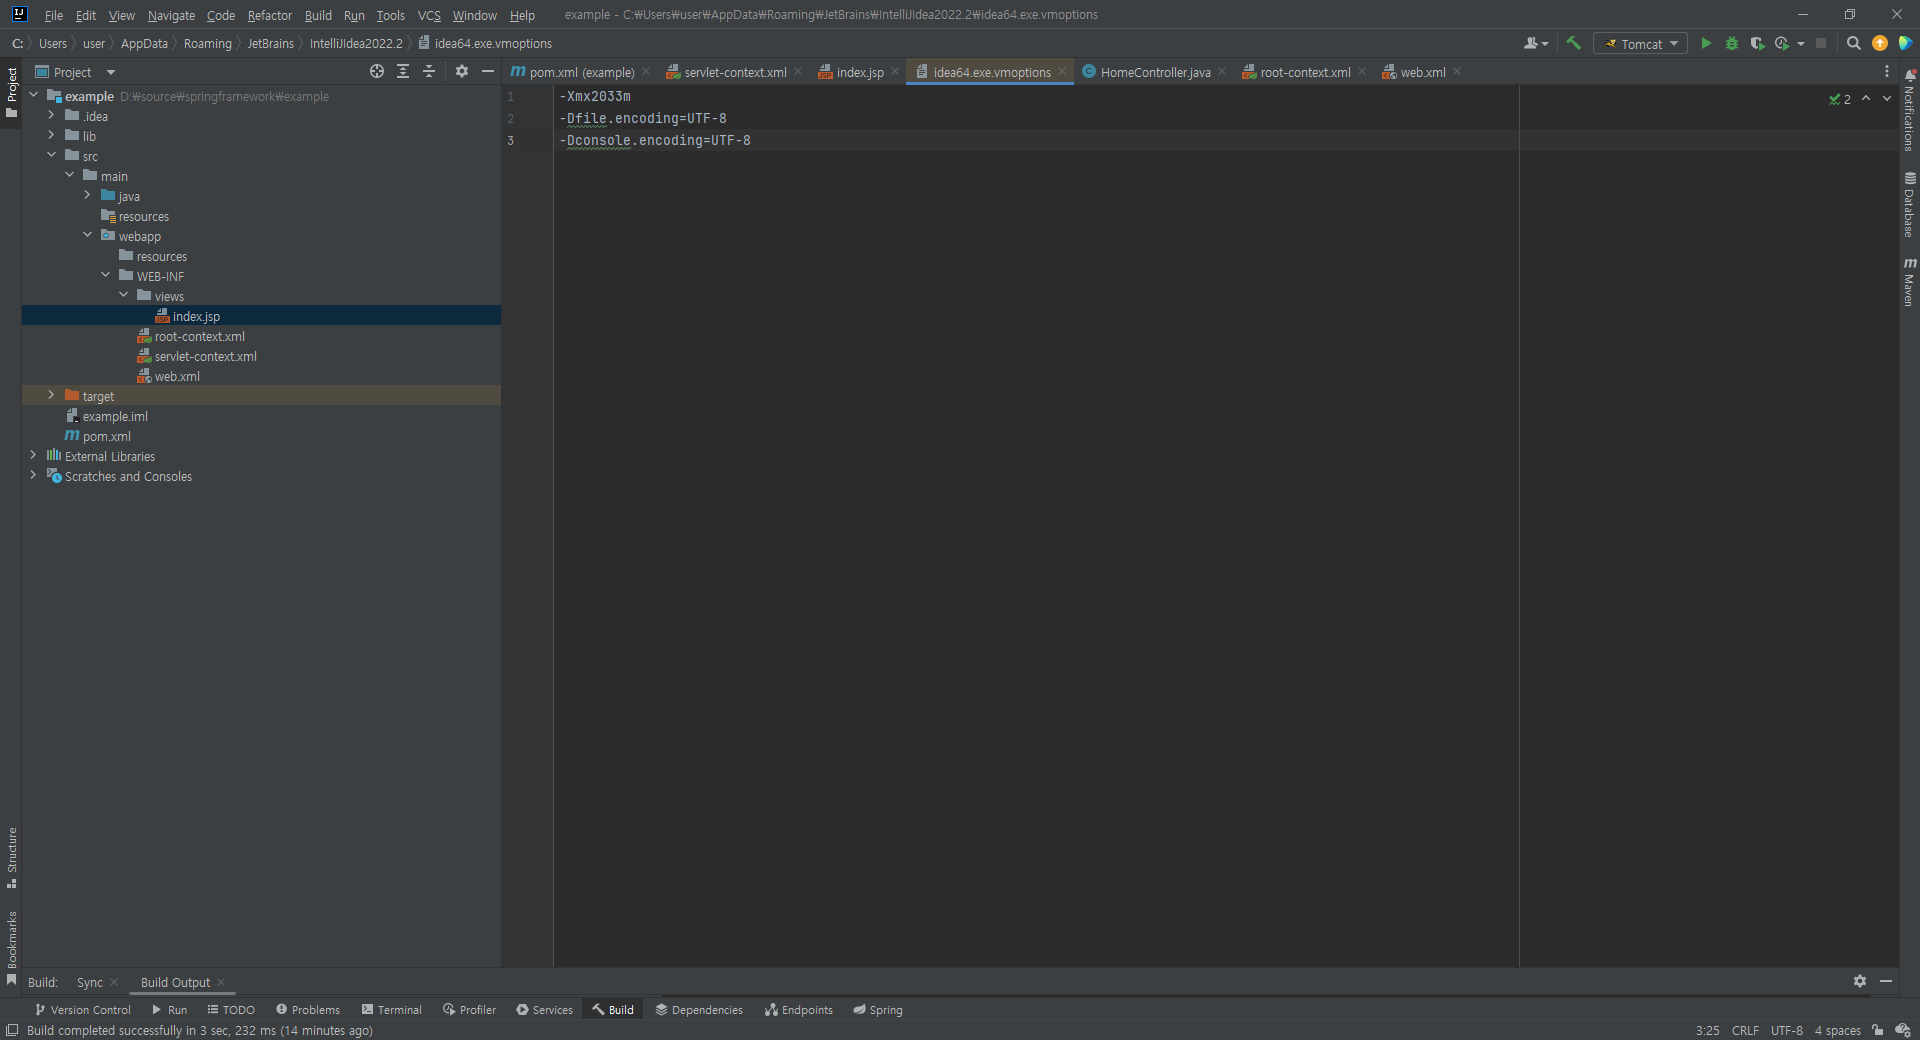
5. 세팅 후 콘솔에 한글이 깨져 보인다면 IntelliJ 재시작 7. HomeController 클래스 코딩
1. 서버 실행시 첫페이지를 출력하기 위한 method 정의
2. 아래 내용과 같이 코딩
        package com.codingrecipe.ex.controller;

        import org.springframework.stereotype.Controller;
        import org.springframework.web.bind.annotation.GetMapping;

        @Controller
        public class HomeController {
            @GetMapping("/")
            public String index() {
                return "index";
            }
        }
8. index.jsp 코딩
1. 기존에 있던 index.jsp 삭제
2. src-main-webapp-WEB-INF-views 폴더에서 우클릭 후 New-JSP 선택 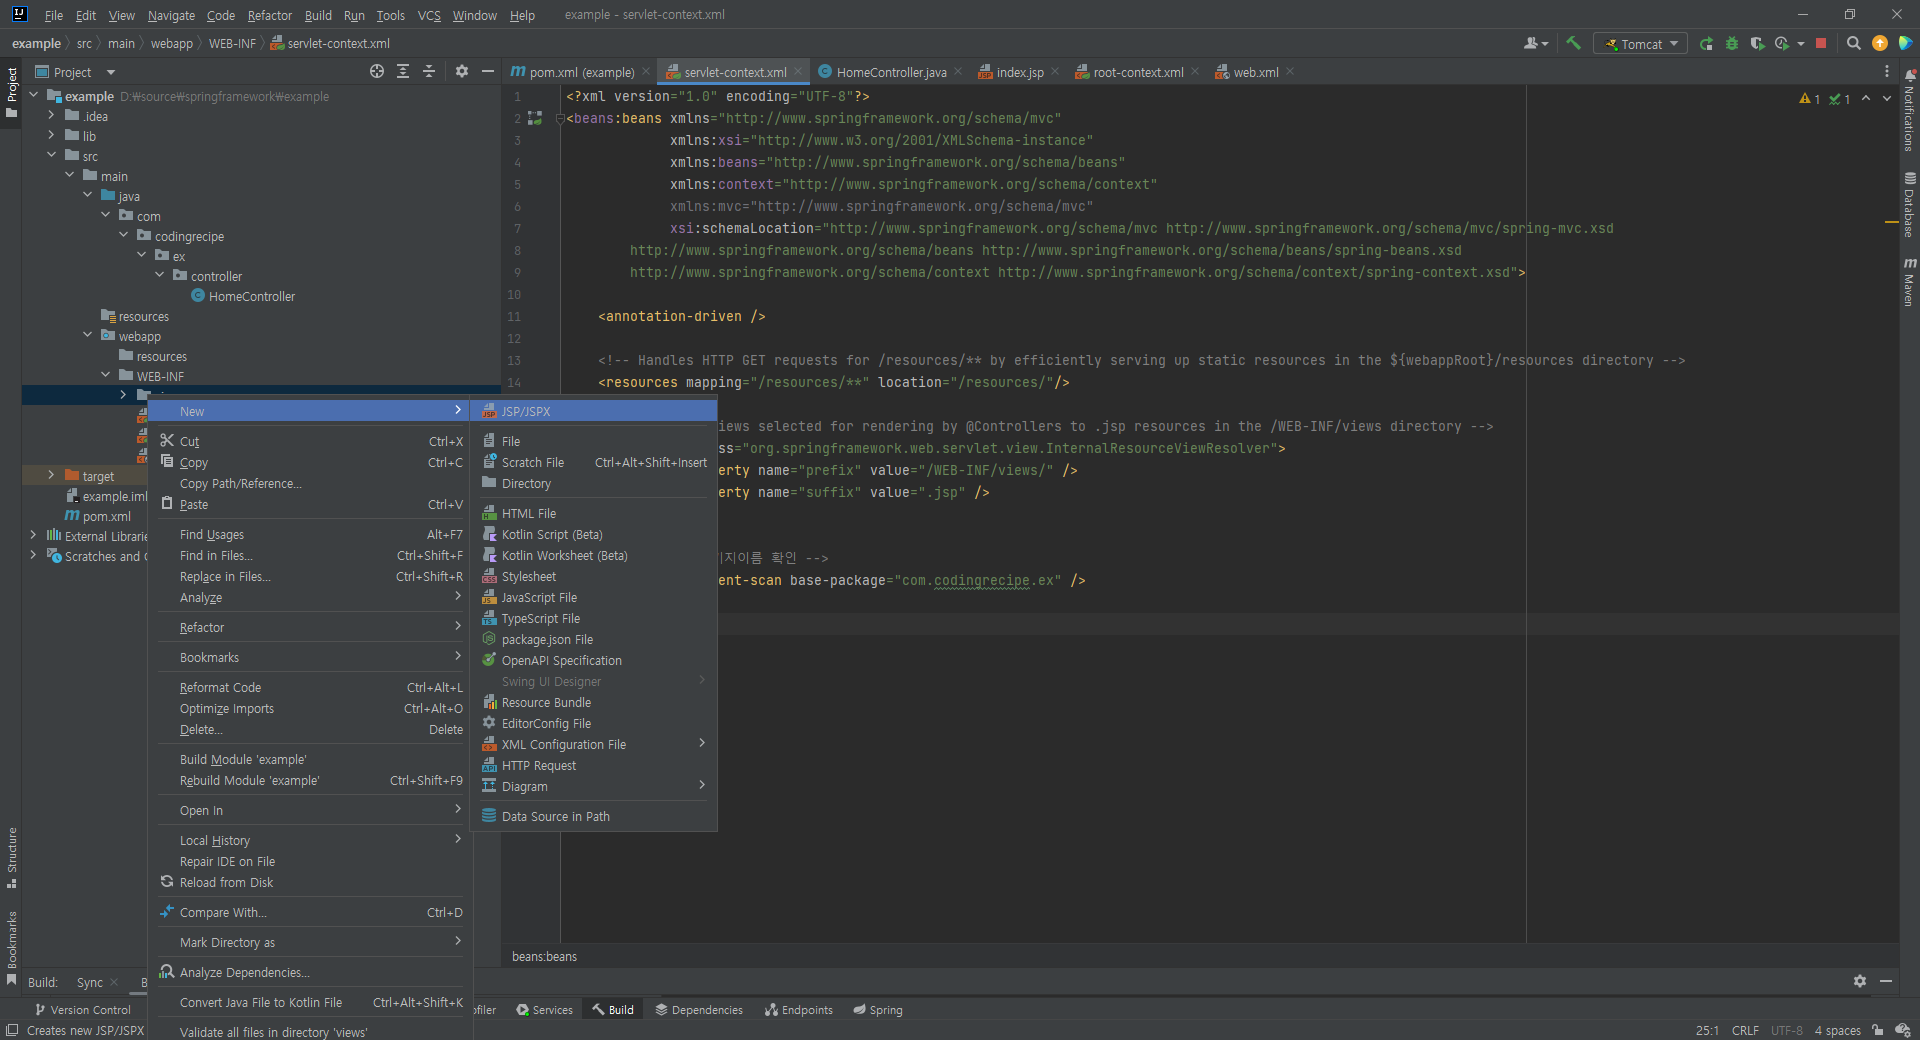
3. 파일명은 index 입력
4. body 태그 안에 아무 내용이나 작성. 본 예제에서는 <h2>Hello Spring!!</h2> 라고 작성함.
9. 프로젝트 실행
1. 우측 상단 녹색 세모 버튼 클릭
2. 브라우저 새창이 열리면서 index.jsp 에 작성한 내용이 출력됨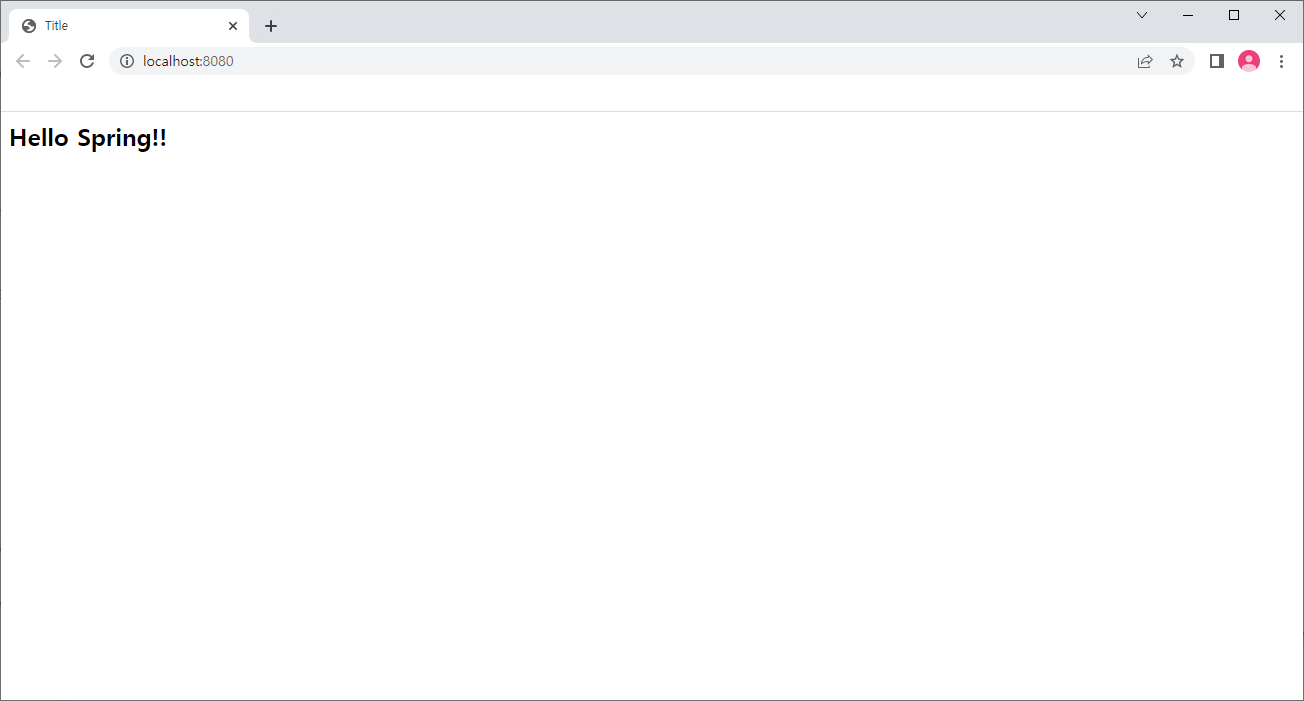

3개의 댓글

2024년 7월 15일
안녕하세요. 유튜브로 강의 시청했는데 제가 유튜브는 댓글을 안써서 여기에라도 궁금한 사항 남겨봅니다.
[스프링 프레임워크(Spring Framework) 게시판 프로젝트] 02_게시판 글쓰기 이 강의를 시청하고 따라했는데요. 컨트롤러 내의 int saveResult = boardService.save(boardDTO); 이 부분에서 널포인터 에러가 발생하고 있습니다. 디버깅결과 form에서 DTO로 값은 잘 전달되었는데요(이것도 롬복 getter,setter가 안돼서 getter,setter를 자동완성으로 만들고 DTO에 담았습니다.) 혹시 의심해볼만한 사항이 있을까요?
답글 달기
안녕하세요 ! 스프링부트 강의 어떤거볼까 이리저리 둘러보다가 선생님 강의 너무 좋아서, 눈으로만 먼저 보다가 오늘 드디어 이것저것 설치하고 따라해보려고 하고있어요! 그런데ㅠㅠ시작부터 난관이,, Spring MVC 추가하려고 add framework support 메뉴로 들어갔는데, Groovy 하나만 있고 다른 항목들은 전혀 안보여서 계속 검색하고 프로젝트 재생성해보고 이리저리 고심했는데 도저히 안되겠어서 답글 남겨요ㅠㅠ 혹시 어떻게 하면 Spring 항목들 생성할 수 있나요?ㅠㅠ