Section 1. InputStream
1. InputStream
- 바이트 단위 입력 스트림의 최상위 추상 클래스
- 많은 추상 메서드가 선언되어 있고 이를 하위 스트림이 상속받아 구현함
- 주요 하위 클래스
| 스트림 클래스 | 설명 |
|---|---|
| FileInputStream | 파일에서 바이트 단위로 자료를 읽음 |
| ByteArrayInputStream | byte 배열 메모리에서 바이트 단위로 자료를 읽음 |
| FilterInputStream | 기반 스트림에서 자료를 읽을 때 추가 기능을 제공하는 보조 스트림의 상위 클래스 |
2. InputStream 주요 메서드
- 주요 메서드
| 스트림 클래스 | 설명 |
|---|---|
| int read() | 입력 스트림으로부터 한 바이트의 자료를 읽고, 읽은 자료의 바이트 수를 반환 |
| int read(byte b[]) | 입력 스트림으로 부터 b[] 크기의 자료를 b[]에 읽고, 읽은 자료의 바이트 수를 반환 |
| int read(byte b[], int off, int len) | 입력 스트림으로 부터 b[] 크기의 자료를 b[]의 off 변수 위치부터 저장하며 len 만큼 읽고, 읽은 자료의 바이트 수를 반환 |
| void close() | 입력 스트림과 연결된 대상 리소스를 닫음 |
3. FileInputStream 사용
- 파일에서 한 바이트씩 자료 읽기
public class FileInputStreamTest1 {

	public static void main(String[] args) {
		FileInputStream fis = null;

		try {
			fis = new FileInputStream("input.txt");

			System.out.println((char)fis.read());
			System.out.println((char)fis.read());
			System.out.println((char)fis.read());

		} catch (IOException e) {
			System.out.println(e);
		} finally{
			try {
				fis.close();
			} catch (IOException e) {
				System.out.println(e);
			} catch (NullPointerException e){
				System.out.println(e);
			}
		}
		System.out.println("end");
	}
}- 파일의 끝까지 한 바이트씩 자료 읽기
- try-catch-resources 문 사용
public class FileInputStreamTest2 {

	public static void main(String[] args) {

		try(FileInputStream fis = new FileInputStream("input.txt")){
			int i;
			while ( (i = fis.read()) != -1){	# 파일의 끝이면 -1 반환
				System.out.println((char)i);
			}
			System.out.println("end");
		} catch (FileNotFoundException e) {
			e.printStackTrace();
		} catch (IOException e) {
			e.printStackTrace();
		}
	}
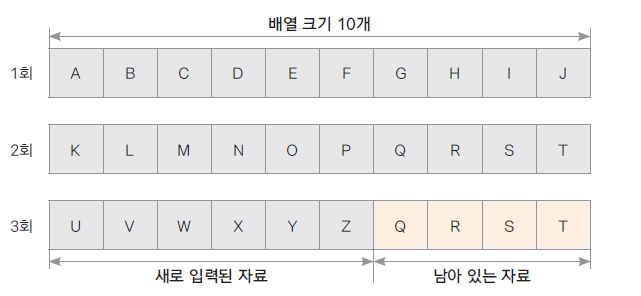
}- 파일에서 바이트 배열로 자료 읽기 (배열에 남아 있는 자료가 있을 수 있음에 유의)
public class FileInputStreamTest3 {

	public static void main(String[] args) {

		try (FileInputStream fis = new FileInputStream("input2.txt")){

			byte[] bs = new byte[10];
			int i;
			while ( (i = fis.read(bs)) != -1){
				/*for(byte b : bs){			# 방법 1
					System.out.print((char)b);
				}*/
				for(int k= 0; k<i; k++){		# 방법 2
					System.out.print((char)bs[k]);
				}
				System.out.println(": " +i + "바이트 읽음" );
			}
		} catch (IOException e) {
			e.printStackTrace();
		}
		System.out.println("end");
	}
}
- 방법 1
- QRST 까지 출력됨 -> 방법 2로 구현

Section 2. OutputStream
1. System 클래스
- 바이트 단위 출력 스트림 최상위 추상 클래스
- 많은 추상 메서드가 선언되어 있고 이를 하위 스트림이 상속받아 구현함
- 주요 하위 클래스
| 스트림 클래스 | 설명 |
|---|---|
| FileOutputStream | 파일에서 바이트 단위로 자료를 씀 |
| ByteArrayOutputStream | byte 배열 메모리에서 바이트 단위로 자료를 씀 |
| FilterOutputStream | 기반 스트림에서 자료를 쓸 때 추가 기능을 제공하는 보조 스트림의 상위 클래스 |
2. InputStream 주요 메서드
- 주요 메서드
| 스트림 클래스 | 설명 |
|---|---|
| int write() | 한 바이트를 출력 |
| int write(byte b[]) | b[] 크기의 자료를 출력 |
| int write(byte b[], int off, int len) | b[] 배열에 있는 자료의 off 위치부터 len 개수만큼 자료를 출력 |
| void flush() | 출력을 위해 잠시 자료가 머무르는 출력 버퍼를 강제로 비워 자료를 출력 |
| void close() | 출력 스트림과 연결된 대상 리소스를 닫습니다. 출력 버퍼가 비워짐 |
3. FileOutputStream 사용
- 파일에 한 바이트씩 쓰기
public class FileOutputStreamTest1 {

	public static void main(String[] args) {

		try(FileOutputStream fos = new FileOutputStream("output.txt")){
			fos.write(65);  # A
			fos.write(66);  # B
			fos.write(67);  # C
		}catch(IOException e) {
			e.printStackTrace();
		}
		System.out.println("출력이 완료되었습니다.");
	}
}
- byte[] 배열에 A-Z 까지 넣고 배열을 한꺼번에 파일에 쓰기
public class FileOutputStreamTest2 {

	public static void main(String[] args) throws IOException {

		FileOutputStream fos = new FileOutputStream("output2.txt",true);
		try(fos){ 					# java 9 부터 제공되는 기능

			byte[] bs = new byte[26];
			byte data = 65;        			# 'A' 의 아스키 값
			for(int i = 0; i < bs.length; i++){ 	# A-Z 까지 배열에 넣기
				bs[i] = data;
				data++;
			}

			fos.write(bs);  			# 배열 한꺼번에 출력하기
		}catch(IOException e) {
			e.printStackTrace();
		}
		System.out.println("출력이 완료되었습니다.");
	}
}
- byte[] 배열의 특정 위치에서 부터 정해진 길이 만큼 쓰기
public class FileOutputStreamTest3 {

	public static void main(String[] args) {

		try(FileOutputStream fos = new FileOutputStream("output3.txt"))
		{

			byte[] bs = new byte[26];
			byte data = 65;
			for(int i = 0; i < bs.length; i++){
				bs[i] = data;
				data++;
			}
			fos.write(bs, 2, 10);   # 배열의 2 번째 위치부터 10 개 바이트 출력하기
		}catch(IOException e) {
			e.printStackTrace();
		}
		System.out.println("출력이 완료되었습니다.");
	}
}
4.flush 와 close 메서드
- 출력 버퍼를 비울때 flush 메서드를 사용
- close 메서드 내부에서 flush 가 호출되므로 close 메서드가 호출되면 출력 버퍼가 비워짐