CloudWatch의 경보 알림 by SNS
AWS에는 SNS라는 알림 기능이 있는데, CloudWatch의 Alarm(경보)을 설정한 뒤 해당하는 내용에 대해 SNS 알람을 받는 것이 가능하다.
이 기능을 통해 가령 RDS의 CPU 점유율이 70~80을 넘길 경우 알람을 전송하도록 설정함으로써 빠른 대처가 가능하다.
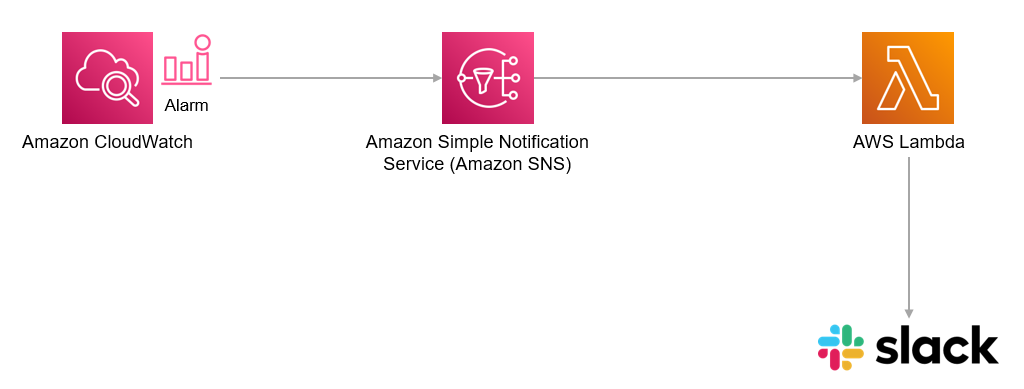
이 때, 알람은 slack으로 받는 것이 가능한데 그 workflow는 아래와 같다.

요약하면, “CloudWatch로 Alarm이 울림 → SNS 트리거에 의해 람다 함수 호출 → 슬랙 알림”의 과정을 거치게 된다.
-
먼저, SNS에서 생성하는 하나의 알림을 ‘주제’라고 하는데 원하는 이름의 주제를 생성한다.
→ 가령, “RDS-alarm”이라는 이름으로 주제를 생성할 수 있다.
-
즉, CloudWatch를 통해 모니터링 하고 싶은 경보를 생성한다.
→ 먼저 "조건"에서 지표 및 조건 지정이 가능한데 특정 임계값을 지정하여 해당하는 임계값 보다 더 클 경우 혹은 작을 경우 알람이 울리도록 설정하는 것이다.
→ 그 다음, "작업 구성"의 "알림"에서 "SNS 주제 선택"에 "기존 SNS 주제 선택"을 클릭하고 "다음으로 알림 전송"에 미리 생성해 놓은 SNS 주제를 선택한다. 그러면 해당 SNS 주제가 람다 함수에서 트리거로 작용하게 된다.
-
그 다음, 트리거를 갖는 람다 함수를 생성한다.
→ 즉, SNS 트리거를 위에서 생성한 주제로 선택한 뒤 해당 트리거에 의해 호출되는 람다 함수를 생성해야 하는 것이다.
→ 함수 생성시에는 "블루프린트 사용"을 선택하고, 그 다음 필터에 ‘slack’을 입력하면 해당되는 목록이 노출된다. 그 중 ‘cloudwatch-alarm-to-slack-python’을 선택하여 구성 버튼을 클릭해야 편리하게 slack으로 알람이 가도록 설정할 수 있다.
- 람다 함수에 slack의 webhook url을 추가하여 원하는 내용의 response가 slack 채널에 전달 되도록 할 수 있다.
위 방식에 맞추어 람다함수까지 작성한 뒤 테스트를 해 보면 다음과 같은 output을 얻을 수 있다.
{
  "Records": [
    {
      "EventSource": "aws:sns",
      "EventVersion": "1.0",
      "EventSubscriptionArn": "arn:aws:sns:eu-west-1:000000000000:cloudwatch-alarms:xxxxxxxx-xxxx-xxxx-xxxx-xxxxxxxxxxxx",
      "Sns": {
        "Type": "Notification",
        "MessageId": "xxxxxxxx-xxxx-xxxx-xxxx-xxxxxxxxxxxx",
        "TopicArn": "arn:aws:sns:eu-west-1:000000000000:cloudwatch-alarms",
        "Subject": "ALARM: \"Example alarm name\" in EU - Ireland",
        "Message": "{\"AlarmName\":\"Example alarm name\",\"AlarmDescription\":\"Example alarm description.\",\"AWSAccountId\":\"000000000000\",\"NewStateValue\":\"ALARM\",\"NewStateReason\":\"Threshold Crossed: 1 datapoint (10.0) was greater than or equal to the threshold (1.0).\",\"StateChangeTime\":\"2017-01-12T16:30:42.236+0000\",\"Region\":\"EU - Ireland\",\"OldStateValue\":\"OK\",\"Trigger\":{\"MetricName\":\"DeliveryErrors\",\"Namespace\":\"ExampleNamespace\",\"Statistic\":\"SUM\",\"Unit\":null,\"Dimensions\":[],\"Period\":300,\"EvaluationPeriods\":1,\"ComparisonOperator\":\"GreaterThanOrEqualToThreshold\",\"Threshold\":1.0}}",
        "Timestamp": "2017-01-12T16:30:42.318Z",
        "SignatureVersion": "1",
        "Signature": "Cg==",
        "SigningCertUrl": "https://sns.eu-west-1.amazonaws.com/SimpleNotificationService-xxxxxxxxxxxxxxxxxxxxxxxxxxxxxxxx.pem",
        "UnsubscribeUrl": "https://sns.eu-west-1.amazonaws.com/?Action=Unsubscribe&SubscriptionArn=arn:aws:sns:eu-west-1:000000000000:cloudwatch-alarms:xxxxxxxx-xxxx-xxxx-xxxx-xxxxxxxxxxxx",
        "MessageAttributes": {}
      }
    }
  ]
}
사용할 만한 내용은 모두 ‘Message’에 들어가 있기 때문에 필요한 key들을 가져와 사용하면 된다.
위의 내용을 참고하여 해당 결과를 호출하기 위한 함수를 작성하면 다음과 같이 작성할 수 있다.
import boto3
import json
import logging
import os

from urllib.request import Request, urlopen
from urllib.error import URLError, HTTPError

HOOK_URL = os.environ['HOOK_URL']

logger = logging.getLogger()
logger.setLevel(logging.INFO)

def lambda_handler(event, context):
    logger.info("Event: " + str(event))
    message = json.loads(event['Records'][0]['Sns']['Message'])
    logger.info("Message: " + str(message))

    alarm_name = message['AlarmName']
    #old_state = message['OldStateValue']
    new_state = message['NewStateValue']
    reason = message['NewStateReason']

    slack_message = {
        'text': "%s state is now %s: %s" % (alarm_name, new_state, reason)
    }

    req = Request(HOOK_URL, json.dumps(slack_message).encode('utf-8'))
    try:
        response = urlopen(req)
        response.read()
        logger.info("Message posted")
    except HTTPError as e:
        logger.error("Request failed: %d %s", e.code, e.reason)
    except URLError as e:
        logger.error("Server connection failed: %s", e.reason)
slack에 전달될 response를 Slack의 “Building attatchments”로 꾸밀 수 있다.
아래의 ‘block’으로 response를 전달해 주면 된다.
{
  "type": "section",
  "text": {
    "type": "mrkdwn",
    "text": "New Paid Time Off request from <example.com|Fred Enriquez>\n\n<https://example.com|View request>"
  }
}
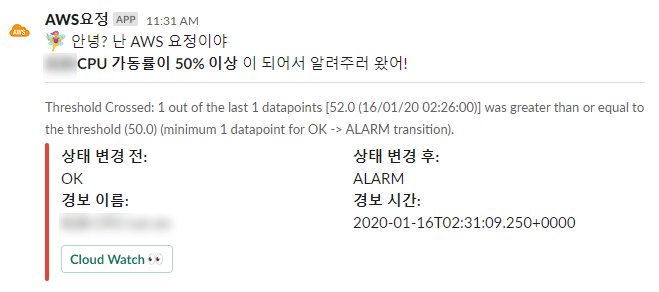
그러면 한 줄로 가독성 떨어지게 오던 것이 블럭으로 보기 좋게 전달된다.
다음과 같은 예시로 작성이 가능하다.
 alarm_name = message['AlarmName']
 alarm_description = message['AlarmDescription']
 old_state = message['OldStateValue']
 new_state = message['NewStateValue']
 reason = message['NewStateReason']
 change_time = message['StateChangeTime']

 color = "#30db3f" if alarm_name.find("off") >= 0 else "#eb4034"

 slack_message = {
   "channel": SLACK_CHANNEL,
   "attachments": [{
     "color": color,
     "blocks": [
       {
         "type": "section",
         "fields": [
             {
                 "type": "mrkdwn",
                 "text": "*상태 변경 전:*\\n" + old_state
             },
             {
                 "type": "mrkdwn",
                 "text": "*상태 변경 후:*\\n" + new_state
             },
             {
                 "type": "mrkdwn",
                 "text": "*경보 이름:*\\n" + alarm_name
             },
             {
                 "type": "mrkdwn",
                 "text": "*경보 시간:*\\n" + change_time
             }
         ]
       },
       {
         "type": "actions",
         "elements": [
             {
               "type": "button",
               "text": {
                   "type": "plain_text",
                   "text": "Cloud Watch :eyes:"
               },
               "style": "primary",
               "url": "<https://ap-northeast-2.console.aws.amazon.com/cloudwatch/home?region=ap-northeast-2#dashboards:name=CPU>"
             }
         ]
       }
     ]
   }],
   "blocks": [
     {
       "type": "section",
       "text": {
           "type": "mrkdwn",
           "text": ":female_fairy: 안녕? 난 AWS 요정이야\\n*" + alarm_description + "* 이 되어서 알려주러 왔어!"
       }
     },
     {
       "type": "divider"
     },
     {
       "type": "context",
       "elements": [
           {
               "type": "mrkdwn",
               "text": reason
           }
       ]
     }
   ]
 }
결과는 아래와 같다.

해당 코드와 사진은 모두 이 블로그 에서 참고했다.
참고
1) https://longtermsad.tistory.com/49
2) https://docs.aws.amazon.com/ko_kr/lambda/latest/dg/with-sns.html
3) https://github.com/blueimp/aws-lambda/blob/master/cloudwatch-alarm-to-slack/test-event.json
