
기능 소개
학생부장님을 위한 기능은 다 구현이 된 것 같군요. 학생부장님은 아침에 학생들을 잡아서(?!) 얼굴을 확인하고 이름을 확인하면 끝입니다.
이제부터는 다른 선생님들을 위한 기능입니다. 특히 담임선생님과 봉사담당선생님입니다. 이 선생님들께서는 교문에서 누가누가 걸렸는지 확인해야합니다.
특히 담임선생님은 우리반 누가 걸렸는지, 봉사담당선생님은 우리 학년에 누가 걸렸는지 구분해서 보실 필요가 있습니다. 따라서 이번에는 리스트에 필터링 기능까지 달아보도록 하겠습니다.
계획
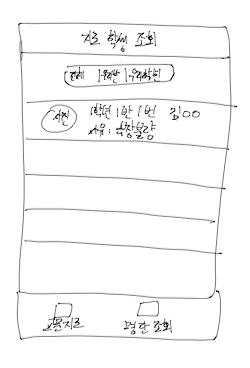
큰 그림
- 아래에 탭바를 통해 교문지도와 명단조회를 오갈 수 있습니다.
- 전체 조회 / 우리 반만 조회 / 우리 학년만 조회를 통해 필터링된 결과를 제공합니다.
- 리스트에는 사진과 학생 정보 + 이름 그리고 사유가 적혀있습니다.
어떻게 구현할 것인가?
- 지난 번까지 만들었던 교문지도 기능과 이번에 만들 명단 조회기능은 논리적으로 수평적 관계를 가집니다. 탭바 컨트롤러를 활용합시다!
- 어떤 필터를 선택할 것인지는 segment control을 이용하겠습니다. 여러 개 중에 하나를 선택하는 경우 버튼 보다 더 직관적인 UI를 제공합니다. (어떤 것들을 선택할 수 있는지, 어떤 것을 선택했는지 한눈에 알 수 있습니다.)
- 마지막으로 TableView를 통해 학생들의 리스트를 보여주겠습니다.
구현
탭바 컨트롤러 구현
탭바 컨트롤러를 구현해봅시다. 탭바 컨트롤러는 컨트롤러들을 배열의 형태로 가지고 있습니다.
- 네비게이션 바를 커스터마이징한 방식과 유사하게 appearance를 사용해서 커스터마이징을 합니다. background는 약간 밝은 색을 내기위해 systemGray6를 썼습니다. (system이 붙은 색은 다크모드에 다른 색으로 변한다는 것에 주의합시다!)
- 애플에서 API를 제공해주지 않는 특성에 대해서는 setValue라는 방법을 통해서 커스터마이징할 수 있습니다. 이 코드는 컴파일 시에 적용되지 않고 런타임에 적용되는 특성을 가지고 있습니다. 따라서 key에 정확한 문자열을 쓰지 않으면 크래시가 날 수 있습니다.
- 탭바 컨트롤러는 viewControllers라는 배열에 하위 VC들을 가지고 있습니다. 배열의 순서와 동일하게 탭바에 표시됩니다.
- 네비게이션 컨트롤러를 만드는 코드가 중복되기 때문에 따로 메소드를 만들었습니다. 네비게이션 바의 속성을 정하는 코드가 있습니다. (개별 VC에서는 해당 코드를 삭제합니다.)
- navigationBarItem과 title이 하위 VC의 소속인 것처럼 tabBarItem과 title도 탭바의 소속이 아닌 탭바 하위 컨트롤러의 속성입니다.
import Foundation
import UIKit

class MainTabController: UITabBarController {

    // MARK: - Properties


    // MARK: - LifeCycle

    override func viewDidLoad() {
        super.viewDidLoad()
        configureViewControllers()

    }


    // MARK: - Helpers

    func configureViewControllers() {
    	//1️⃣
        let appearance = UITabBarAppearance()
        appearance.configureWithDefaultBackground()
        appearance.backgroundColor = .systemGray6
        self.tabBar.standardAppearance = appearance
        self.tabBar.scrollEdgeAppearance = appearance

	//2️⃣
        self.tabBar.setValue(UIColor.black, forKey: "tintColor")

        let faceCheck = FaceCheckViewController()
        let nav1 = createNavigationController(image: UIImage(systemName: "checkmark"), title: "교문 지도", rootViewController: faceCheck)

        let studentList = StudentListViewController()
        let nav2 = createNavigationController(image: UIImage(systemName: "doc.text"), title: "지도 명단", rootViewController: studentList)

        //3️⃣
        self.viewControllers = [nav1, nav2]
    }

    //4️⃣
    func createNavigationController(image: UIImage?, title: String, rootViewController: UIViewController) -> UINavigationController {
        let nav = UINavigationController(rootViewController: rootViewController)

                //5️⃣
        nav.tabBarItem.image = image
        nav.tabBarItem.title = title

        let appearance = UINavigationBarAppearance()
        appearance.configureWithDefaultBackground()
        appearance.backgroundColor = .lightGray
        appearance.titleTextAttributes = [NSAttributedString.Key.foregroundColor : UIColor.white, NSAttributedString.Key.font : UIFont.systemFont(ofSize: 25)]

        let bar = nav.navigationBar
        bar.standardAppearance = appearance
        bar.compactAppearance = appearance
        bar.scrollEdgeAppearance = appearance

        bar.overrideUserInterfaceStyle = .dark

        return nav
    }
}
필터를 위한 SegmentControl 구현하기
filter 종류 enum으로 구현하기
filter 종류는 늘어나거나 바뀔 가능성이 없어서 확장성과는 크게 관계없지만 enum으로 따로 선언해두지 않으면 segment control의 index로 VM이나 TableView와 소통해야합니다. 이렇게 되면 View에 너무 많은 부담을 지우게 되므로 따로 enum을 선언해서 관리하겠습니다. 코딩할 때도 미리 이렇게 선언해두는 편이 실수를 줄일 수 있고 좋습니다.
Int를 상속 받은 후에 첫번째 case에 원시값 0을 주면 다른 case들이 자동으로 원시값 1, 2를 순서대로 가지게 됩니다. 이는 segment control의 index와 연동해서 사용할 때 유용합니다.
caseIterable의 allCases 내부에 사용해서 segment control에서 사용할 배열을 얻는 점에도 주목하시면 좋겠네요.
enum StudentListFilter: Int, CaseIterable {
    case all = 0
    case myClass
    case myGrade

    var description: String {
        switch self {
        case .all: return "전체"
        case .myClass: return "우리 반"
        case .myGrade: return "우리 학년"
        }
    }

    static let segmentItems = StudentListFilter.allCases.map({ filter in filter.description })
}
segmentControl 구현
코드로 세그먼트를 구현해보았습니다. 세그먼트를 items를 array 형태로 받는데 String뿐만 아니라 Image가 들어있는 배열로도 만들 수 있습니다.
- 현재 filter값을 멤버변수로 만들어두었습니다. didSet 구문을 통해 filter가 바뀌면 table view를 리로드할 예정입니다.
- lazy var로 선언한 이유는 이어질 클로저에서 self에 접근하기 위해서 입니다.
- 선택된 segment를 정해줍니다. 정해주지 않으면 처음에는 아무것도 선택되지 않은 상태가 됩니다.
- 버튼과 마찬가지로 action을 연결할 수 있습니다. selector 함수에 sender를 전달해주어 함수에서 segment 객체에 접근할 수 있게 합니다.
- rawValue로 선언하는 열거형 인스턴스는 옵셔널입니다. 해당 rawValue를 가지는 열거형이 없을 수도 있기 때문입니다.
//1️⃣
var currentStudentListFilter = StudentListFilter.all {
    didSet {
        //TODO: - 테이블뷰 리로드
    }
}

//2️⃣
lazy var filteringSegmentControl: UISegmentedControl = {
    let sg = UISegmentedControl(items: StudentListFilter.segmentItems)
    //3️⃣
    sg.selectedSegmentIndex = self.currentStudentListFilter.rawValue
    sg.setTitleTextAttributes([NSAttributedString.Key.font: UIFont.systemFont(ofSize: 20)], for: .normal)
    sg.setTitleTextAttributes([NSAttributedString.Key.font: UIFont.systemFont(ofSize: 30)], for: .selected)

    //4️⃣
    sg.addTarget(self, action: #selector(segmentValueChanged(sender:)), for: .valueChanged)
    return sg
}()

@objc func segmentValueChanged(sender: UISegmentedControl) {
    let selectedIndex = sender.selectedSegmentIndex
    //5️⃣
    guard let newFilter = StudentListFilter(rawValue: selectedIndex) else { return }
    currentStudentListFilter = newFilter
}
결과물
서브뷰에 더하는 코드는 생략하겠습니다. 결과는 아래와 같습니다.
tableView 구현하기
Guidance Model 만들기
tableView를 구현하기 전에 tableView에 전달할 data의 모델부터 구현해야 합니다. 생활지도라는 뜻의 Guidance 구조체를 만들어줍시다. 교칙을 위반한 학생과 이유로 구성이 되어 있습니다.
struct Guidance {
    let student: Student
    let reason: GuidanceReason
}
viewModel 구현하기
임시로 사용할 더미데이터를 포함한 뷰모델을 구현해보았습니다. 더미데이터 부분은 나중에 서버에서 받아오는 데이터로 대체되게 됩니다.
뷰 모델 부분을 보면 내부에서 사용하는 _guidance와 외부에서 참조 가능한 guidance로 구분이 되어 있습니다. 원래는 viewModel이 filter를 멤버 변수로 가지고 있고 계산 프로퍼티로 guidance를 만들려고 했습니다. 하지만 그렇게 하면 tableview가 guidance를 참조할 때마다 계산 프로퍼티를 정의한 로직을 실행합니다. 내부가 고차함수 filter로 이루어져있기 때문에 그렇게 할 경우에는 성능문제가 발생할 수 있습니다.
그래서 아래처럼 guidance를 두 가지로 만들고 filter가 바뀔 때마다 메소드를 changeFilter 실행시켜 guidances변수에 미리 배결을 저장해놓기로 했습니다. 이렇게 하면 똑같은 로직이 filter가 바뀔 때 한번만 실행됩니다.
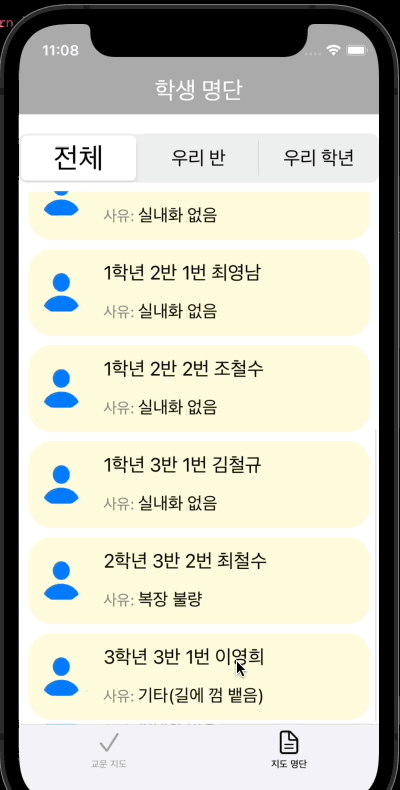
그리고 우리 학년은 1학년 우리 반은 1학년 1반으로 가정했습니다.
var dummyGuidances = [
    Guidance(student: Student(id: 1, grade: 1, classNumber: 1, number: 1, name: "김철수", profilePicture: nil), reason: .wrongClothes),
    Guidance(student: Student(id: 2, grade: 1, classNumber: 1, number: 2, name: "김영희", profilePicture: nil), reason: .noShoes),
    Guidance(student: Student(id: 3, grade: 1, classNumber: 1, number: 3, name: "김영수", profilePicture: nil), reason: .trespassing),
    Guidance(student: Student(id: 4, grade: 1, classNumber: 1, number: 4, name: "이철수", profilePicture: nil), reason: .noShoes),
    Guidance(student: Student(id: 5, grade: 1, classNumber: 1, number: 5, name: "박철수", profilePicture: nil), reason: .noShoes),
    Guidance(student: Student(id: 6, grade: 1, classNumber: 2, number: 1, name: "최영남", profilePicture: nil), reason: .noShoes),
    Guidance(student: Student(id: 7, grade: 1, classNumber: 2, number: 2, name: "조철수", profilePicture: nil), reason: .noShoes),
    Guidance(student: Student(id: 8, grade: 1, classNumber: 3, number: 1, name: "김철규", profilePicture: nil), reason: .noShoes),
    Guidance(student: Student(id: 9, grade: 2, classNumber: 3, number: 2, name: "최철수", profilePicture: nil), reason: .wrongClothes),
    Guidance(student: Student(id: 10, grade: 3, classNumber: 3, number: 1, name: "이영희", profilePicture: nil), reason: .others(detail: "길에 껌 뱉음"))
]

class StudentListViewModel {

    // TODO: - get data from server
    private let _guidances = dummyGuidances

    lazy var guidances: [Guidance] = _guidances

    func changeFilter(to filter: StudentListFilter) {
        switch filter {
        case .all:
            self.guidances = _guidances
        case .myGrade:
            self.guidances = _guidances.filter { guidance in
                guidance.student.grade == 1
            }
        case .myClass:
            self.guidances = _guidances.filter { guidance in
                guidance.student.grade == 1 && guidance.student.classNumber == 1
            }
        }
    }
}
VC에 dataSource, delegate 구현하기
- viewDidLoad에서 실행하는 메소드입니다. 현재 VC를 dataSource와 delegate로 등록하고 table view에서 사용할 cell 타입을 지정합니다. 그리고 자동으로 생성되는 separator는 없애도록 하겠습니다.
- 지난 번에 사용한 collection view처럼 크기를 동적으로 정할 필요는 없습니다. 고정 값으로 합니다. table view는 높이만 정해주면 됩니다.
//1️⃣
func configureTableView() {
    tableView.dataSource = self
    tableView.delegate = self
    tableView.register(StudentListCell.self, forCellReuseIdentifier: reuseIdentifier)
    tableView.separatorStyle = .none
}
extension StudentListViewController: UITableViewDataSource {
func tableView(_ tableView: UITableView, numberOfRowsInSection section: Int) -> Int {
viewModel.guidances.count
}
func tableView(_ tableView: UITableView, cellForRowAt indexPath: IndexPath) -> UITableViewCell {
guard let cell = tableView.dequeueReusableCell(withIdentifier: reuseIdentifier) as? StudentListCell else { return UITableViewCell() }
cell.guidance = viewModel.guidances[indexPath.row]
return cell
}
}
//2️⃣
extension StudentListViewController: UITableViewDelegate {
func tableView(_ tableView: UITableView, heightForRowAt indexPath: IndexPath) -> CGFloat {
return 100
}
}cell class 구현하기
계획에 따르면 cell에 보여줄 정보는 프로필 사진과 학년-반-번호-이름, 그리고 생활지도 사유입니다. imageView 1개와 label 2개를 넣어줍시다.
- VC가 아니라 View가 뷰모델을 가져도 MVVM 패턴에 위배되지는 않는지는 구글링해도 잘 모르겠습니다. 하지만 그렇다고 Cell에 data를 다루는 모든 코드를 넣는 것도 아닌 것 같습니다. guidance와 viewModel을 멤버 변수로 만들어줍시다. 두 멤버 변수를 옵셔널로 설정한 이유는 init을 수동으로 하는 것이 아니라 tableView가 자동으로 하기 때문에 이니셜라이저에 포함할 수 없기 때문입니다. (옵셔널로 안하면 이니셜라이저에 포함해야 합니다. 그러면 tableView가 알아서 사용할 수 없겠죠? 테이블뷰는 guidance에 뭘 넣어야 하는지 모르니까요.)
- layoutSubviews()는 view의 frame값에 접근해서 실행해야하는 UI관련 초기화 코드를 넣어주면 됩니다. init이나 viewDidLoad(VC의 경우) 단계에서는 아직 frame값이 정해지지 않았기 때문에 접근할 수 없지만 layoutSubviews()에서는 가능합니다. 이 메소드는 view가 로드되고 나서 2번 실행됩니다. 여기서는 해당 메소드 안에 contentView의 inset을 설정하기 위해서 사용했습니다.
- cell의 view에 직접 붙이지 않고 contentView에 붙였습니다. 보통 이렇게 하는 이유는 2가지 입니다.
- cell과 cell 사이에 spacing을 주는 효과를 주기 위해서 입니다. 여기서 진짜 spacing이 아니라 주는 효과라고 설명하는 이유는 실질적으로 cell 끼리는 붙어 있는데 cell의 subView인 contentView에 inset을 주어서 spacing처럼 보이게하는 기법이기 때문입니다.
- cell 내부에 터치 이벤트를 받아서 user interaction을 하는 객체가 있을 경우 그냥 view에 붙일 경우 cell이 터치 이벤트에 응답하기 때문에 해당 객체에는 이벤트가 전달되지 않습니다. (리스폰더 체인) 하지만 contentView에 붙이는 경우에는 해당 객체가 cell보다 먼저 이벤트를 받습니다.
import UIKit

class StudentListCell: UITableViewCell {

    // MARK: - Properties

    //1️⃣
    var guidance: Guidance? {
        didSet {
            self.viewModel = StudentListCellViewModel(guidance: guidance!)
            configure()
        }
    }

    var viewModel: StudentListCellViewModel?

    let profileImageView: UIImageView = {
        let iv = UIImageView()
        iv.contentMode = .scaleAspectFill
        iv.clipsToBounds = true
        iv.widthAnchor.constraint(equalToConstant: 48).isActive = true
        iv.heightAnchor.constraint(equalToConstant: 48).isActive = true
        iv.layer.cornerRadius = 48 / 2
        return iv
    }()

    let infoLabel: UILabel = {
        let label = UILabel()
        label.font = .systemFont(ofSize: 20)
        return label
    }()

    let reasonLabel = UILabel()

    // MARK: - LifeStyle

    override init(style: UITableViewCell.CellStyle, reuseIdentifier: String?) {
        super.init(style: style, reuseIdentifier: reuseIdentifier)
        configureUI()
    }

    required init?(coder: NSCoder) {
        fatalError("init(coder:) has not been implemented")
    }

    //2️⃣
    override func layoutSubviews() {
        super.layoutSubviews()
        contentView.frame = contentView.frame.inset(by: UIEdgeInsets(top: 5, left: 10, bottom: 5, right: 10))
    }


    // MARK: - Helpers

    func configureUI() {
	//3️⃣
        contentView.backgroundColor = UIColor.init(red: 255/256, green: 252/256, blue: 220/256, alpha: 1)
        contentView.layer.cornerRadius = (100 - 10) / 4

        contentView.addSubview(profileImageView)
        profileImageView.translatesAutoresizingMaskIntoConstraints = false
        profileImageView.centerYAnchor.constraint(equalTo: contentView.centerYAnchor).isActive = true
        profileImageView.leftAnchor.constraint(equalTo: contentView.leftAnchor, constant: 10).isActive = true

        contentView.addSubview(infoLabel)
        infoLabel.translatesAutoresizingMaskIntoConstraints = false
        infoLabel.centerYAnchor.constraint(equalTo: contentView.centerYAnchor, constant: -20).isActive = true
        infoLabel.leftAnchor.constraint(equalTo: profileImageView.rightAnchor, constant: 20).isActive = true
        infoLabel.rightAnchor.constraint(equalTo: contentView.rightAnchor).isActive = true

        contentView.addSubview(reasonLabel)
        reasonLabel.translatesAutoresizingMaskIntoConstraints = false
        reasonLabel.centerYAnchor.constraint(equalTo: contentView.centerYAnchor, constant: 20).isActive = true
        reasonLabel.leftAnchor.constraint(equalTo: profileImageView.rightAnchor, constant: 20).isActive = true
        reasonLabel.rightAnchor.constraint(equalTo: contentView.rightAnchor).isActive = true
    }

    func configure() {
        infoLabel.text = viewModel?.infoLabelText
        reasonLabel.attributedText = viewModel?.reasonAttributedText
        profileImageView.image = viewModel?.profileImage
    }
}
cell의 viewModel 구현하기
- attributedString은 하나의 객체 내에 서로 다른 속성을 가진 String을 포함할 수 있습니다. 아래에서는 상대적으로 덜 중요한 정보인 “사유: “는 회색에 작은 글씨, 더 중요한 정보인 실제 이유는 검은 색에 상대적으로 큰 글씨를 적용했습니다.
import UIKit

struct StudentListCellViewModel {

    // MARK: - Properties

    let guidance: Guidance

    // MARK: - LabelText

    var infoLabelText: String {
        let student = guidance.student
        return "\(student.grade)학년 \(student.classNumber)반 \(student.number)번 \(student.name)"
    }

    //1️⃣
    var reasonAttributedText: NSAttributedString {
        let reason = guidance.reason
        let attributedString = NSMutableAttributedString(string: "사유: ", attributes: [.font: UIFont.systemFont(ofSize: 16), .foregroundColor: UIColor.gray])
        let reasonString: String = {
            if case .others(let detail) = reason {
                return "\(reason.description)(\(detail ?? ""))"
            } else {
                return "\(reason.description)"
            }
        }()
        attributedString.append(NSAttributedString(string: reasonString, attributes: [.font: UIFont.systemFont(ofSize: 18), .foregroundColor: UIColor.black]))
        return attributedString
    }

    // MARK: - profileImage

    lazy var profileImage: UIImage = {
        if let image = guidance.student.profilePicture {
            return image
        } else {
            return UIImage(systemName: "person.fill")!
        }
    }()
}
결과
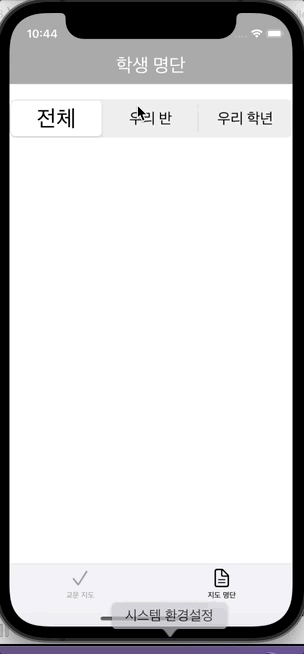
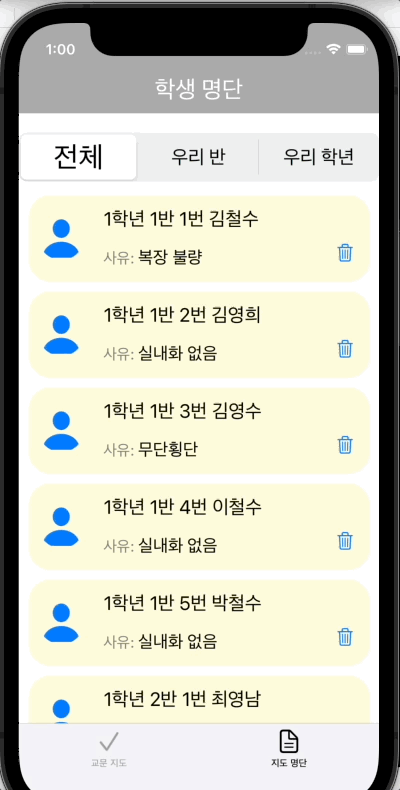
- 필터별로 전체 보기, 1학년 1반만 보기, 1학년만 보기를 제공합니다.
- 학생의 사진, 정보, 생활지도 사유를 보여줍니다.
두 개만 더!
생활지도 추가 로직
지금까지는 교문지도 탭에서 추가를 해도 데이터에는 변화가 없었습니다. 정확히 얘기하면 데이터 자체가 없었습니다. 이제는 더미 데이터이지만 데이터가 있으니 데이터를 추가하는 로직을 만들어 봅시다.
viewModel에서 등록하는 메소드
이렇게만 해두면 자동으로 tableView에서 업데이트 될 것이라고 생각하기 쉽지만 생각보다 추가적인 수정이 필요합니다.
func registerGuidance(reason: GuidanceReason) {
    let guidance = Guidance(student: student, reason: reason)
    dummyGuidances.append(guidance)
}
List VM 수정
우리의 StudentListViewModel()은 객체가 처음에 생성될 때 1번만 전역에서 dummyData를 읽어옵니다. 전역 더미데이터에 추가하더라도 list VC가 init된 시점의 (TabBarController가 생성된 시점과 동일합니다.) 더미데이터만 가지고 있습니다.
따라서 VM에 해당 메소드를 추가해서 전역에서 새로 데이터를 읽어오도록 합시다.
func resetGuidances() {
    self._guidances = dummyGuidances
}
List VC 수정
데이블 데이터가 수정되면 테이블뷰를 리로드할 헬퍼 함수를 하나 만들어 놓습니다. 새로 전역에서 더미데이터를 읽어오고 필터링을 다시 한 다음에 tableView를 리로드합니다. 이것을 뷰가 보여질 때마다 실행해주면 됩니다.
func reloadTableView() {
    viewModel.resetGuidances()
    viewModel.changeFilter(to: currentStudentListFilter)
    tableView.reloadData()
}
override func viewWillAppear(_ animated: Bool) {
super.viewWillAppear(animated)
reloadTableView()
}결과
새로운 학생이 추가되는 것을 볼 수 있습니다.
삭제 로직
추가가 있으면 삭제가 있어야하는 것이 인지상정입니다. iOS의 table view는 자체적으로 삭제할 수 있는 api를 제공합니다만 컴동쌤은 cell에 삭제 버튼을 넣고 delegate pattern을 통해서 삭제기능을 구현 해보고자 합니다.
삭제 버튼 추가
- cell에 버튼을 추가하겠습니다. 위에 content view에 button을 붙여야하는 이유에 대해 언급한 적이 있었죠? content view위에 붙여야 터치 이벤트를 cell이 아니라 button에 전달할 수 있습니다!
- delegate 패턴을 위해 protocol을 선언하겠습니다. 삭제 버튼이 클릭이 되면 해당 델리게이트 메소드가 실행됩니다.
let deleteButton: UIButton = {
    let button = UIButton()
    button.widthAnchor.constraint(equalToConstant: 50).isActive = true
    button.heightAnchor.constraint(equalToConstant: 50).isActive = true
    button.setImage(UIImage(systemName: "trash"), for: .normal)
    button.addTarget(self, action: #selector(deleteButtonTapped), for: .touchUpInside)
    return button
}()
func configureUI() {
// ...생략...
//1️⃣
contentView.addSubview(deleteButton)
deleteButton.translatesAutoresizingMaskIntoConstraints = false
deleteButton.bottomAnchor.constraint(equalTo: contentView.bottomAnchor, constant: -5).isActive = true
deleteButton.rightAnchor.constraint(equalTo: contentView.rightAnchor).isActive = true
}//2️⃣
protocol StudentListCellDelegate: AnyObject {
func deleteButtonTapped(in cell: StudentListCell)
}@objc func deleteButtonTapped() {
delegate?.deleteButtonTapped(in: self)
}StudentListController에서 delegate 패턴 사용하기
델리게이프 패턴을 사용하기 위해서는 cell의 델리게이트를 정해주어야 합니다. 현재 VC로 지정하는 코드를 넣습니다.
델리게이트 메소드를 정의 해봅시다. cell에서 guidance를 가져오고 viewModel에 정의된 (이제 앞으로 정의할) 삭제 메소드를 실행합니다. 그리고 테이블 뷰를 리셋합니다. 추가 로직에서 설명했듯이 해당 메소드는 전역에서 데이터를 다시 가져와서 filter를 하고 실행해줍니다.
func tableView(_ tableView: UITableView, cellForRowAt indexPath: IndexPath) -> UITableViewCell {
    guard let cell = tableView.dequeueReusableCell(withIdentifier: reuseIdentifier) as? StudentListCell else { return UITableViewCell() }
    cell.guidance = viewModel.guidances[indexPath.row]
    cell.delegate = self
    return cell
}
// MARK: - StudentListCellDelegate
extension StudentListViewController: StudentListCellDelegate {
func deleteButtonTapped(in cell: StudentListCell) {
guard let guidance = cell.guidance else { return }
viewModel.deleteGuidance(guidance)
reloadTableView()
}
}ViewModel에서 삭제 로직 구현
삭제를 하려면 cell에서 전달 받은 guidance 인스턴스와 동일한 인스턴스를 전역에 있는 더미데이터에서 찾아야 합니다. 그려려면 인스턴스 고유하고 유일한 id가 필요합니다. 일단 임시로 UUID를 넣어줍시다. (서버가 있다면 서버에서 guidance를 DB에 저장하면서 만들어 줄 것입니다.)
이렇게 id가 생기면 filter를 통해서 삭제 로직을 구현할 수 있습니다.
struct Guidance {
    let id = UUID()
    let student: Student
    let reason: GuidanceReason
}
func deleteGuidance(_ guidance: Guidance) {
let toDeleteID = guidance.id
dummyGuidances = dummyGuidances.filter { guidance in
guidance.id != toDeleteID
}
}결과
필터에 관계없이 전역에서 데이터가 삭제되서 필터를 바꾸어도 해당 인스턴스가 삭제된 것을 볼 수 있습니다.
마치며...
- 탭바 컨트롤러를 다루어 보았습니다. 나중에 선생님들마다 다른 권한을 부여해서 탭바에 뜨는 controller를 다르게 하는 것도 시도해보고 싶네요.
- MVVM 패턴을 적용해보면서 본격적으로 디자인 패턴을 공부해보고 싶은 생각이 듭니다.
