Code를 써보자!
저번 Core Data에 대한 포스팅에서는 Entity 설계를 Xcode로 하면서 아직 Core Data를 위한 코드를 하나도 작성한 적이 없는데요. 이번 포스팅에서는 코드와 함께 Core Data에 실제로 데이터를 저장해보겠습니다.
사전 준비
AppDelegate에 Core Data 코드 넣기
Core Data를 사용하기 위해서는 AppDelegate에 아래 코드를 입력해야 합니다. 간단히 설명하면 AppDelegate에 CoreData 영구 저장소와 영구 저장소에 저장하는 메소드를 정의하는 코드입니다.
중간 부분에 자신의 Data Model 파일명을 넣는 것을 잊지 마세요!
// MARK: - Core Data stack

lazy var persistentContainer: NSPersistentContainer = {
    /*
     The persistent container for the application. This implementation
     creates and returns a container, having loaded the store for the
     application to it. This property is optional since there are legitimate
     error conditions that could cause the creation of the store to fail.
    */
    let container = NSPersistentContainer(name: "school")
    container.loadPersistentStores(completionHandler: { (storeDescription, error) in
        if let error = error as NSError? {
            // Replace this implementation with code to handle the error appropriately.
            // fatalError() causes the application to generate a crash log and terminate. You should not use this function in a shipping application, although it may be useful during development.

            /*
             Typical reasons for an error here include:
             * The parent directory does not exist, cannot be created, or disallows writing.
             * The persistent store is not accessible, due to permissions or data protection when the device is locked.
             * The device is out of space.
             * The store could not be migrated to the current model version.
             Check the error message to determine what the actual problem was.
             */
            fatalError("Unresolved error \(error), \(error.userInfo)")
        }
    })
    return container
}()

// MARK: - Core Data Saving support

func saveContext () {
    let context = persistentContainer.viewContext
    if context.hasChanges {
        do {
            try context.save()
        } catch {
            // Replace this implementation with code to handle the error appropriately.
            // fatalError() causes the application to generate a crash log and terminate. You should not use this function in a shipping application, although it may be useful during development.
            let nserror = error as NSError
            fatalError("Unresolved error \(nserror), \(nserror.userInfo)")
        }
    }
}
UI 소개
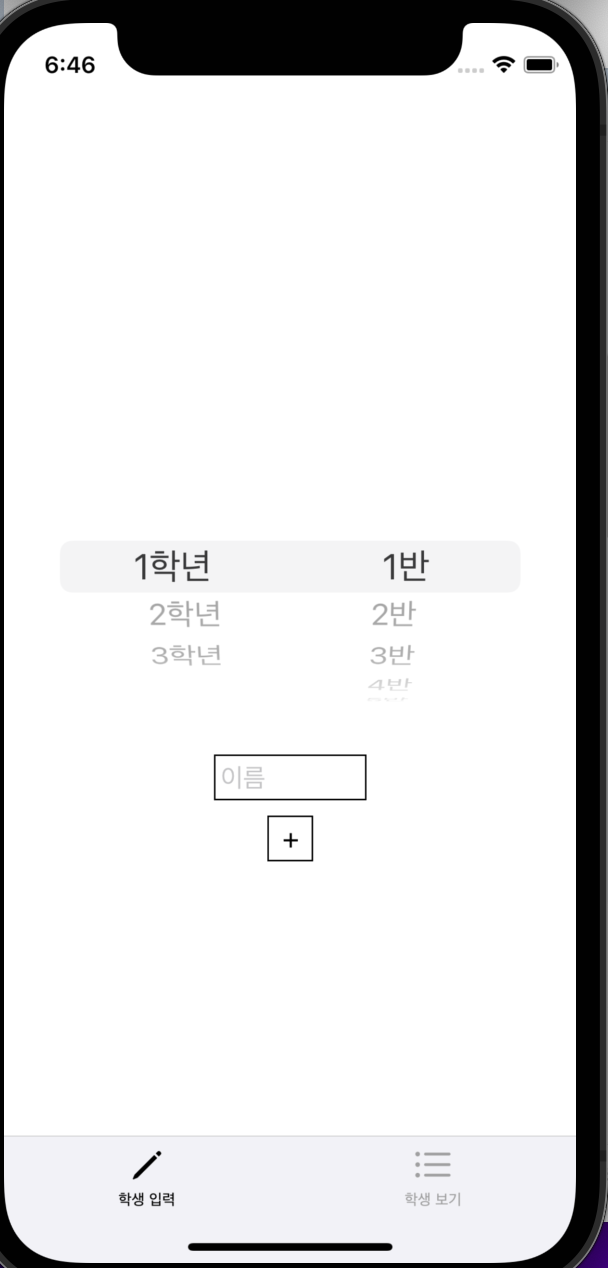
이제부터 만들 앱은 학생을 저장하고 조회할 수 있는 아주 간단한 앱입니다.
저장 화면
저장할 수 있는 화면에서는 학년, 반, 이름을 입력해서 + 버튼을 누르면 코어 데이터에 학생 데이터가 저장되도록 구현할 예정입니다.
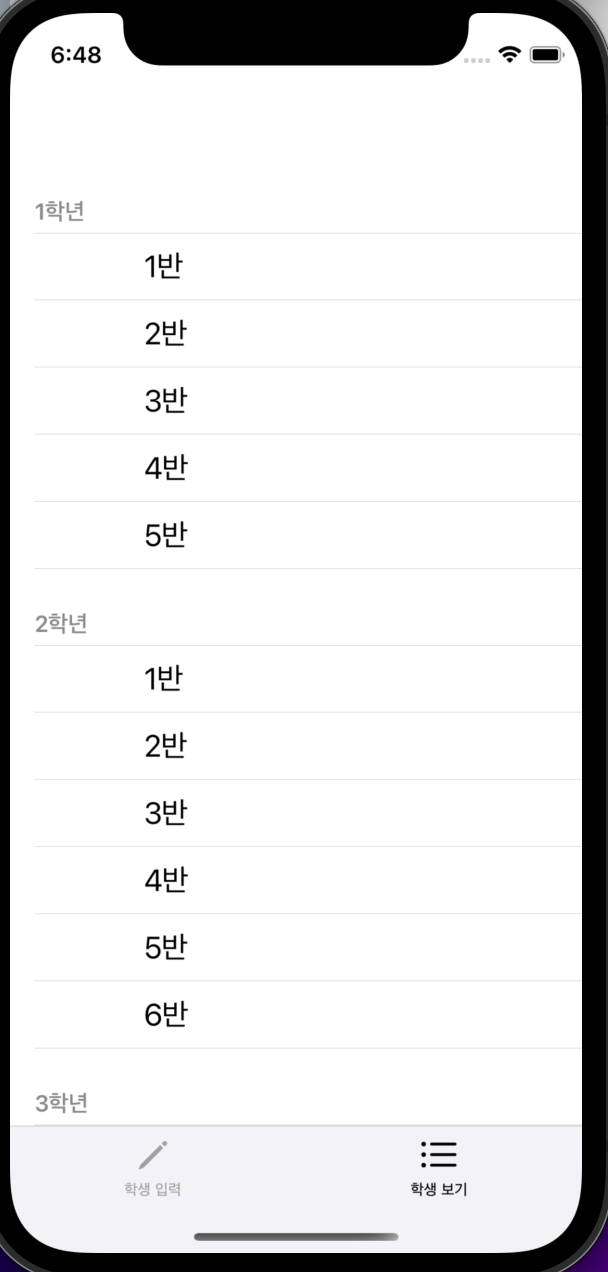
조회 화면
조회 화면에서는 테이블 뷰로 학년과 반을 보여주고 반을 터치하면 그 반에 소속된 학생들의 리스트를 보여주도록 하겠습니다.
Data Model 수정
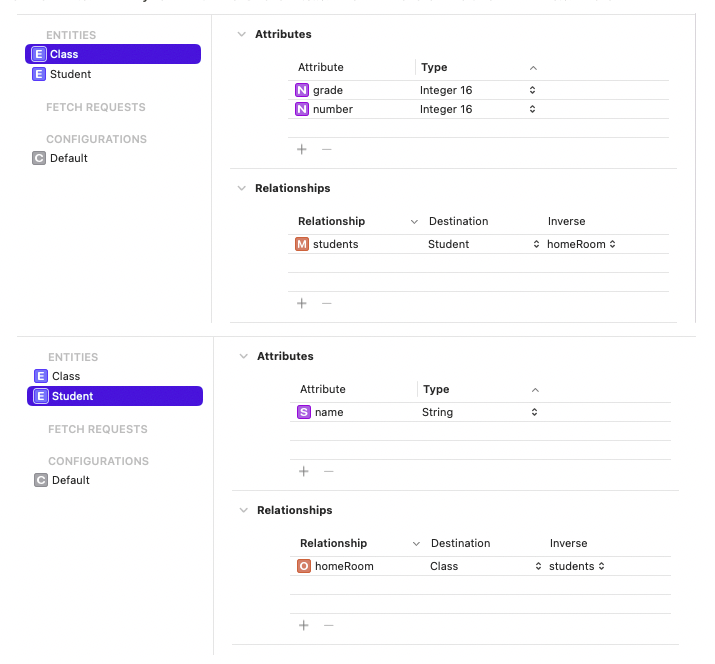
Entity 단순하게 수정
이번 앱을 만들기 위해서 최대한 간단하게 Data Model 수정을 해보겠습니다.
저번에 만들었던 Entity에는 선생님과 동아리도 있었는데 모두 삭제하고 학생과 반만 남기겠습니다.
Class 이름 수정
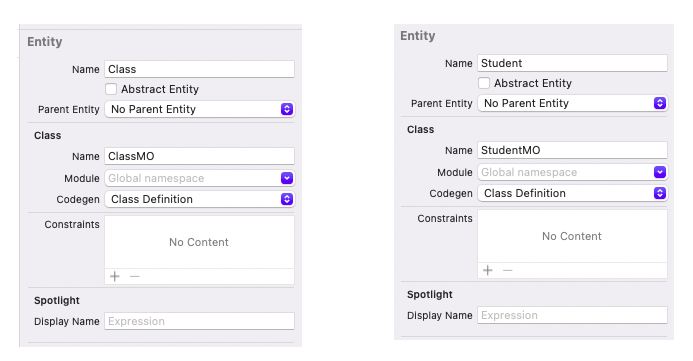
정의한 Entity는 코드에서는 클래스로 취급됩니다. 즉 데이터 1개가 클래스의 인스턴스가 되는 것입니다.
Class에 보면 Name이라는 항목이 있는데 해당 항목이 우리가 실제 인스턴스를 형성할 클래스의 이름을 정할 수 있습니다.
여기서는 Entity 이름에 MO를 붙이겠습니다. MO는 Managed Object의 약자입니다. 우리가 정의한 데이터 모델의 틀 (Managed Object Model)에 맞추어 생성된 실제 데이터를 의미합니다. 관계형 DB에서 Table의 Row과 유사한 개념입니다.
DAO 객체 만들기
DAO는 Data Access Object의 약자로 DB에 접근해서 데이터를 읽어오고 조작하는 것을 전담하는 객체를 의미합니다. 우리 앱의 경우 Core Data에 접근해 데이터를 읽어오는 역할을 할 것입니다.
해당 객체는 싱글톤으로 만들겠습니다.
그리고 property로 context 참조를 가지고 있도록 하겠습니다. Context는 데이터를 읽고, 생성하고 삭제할 수 있는 기능과 영구 저장소에서 데이터를 가져오거나 생성, 삭제한 내용을 영구 저장소에 반영하는 역할을 합니다. Core data의 가장 핵심적인 객체라고 볼 수 있습니다.
class SchoolDAO {

    static let shared = SchoolDAO()

    let context: NSManagedObjectContext = {
        let appDelegate = UIApplication.shared.delegate as! AppDelegate
        return appDelegate.persistentContainer.viewContext
    }()

}
마치며...
- 이제 Core Data를 쓰기 위한 준비가 다 되었습니다.
- 다음 포스팅에는 직접 API를 만들면서 Core Data가 데이터를 다루는 법을 알아보겠습니다!
