Bean의 정의와 특징
POJO와 Bean의 관계
Bean은 Spring 컨테이너가 생성하는 객체이자 순수 자바 객체(POJO)로 Java를 제외한 다른 어플리케이션에 의존하지 않고 Spring과 JVM만 있으면 객체를 생성 할 수 있다. → 이를 통해 Test Unit 기반 모듈 테스트가 가능
- Bean : 스프링 컨테이너가 관리하는 객체로, 의존성 주입과 생명주기 관리가 적용된 구성 단위
- POJO : 특정 프레임워크나 규약에 의존하지 않고 순수하게 작성된 자바 객체
Bean 메타정보의 구성
Bean 메타정보는 스프링 컨테이너가 Bean을 생성·관리하기 위해 보관하는 설정 정보 집합이다.
여기에는 Bean 이름, 클래스 타입, 스코프, 초기화/소멸 메서드, 의존성 정보 등이 포함된다.
Bean 메타정보를 기반으로 컨테이너는 Bean의 생명주기와 주입 과정을 제어한다.
메타 데이터 목록
- Bean ID/Name : Bean을 구분하기 위한 고유 식별자
- Bean Class : Bean으로 등록할 실제 클래스 경로 (예: com.example.MyService)
- Scope : Bean의 생명주기 범위 (singleton, prototype, request, session 등)
- Constructor Arguments : Bean 생성 시 주입할 생성자 인자
- Property Values : Setter를 통해 주입할 프로퍼티 값
- Autowire Mode : 의존성 주입 방식 (byType, byName, constructor 등)
- Init / Destroy Method : Bean 초기화 및 소멸 시 호출할 메서드
- Lazy Initialization : 필요 시점까지 Bean 생성을 지연할지 여부
- Depends-on : 생성 순서를 보장하기 위해 의존하는 다른 Bean
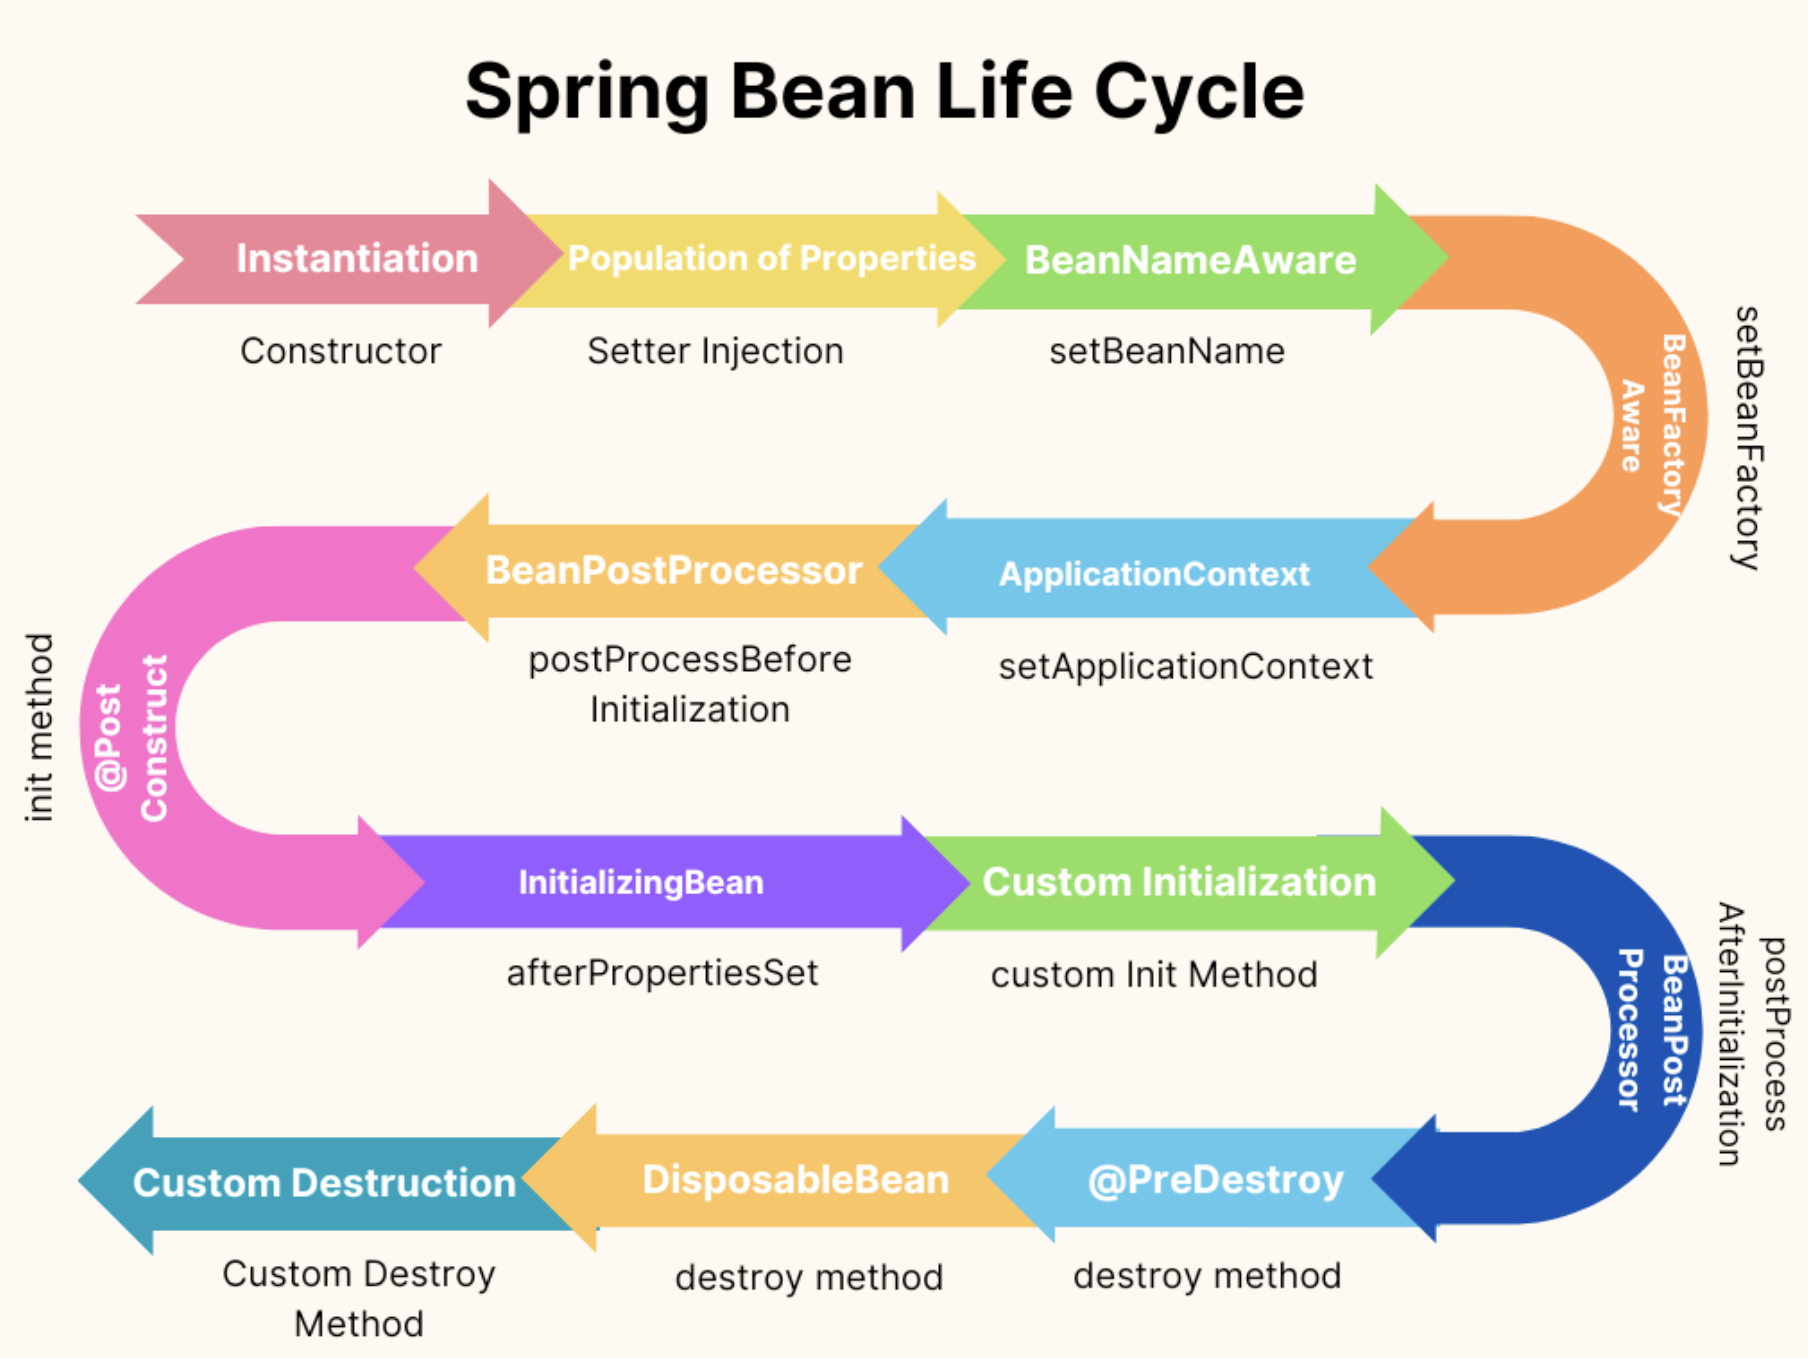
Spring IoC 컨테이너에서의 Bean 생명주기
- Bean Creation (빈 생성) : 컨테이너가 시작되며 Bean 인스턴스를 생성
- Dependency Injection (의존성 주입) : 생성자, 세터, 필드를 통해 의존 객체를 주입
- Bean Initialization (빈 초기화) : afterPropertiesSet(), init-method 등을 통해 초기화 로직 수행
- Bean Ready & Usage (빈 사용) : 애플리케이션에서 빈이 준비되어 사용됨
- Bean Destruction (빈 소멸) : 컨테이너 종료 시 destroy() 또는 destroy-method 호출로 정리
Spring Core (ApplicationContext, BeanFactory)
Spring Core
Spring Core Container는 Spring Framework의 핵심으로, 객체의 생성, 조립, 생명주기 관리(DI)를 담당하는 컨테이너이다. ApplicationContext와 BeanFactory를 통해 빈(Bean)들을 정의하고 관리하며, 애플리케이션에 필요한 의존성을 주입한다.
핵심 모듈에는 Beans, Core, Context, Expression Language가 포함되어 있다.
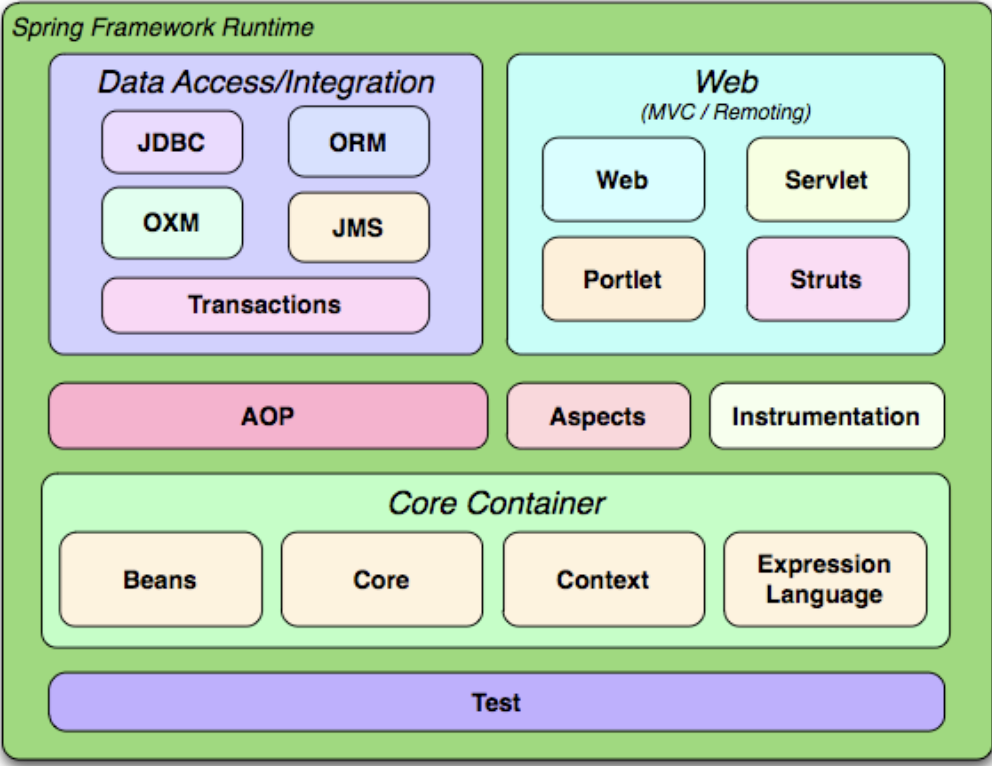
- Beans : Bean 정의, 생성, DI(의존성 주입) 등 객체 관리 핵심 기능 제공
- Core : IoC 컨테이너의 기반 구조와 유틸리티 기능 제공
- Context : 국제화, 이벤트 처리, 리소스 로딩 등 애플리케이션 컨텍스트 제공
- Expression Language (SpEL) : 런타임 시점에 객체 그래프를 탐색·조작할 수 있는 표현식 언어 제공
ApplicationContext와 BeanFactory
BeanFactory: 스프링의 기본 IoC 컨테이너로, Bean의 생성·관리·의존성 주입 기능을 제공하는 최소 단위 컨테이너
ApplicationContext: BeanFactory를 확장한 고급 컨테이너로, 국제화, 이벤트 발행, 리소스 로딩 등 애플리케이션
전반의 부가 기능을 제공
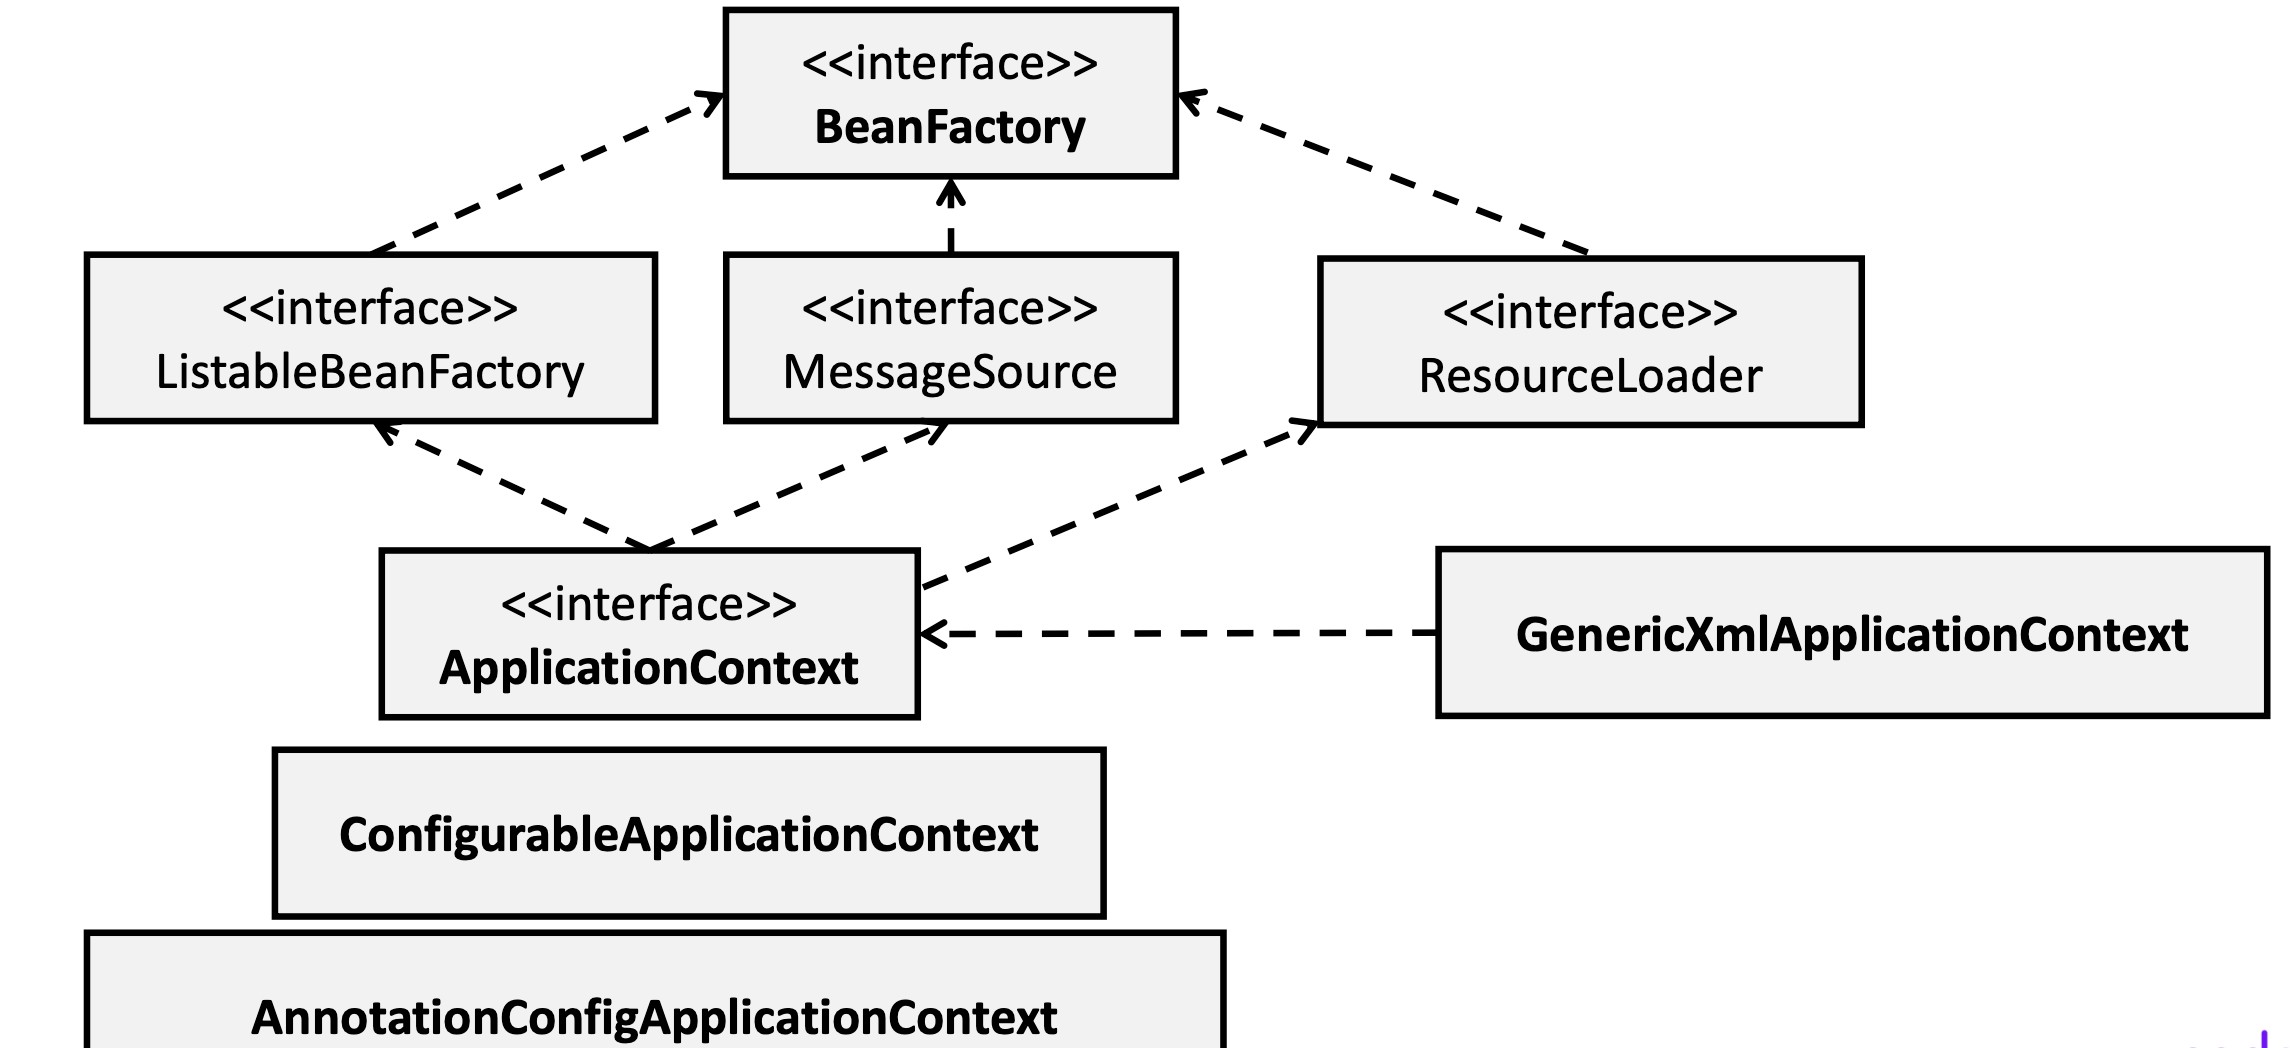
Spring Core 의존성 관계 상세 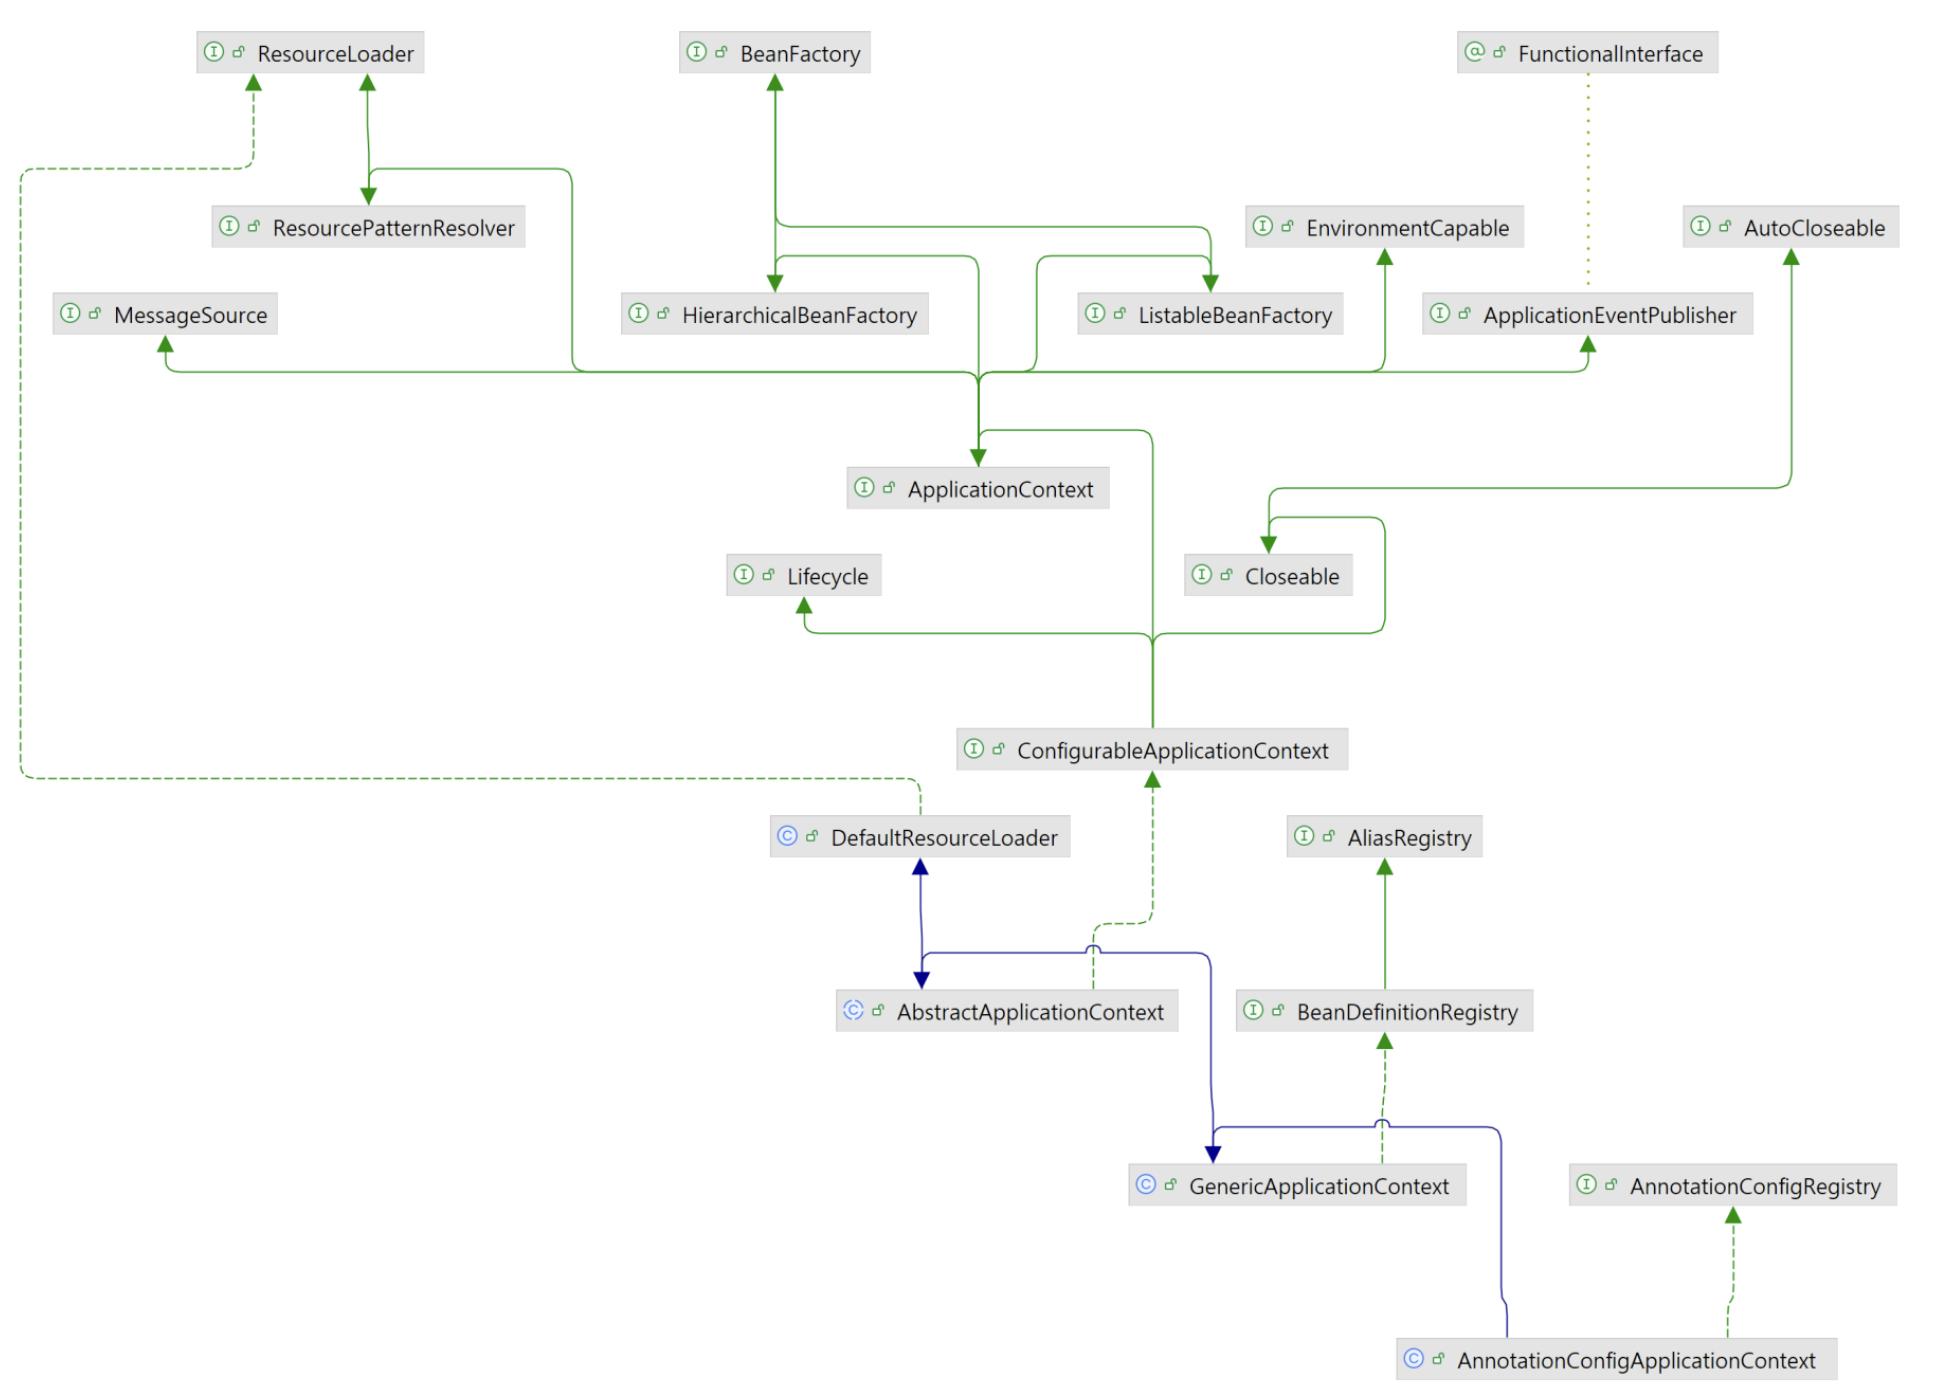
Spring IOC
Spring IoC
IoC (Inversion of Controller)는 프로그램을 구성하고 실행하는 점에서 필요한 흐름이나 객체에 대한 생성, 변경 등의 관리를 사용자가 아닌 프레임워크에서 관리하는 개념으로 사용자가 필요한 객체의 생성과 소멸까지의 모든 생명주기 관리를 Container라는 객체에서 직접 관리하여 사용자는 객체 설계만 집중 하도록 돕는 개념 (쉽게 말하면 코드에 new를 쓰지 않는 개념) → 프레임워크에서 메모리 관리를 수행함으로 개발자는 Memory Leak에 대한 부담이 줄어든다.
Spring IoC 컨테이너의 역할
- 객체의 생명주기와 의존성 관리
- POJO 객체의 생성, 초기화, 소멸 등의 처리 담장
- 개발자가 직접 객체를 생성할 수 있지만 해당 권한을 컨테이너에 맡김으로써 소스 코드 구현 시간 단축
Spring DI(의존성 주입)의 개념
DI(Dependency Injection)는 IoC 구현의 핵심 기술로 사용하는 객체를 Java 소스코드에서 직접 생성하여 만드는 것이 아니라 컨테이너가 Bean의 설정 정보를 통해 자동으로 해당 객체를 생성하고 연결하는 개념이다.
Spring Boot에선 어노테이션 위주의 의존성 주입을 선호하고, Spring Framework에선 XML로 기반의 의존성 주입을 선호 하였다.
DI의 장점
- 사용자는 비즈니스 로직에 집중하고 각종 설정 정보를 분리하여 관리 가능
- 각 객체 간의 종속 관계(결합도) 해소 가능
- 객체간의 종속 관계(결합도) : 한 클래스에서 필드 객체를 생성 할 때 발생하는 두 객체 간의 관계를 말하며, 각 객체 간의 내용이 수정 될 경우 영향을 미치는 정도를 나타냄
결과적으로 Java와 XML 소스코드 기법 둘 다 학습이 필요하여 Spring 프레임워크가 어렵고 복잡했고,
이를 해소하기 위해 Spring Boot에서는 XML 기반의 DI와 Bean을 사용하지 않고 구성하도록 변경되었다
Java 기반 Bean 설정
@Configuration과 @Bean
Spring Boot에서는 Framework에서 사용하던 XML 설정 방식을 사용하지 않고 새로운 설정(Config) 방식이 필요하였으며, 이를 위해 추가된 어노테이션이 @Configuration과 @Bean이다.
@Configuration 자바 클래스를 스프링 설정 클래스로 지정하는 어노테이션으로 XML 설정 없이 자바 코드로 Bean 등록
@Bean 메서드가 반환하는 객체를 스프링 Bean으로 등록 할 때 사용하는 어노테이션
// Class 기반
@Component
public class MyBean {
  private String name;
  private String id;
}

// @Configuration과 @Bean 기반
@Configuration
public class MyConfig {
  @Bean
  public Configurer myConfigurer() {
    Configurer configurer = new Configurer();
    configurer.setOption("value");
    return configurer;
  }
}
@Bean 이름 규칙
@Bean으로 생성된 Bean의 이름은 일반적으로 메서드의 이름이다. 이에 따라 동일 타입의 설정이라도 변수 명을 통해 식별이 가능하다.
@Configuration
public class MyConfig {
  // 첫 번째 Configurer
  @Bean
  public Configurer dbConfigurer() {
    Configurer configurer = new Configurer();
    configurer.setOption("DB 설정 값");
    return configurer;
}

// 두 번째 Configurer
  @Bean
  public Configurer apiConfigurer() {
    Configurer configurer = new Configurer();
    configurer.setOption("API 설정 값");
    return configurer;
  }
}

// 두 Configurer를 주입받아 사용하는 서비스
@Bean
public MyService myService(Configurer dbConfigurer, Configurer apiConfigurer) {
  return new MyServiceImpl(dbConfigurer,
apiConfigurer);
}
@Bean의 별칭 사용 방법
하나의 Bean을 하나 또는 여러 이름으로 등록해 다양한 이름으로 주입할 수 있게 하는 기능이다.
@Bean(name = "name1") 또는 @Bean(name = {"name1", "name2"})식으로 활용 가능하다.
컴포넌트 스캔(Component Scan)
컴포넌트 스캔은 스프링이 지정한 패키지를 탐색해 @Component, @Service, @Repository, @Controller 등이 붙은 클래스를 자동으로 Bean으로 등록하는 기능이다.
기본적으로 @SpringBootApplication 위치의 패키지와 하위 패키지를 스캔한다.
필요 시 @ComponentScan(basePackages = "…")으로 범위를 직접 지정 가능 하다.
스캔 대상 커스터마이징
- 스캔할 패키지 지정 하는 방법
@ComponentScan(basePackages = {"com.app.service", "com.common.lib"}) - 특정 클래스 기준으로 스캔 시작:
@ComponentScan(basePackageClasses = {MyMarkerClass.class})
→ 멀티모듈 구조에서 공통 모듈까지 스캔할 때 유용 - 필터링 옵션 활용
포함/제외 조건을 커스터마이징 가능@ComponentScan( basePackages = "com.app", includeFilters = @ComponentScan.Filter(type = FilterType.ANNOTATION, classes = CustomComponent.class), excludeFilters = @ComponentScan.Filter(type = FilterType.ASSIGNABLE_TYPE, classes = LegacyService.class) )
필터 타입
- ANNOTATION: 특정 어노테이션이 붙은 클래스만
- ASSIGNABLE_TYPE: 특정 클래스/인터페이스 타입만
- REGEX: 클래스명 패턴 매칭
- CUSTOM: 커스텀 필터 구현
Spring Boot의 Bean 자동 등록의 개념
@SpringBootApplication 내부의 @EnableAutoConfiguration이 클래스패스의 조건과 설정 파일을 참고하여 Bean을 자동 등록
또한 spring.factories에 정의된 자동구성 클래스(AutoConfiguration) 목록을 읽어 Bean 생성된다.
@SpringBootApplication의 동작 방식
포함 어노테이션 :
@ComponentScan 현재/하위 패키지를 탐색해 Bean 등록
@EnableAutoConfiguration 조건부 자동 구성 Bean 등록
@Configuration 설정 클래스 역할
자동 등록된 Bean의 종류
- 데이터소스(DataSource), JPA(EntityManagerFactory), 톰캣(TomcatServletWebServerFactory), 메시징, 보안 등
spring-boot-autoconfigure모듈에서 제공
자동 등록된 Bean 커스텀 하기
- 자동 등록된 Bean 덮어쓰기
- 동일 이름의 @Bean 재정의
@Bean public DataSource dataSource() { return new CustomDataSource(); }- → 같은 타입/이름 Bean이 자동 등록되어 있어도 수동 등록이 우선
- ※ 주의: 이름 충돌 시 의도치 않게 덮어쓸 수 있음
- 동일 이름의 @Bean 재정의
- 설정 속성을 통한 Bean 커스터마이징
- application.properties / yaml로 자동 등록 Bean의 설정 조정
- spring.datasource.url: jdbc:mysql://localhost:3306/mydb spring.datasource.username: user
- 자동 등록 제외시키기
- 특정 AutoConfiguration 제외
@SpringBootApplication(exclude = {DataSourceAutoConfiguration.class})
- application.yml로 제외:
spring:
  autoconfigure:
    exclude: org.springframework.boot.autoconfigure.jdbc.DataSourceAutoConfiguration
- 특정 AutoConfiguration 제외
의존관계 주입(DI)의 이해
Spring DI(의존관계주입)의 종류
생성자 주입(Constructor Injection) : 생성자를 통해 의존성을 주입해 불변성과 테스트 용이성을 확보하는 방식
세터 주입(Setter Injection) : 세터 메서드를 통해 의존성을 주입해 선택적·변경 가능한 의존성을 처리하는 방식
필드 주입(Field Injection) : 필드에 직접 의존성을 주입하는 간단한 방식이지만 테스트 유지보수에 제약이 있음
→ Spring에서는 5.0 부터 생성자 주입 방법을 권장함
DI - 생성자 주입 (Constructor Injection)
생성자 주입은 객체 생성 시 필요한 의존성을 생성자를 통해 주입하는 방식이다.
Spring Framework 5.x (2017~)부터 스프링 팀이 권장 DI를 생성자 주입으로 공식화하여 해당 방법을 권장한다. (lombok의 @RequiredArgsConstructor로 생략 가능하다.)
- 불변성 보장: 한 번 주입된 후 변경 불가 → final 키워드로 의존성을 명확하게 표현 가능
- 테스트 용이성: Mock 객체를 생성자에서 바로 넣을 수 있어 단위 테스트 편리
@Service
public class OrderService {
  private final OrderRepository repository;
  @Autowired // Spring 4.3부터 생략 가능
  public OrderService(OrderRepository repository) {
    this.repository = repository;
  }
}

@Service
@RequiredArgsConstructor
public class OrderService {
  private final OrderRepository repository;
}
DI - Setter 주입 (Setter Injection)
세터 주입은 세터 메서드를 통해 의존성을 주입하여 객체 생성 후에도 의존성을 변경할 수 있는 방식이다.
주로 선택적 의존성이나 런타임 시점의 변경 가능성이 있는 의존성에 활용된다.
@Service
public class OrderService {
  private OrderRepository repository;
  @Autowired
  public void setRepository(OrderRepository repository) {
    this.repository = repository;
  }
}
DI - 필드 주입 (Field Injection)
필드 주입은 필드에 직접 의존성을 주입하여 가장 간단하게 의존성을 설정하는 방식이다.
레거시에서 가장 많이 활용되던 방법이었으나 객체지향 원칙 위배와 불변성 보장되지 않는 이유로 현재는 권장되지 않는 방법이다. (사용은 가능하다.)
한계점
- 불변성/캡슐화 약화
- 테스트 시 Mock 주입이 어려움 (리플렉션 필요)
- 생성 시점에 의존성 확인 어려움 → 유지보수성 저하
@Service
public class OrderService {
  @Autowired
  private OrderRepository repository;
}
XML 기반 DI 방법
XML 기반 DI는 스프링 설정 파일(XML)에 Bean과 의존관계를 명시적으로 정의하여 컨테이너가 주입하도록 하는 방식이다. 코드 수정 없이 설정 파일만으로 의존성 변경이 가능해 유연하지만, 가독성과 유지보수가 어려워 최근에는 자바/어노테이션 기반 DI가 주로 사용된다.
→ Spring 레거시에서는 설정시 xml 사용의 선호도가 여전히 높다.
생성자 주입(Constructor Injection)
<beans>
	<bean id="orderRepository" class="com.example.OrderRepositoryImpl" />
	<bean id="orderService" class="com.example.OrderService">
		<constructor-arg ref="orderRepository" />
	</bean>
</beans>

<beans>
	<bean id="orderRepository" class="com.example.OrderRepositoryImpl" />
		<bean id="orderService" class="com.example.OrderService">
		<property name="repository" ref="orderRepository" />
	</bean>
</beans>
동일 타입 빈 처리 (@Primary, @Qualifier, Bean 이름 지정)
컨테이너에 동일 타입의 Bean이 여러 개 존재할 때 어떤 Bean을 주입할지 결정하는 방법을 제공한다.
@Primary, @Qualifier, Bean 이름 지정 등을 사용해 명시적으로 주입 대상을 선택할 수 있다.
-
@Qualifier를 통한 명시적 선택
- 특정 이름의 Bean을 지정해 주입
- 동일 타입 빈이 여러 개일 때 원하는 Bean을 직접 지정
@Service("kakaoPaymentService") public class KakaoPaymentService implements PaymentService { } @Service("naverPaymentService") public class NaverPaymentService implements PaymentService { } @Service public class OrderService { private final PaymentService paymentService; public OrderService(@Qualifier("kakaoPaymentService") PaymentService paymentService) { this.paymentService = paymentService; } } -
@Primary를 통한 기본값 지정
- 우선순위가 높은 기본 Bean 지정
- 동일 타입 빈 중 하나를 자동 주입 시 기본값으로 선택
@Primary @Service public class KakaoPaymentService implements PaymentService { } -
빈 이름을 통한 식별
- Bean 이름과 동일한 변수명/파라미터명으로 주입
@Autowired는이름과 타입을 모두 고려하므로, 이름이 Bean 이름과 같으면 우선 주입
@Autowired
private PaymentService kakaoPaymentService; // Bean 이름과 동일
Spring DI에서 다양한 의존관계 처리 방식
- 선택적 의존관계 처리
- 필요성: 특정 Bean이 없더라도 애플리케이션이 동작해야 할 때 사용
- 방법:
@Autowired(required = false)Bean이 없으면 주입 생략Optional<T>값이 없을 수도 있음을 명시@NullableBean이 없으면 null 주입
@Autowired(required = false)
private NotificationService notificationService;

@Autowired
public void setService(@Nullable NotificationService notificationService) { ... }

@Autowired
public void setService(Optional<NotificationService> notificationService) { ... }

public NotificationService(Optional<EmailService> emailService) {
  this.emailService = emailService.orElse(null);
}- 컬렉션/배열 의존관계
- 특징: 동일 타입 Bean이 여러 개일 때 List/Map/배열로 한 번에 주입
- 활용: 전략 패턴, 플러그인 구조 등 유연한 확장성 제공
@Autowired
private List<PaymentService> paymentServices;

@Autowired
private Map<String, PaymentService> paymentServiceMap;

public PaymentProcessor(List<PaymentService> paymentServices) {
  this.paymentServices = paymentServices;
}- 순환 참조 방지
- 문제: A → B, B → A처럼 서로를 의존할 때 순환 참조 에러 발생
- 해결 방법:
- 생성자 주입 대신 Setter 주입: 런타임 시점에 주입
- @Lazy 사용: 지연 로딩으로 Bean 초기화 순환 문제 완화
- 설계 리팩터링: 의존 구조 분리 (인터페이스 도입, 이벤트 발행 등)
@Autowired
@Lazy
private OrderService orderService;

private final CustomerService customerService;

// @Lazy로 지연 주입 → 순환 참조 시점 문제 해결
public OrderService(@Lazy CustomerService customerService) {
this.customerService = customerService;
}
Bean 스코프와 라이프사이클
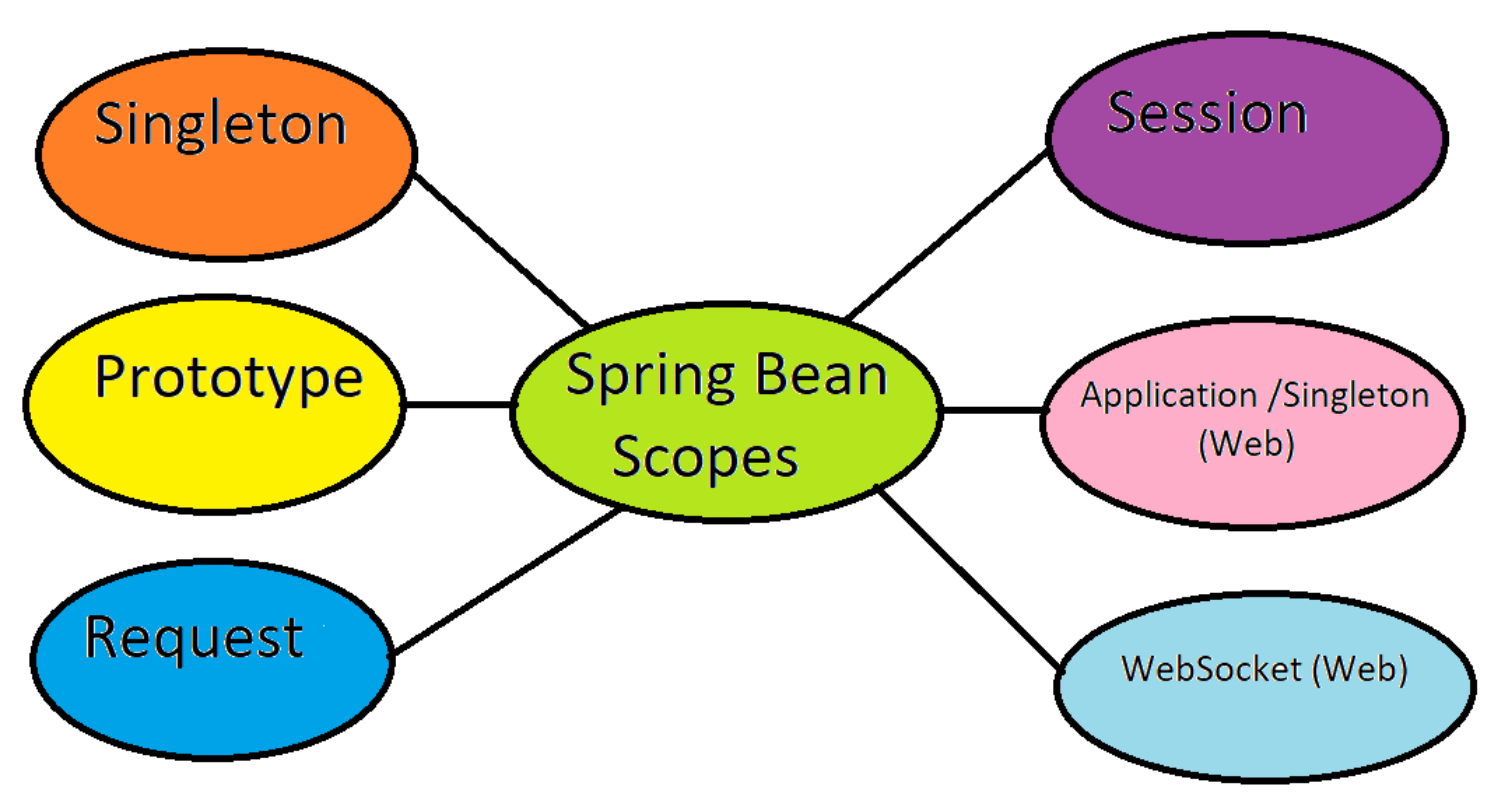
Bean 스코프의 이해
Bean 스코프는 스프링 컨테이너가 Bean 인스턴스를 생성하고 관리하는 범위와 생명주기를 의미한다.
기본은 싱글톤이지만, 필요에 따라 프로토타입, 요청(request), 세션(session), 애플리케이션(application) 등으로 지정할 수 있다.
싱글톤과 프로토타입
싱글톤 (singleton)
- 기본 스코프 (Spring default)
- 컨테이너 시작 시 1개 인스턴스 생성
- 모든 요청에서 동일 인스턴스 사용
- 예시:
@Scope("singleton")
프로토타입 (prototype)
- 요청할 때마다 새로운 인스턴스 생성
- 컨테이너는 생성까지만 관리, 소멸은 호출 측에서
- 예시:
@Scope("prototype")
웹 스코프(Web Scope)
웹 스코프는 Spring 웹 애플리케이션 환경에서 Bean의 생명주기를 HTTP 요청이나 세션 단위로 관리하는 스코프이다. 주요 스코프로는 request, session, application, websocket이 있으며, 각각 요청·세션·서블릿 컨텍스트·웹소켓 연결 단위로 Bean이 생성·소멸된다.
- request : HTTP 요청마다 새로 생성되어 요청 처리 완료 시 소멸되는 Bean 스코프.
- session : 사용자 세션마다 하나씩 유지되며 세션 종료 시 소멸되는 Bean 스코프.
- application : 서블릿 컨텍스트 전체에서 공유되며 애플리케이션 종료 시까지 유지되는 Bean 스코프.
- websocket : 웹소켓 연결 단위로 생성되어 연결이 끊어질 때 소멸되는 Bean 스코프.
@Scope(WebApplicationContext.SCOPE_REQUEST)
public class RequestBean {} // HTTP 요청마다 생성- SCOPE_REQUEST → 요청 단위
- SCOPE_SESSION → 세션 단위
- SCOPE_APPLICATION → 서블릿 컨텍스트 단위
- SCOPE_WEBSOCKET → 웹소켓 연결 단위
스코프 프록시 (Scope Proxy)
스코프 프록시는 싱글톤 Bean이 짧은 생명주기 Bean(Request, Session 등)을 안전하게 참조할 수 있도록 가짜 프록시 객체를 대신 주입하는 기능이다. 실제 요청 시점에 프록시가 진짜 스코프 Bean을 찾아 위임하여 생명주기 충돌 문제를 해결한다.
@Scope(value = WebApplicationContext.SCOPE_REQUEST, proxyMode = ScopedProxyMode.TARGET_CLASS)
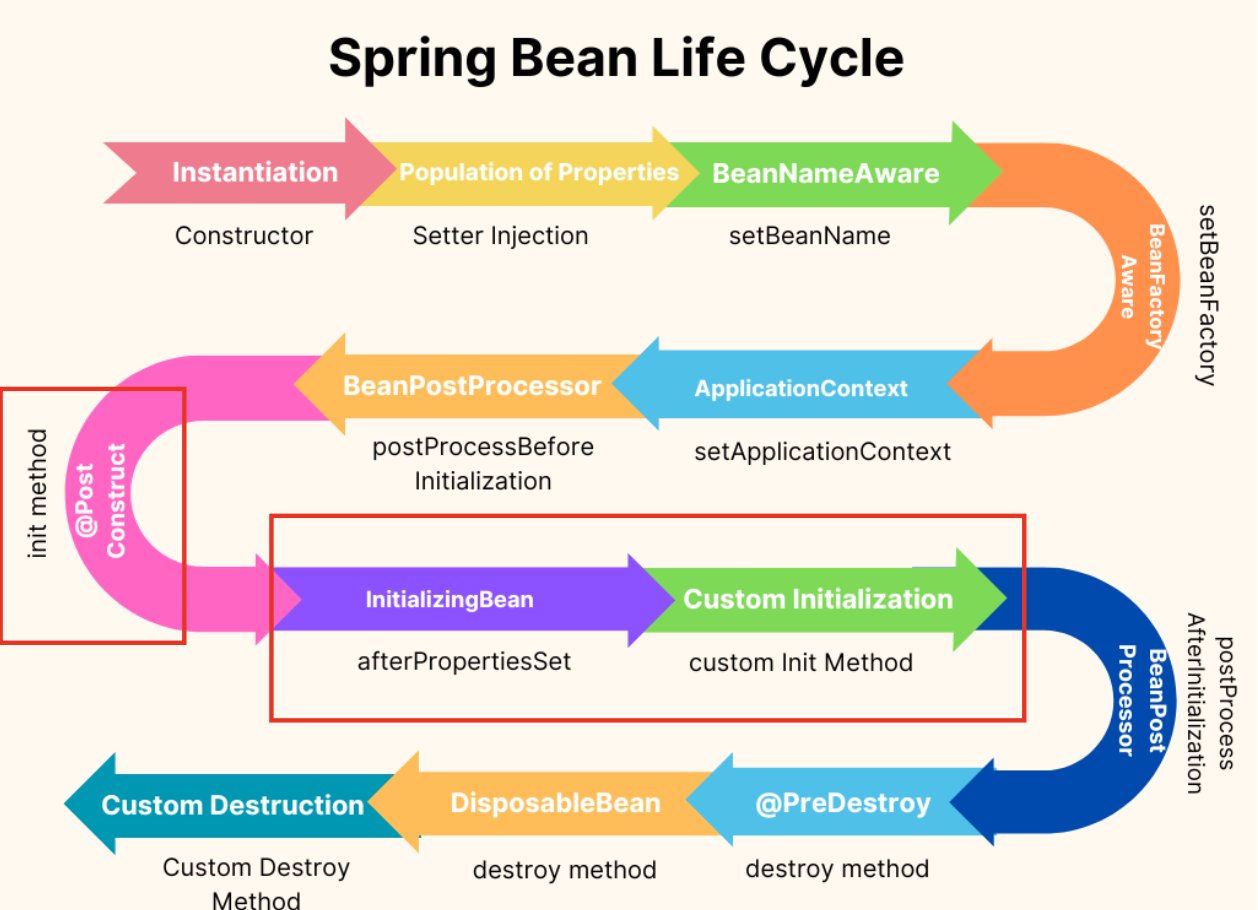
public class MyRequestBean { ... }Spring Bean 라이프사이클 콜백
라이프사이클 콜백은 Bean 생성 이후 초기화 작업과 컨테이너 종료 시 자원 해제를 수행할 수 있도록 제공되는 훅(hook)이다.
이를 위해 @PostConstruct, @PreDestroy, init/destroy 메서드, InitializingBean, DisposableBean 등의 방법을 활용한다.
@Component
public class MyService {
  @PostConstruct
  public void init() {
    System.out.println("초기화 로직");
  }

  @PreDestroy
  public void cleanup() {
    System.out.println("소멸 로직");
  }
}-
초기화와 소멸 메서드 (Custom init/destroy)
- 설정 파일 또는 @Bean에서 지정
@Bean(initMethod = "init", destroyMethod = "cleanup") public MyService myService() { return new MyService(); }- → Bean이 생성된 뒤 init() 호출, 컨테이너 종료 시 cleanup() 호출
-
@PostConstruct와 @PreDestroy
- JSR-250 표준 애노테이션, 가장 간단하고 권장되는 방법
@Component public class MyService { @PostConstruct public void init() { System.out.println("초기화 로직"); } @PreDestroy public void cleanup() { System.out.println("소멸 로직"); } } -
InitializingBean과 DisposableBean
- Spring 전용 인터페이스 구현
@Component
public class MyService implements InitializingBean, DisposableBean {
  @Override
  public void afterPropertiesSet() {
    System.out.println("초기화 로직");
  }

  @Override
  public void destroy() {
    System.out.println("소멸 로직");
  }
}
설정 정보 외부화
설정 정보 외부화의 필요성
설정 정보 외부화는 애플리케이션 코드와 설정을 분리해 환경 변화나 보안 요구에 대응 하는 방법으로 스프링은 이를 통해 환경별로 다른 값 적용, 민감 정보 보호, 운영 중 설정 변경을 가능하게 한다.
필요성
- 환경별 설정 분리: 개발· 테스트· 운영 환경마다 다른 설정을 프로필과 외부 파일로 관리
- 민감 정보 관리: 비밀번호·API 키 등 보안 정보를 코드에서 분리해 안전하게 저장
- 운영 환경에서의 설정 변경: 재배포 없이 외부 설정 변경만으로 애플리케이션 동작 조정
설정 정보 외부화 방법
-
@Value를 사용한 단순 값 주입
- 하드코딩된 상수나 단순 문자열, 숫자를 Bean에 직접 주입할 때 사용
@Value("Hello Spring") private String greeting; @Value("8080") private int port; -
프로퍼티 주입 (Properties / YAML)
- application.properties 또는 application.yml에 정의된 값을 읽어와 주입
app: name: MySpringApp version: 1.2.3 server: port: 8080 url: https://example.com@Value("${app.name}") private String appName; @Value("${app.version}") private String appVersion; @Value("${app.server.port}") private int serverPort; -
SpEL 활용 (Spring Expression Language)
- 표현식 언어를 이용해 Bean 값, 시스템 속성, 계산식 등을 동적으로 주입
// 간단한 수식 @Value("#{2 * 3}") private int number; // 시스템 속성 @Value("#{systemProperties['user.home']}") private String userHome; // 다른 Bean 값 참조 @Value("#{someBean.someProperty}") private String otherBeanValue; -
기본값 설정 (default)
- 프로퍼티가 존재하지 않을 때 기본값을 설정할 수 있다.
@Value("${app.description:Default App Description}")
private String description;

@Value("${server.port:8080}")
private int port;

@Value("${feature.enabled:false}")
private boolean featureEnabled;
@ConfigurationProperties 활용
@ConfigurationProperties는 application.yml 또는 properties에 정의된 값을 타입 안전한 POJO 클래스에 바인딩하는 어노테이션이다. 계층형 구조를 그대로 매핑할 수 있어 설정 관리가 편리하고, 리스트·맵 등 복잡한 타입도 지원한다. 주로 환경별 설정, 외부 서비스 연결 정보, 커스텀 애플리케이션 설정을 주입할 때 사용된다.
app:
  name: MySpringApp
  version: 1.0.0
  server:
    url: https://example.com
    timeout: 5000
  admins:
    - admin1@example.com
    - admin2@example.com
  metadata:
    region: korea
owner: admin-team@ConfigurationProperties(prefix = "app")
public class AppProperties {
@NotBlank
private String name;
private String version;
private Server server;
private List<String> admins;
private Map<String, String> metadata;
}@ConfigurationProperties- 유효성 검사 적용
@ConfigurationProperties 유효성 검사는 JSR-303 Bean Validation(@Valid, @Validated)을 적용해 설정 값의 형식·범위를 검증하는 기능이다. 이를 통해 잘못된 설정 값으로 애플리케이션이 실행되는 것을 방지할 수 있다.
@Component
@ConfigurationProperties(prefix = "app")
@Validated
public class AppProperties {
  @NotBlank
  private String name;

  @Min(1)
  private int timeout;
}
유효성 검사 적용 주요 어노테이션
| 어노테이션 | 적용 대상 | 설명 |
|---|---|---|
| @NotNull | 모든 타입 | null 불가 |
| @NotBlank | 문자열 | null· 공백 불가 |
| @Size(min,max) | 문자열, 컬렉션 | 길이 또는 크기 제한 |
| @Min(value) | 숫자 | 최소값 지정 |
| @Max(value) | 숫자 | 최대값 지정 |
| 문자열 | 이메일 형식 검사 | |
| @Pattern | 문자열 | 정규식 패턴 일치 여부 |
Environment 활용
Spring의 Environment는 애플리케이션 실행 환경 정보를 추상화해 프로퍼티 값, 시스템 환경 변수, 프로파일 등을 접근할 수 있는 인터페이스이다. 이를 통해 설정값 조회 및 활성화된 프로필 관리가 가능하다.
@Autowired
private Environment environment;

public void print() {
  System.out.println(environment.getProperty("app.name"));
}
PropertySource 이해
@PropertySource는 외부 프로퍼티 파일(.properties, .yml 등)을 Spring Environment에 추가해 애플리케이션에서 참조 가능하게 하는 어노테이션이다. 이를 통해 설정값을 코드와 분리해 관리할 수 있다.
또한 JVM 옵션 (-Dkey=value) OS 환경변수도 가져올수 있다.
@Configuration
@PropertySource("classpath:app.properties")
public class AppConfig {
  @Value("${app.name}")
  private String appName;

  @Value("${app.version}")
  private String appVersion;
}
프로퍼티 소스 추가
프로퍼티 소스 추가는 Spring의 Environment에 새로운 설정 소스를 등록해 애플리케이션에서 참조할 수 있게 하는 기능이다. 이를 통해 기본 application.properties/yml 외에도 외부 파일, OS 환경 변수, 커스텀 경로의 설정 파일 등을 동적으로 로드해 사용할 수 있다.
@Configuration
public class DynamicPropertyConfig {
  @Bean
  public static PropertySourcesPlaceholderConfigurer propertySourcesPlaceholderConfigurer() {
    PropertySourcesPlaceholderConfigurer configurer = new PropertySourcesPlaceholderConfigurer();
    configurer.setLocation(new FileSystemResource("/etc/app/config/custom.properties"));
    return configurer;
  }
}
프로퍼티 소스 우선순위 규칙
스프링은 여러 프로퍼티 소스를 계층적으로 관리하며, 뒤에 추가된 소스가 우선 시 된다.
- 커맨드라인 인자 (--key=value)
- Java 시스템 속성 (-Dkey=value)
- OS 환경 변수
- application-{profile}.yml/properties
- application.yml/properties
- @PropertySource 로드 파일
- 기본값 (코드 내부)
조건부 Bean 구성
@Profile 활용
@Profile는 동일한 애플리케이션 코드에서 개발(dev), 테스트(test), 운영(prod) 등 환경별로 다른 설정을 적용할 수 있게 해주는 기능이다. 주로 DB 연결 정보, 로그 레벨, 외부 API 주소 등 환경별로 달라지는 값을 분리해 관리할 때 사용한다. 이를 통해 코드 수정 없이 활성화된 프로필에 따라 적절한 Bean이나 설정이 자동 적용된다.
@Configuration
@Profile("common")
public class CommonConfig {
  @Bean
  public String commonBean() {
    return "공통 설정";
  }
}

@Configuration
@Profile("dev")
public class DevConfig {
  @Bean
  public String serverUrl() {
    return "http://localhost:8080";
  }
}
@Conditional 어노테이션
@Conditional은 특정 조건이 충족될 때만 Bean을 등록하거나 설정을 적용하도록 제어하는 어노테이션이다.
이를 통해 환경, 클래스 존재 여부, 커스텀 조건 등에 따라 유연하게 Bean 로딩을 제어할 수 있다.
@Configuration
@ConditionalOnProperty(name = "feature.enabled", havingValue = "true")
public class FeatureConfig {
  @Bean
  public FeatureService featureService() {
    return new FeatureService();
  }
}
커스텀 Condition 구현
커스텀 Condition 구현은 Condition 인터페이스를 직접 구현해 Bean 등록 여부를 결정하는 사용자 정의 조건을 만드는 방식이다. 이를 통해 환경 값, 시스템 상태, 비즈니스 로직 등 다양한 조건 기반으로 유연하게 Bean 로딩을 제어할 수 있다.
public class MyCustomCondition implements Condition {
  @Override
  public boolean matches(ConditionContext context, AnnotatedTypeMetadata metadata) {
    String env = context.getEnvironment().getProperty("app.env");
    return"local".equals(env);
  }
}

@Configuration
@Conditional(MyCustomCondition.class)
public class CustomConfig {
  @Bean
  public MyService myService() {
    return new MyService();
  }
}
자주 사용되는 Condition 클래스 (Spring Boot)
자주 사용되는 Condition 클래스는 Spring Boot에서 환경 조건에 따라 자동 구성 여부를 제어하는 클래스들이다. 예시로 @ConditionalOnProperty, @ConditionalOnClass, @ConditionalOnMissingBean 등이 있으며, 설정 값·클래스 존재 여부·빈 등록 여부 등에 따라 Bean 로딩을 제어한다.
- @ConditionalOnProperty : 프로퍼티 값이 특정 조건과 일치할 때
- @ConditionalOnClass / @ConditionalOnMissingClass : 클래스 존재 여부에 따라
- @ConditionalOnBean / @ConditionalOnMissingBean : 특정 Bean이 있거나 없을 때
- @ConditionalOnWebApplication / @ConditionalOnNotWebApplication : 웹 애플리케이션 여부
- @ConditionalOnExpression : SpEL 표현식으로 조건 지정
- @ConditionalOnJava : 특정 자바 버전 이상일 때
// application.yml 에서 feature.enabled=true 일 때만 이 Bean이 생성됨
@Bean
@ConditionalOnProperty(name = "feature.enabled", havingValue = false)
public MyService myService() {
  return new MyService();
}
Bean 순서 등록 제어
의존관계에 따른 자동 순서 결정 방법
의존관계에 따른 자동 순서는 Spring이 Bean 간의 의존성을 분석해 자동으로 적절한 초기화 순서를 보장한다.
Bean 생성 시 생성자/필드 주입 관계를 기반으로 의존 대상 Bean이 먼저 로드되도록 보장하며 이를 통해 명시적인 순서 지정 없이도 안전한 Bean 초기화가 가능해진다.
→ 즉, A가 B를 주입받으면 B가 먼저 생성하며, 개발자가 따로 순서를 지정할 필요 없음.
명시적 순서 제어
개발자가 직접 Bean 초기화나 실행 순서를 지정해 의존 관계와 무관하게 처리 우선순위를 부여도 가능하다.
이를 위해 @DependsOn, @Order, Ordered 인터페이스 등이 제공 Bean 로딩 및 실행 순서를 제어할 수 있다.
-
@DependsOn
- 특정 Bean이 먼저 생성되도록 강제
@Component @DependsOn("firstBean") public class SecondBean { public SecondBean() {} } -
@Order
- 컬렉션(List, Set) 형태로 Bean을 주입할 때 순서를 지정
@Component @Order(1) public class FirstHandler implements Handler {} @Component @Order(2) public class SecondHandler implements Handler {} -
Ordered 인터페이스
- 클래스 내부에서 순서를 동적으로 정의
@Component
public class DynamicHandler implements Handler, Ordered {
  @Override
  public int getOrder() {
    return 5; // 낮을수록 우선순위 높음 }
  }
}