자바 다시 시작
람다
함수형 프로그래밍 (functional programming) 이란 함수를 정의하고 이 함수를 데이터 처리부로 보내 데이터를 처리하는 기법을 말한다. 데이터 처리부는 데이터만 가지고 있을 뿐, 처리 방법이 정해져 있지 않아 외부에서 제공된 함수에 의존한다.
자바는 함수형 프로그래밍을 위해 Java8부터 람다식 (Lambda Expression) 을 지원한다. 람다식은 데이터 처리부에 제공되는 함수 역할을 하는 매개변수를 가진 중괄호 블록이다. 데이터 처리부는 람다식을 받아 매개변수에 데이터를 대입하고 중괄호를 실행시켜 처리한다.
람다식 : (매개변수, ...) -> { 처리 내용 }함수형 인터페이스 (Functional Interface)
함수형 인터페이스 (Functional interface) 는 1개의 추상 메소드를 갖고 있는 인터페이스를 말한다. Single Abstract MEthod (SAM) 이라고 불리기도 한다.
함수형 인터페이스를 사용하는 이유는 자바의 람다식은 함수형 인터페이스로만 접근이 되기 때문.
참고 사이트
package com.tech.lambda1;

interface Bank{
	void save();
}

class Customer{
	public void deposit(Bank saveMoney) {
		saveMoney.save();
	}
}

public class LambdaTest1 {
	public static void main(String[] args) {
		Customer customer=new Customer();
//		람다식 사용 전 표현
		customer.deposit(new Bank() {
			@Override
			public void save() {
				System.out.println("1번 입금액 1000");
			}
		});
		System.out.println("=============");
//		람다식 사용 표현
		customer.deposit(() -> {
			System.out.println("1번 입금액 1000_람다식");
		});
	}
}
결과
1번 입금액 1000
=============
1번 입금액 1000_람다식
override 할 필요 없이 바로 출력문을 사용할 수 있다.
package com.tech.lambda2;

// 리턴 값이 있는 람다식

interface Bank{
	int save();
}

class Customer{
	public void deposit(Bank saveMoney) {
		int rMoney=saveMoney.save();
		System.out.println("money:"+rMoney);
	}
}

public class LambdaTest1 {
	public static void main(String[] args) {
		Customer customer=new Customer();
//		람다식 사용 전 표현
		customer.deposit(new Bank() {
			@Override
			public int save() {
				System.out.println("1번 입금액 1000");
				return 1000;
			}
		});
		System.out.println("=============");
//		람다식 사용 표현
		customer.deposit(() -> {
			System.out.println("1번 입금액 2000_람다식");
			return 2000;
		});
	}
}
결과
1번 입금액 1000
money:1000
=============
1번 입금액 2000_람다식
money:2000
return 값이 있는 람다식
package com.tech.lambda3;

// 매개변수가 있는 람다식

interface Bank{
	void save(int money);
}

class Customer{
	public void deposit(Bank saveMoney) {
		saveMoney.save(1000);

	}
}

public class LambdaTest1 {
	public static void main(String[] args) {
		Customer customer=new Customer();
//		람다식 사용 전 표현
		customer.deposit(new Bank() {
			@Override
			public void save(int money) {
				System.out.println("1번 입금액 "+money);
			}
		});
		System.out.println("=============");
//		람다식 사용 표현
		customer.deposit((int a) -> {
			System.out.println("1번 입금액 "+a+"_람다식");
		});
//		람다식 사용 표현 2
		customer.deposit((a) -> { // 타입 생략 가능
			System.out.println("1번 입금액 "+a+"_람다식");
		});
//		람다식 사용 표현 3
		customer.deposit(a -> { // 괄호 생략 가능, 매개변수가 둘 이상이면 괄호 생략 불가능
			System.out.println("1번 입금액 "+a+"_람다식");
		});
	}
}
결과
1번 입금액 1000
=============
1번 입금액 1000_람다식
1번 입금액 1000_람다식
1번 입금액 1000_람다식
매개변수가 있는 람다식
package com.tech.lambda4;

// 매개변수가 있는 람다식

interface Bank{
	void save(int bunho, int money);
}

class Customer{
	public void deposit(Bank saveMoney) {
		saveMoney.save(1, 1000);

	}
}

public class LambdaTest1 {
	public static void main(String[] args) {
		Customer customer=new Customer();
//		람다식 사용 전 표현
		customer.deposit(new Bank() {
			@Override
			public void save(int bunho, int money) {
				System.out.println(bunho+"번 입금액 "+money);
			}
		});
		System.out.println("=============");
//		람다식 사용 표현
		customer.deposit((int a, int b) -> {
			System.out.println(a+"번 입금액 "+b+"_람다식");
		});
//		람다식 사용 표현 2
		customer.deposit((a, b) -> { // 타입 생략 가능
			System.out.println(a+"번 입금액 "+b+"_람다식");
		});
	}
}
결과
1번 입금액 1000
=============
1번 입금액 1000_람다식
1번 입금액 1000_람다식
매개변수가 2개인 람다식
package com.tech.lambda6;

// 오버로딩된 인터페이스가 있을때의 람다식

interface Bank{
	void save(int bunho, int money);
}

interface Card{
	void save(String name, int money);
}

class Customer{
	public void deposit(Bank saveMoney) {
		saveMoney.save(1, 1000);
	}
	public void deposit(Card saveMoney) {
		saveMoney.save("hong1", 1000);
	}
}

public class LambdaTest1 {
	public static void main(String[] args) {
		Customer customer=new Customer();
//		람다식 사용 전 표현
		customer.deposit(new Bank() {
			@Override
			public void save(int bunho, int money) {
				System.out.println(bunho+"번 입금액 "+money);
			}
		});
		System.out.println("=============");
//		람다식 사용 표현 1
		customer.deposit((int bunho, int money) -> { // 타입 명시
			System.out.println(bunho+"번 입금액 "+money+"_람다식");
		});
//		람다식 사용 표현 2
		customer.deposit((String bunho, int money) -> { // 타입 명시
			System.out.println(bunho+"번 입금액 "+money+"_람다식");
		});
	}
}
결과
1번 입금액 1000
=============
1번 입금액 1000_람다식
hong1번 입금액 1000_람다식
오버로딩된 인터페이스가 있을때는 타입을 명시해줘야 한다.
package com.tech.lambda6_text;

interface Calculable{
	void calculate(int x, int y);
}

public class LambdaExample {
	public static void main(String[] args) {
//		람다식 사용 x
		LambdaExample lambdaExample=new LambdaExample();
		lambdaExample.action(new Calculable() {
			@Override
			public void calculate(int x, int y) {
				int x2=10;
				int y2=4;
				int result=x2+y2;
				System.out.println("result: "+result);
			}
		});
		System.out.println("============");
//		람다식 사용
		action((x,y)->{
			int result=x+y;
			System.out.println("result: "+result);
		});
		action((x,y)->{
			int result=x-y;
			System.out.println("result: "+result);
		});
	}
	public static void action(Calculable calculable) {
		int x=10;
		int y=4;
		calculable.calculate(x, y);
	}

}
결과
result: 14
============
result: 14
result: 6
람다식을 활용하면 코드가 훨씬 간결해지고, 클래스를 구현 할 필요가 없다.
싱글톤 패턴
애플리케이션 전체에서 단 한 개의 객체만 생성해서 사용하고 싶다면 싱글톤 (Singleton) 패턴을 적용할 수 있다. 싱글톤 패턴의 핵심은 생성자를 private 접근 제한해서 외부에서 new 연산자로 생성자를 호출할 수 없도록 막는 것이다.
package com.tech.gt001;

public class Singleton {

	private static Singleton singleton=new Singleton();

	private Singleton() {

	}

	public static Singleton getInstance() {
		return singleton;
	}

}
Singleton.java
package com.tech.gt001;

public class SingletonExample {
	public static void main(String[] args) {

//		Singleton obj1=new Singleton();
//		Singleton obj2=new Singleton();
//		접근제한자가 private 이기 때문에 오류가 난다.

		Singleton obj1=Singleton.getInstance();
		System.out.println("obj1 :"+obj1);
		Singleton obj2=Singleton.getInstance();
		System.out.println("obj2 :"+obj2);

		if(obj1==obj2) {
			System.out.println("같은 Singleton 객체입니다.");
		}else {
			System.out.println("다른 Singleton 객체입니다.");
		}
	}
}
SingletonExample.java
결과
obj1 :com.tech.gt001.Singleton@5594a1b5
obj2 :com.tech.gt001.Singleton@5594a1b5
같은 Singleton 객체입니다.
Linux DB
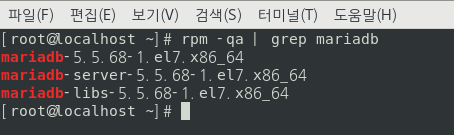
rpm - qa | grep mariadbyum -y install mariadb-server.x86_64 mariadb-clientsystemctl status mariadbsystemctl start mariadbsystemctl enable mariadbmysql_secure_installationmysql -u root -p111111mysql 접속 명령어, user:root / pw:111111
show databases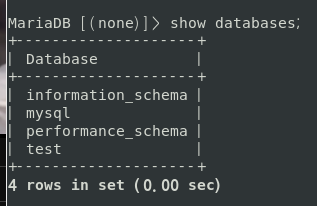
cd /home/다시 home으로 와서
wget https://dlm.mariadb.com/1965742/Connectors/java/connector-java-2.7.5/mariadb-java-client-2.7.5.jarweb 에서 mariadb~.jar 파일 가져오기
cd /usr/lib/lib 폴더로 이동해서
cp /home/mariadb-java-client-2.7.5.jar .maria~.jar 파일 복사하기
vi /etc/profileexport CLASSPATH=.:$JAVA_HOME/lib/mariadb-java-client-2.7.5.jarprofile 들어가서 export 추가
source /etc/profile수정 작업 적용
cd /home/centos/vitest/vitest 폴더로 이동
vi DBConn.java
import java.sql.Connection;
import java.sql.DriverManager;
import java.sql.PreparedStatement;
import java.sql.ResultSet;
import java.sql.SQLException;
public class DBConn {
public static void main(String[] args) {
final String driver = "org.mariadb.jdbc.Driver";
final String DB_IP = "localhost";
final String DB_PORT = "3306";
final String DB_NAME = "test";
final String DB_URL =
"jdbc:mariadb://" + DB_IP + ":" + DB_PORT + "/" + DB_NAME;
Connection conn = null;
PreparedStatement pstmt = null;
ResultSet rs = null;
try {
Class.forName(driver);
conn = DriverManager.getConnection(DB_URL, "root", "111111");
if (conn != null) {
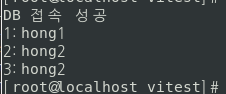
System.out.println("DB 접속 성공");
}
} catch (ClassNotFoundException e) {
System.out.println("드라이버 로드 실패");
e.printStackTrace();
} catch (SQLException e) {
System.out.println("DB 접속 실패");
e.printStackTrace();
}
try {
String sql = "select * from sample";
pstmt = conn.prepareStatement(sql);
rs = pstmt.executeQuery();
int id= 0;
String name = null;
while (rs.next()) {
id= rs.getInt(1);
name = rs.getString(2);
System.out.println(id+":"+name);
}
} catch (SQLException e) {
System.out.println("error: " + e);
} finally {
try {
if (rs != null) {
rs.close();
}
if (pstmt != null) {
pstmt.close();
}
if (conn != null && !conn.isClosed()) {
conn.close();
}
} catch (SQLException e) {
e.printStackTrace();
}
}
}
}DBConn.java
db 연결 클래스 생성
javac DBConn.javaDBConn.java 컴파일
java DBConn컴파일한 class 파일 실행