Revoke
Revoke : 권한 제거
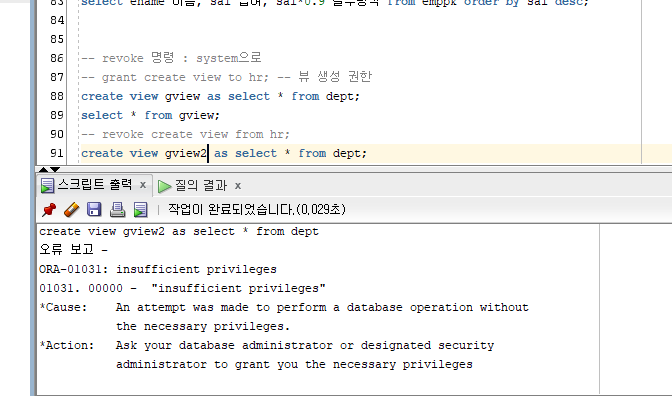
hr 의 권한을 revoke 시켜서 view 를 만들 수 없다.
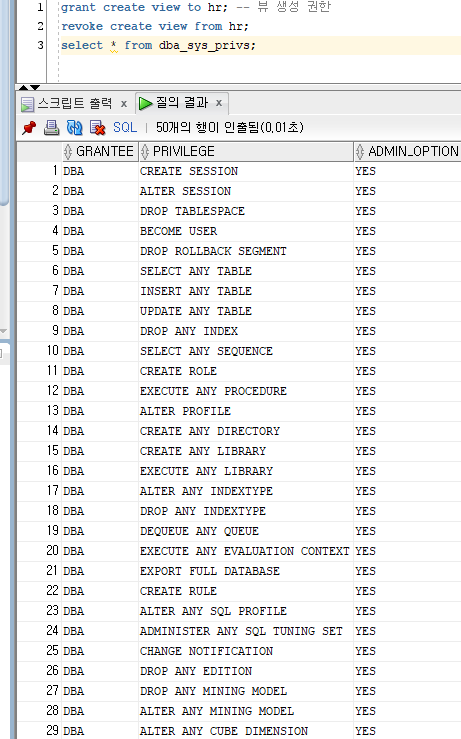
권한 목록
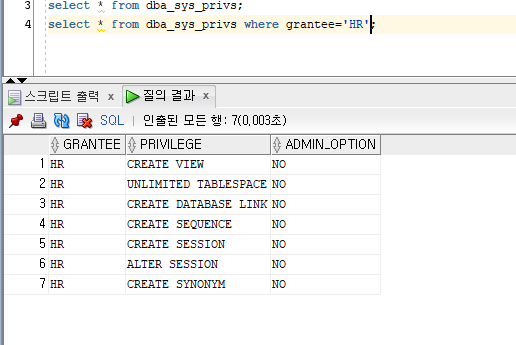
HR 의 권한 목록
body{
    background-color: yellow;
    font-family: Impact, Haettenschweiler, 'Arial Narrow Bold', sans-serif;
    color: #333;
}
h1{
    border-top: 5px solid red;
}
p.first{
    color: green;
}
p.second{
    color: blue;
}
em{
    color: red;
}
coffee.css
<!DOCTYPE html>
<html lang="en">
<head>
<meta charset="UTF-8">
<meta name="viewport" content="width=device-width, initial-scale=1.0">
<title>Document</title>
<link rel="stylesheet" href="../css/coffee.css">
</head>
<body>
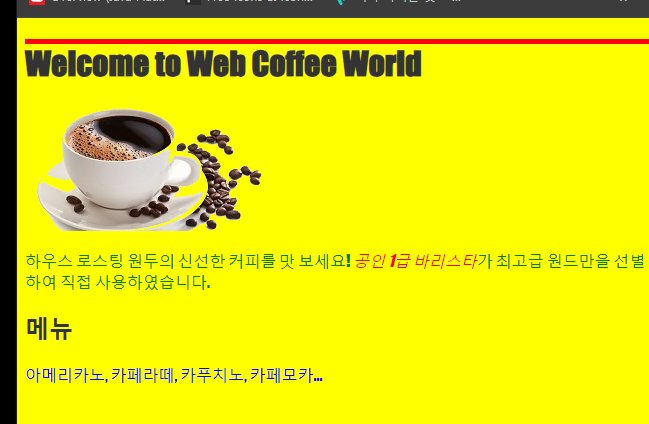
<h1>Welcome to Web Coffee World</h1>
<img src="../img/coffee2.png" alt="coffee2">
<p class="first">
하우스 로스팅 원두의 신선한 커피를 맛 보세요!
<em>공인 1급 바리스타</em>가
최고급 원드만을 선별하여 직접 사용하였습니다.
</p>
<h2>메뉴</h2>
<p class="second">
아메리카노, 카페라떼, 카푸치노, 카페모카...
</p>
</body>
</html>coffee.html
Div
div : layer 의 개념
<!DOCTYPE html>
<html lang="en">
<head>
    <meta charset="UTF-8">
    <meta name="viewport" content="width=device-width, initial-scale=1.0">
    <title>Document</title>
</head>
<body>
    <style>
        body{
            background-color: green;
        }
        div{
            width: 500px;
            height: 150px;
            border: 30px solid transparent;
            border-image: url(border.png) 30 30 round;
        }
    </style>
    <!-- 레이어 개념 -->
    <div>이미지로 경계선을 만들다</div>
</body>
</html>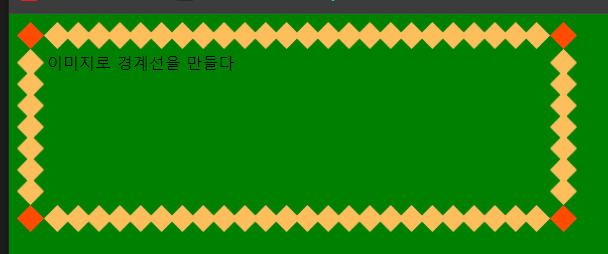
<!DOCTYPE html>
<html lang="en">
<head>
    <meta charset="UTF-8">
    <meta name="viewport" content="width=device-width, initial-scale=1.0">
    <title>Document</title>
</head>
<body>
    <style>
        div{
            width: 150px;
            border: 2px solid red;
            border-radius: 5px;
        }
    </style>
    <div>보더 라운드 적용하기</div>
</body>
</html>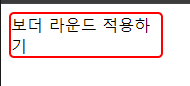
<!DOCTYPE html>
<html lang="en">
<head>
    <meta charset="UTF-8">
    <meta name="viewport" content="width=device-width, initial-scale=1.0">
    <title>Document</title>
    <style>
        div{
            width: 300px;
            height: 50px;
            background-color: green;
            box-shadow: 20px 10px 5px #666;
        }
    </style>
</head>
<body>
    <div></div>
</body>
</html>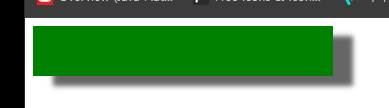
<!DOCTYPE html>
<html lang="en">
<head>
    <meta charset="UTF-8">
    <meta name="viewport" content="width=device-width, initial-scale=1.0">
    <title>Document</title>
</head>
<body>
    <p style="border-style:none ;">none</p>
    <p style="border-style:dotted ;">dotted</p>
    <p style="border-style:dashed ;">dashed</p>
    <p style="border-style:solid ;">solid</p>
    <p style="border-style:double ;">double</p>
    <p style="border-style:groove ;">groove</p>
    <p style="border-style:ridge ;">ridge</p>
    <p style="border-style:inset ;">inset</p>
    <p style="border-style:outset ;">outset</p>
</body>
</html>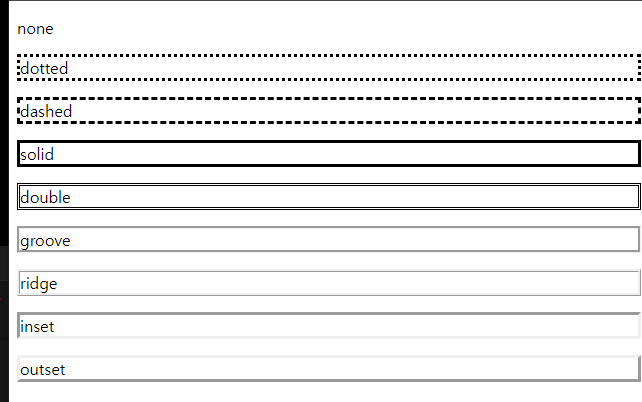
<!DOCTYPE html>
<html lang="en">
<head>
    <meta charset="UTF-8">
    <meta name="viewport" content="width=device-width, initial-scale=1.0">
    <title>Document</title>
</head>
<body>
    <style>
        p.thick{
            border-style: solid;
            border-width: thick;
            border-color: green;
        }
        p.medium{
            border-style: solid;
            border-width: medium;
            border-color: red;
        }
        p.thin{
            border-style: solid;
            border-width: thin;
            border-color: blue;
        }
    </style>
    <p class="thick">thick</p>
    <p class="medium">medium</p>
    <p class="thin">thin</p>
</body>
</html>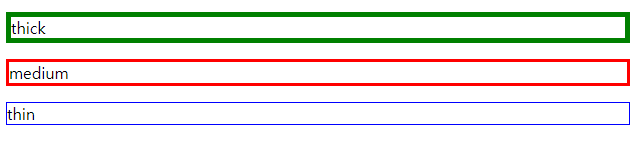
<!DOCTYPE html>
<html lang="en">
<head>
    <meta charset="UTF-8">
    <meta name="viewport" content="width=device-width, initial-scale=1.0">
    <title>Document</title>
</head>
<body>
    <style>
        h1{
            background: linear-gradient(090deg,red 0%, orange 50%, yellow 100%);
        }
        p.a{
            background-color: #0055ff;
        }
        p.d{
            font-family:Impact, Haettenschweiler, 'Arial Narrow Bold', sans-serif;
        }
    </style>
    <h1>Css Color Chart</h1>
    <p class="a">color #1</p>
    <p class="b">color #2</p>
    <p class="c">color #3</p>
    <p class="d">color #4</p>
</body>
</html>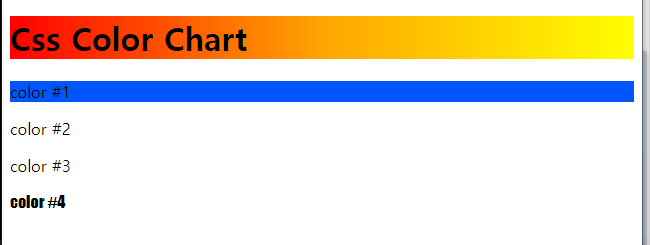
<!DOCTYPE html>
<html lang="en">
<head>
    <meta charset="UTF-8">
    <meta name="viewport" content="width=device-width, initial-scale=1.0">
    <title>Document</title>
</head>
<body>
    <style>
        .article{
            column-count: 2;
            column-gap: 50px;
            column-rule: 4px inset green;
        }
    </style>
    <div class="article">
        Graphical User Interface의 약자. 현대 운영 체제는 물론이고 온갖 게임이나 유틸리티 등에서도 모두 이용되고 있다. 기존의 직접 문자를 입력하는 인터페이스는 CLI(Command-line Interface) 또는 CUI(Character User Interface)라고 부른다. UNIX 콘솔이나 도스 시리즈가 CLI의 대표적인 예.

CLI와 GUI의 차이를 알기 쉽게 설명하면, CLI는 음식을 주문할 때 점원에게 말 또는 글로 주문하는 것이고, GUI는 점원에게 음식이 그려진 메뉴판에서 원하는 것을 가리키며 달라고 하는 것과 같다.

장점 역시 이와 같은데, GUI는 일단 눈에 확 띄어서 뭘 하는지 잘 보인다는 점과 쉽고 직관적인 조작 방식이 있다. 따라서 컴퓨터 언어를 몰라도 조작이 가능한데, 비유를 하면 외국 식당에 가서 주문을 넣을 때, 해당 지역의 언어를 구사할 줄 몰라도 단순히 메뉴판의 그림을 가리키는 것만으로도 주문이 가능한 것과 같다. 그밖에 CLI는 추상적인 명령어를 입력해야 했고, 명령을 입력해서 이게 잘 되나 안 되나 직접 눈으로 보는 것도 힘들었지만 GUI는 알기 쉽게 그래픽으로 다 표현해준다. 조작도 명령어 입력 이런 거 없고 그냥 마우스 커서 갖다 대서 클릭만 하면 다 된다.[1]
2. 역사[편집]
시초는 1958년 북미항공우주방위사령부의 SAGE 시스템이다. 다만 창이나 아이콘 등으로 프로그램을 실행하고 멀티태스킹을 하는 것 보다는 단일 프로그램을 제어하기 위한 물건이었다. 라이트펜으로 찍으면 이게 아군기인지 적(=소련)기인지 구분하는 기능을 가지고 있었는데, 천공 카드나 점퍼선 같은 흉악한 인터페이스 없이 그림만으로 군인이 컴퓨터와 소통할 수 있게 만들었다는 점만으로 나름 획기적이었다. 다만 당시로서는 군사 기밀이었기 때문에 민간용으로 사용되지는 않았다. 아무튼 이 시스템은 그 이후 1983년까지도 잘 써먹었다.

그 후 1963년 아이번 서덜랜드의 MIT 박사 논문인 "Sketchpad: A Man-machine Graphical Communications System"에서 스케치패드가 등장하는데, SAGE에 대해서는 좀 논란이 있지만 본격적인 최초의 GUI가 스케치패드라는 것에는 별 반론이 없다. 대충 콜로서스와 ENIAC의 관계라고 생각하면 비슷하다. 그리고 이를 계기로 서덜랜드는 국방부를 거쳐 여러 연구 프로젝트를 뛰게 되는데, 이때 키워낸 제자들의 위용이 좀 많이 무섭다. 몇 명 보자면...
앨런 케이 - 밑에 나오는 스타 워크스테이션의 개발자.
존 워노크 - 포스트스크립트 언어 개발. 어도비 창립자.
놀런 부슈널 - 퐁 개발, 아타리 창립자.
짐 클라크 - 실리콘 그래픽스 창립자.
에드윈 캐트멀 - 픽사 창립자.

그리고 테드 넬슨이 제안한 하이퍼링크의 개념과 GUI를 제어할 수 있는 효과적인 입력장치인 더글러스 엥겔바트의 마우스가 등장하고, 1973년에 와서는 GUI 운영체제를 탑재한 최초의 컴퓨터인 제록스 앨토(Alto) 컴퓨터가 등장하게 된다.
    </div>
</body>
</html>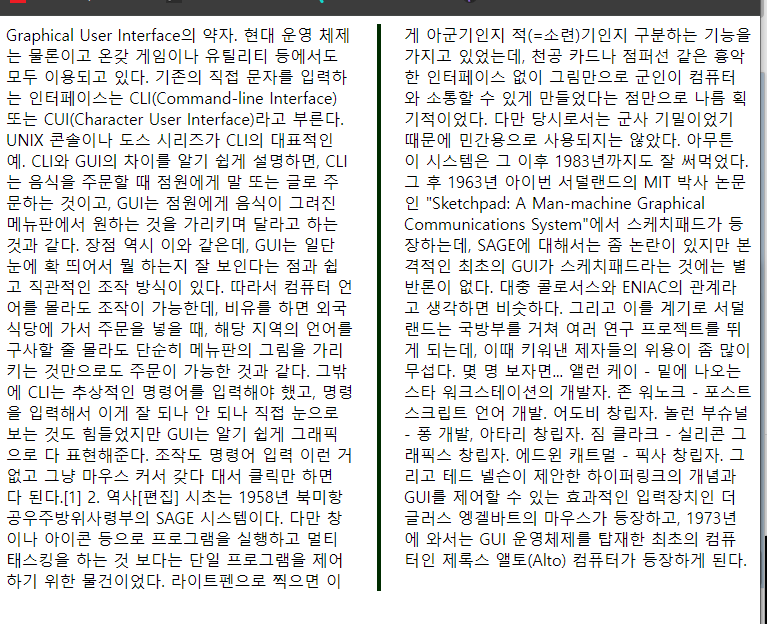
<!DOCTYPE html>
<html lang="en">
<head>
    <meta charset="UTF-8">
    <meta name="viewport" content="width=device-width, initial-scale=1.0">
    <title>Document</title>
</head>
<body>
    <style>
        div{
            border: 1px solid red;
            background-color: yellow;
            width: 100px;
            height: auto;
            resize: both;
            overflow: auto;
        }
    </style>
    <div>박스의 크기를 조절하세요.</div>
</body>
</html>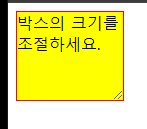
<!DOCTYPE html>
<html lang="en">
<head>
    <meta charset="UTF-8">
    <meta name="viewport" content="width=device-width, initial-scale=1.0">
    <title>Document</title>
</head>
<body>
    <style>
        body{
            font-size:medium;
        }
        p#t1{
            font-size: 2em;
            font-style: italic;
        }
        p#t2{
            font-size: 1.5em;
            font-style: italic;
            font-weight: bold;
        }
        p#t3{
            font-size: 2em;
            font-style: italic;
            font-weight: bold;
        }
    </style>
    <p id="t1">paragraph t1</p>
    <p id="t2">paragraph t2</p>
    <p id="t3">paragraph t3</p>
</body>
</html>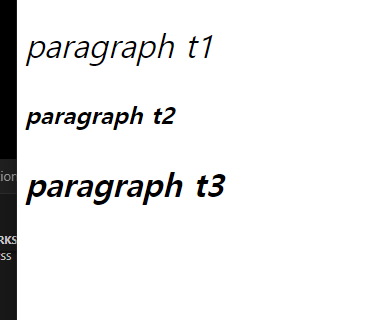
<!DOCTYPE html>
<html lang="en">
<head>
    <meta charset="UTF-8">
    <meta name="viewport" content="width=device-width, initial-scale=1.0">
    <title>Document</title>
</head>
<body>
    <style>
        h1{
            text-decoration: overline;
        }
        h2{
            text-decoration: line-through;
        }
        h3{
            text-decoration: underline;
        }
    </style>
    <h1>텍스트 장식의 예입니다.</h1>
    <h2>텍스트 장식의 예입니다.</h2>
    <h3>텍스트 장식의 예입니다.</h3>
</body>
</html>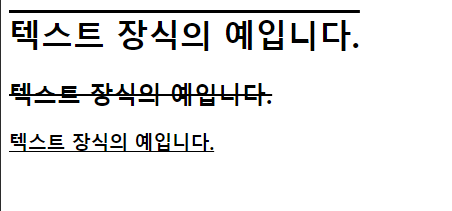
<!DOCTYPE html>
<html lang="en">
<head>
    <meta charset="UTF-8">
    <meta name="viewport" content="width=device-width, initial-scale=1.0">
    <title>Document</title>
</head>
<body>
    <style>
        p.upper{
            text-transform: uppercase;
        }
        p.lower{
            text-transform: lowercase;
        }
        p.capit{
            text-transform: capitalize;
        }
    </style>
    <p class="upper">text_transform</p>
    <p class="lower">text_transform</p>
    <p class="capit">text_transform</p>
</body>
</html>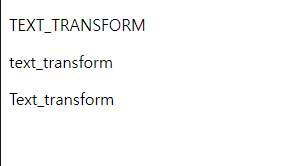
<!DOCTYPE html>
<html lang="en">
<head>
<meta charset="UTF-8">
<meta name="viewport" content="width=device-width, initial-scale=1.0">
<title>Document</title>
</head>
<body>
<style>
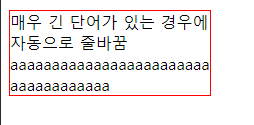
p.test{
width: 200px;
border: 1px solid red;
word-wrap: break-word;
}
</style>
<p class="test">매우 긴 단어가 있는 경우에 자동으로 줄바꿈
aaaaaaaaaaaaaaaaaaaaaaaaaaaaaaaaaaaa
</p>
</body>
</html>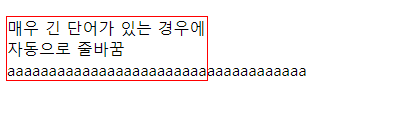
오늘 HTML 끝
db 미션 +
-- 미션 +
select * from emppk;
-- 41번 입사일로부터 90일이 지난 후의 사원이름, 입사일, 90일 후의 날, 급여를 출력하라.
select ename 사원이름, hiredate 입사일, hiredate+90 "90일 후의 날", sal 급여 from emppk;
-- 42번 입사일로 부터 6개월이 지난 후의 입사일, 6개월 후의 날짜, 급여를 출력하라.
select hiredate 입사일, add_months(hiredate,6), sal 급여 from emppk;
-- 43번 입사한 달 기준, 그 달의 근무일수를 계산하여 부서번호, 이름, 근무일수를 출력하라.
select deptno 부서번호, ename 이름, last_day(hiredate)-hiredate 근무일수 from emppk;
-- 44번 모든 사원의 입사일 기준 60일이 지난 후의 MONDAY 는 몇 년 , 몇 월, 몇 일 인가를 구하여
-- 이름, 입사일, MONDAY를 출력하라.
select ename 이름, hiredate 입사일, next_day(hiredate+60,'월') MONDAY from emppk;
-- 45번 입사일로부터 오늘까지의 일수를 구하여 이름, 입사일, 근무일수를 출력하라.
select ename 이름, hiredate 입사일, round(sysdate-hiredate) 근무일수 from emppk;
-- 46번 입사일을 1996년 5월 14일 의 형태로 이름, 입사일을 출력하라.
select ename 이름, to_char(hiredate,'yyyy"년 "mm"월 "dd"일"') 입사일 from emppk;
-- 47번 이름의 글자수가 6자 이상인 사람의 이름을 앞에서 3자리만 구하여 소문자로 이름만을 출력하라.
select lower(substr(ename,1,3)) from emppk where length(ename)>=6;
-- 48번 10번 부서 월급의 평균, 최고, 최저, 인원수를 구하여 출력하라.
select avg(sal) 평균, max(sal) 최고, min(sal) 최저, count(deptno) 인원수 from emppk where deptno=10;
-- 49번 각 부서별 급여의 평균, 최고, 최저, 인원수를 구하여 출력하라.
select deptno 부서번호, avg(sal) 평균, max(sal) 최고, min(sal) 최저, count(deptno) 인원수  from emppk group by deptno;
-- 50번 각 부서별 같은 업무를 하는 사람의 인원수를 구하여 부서번호, 업무명, 인원수를 출력하라.
select deptno 부서번호, job 업무명, count(job) 인원수 from emppk group by deptno, job order by deptno;
-- 51번 같은 업무를 하는 사람의 수가 4명 이상인 업무와 인원수를 출력하라.
select job 업무, count(job) from emppk group by job having count(job)>=4;
-- 52번 각 부서별 평균 월급, 전체 원급, 최고 원급, 최저 월급 을 구하여 평균 원급이 많은 순으로 출력하라.
select avg(sal) "평균 월급", sum(sal) "전체 월급", max(sal) "최고 월급", min(sal) "최저 월급" from emppk
group by deptno order by avg(sal) desc;
-- 53번 EMP와 DEPT TABLE 을 JOIN하여 부서번호, 부서명, 이름, 급여를 출력하라.
select e.deptno 부서번호, d.dname 부서명, e.ename 이름, e.sal 급여 from emppk e,dept d where e.deptno=d.deptno;
-- 54번 이름이 ALLEN인 사원의 부서명을 출력하라.
select d.dname 부서명 from emppk e,dept d where e.deptno=d.deptno and ename='ALLEN';
-- 55번 DEPT TABLE 에 있는 모든 부서를 출력하고, EMP  TABLE 에 있는 DATA와 JOIN하여
-- 모든 사원의 이름, 부서번호, 부서명, 급여를 출력하라.
select dname 부서 from dept;
select e.ename 이름, e.deptno 부서번호, d.dname 부서명, e.sal 급여 from emppk e, dept d where e.deptno=d.deptno;
개발자 준비의 준비준비중..