지난 시간 복습
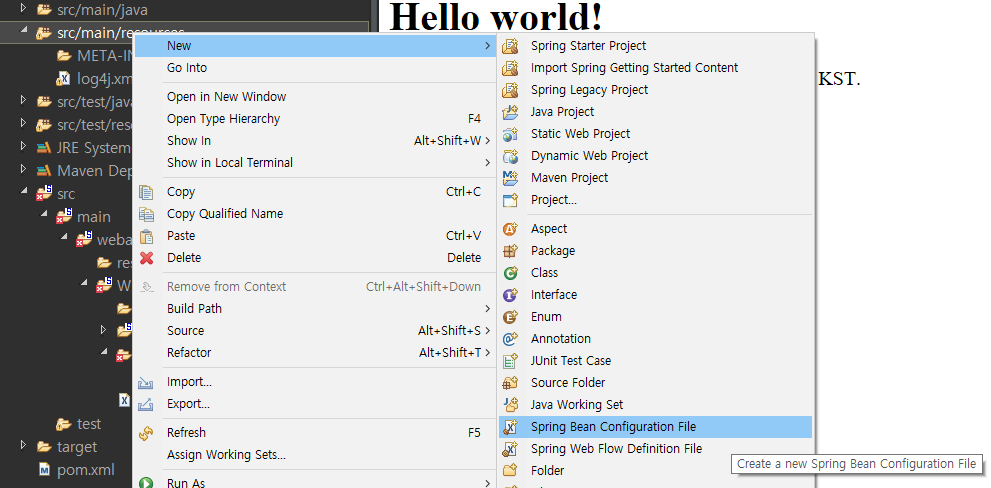
src/main/resources 우클릭 - new - spring bean definition file
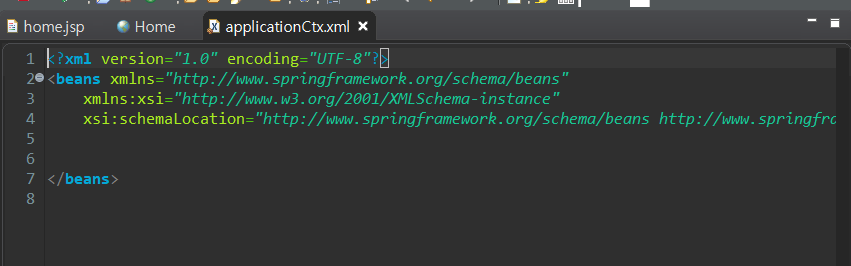
bean 파일 생성
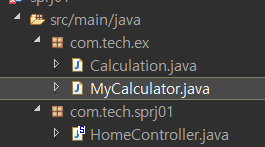
계산기 기능을 구현하기 위해 Calculation.java 와 MyCalculator.java 클래스를 ex 패키지에 생성

bean 객체 생성
다시 MyCacluator 클래스로 이동
calculation, firstNum, secondNum 필드 선언
각각 getter/setter 생성
빈 생성자 생성
add,sub,multi,div method 생성
Calculation 클래스에서 add/sub/multi/div method 생성
mainClass 클래스 생성
bean 파일 Context 루트 따기
(AbstractApplicationContext class 의 GenericXmlApplicationContext method 사용)
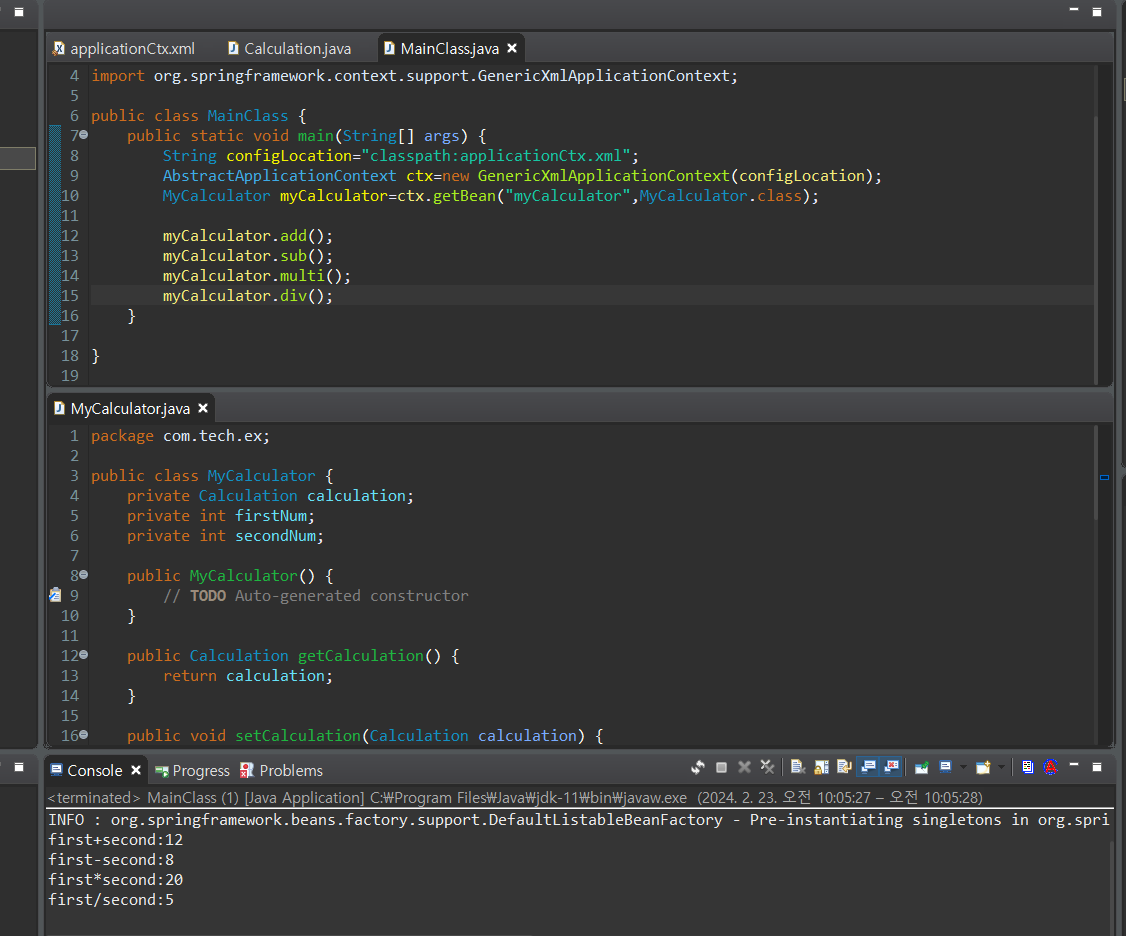
다시 getBean method 를 사용해서 myCalculator.class 에서 myCalculator 받아오기
실행
package com.tech.ex;

public class Calculation {
	public void add(int i, int j) {
		System.out.println("first+second:"+(i+j));
	}
	public void sub(int i, int j) {
		System.out.println("first-second:"+(i-j));
	}
	public void multi(int i, int j) {
		System.out.println("first*second:"+(i*j));
	}
	public void div(int i, int j) {
		System.out.println("first/second:"+(i/j));
	}

}
Calculation.java
package com.tech.ex;

public class MyCalculator {
	private Calculation calculation;
	private int firstNum;
	private int secondNum;

	public MyCalculator() {
		// TODO Auto-generated constructor
	}

	public Calculation getCalculation() {
		return calculation;
	}

	public void setCalculation(Calculation calculation) {
		this.calculation = calculation;
	}


	public int getFirstNum() {
		return firstNum;
	}

	public void setFirstNum(int firstNum) {
		this.firstNum = firstNum;
	}

	public int getSecondNum() {
		return secondNum;
	}

	public void setSecondNum(int secondNum) {
		this.secondNum = secondNum;
	}
	public void add() {
		calculation.add(firstNum,secondNum);

	}
	public void sub() {
		calculation.sub(firstNum,secondNum);

	}
	public void multi() {
		calculation.multi(firstNum,secondNum);

	}
	public void div() {
		calculation.div(firstNum,secondNum);

	}

}
MyCalculator.java
package com.tech.ex;

import org.springframework.context.support.AbstractApplicationContext;
import org.springframework.context.support.GenericXmlApplicationContext;

public class MainClass {
	public static void main(String[] args) {
		String configLocation="classpath:applicationCtx.xml";
		AbstractApplicationContext ctx=new GenericXmlApplicationContext(configLocation);
		MyCalculator myCalculator=ctx.getBean("myCalculator",MyCalculator.class);

		myCalculator.add();
		myCalculator.sub();
		myCalculator.multi();
		myCalculator.div();
	}

}
MainClass.java
<?xml version="1.0" encoding="UTF-8"?>
<beans xmlns="http://www.springframework.org/schema/beans"
	xmlns:xsi="http://www.w3.org/2001/XMLSchema-instance"
	xsi:schemaLocation="http://www.springframework.org/schema/beans http://www.springframework.org/schema/beans/spring-beans.xsd">

<!-- bean 객체 등록 -->
	<bean id="calculation" class="com.tech.ex.Calculation" />
	<bean id="myCalculator" class="com.tech.ex.MyCalculator">
		<property name="calculation">
			<ref bean="calculation" />
		</property>
		<property name="firstNum" value="10"/>
		<property name="secondNum" value="2"/>
	</bean>

</beans>
applicationCtx.xml
Run - java application
config file 을 만들어 활용할 예정
(xml 이 아닌 java 파일로 bean 객체를 만들 예정)
1차 오류 : CGLIB 가 필요하다고 함
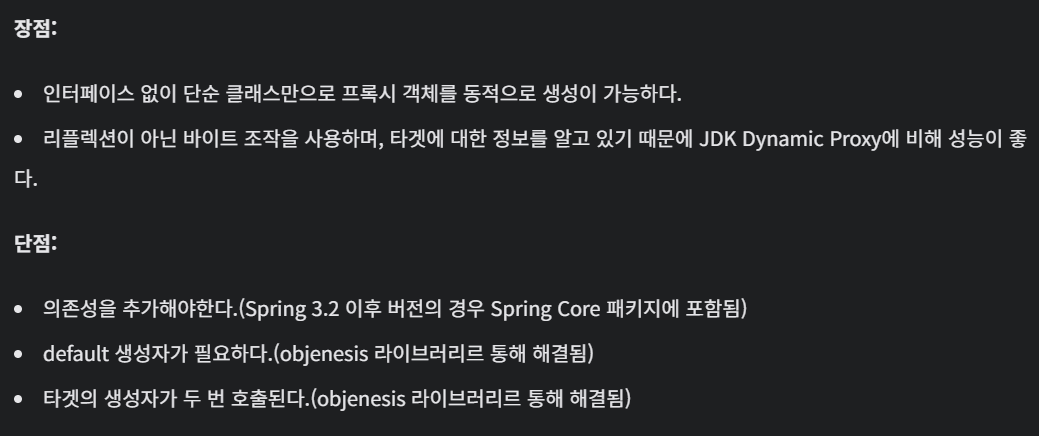
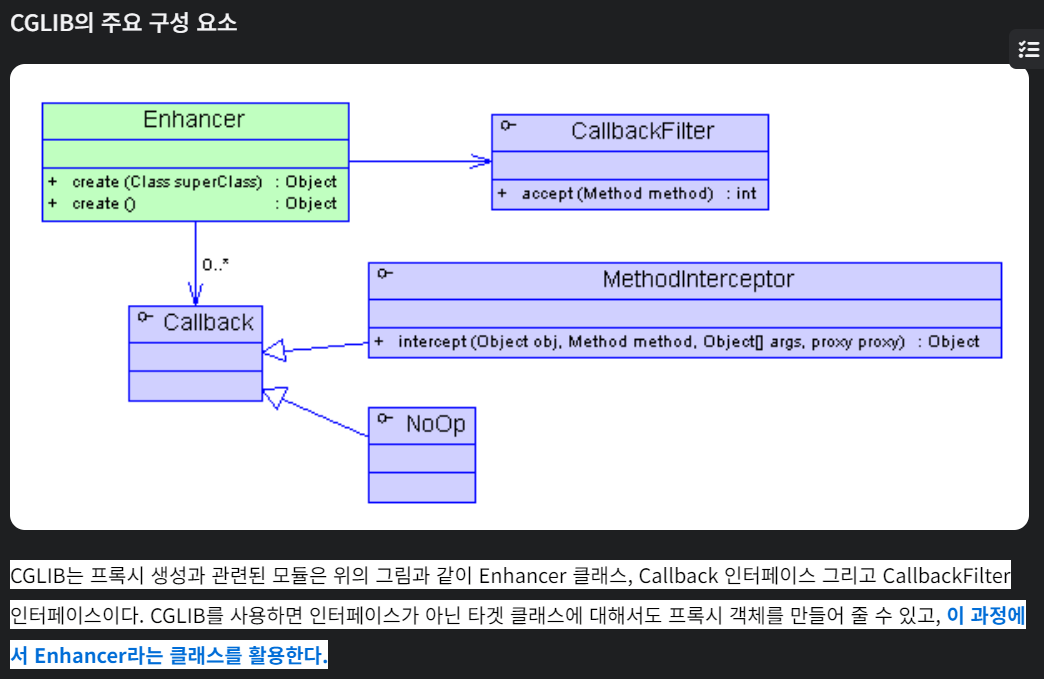
출처 : https://memodayoungee.tistory.com/151
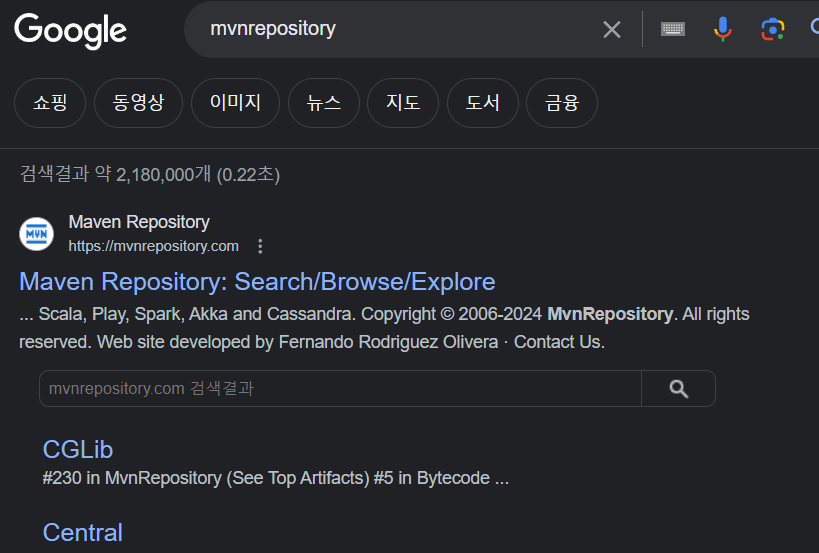
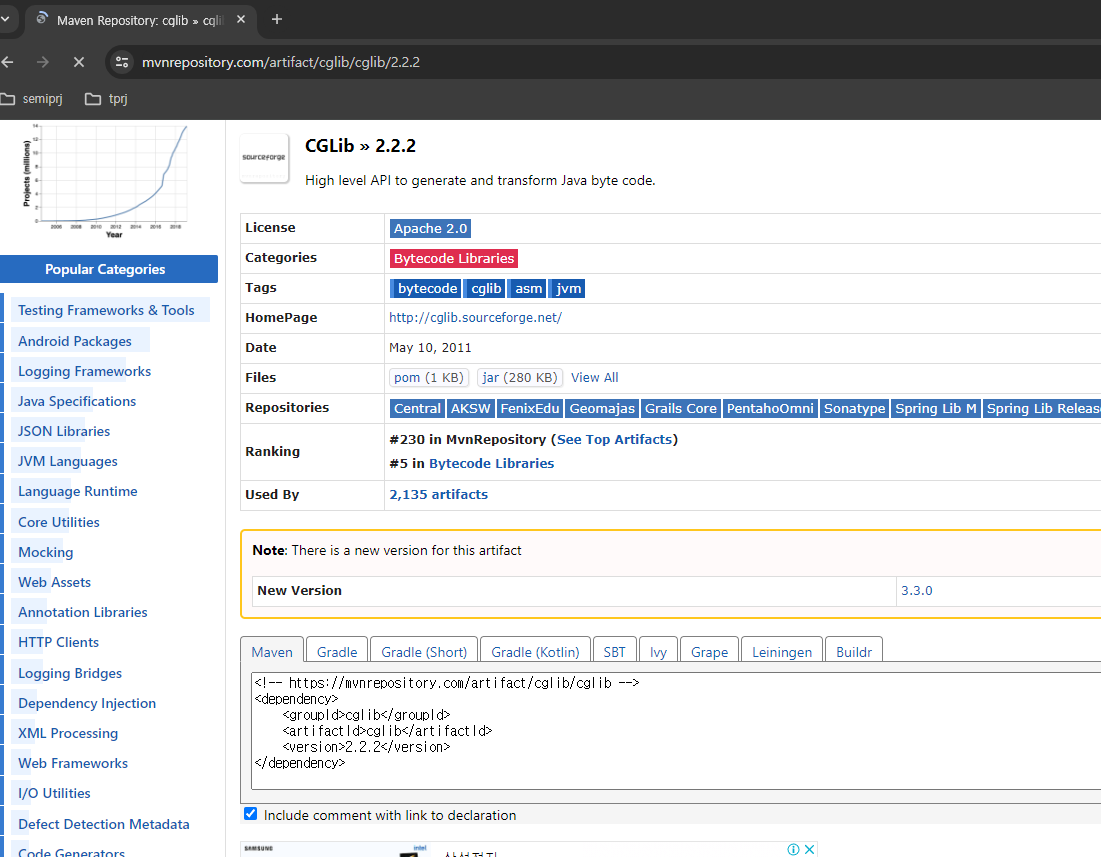
google - mvnrepository 0 cglib 2.2.2 - maven - 복사

project - pom.xml
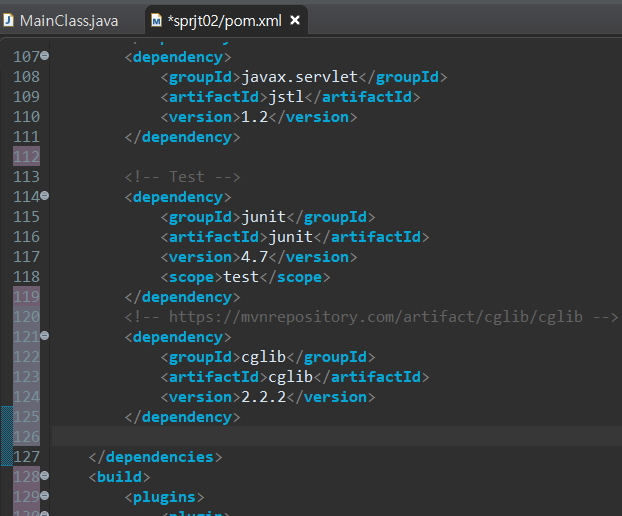
복사한 내용 추가
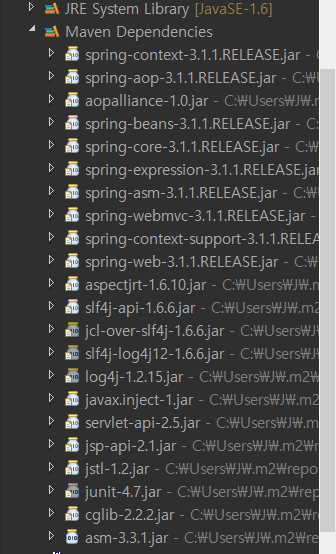

cglib 추가된 것을 확인 가능
실행 됨
package com.tech.ex;

public class Student {
	private String name;
	private String age;
	private String gradeNum;
	private String ClassNum;

	public Student(String name, String age) {
		this.name=name;
		this.age=age;
	}

	public String getName() {
		return name;
	}

	public void setName(String name) {
		this.name = name;
	}

	public String getAge() {
		return age;
	}

	public void setAge(String age) {
		this.age = age;
	}

	public String getGradeNum() {
		return gradeNum;
	}

	public void setGradeNum(String gradeNum) {
		this.gradeNum = gradeNum;
	}

	public String getClassNum() {
		return ClassNum;
	}

	public void setClassNum(String classNum) {
		ClassNum = classNum;
	}

}
Student.java
package com.tech.ex;

import org.springframework.context.annotation.Bean;
import org.springframework.context.annotation.Configuration;

@Configuration
public class AppConfig {
	// bean 등록
	@Bean
	public Student student1() {
		Student student=new Student("홍길동", "20"); // 생성자를 통한 data 전달

		student.setGradeNum("5학년");
		student.setClassNum("computer"); // setter 를 통한 data 전달

		return student;
	}

	@Bean
	public Student student2() {
		Student student=new Student("홍길순", "19"); // 생성자를 통한 data 전달

		student.setGradeNum("4학년");
		student.setClassNum("python"); // setter 를 통한 data 전달

		return student;
	}

}
AppConfig.java
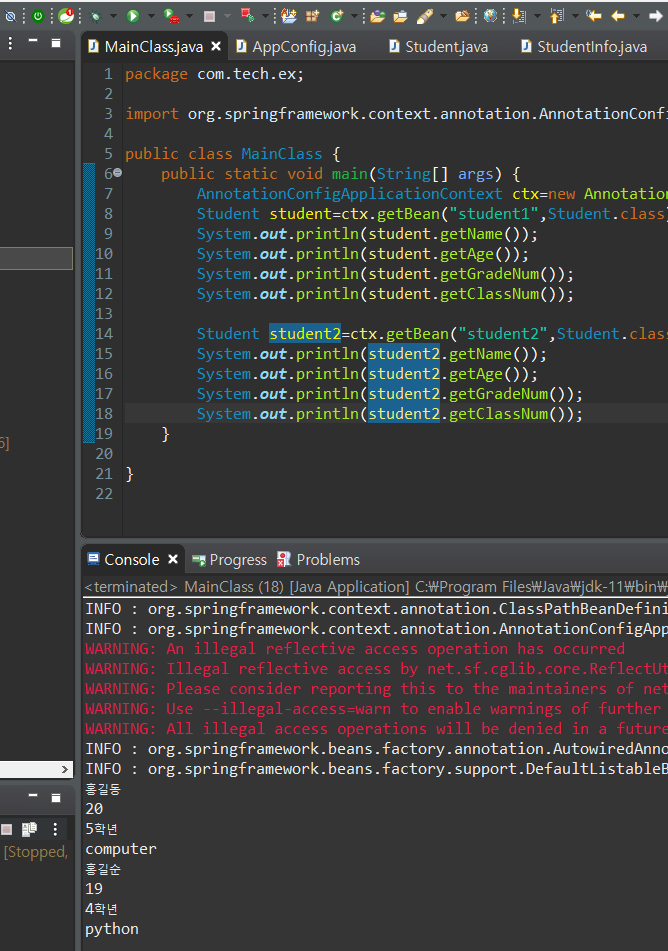
package com.tech.ex;

import org.springframework.context.annotation.AnnotationConfigApplicationContext;

public class MainClass {
	public static void main(String[] args) {
		AnnotationConfigApplicationContext ctx=new AnnotationConfigApplicationContext(AppConfig.class);
		Student student=ctx.getBean("student1",Student.class);
		System.out.println(student.getName());
		System.out.println(student.getAge());
		System.out.println(student.getGradeNum());
		System.out.println(student.getClassNum());

		Student student2=ctx.getBean("student2",Student.class);
		System.out.println(student2.getName());
		System.out.println(student2.getAge());
		System.out.println(student2.getGradeNum());
		System.out.println(student2.getClassNum());
	}

}
MainClass.java
studentinfo 사용
	@Bean
	public StudentInfo studentInfo() {
		StudentInfo studentInfo=new StudentInfo(this.student1());
		return studentInfo;
	}
AppConfig.java 에 Bean 추가
		System.out.println("------------------------------------");
		StudentInfo studentInfo=ctx.getBean("studentInfo",StudentInfo.class);
		studentInfo.getStudentInfo();
MainClass.java 에 studentinfo 출력 내용 추가

실행 화면
student2 의 bean 에 hobbys, maps 추가
	private ArrayList<String> hobbys;

	private HashMap<String, String> maps;

	public ArrayList<String> getHobbys() {
		return hobbys;
	}

	public void setHobbys(ArrayList<String> hobbys) {
		this.hobbys = hobbys;
	}

	public HashMap<String, String> getMaps() {
		return maps;
	}

	public void setMaps(HashMap<String, String> maps) {
		this.maps = maps;
	}
Student.java 에 ArrayList - hobbys, Hashmap - maps 추가
	@Bean
	public Student student2() {
		Student student=new Student("홍길순", "19"); // 생성자를 통한 data 전달

		student.setGradeNum("4학년");
		student.setClassNum("python"); // setter 를 통한 data 전달

		ArrayList<String> hobbys=new ArrayList<String>();
		hobbys.add("수영");
		hobbys.add("승마");
		student.setHobbys(hobbys);

		HashMap<String, String> maps=new HashMap<String, String>();
		maps.put("1","김밥1");
		maps.put("2","김밥2");
		student.setMaps(maps);

		return student;
	}
AppConfig.java 에 bean 추가
			System.out.println("취미: "+student.getHobbys());
			System.out.println("간식: "+student.getMaps());
StudentInfo.java 에 getHobbys / getMaps 추가
studentinfo bean 의 student1 을 student2 로 변경 후 실행
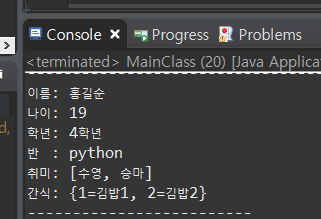
실행 화면
여기까지는 java 단에서의 Spring 에 대한 이해에 관한 내용이었음.
이제 전체 (web 단) 에 대한 내용을 진행할 예정
Spring MVC 구조
home.jsp 가 어떻게 동작하는지
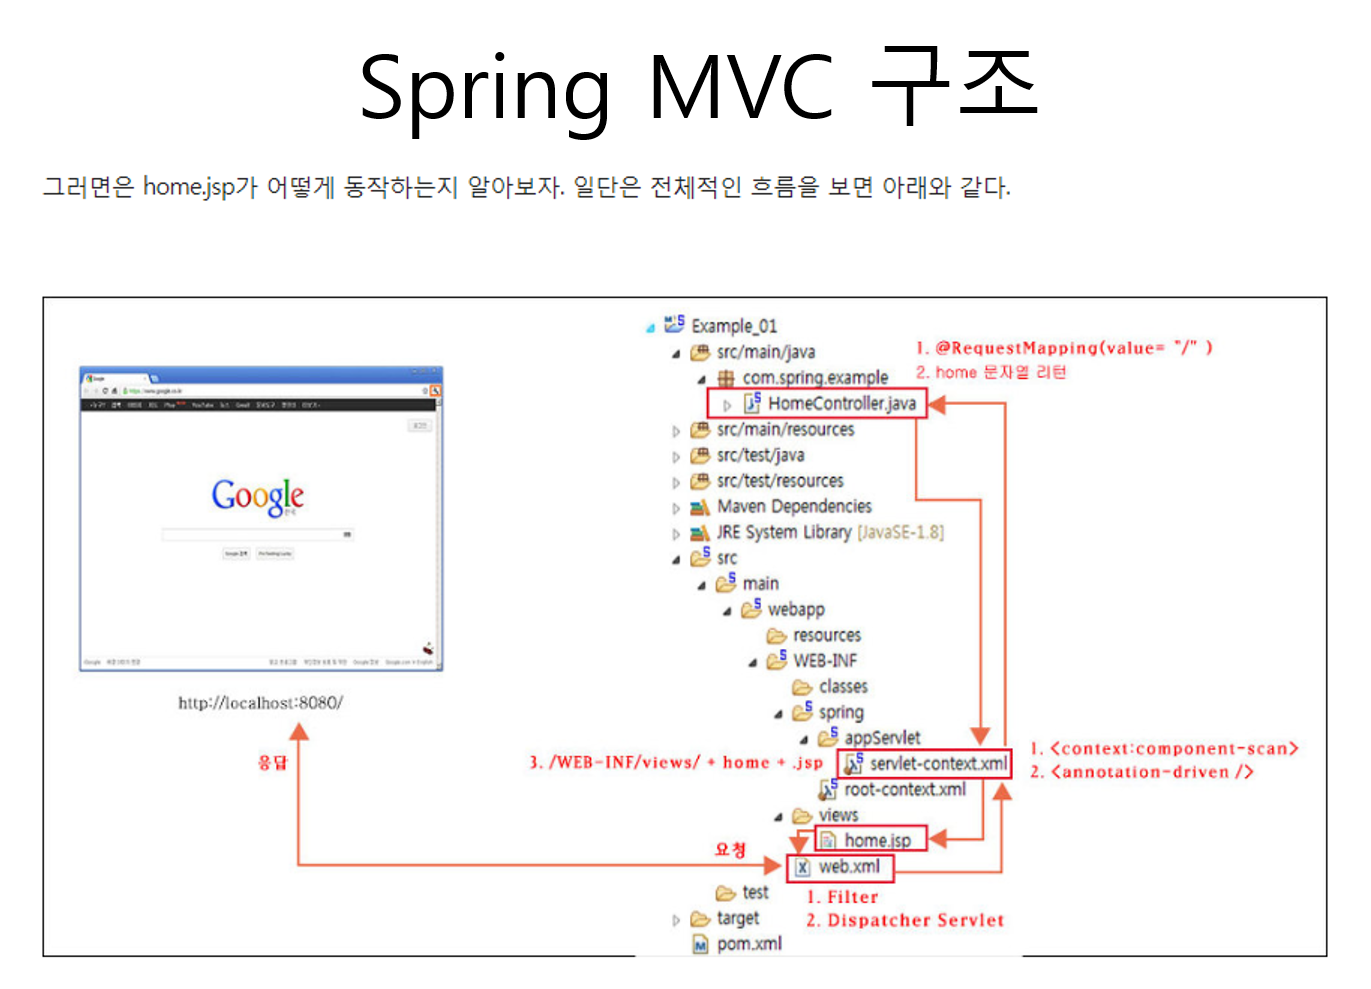
- 서버 (톰캣) 에서 web.xml 을 인식하고 있음.
- 서버가 요청하면 web.xml 에서 인식된 내용대로 처리할 예정.
- web.xml 의 내용 중 dispathcer servlet 으로 처리된다고 되어있음.
- dispatcher servlet class 에는 주소 정보를 가져와서 servlet-context.xml 을 통해 web-info - views 폴더로 전달하고, 주소 끝에 .jsp 가 들어가게 되어있음.

- 그 내용은 HomeController.java 를 통해 설정.
- 해서 home.jsp 를 찾아서 실행시킴
	@RequestMapping("test")
	public String test() {
		return "test";
	}
HomeController.java 에 test.jsp 를 Mapping 하라는 내용 추가
test.jsp 생성
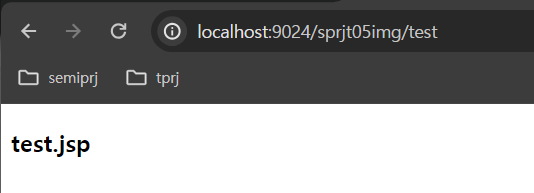
주소에 test 를 추가하면 test.jsp 를 실행
Spring 한글 추가
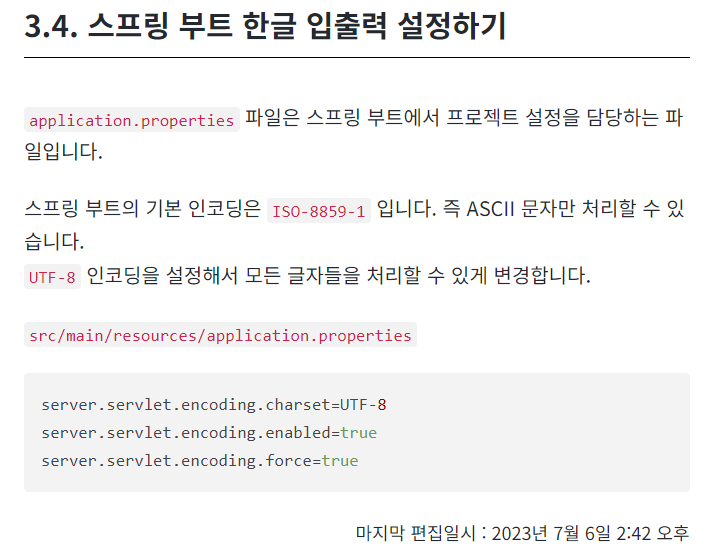
한글이 안되서 application.properties 파일을 새로 만들어 넣음
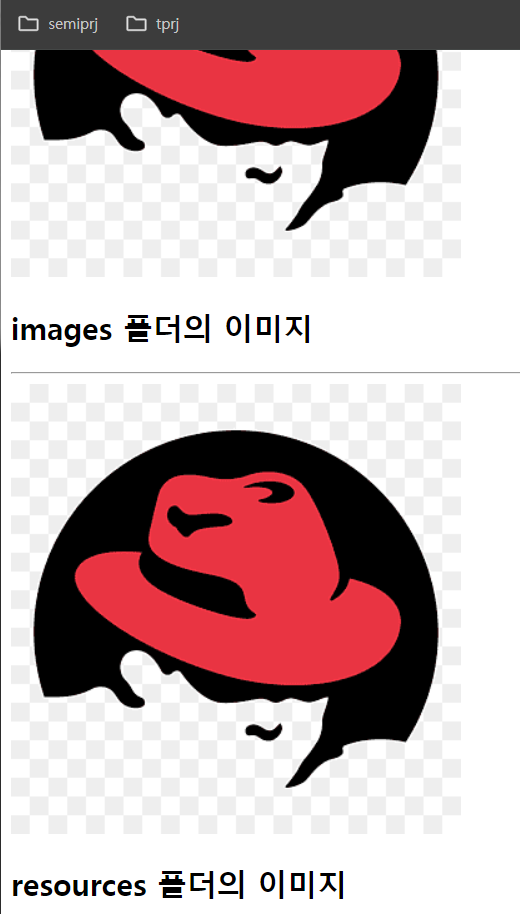
images 파일과 resources 파일에 img 를 넣어보기
<%@ page language="java" contentType="text/html; charset=UTF-8"
    pageEncoding="UTF-8"%>
<%@ taglib prefix="c" uri="http://java.sun.com/jsp/jstl/core" %>
<!DOCTYPE html>
<html>
<head>
<meta charset="UTF-8">
<title>Insert title here</title>
</head>
<body>
<h3>img5.jsp</h3>
<img src="/sprjt05img/images/redhat.png" alt="" /> <br />
<h2>images 폴더의 이미지</h2>
<hr />
<img src="/sprjt05img/resources/redhat.png" alt="" />
<h2>resources 폴더의 이미지</h2>
</body>
</html>
img5.jsp

resources 폴더의 이미지는 읽어오지 못한다.
servlet-context.xml 파일 내에

<resources mapping="/images/**" location="/images/" />내용을 추가하면
resources 폴더내의 이미지도 보여준다.
project Export 하는 법
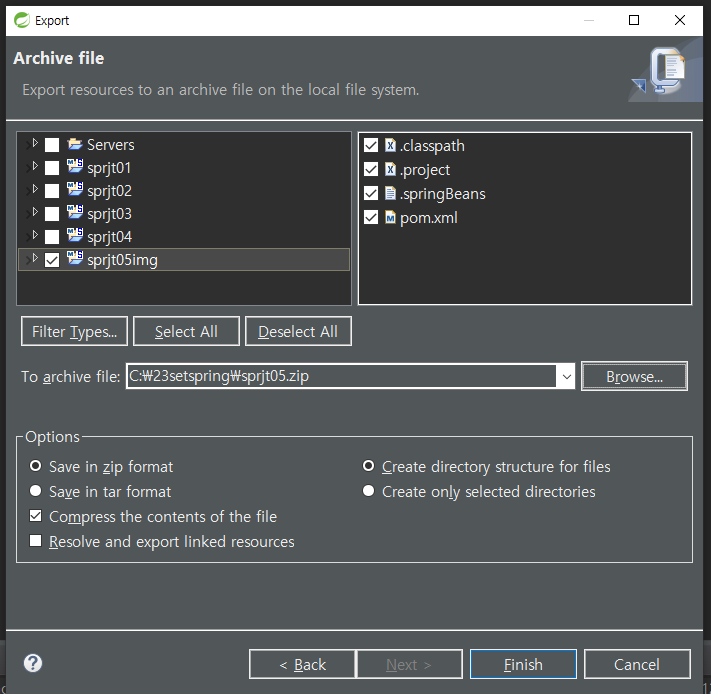
project 우클릭 - export - general - archive file - 이름,경로 설정 - finish

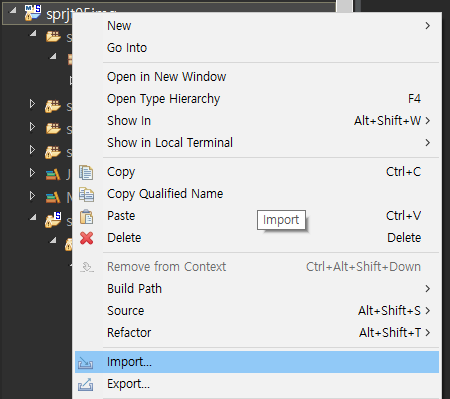
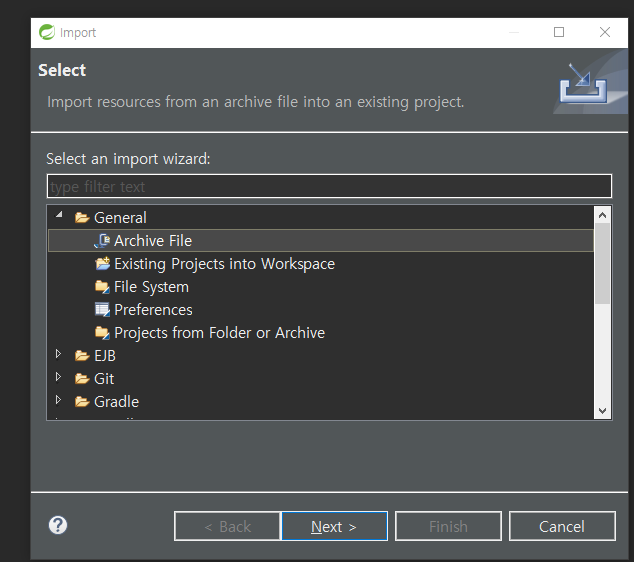
Project Import 하는 법
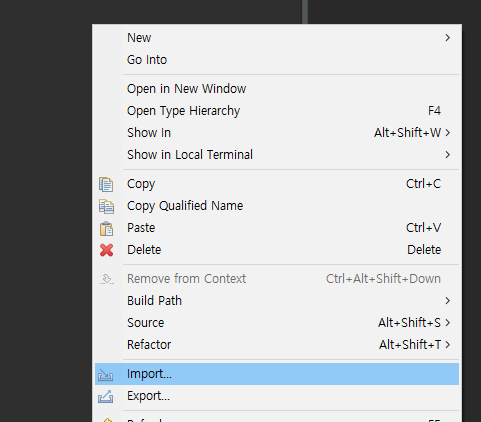
우클릭 - import - Existing Projects Into Workspace - Archive file
Controller 를 쓰려면 @Controller 라는 Annotation 을 사용해야 함

기본적인 scan 위치가 com.tech.sprj06controller 라서
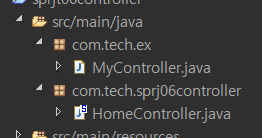
이렇게 package 를 나눠놓으면 sprj06controller 의 하위 내용이 아니기 때문에 scan 이 안된다.
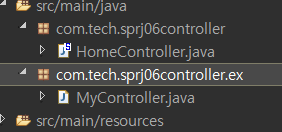
이렇게 하위 패키지로 변경하면 다시 인식할 수 있다.
<%@ taglib uri="http://java.sun.com/jsp/jstl/core" prefix="c" %>
<%@ page session="false" %>
<html>
<head>
<title>Home</title>
</head>
<body>
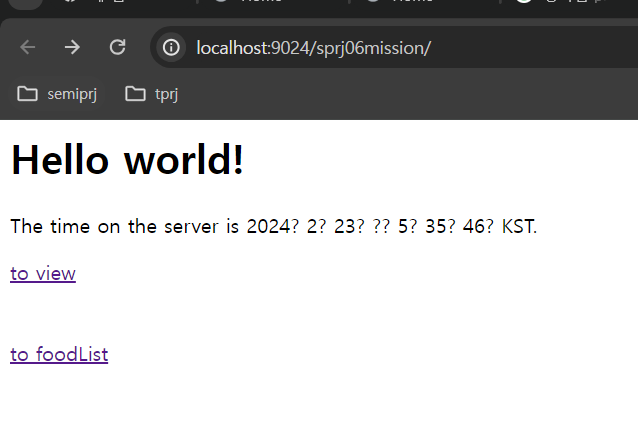
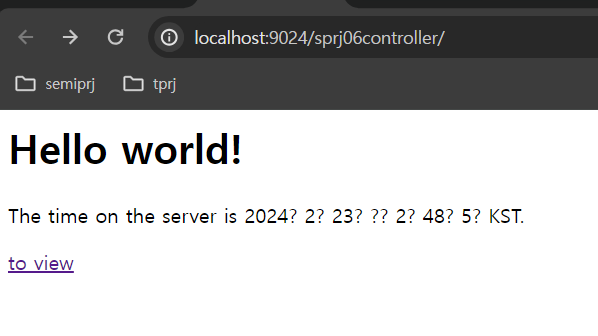
<h1>
Hello world!
</h1>
<P> The time on the server is ${serverTime}. </P>
<a href="view">to view</a>
</body>
</html>home.jsp
<%@ page language="java" contentType="text/html; charset=UTF-8"
pageEncoding="UTF-8"%>
<%@ taglib prefix="c" uri="http://java.sun.com/jsp/jstl/core" %>
<!DOCTYPE html>
<html>
<head>
<meta charset="UTF-8">
<title>Insert title here</title>
</head>
<body>
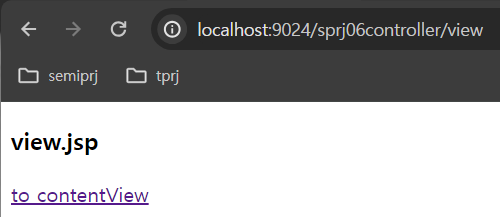
<h3>view.jsp</h3>
<a href="content/contentView">to contentView</a>
</body>
</html>view.jsp
<%@ page language="java" contentType="text/html; charset=UTF-8"
pageEncoding="UTF-8"%>
<%@ taglib prefix="c" uri="http://java.sun.com/jsp/jstl/core" %>
<!DOCTYPE html>
<html>
<head>
<meta charset="UTF-8">
<title>Insert title here</title>
</head>
<body>
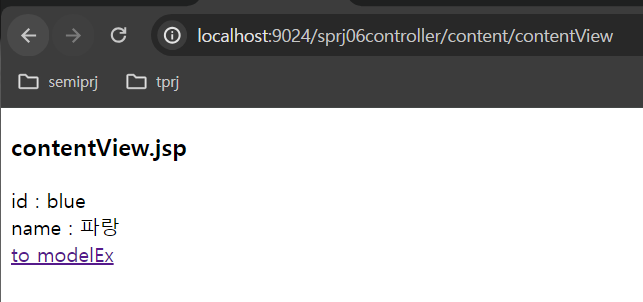
<h3>contentView.jsp</h3>
id : ${id } <br />
name : ${name } <br />
<a href="../model/modelEx">to modelEx</a>
</body>
</html>contentView.jsp
<%@ page language="java" contentType="text/html; charset=UTF-8"
pageEncoding="UTF-8"%>
<%@ taglib prefix="c" uri="http://java.sun.com/jsp/jstl/core" %>
<!DOCTYPE html>
<html>
<head>
<meta charset="UTF-8">
<title>Insert title here</title>
</head>
<body>
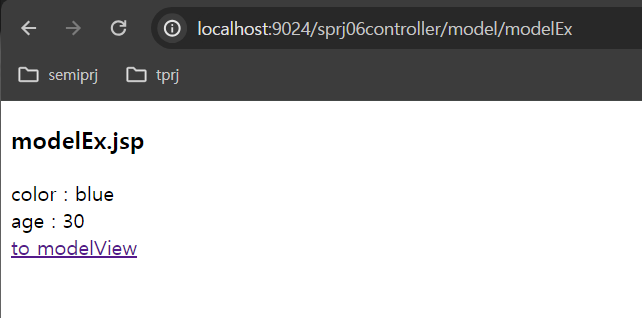
<h3>modelEx.jsp</h3>
color : ${color } <br />
age : ${age } <br />
<a href="../modelAndView/modelView">to modelView</a>
</body>
</html>modelEx.jsp
<%@ page language="java" contentType="text/html; charset=UTF-8"
pageEncoding="UTF-8"%>
<%@ taglib prefix="c" uri="http://java.sun.com/jsp/jstl/core" %>
<!DOCTYPE html>
<html>
<head>
<meta charset="UTF-8">
<title>Insert title here</title>
</head>
<body>
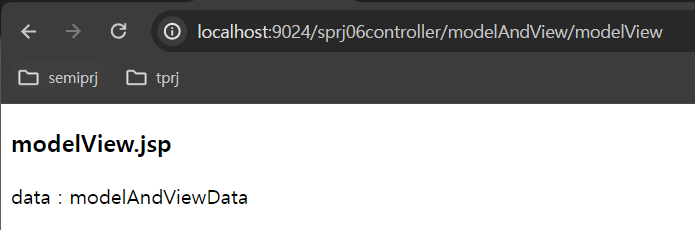
<h3>modelView.jsp</h3>
data : ${data } <br />
</body>
</html>modelView.jsp
package com.tech.sprj06controller;

import org.springframework.stereotype.Controller;
import org.springframework.ui.Model;
import org.springframework.web.bind.annotation.RequestMapping;
import org.springframework.web.servlet.ModelAndView;

@Controller
public class MyController {
	@RequestMapping("view")
	public String view() {
		return "view";
	}

	@RequestMapping("/content/contentView")
	public String contentView(Model model) {
		// 데이터 전달
		model.addAttribute("id","blue");
		model.addAttribute("name","파랑");

		return "/content/contentView";
	}

	@RequestMapping("/model/modelEx")
	public String modelView(Model model) {
		model.addAttribute("color","blue");
		model.addAttribute("age","30");
		return "/model/modelEx";
	}

	@RequestMapping("/modelAndView/modelView")
	public ModelAndView modelAndView() {
		ModelAndView mv=new ModelAndView();
		mv.addObject("data","modelAndViewData");
		mv.setViewName("modelAndView/modelView");

		return mv;
	}

}
MyController.java
home -> view -> contentView -> modelEx -> modelView
또는 servlet-context.xml 에서 scan 부분을 수정하면 된다

package com.tech.ex;

import org.springframework.stereotype.Controller;
import org.springframework.web.bind.annotation.RequestMapping;

@Controller
public class HiController {
	@RequestMapping("hi")
	public String hi() {

		return "hi";
	}

}
HiController.java
<%@ page language="java" contentType="text/html; charset=UTF-8"
pageEncoding="UTF-8"%>
<%@ taglib prefix="c" uri="http://java.sun.com/jsp/jstl/core" %>
<!DOCTYPE html>
<html>
<head>
<meta charset="UTF-8">
<title>Insert title here</title>
</head>
<body>
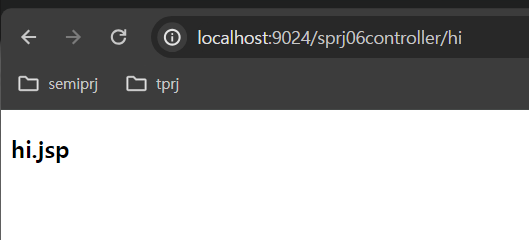
<h3>hi.jsp</h3>
</body>
</html>hi.jsp
git 협업 연습 (sourcetree 사용)
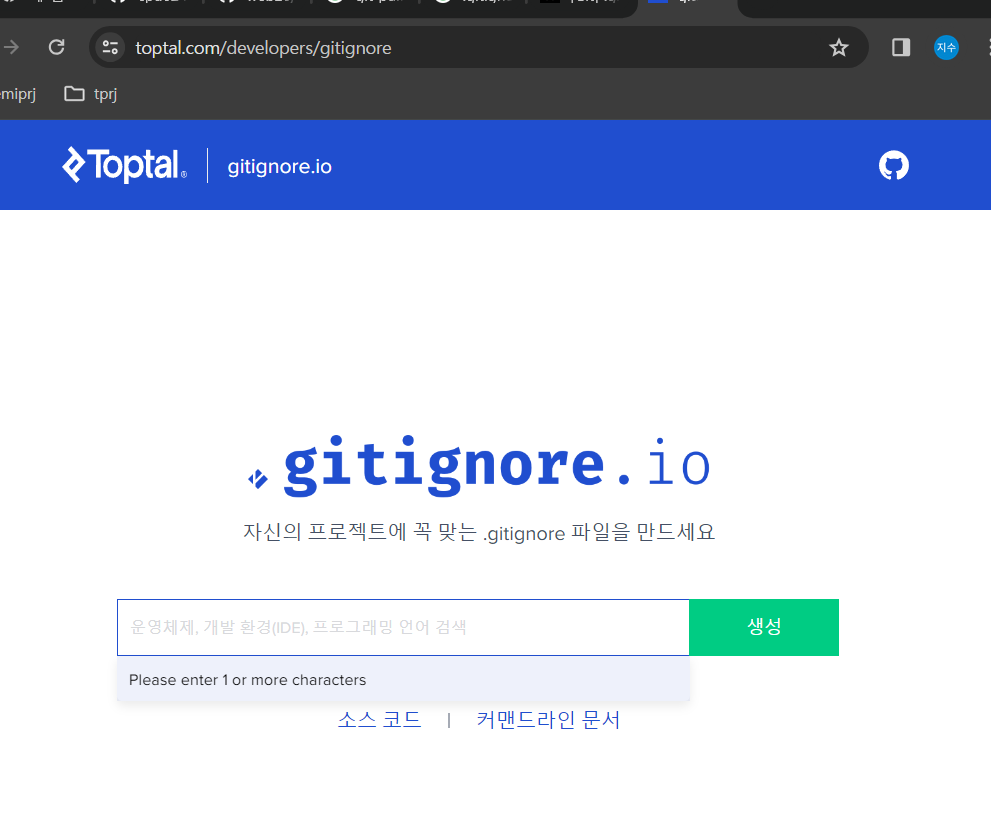
.gitignore
Spring 미션
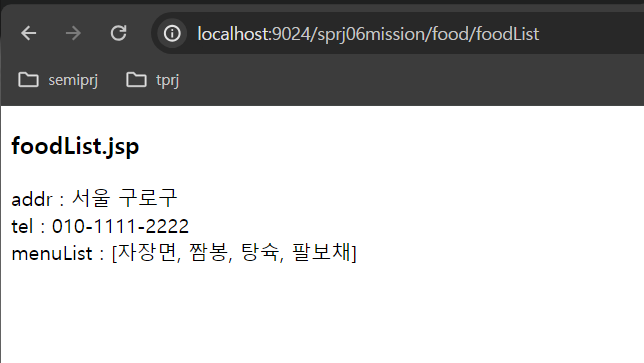
적절한 위치에 FoodController 를 만들기
addr - "서울 구로구"
tel - "010-1111-2222"ArrayList
자장면, 짬봉, 탕슉, 팔보채
3 개의 data 를 model 에 담아
food/foodlist.jsp에 전달 후 출력
home.jsp 에 적절히 링크 달기
메일로 제출
메일제목: 컨트롤러1미션_홍길동
제출내용: export zip 파일, 결과화면 캡쳐
package com.tech.ex;

import java.util.ArrayList;

import org.springframework.stereotype.Controller;
import org.springframework.ui.Model;
import org.springframework.web.bind.annotation.RequestMapping;

@Controller
public class FoodController {
	@RequestMapping("food/foodList")
	public String foodList(Model model) {
		ArrayList<String> menuList=new ArrayList<String>();
		menuList.add("자장면");
		menuList.add("짬봉");
		menuList.add("탕슉");
		menuList.add("팔보채");

		model.addAttribute("addr","서울 구로구");
		model.addAttribute("tel","010-1111-2222");
		model.addAttribute("menuList",menuList);

		return "food/foodList";
	}

}
FoodController.java
<%@ page language="java" contentType="text/html; charset=UTF-8"
    pageEncoding="UTF-8"%>
<%@ taglib prefix="c" uri="http://java.sun.com/jsp/jstl/core" %>
<!DOCTYPE html>
<html>
<head>
<meta charset="UTF-8">
<title>Insert title here</title>
</head>
<body>
<h3>foodList.jsp</h3>

addr : ${addr } <br />
tel : ${tel } <br />
menuList : ${menuList } <br />
</html>
foodList.jsp