
본 시리즈는 같은 학원 수강생들과 함께하는 React 스터디 진행의 내용을 바탕으로 무작정 부딪치고 시간을 들여 얻은 지식을 공유하고자 한다.
학습 내용은 본인이 작성한 예제로 진행했으므로 틀린점이나 보완점이 있으면 피드백 부탁드립니다.
🤔Redux란?
리덕스는 Reducer와 Flux를 합친 데이터 관리 도구이다. 리덕스가 나오기 전 웹 애플리케이션은 MVC 패턴으로 데이터를 관리하였다. 그럼 리덕스에 대해 알아보기 전에 MVC 패턴을 간단히 알아보자.
MVC 패턴
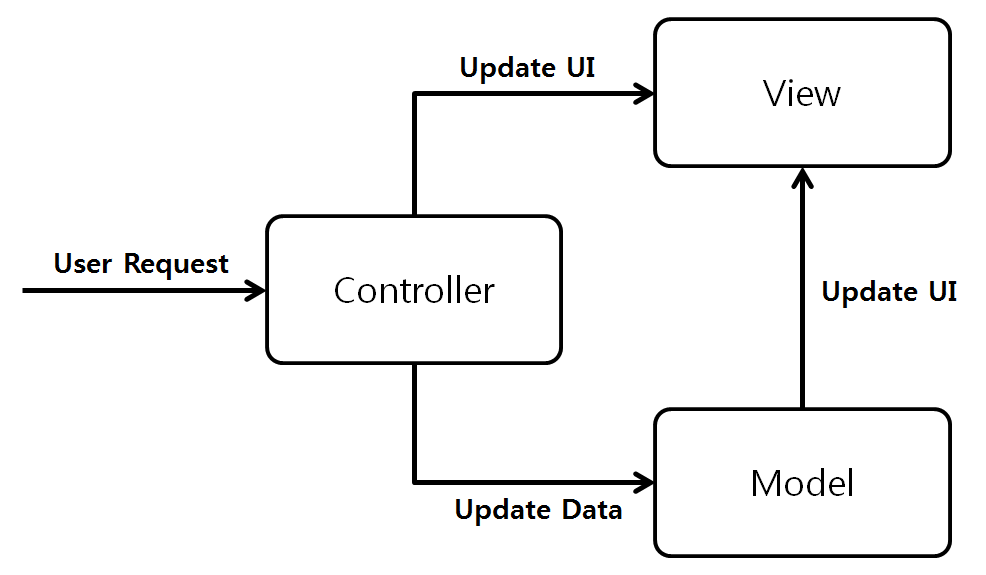
MVC 패턴은 Model, View, Controller로 구성된다.
- Model: 데이터의 형식이나 구조를 관리
- View: 사용자에게 보여지는 데이터 및 화면
- Controller: 클라이언트의 요청을 관리하며 변경되는 데이터를
Model과View로 업데이트한다.
데이터의 흐름은 양방향이며 Controller에 의해 View와 Model이 바뀔 수 있으며 서로 큰 연관관계를 맺고 있다. 분명 코드를 작성하기 쉽지만 애플리케이션의 규모가 커진다면 각 모듈 간 관계가 복잡해져 데이터의 흐름을 이해하기 어려워진다. Facebook은 특히 이러한 문제점을 심히 겪고 있었는데 이를 해결하기 위해 Flux 패턴을 개발했다.
Flux 패턴
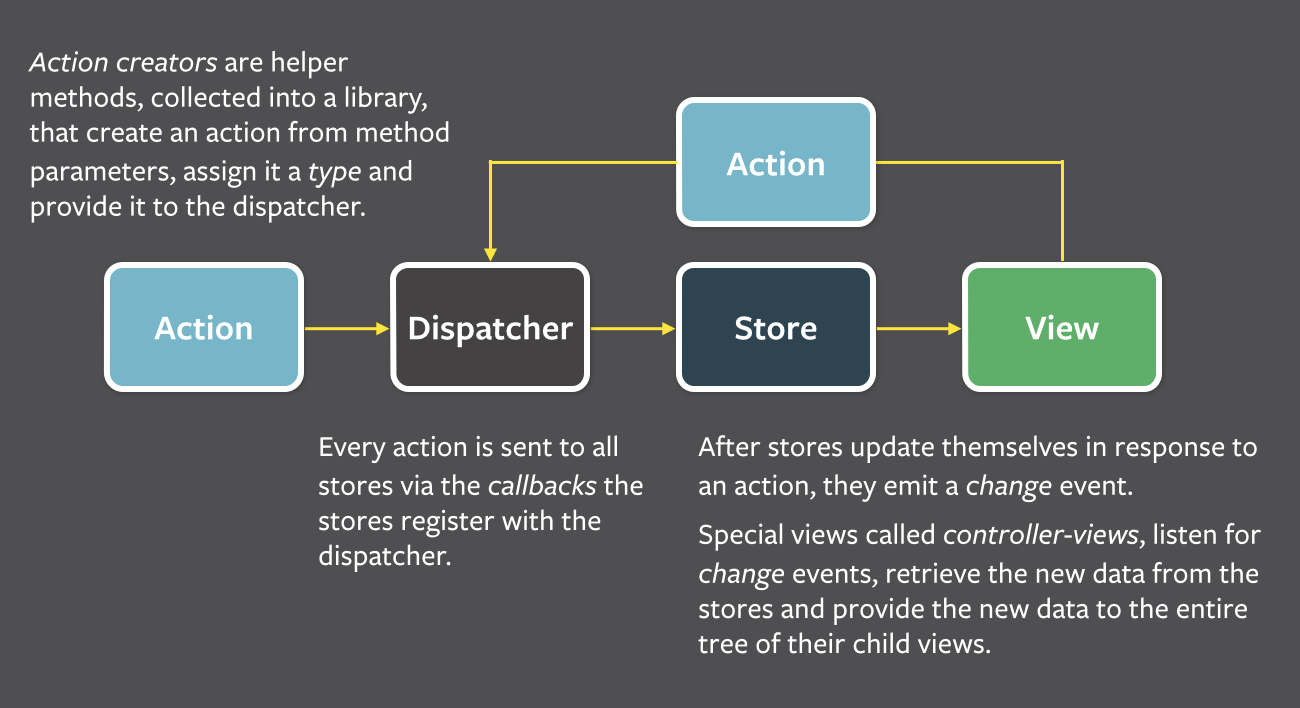
Flux 패턴의 가장 큰 특징은 위의 도면과 같이 단방향 데이터 흐름이다. View는 데이터의 변경을 발생시키지 않고 Action을 발생시키며 Action은 Dispatcher를 통해 수행되어 데이터 저장소의 데이터를 변경시킨다. 큰 장점으로 단순한 흐름으로써View가 변경된다 하더라도 데이터의 변경은 일어나지 않아 개발자는 데이터의 변화를 예측하기 쉽다는 것이다.
Redux
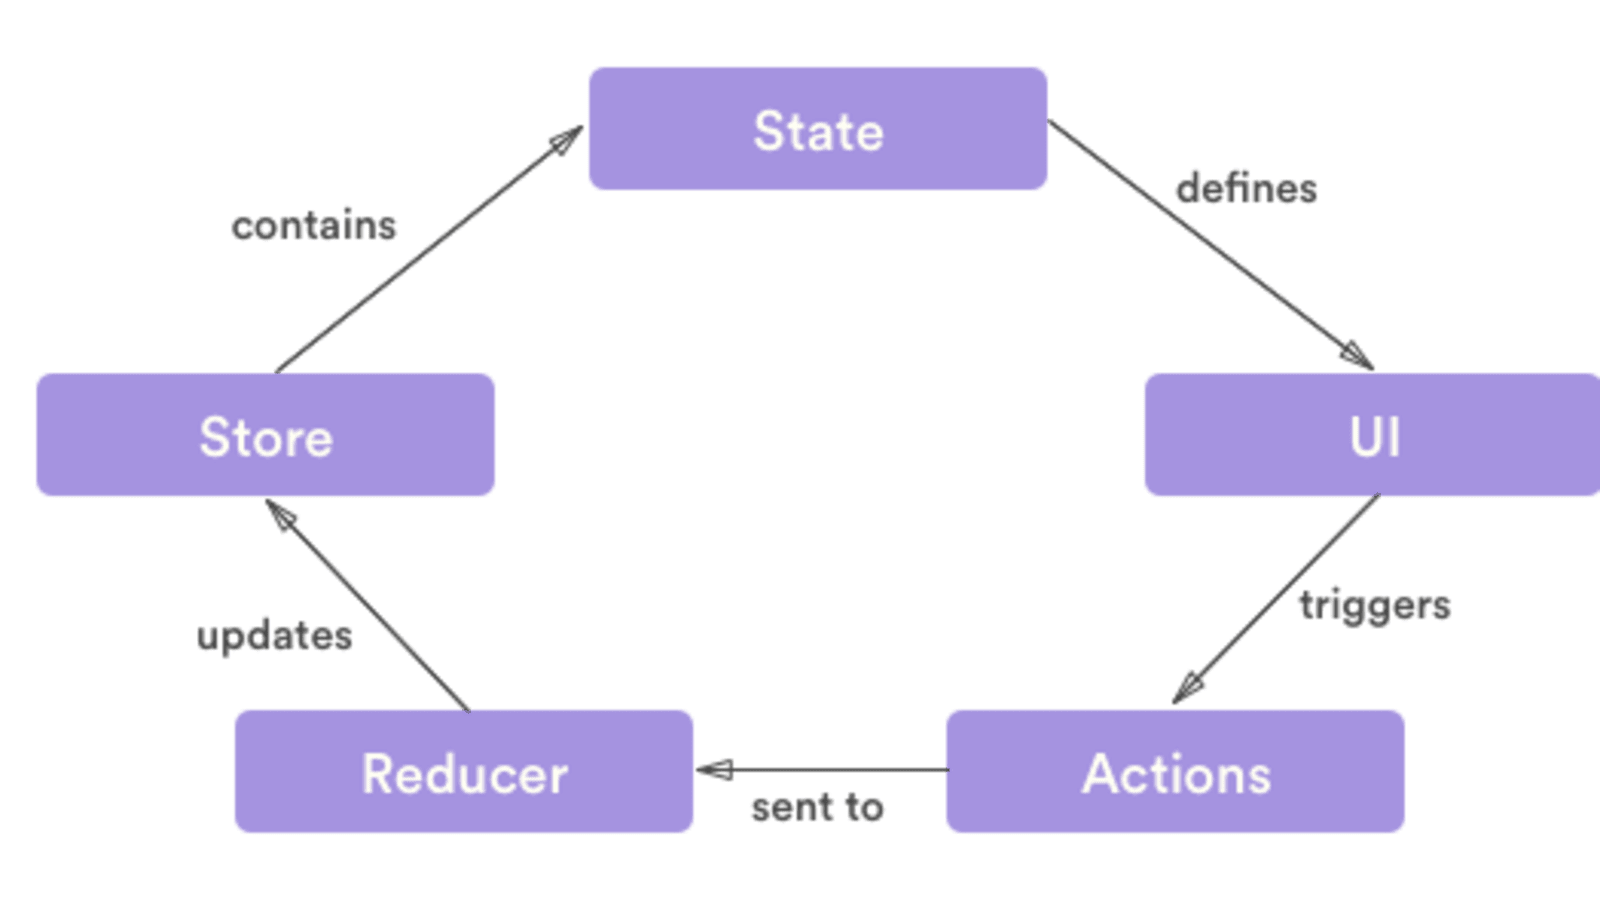
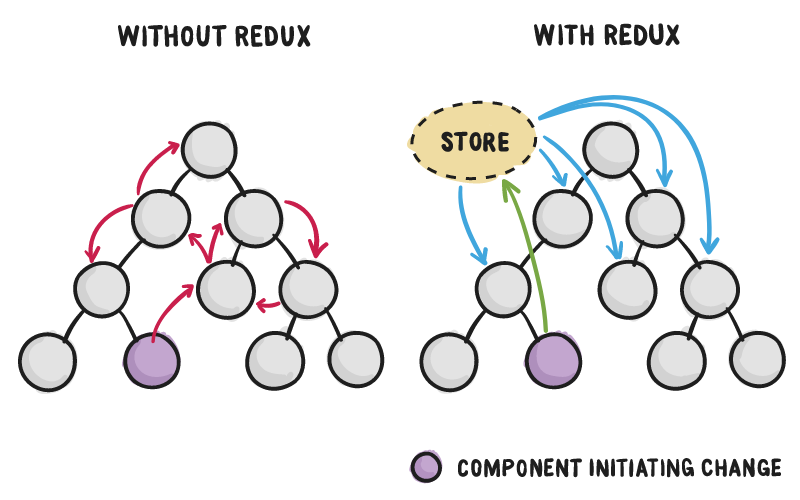
Redux는 Flux 패턴에 Reducer를 결합한 것으로 Flux 패턴과 다른 점은 데이터의 변경이 Reducer에서 발생한다는 것이다. 또한 store를 통해 모든 컴포넌트는 props로 전달받지 않고 직접 데이터를 조회할 수 있기 상위 컴포넌트로부터 힘들게 저 밑에 있는 하위 컴포넌트로 전달할 필요가 없다.
Redux 3원칙
Single source of truth
The state of your whole application is stored in an object tree within a single store
모든 상태는 하나의 스토어 안에 객체 트리 구조로 저장된다.
State is read-only
The only way to change the state is to emit an action, an object describing what happened.
상태 변화는 무슨 일이 일어날지 예상할 수 있는 Action으로만 이루어진다.
Changes are made with pure functions
To specify how the state tree is transformed by actions, you write pure reducers.
상태 트리가 Action에 의해 어떻게 변화되는지 지정하기위해 순수 리듀서를 작성해야 한다.
🎆React와 Redux 사용해보기
먼저 필요한 의존 모듈을 설치하도록 하자.
yarn add redux react-redux redux-devtools-extension
- redux - 리덕스 모듈
- react-redux - 리액트에서 리덕스를 편리하게 사용하기 위한 모듈
- redux-devtools-extension - 리덕스 store의 state를 볼 수 있는 개발자 모듈
Redux를 사용하여 간단한 카운트 함수를 작성해보았다.
// modules/counter.js

// ========= Action 타입 지정
const INCREASE = 'counter/INCREASE';
const DECREASE = 'counter/DECREASE';

// ========= Action 함수
export const increase = () => ({
  type: INCREASE,
});

export const decrease = () => ({
  type: DECREASE,
});

const initialState = {
  count: 0,
};

// ========= reducer
const reducer = (state = initialState, action) => {
  switch (action.type) {
    case INCREASE:
      return {
        ...state,
        count: state.count + 1,
      };
    case DECREASE:
      return {
        ...state,
        count: state.count - 1,
      };
    default:
      return state;
  }
};

export default reducer;Action과 Reducer를 먼저 작성해보았다. 먼저 Action 타입을 상수로 지정하여 자동 완성 및 구분이 쉽도록 type을 지정했다.
Action 함수는 type을 가진 객체를 반환하며 이 객체를 dispatch하면 리듀서를 통해 상태가 변하게 되는 것이다.
Reducer의 첫 번째 인자는 state로 store의 상태를 나타낸다. 또한 dispatch된 객체를 두 번째 인자(action)로 받아 type을 검사하여 state가 어떻게 변화될지 지정하고 변화된 state를 반환하여 store의 state를 변경시킨다.
🎈 위와 같은 코드 작성법은 Ducks 패턴이라고 하며 기능과 관련된
Action,Action함수,reducer를 한 곳에 작성하는 패턴이다. 기능별로 파일을 작성하기에 어떠한 기능을 유지보수할 때 좋다는 장점을 가지고 있다.
// modules/rootReducer.js
import { combineReducers } from 'redux';
import counter from './counter';

const rootReducer = combineReducers({
  counter,
});

export default rootReducer;
여러 Reducer의 state를 하나의 store로 관리하기 위해 Reducer를 하나로 모으는 rootReducer를 작성하고 index.js에서 사용하기 위해 export하였다.
// index.js
import React from 'react';
import ReactDOM from 'react-dom';
import './index.css';
import App from './App';
import * as serviceWorker from './serviceWorker';
import { createStore } from 'redux';
import rootReducer from './modules';
import { Provider } from 'react-redux';
import { composeWithDevTools } from 'redux-devtools-extension';

// rootReducer로 store 만들기
// composeWithDevTools() - 리덕스 개발자 도구 활성화
const store = createStore(rootReducer, composeWithDevTools());

// Provider는 store를 컴포넌트들에게 제공하는 역할
ReactDOM.render(
  <React.StrictMode>
    <Provider store={store}>
      <App />
    </Provider>
  </React.StrictMode>,
  document.getElementById('root')
);

// If you want your app to work offline and load faster, you can change
// unregister() to register() below. Note this comes with some pitfalls.
// Learn more about service workers: https://bit.ly/CRA-PWA
serviceWorker.unregister();
이렇게 함으로써 리덕스를 사용하기 위한 기본 설정은 모두 마쳤다.
// components/Counter.jsx
import React from 'react';

const Counter = ({ count, onIncrease, onDecrease }) => {
  return (
    <div>
      <h1>{count}</h1>
      <button onClick={onIncrease}>+1</button>
      <button onClick={onDecrease}>-1</button>
    </div>
  );
};

export default Counter;CounterComponent는 CounterContainer로 부터 count, onIncrease, onDecrease를 받아 출력하거나 이벤트를 할당한다.
import React from 'react';
import { shallowEqual, useDispatch, useSelector } from 'react-redux';
import Counter from '../components/Counter';
import { decrease, increase } from '../modules/counter';

// 컨테이너 컴포넌트는 데이터를 관리하며
// 렌더링할 컴포넌트에게 props로 넘긴다.
const CounterContainer = () => {
  // useState: store의 state를 고르는 함수라고 생각
  const { count } = useSelector(
    ({ counter }) => ({
      count: counter.count,
    }),
    shallowEqual
  );

  const dispatch = useDispatch();
  const onIncrease = () => dispatch(increase());
  const onDecrease = () => dispatch(decrease());

  return <Counter count={count} onIncrease={onIncrease} onDecrease={onDecrease} />;
};

export default CounterContainer;CounterContainer는 데이터를 store에서 조회하여 가공한 뒤 CounterComponent에 props로 넘겨주는 역할을 한다.
리덕스의 store에 접근하기 위해 useSelector() 함수를 사용한다. 콜백 함수를 매개 변수로 받으며 콜백 함수의 반환 값을 객체 구조 분해로 할당했다.
action 객체를 dispatch하기 위해 useDispatch() 함수를 호출하여 할당한다.
그 후 할당한 dispatch 함수의 매개 변수로 modules에 정의했던 action 함수를 호출하여 반환된 action 객체를 넘겨줌으로써 reducer에 action 객체를 전달한다.
🚨 shallowEqual은 말 그대로 얕은 비교를 하여 같은지 검사하는 옵션으로 같은 값일 때는 새로운 객체를 생성하지 않게 하여 최적화를 수행한다.
import React from 'react';
import './App.css';
import CounterContainer from './containers/CounterContainer';

const App = () => {
  return (
    <>
      <CounterContainer />
    </>
  );
};

export default App;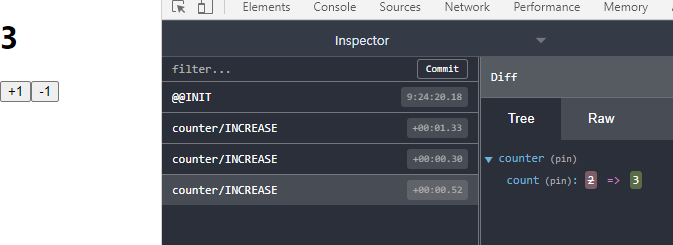
위 처럼 버튼을 클릭할 때마다 action이 dispatch되고 state가 변하는 것을 볼 수 있었다.
🔊 리덕스 개발자 도구를 사용하려면 크롬 확장 프로그램를 설치한다.
https://chrome.google.com/webstore/detail/redux-devtools/lmhkpmbekcpmknklioeibfkpmmfibljd?utm_source=chrome-ntp-icon