-학습 내용-
LazyVGrid
- SwiftUI에서
LazyVGrid를 활용한 뷰 생성하기 LazyVGrid와Picker를 결합하여 응용하기
CodeReview
LazyVGrid 란?
View타입을 가진 멤버를 그리드 형식으로 배치하고 싶을 때 사용하는 코드로, 3가지의 속성을 가지고 있다.
.fixed- 사용자가 값을 지정하고, 내부 멤버가 지정된 값 만큼의 크기(Space)를 가진다..adaptive- 사용자가 값을 지정하고, 지정된 값을 최소크기로 하여 화면을 가득 채운다.(수량 자동).flexible- 최소/최대값을 정해두고 뷰 크기에 따라 사이즈를 조절할 수 있다. 인자에 아무것도 주어지지 않는다면 해당 뷰의 크기를 아이템의 수로 나눠 계산해 그린다.
1. LazyVGrid 기본 형태
LazyVGrid의 기본 형태는 아래와 같다.
struct LazyVGrid

init(
    columns: [GridItem],
    alignment: HorizontalAlignment = .center,
    spacing: CGFloat? = nil,
    pinnedViews: PinnedScrollableViews = .init(),
    @ViewBuilder content: () -> Content
)
2. LazyVGrid 선언/호출
// 레이지 버티칼 그리드 뷰
// column 은 호리젠탈 아이템의 레이아웃을 설정하는 부분
// [GridItem] 옵션 3개
// .fixed 고정
// .adaptive 지정된 사이즈를 최소로 화면 꽉 채우기(수량 자동)
// .flexible 하나만 채우기(계산해서 분할로 채우기)
import SwiftUI

struct testView: View {
    // LazyVGrid의 column 값 설정
    let columns = [GridItem(.flexible()), GridItem(.flexible())]
    // Rectangle()의 컬러를 설정하기 위핸 Array 타입 생성
    let rectangleColor: [Color] = [.purple, .pink, .red, .orange, .yellow, .green, .blue, .brown, .accentColor, .black, .cyan, .gray]

    var body: some View {

        LazyVGrid(columns: columns, spacing: 10) {
        // ForEach문으로 rectangleColor의 멤버 수만큼 내부 코드를 반환
        ForEach(rectangleColor, id: \.self) { color in
            Rectangle()
                .foregroundColor(color)
                .frame(height: 120)
                .overlay {
                }
            }
        }
    }
}| 코드 실행 결과 |
|---|
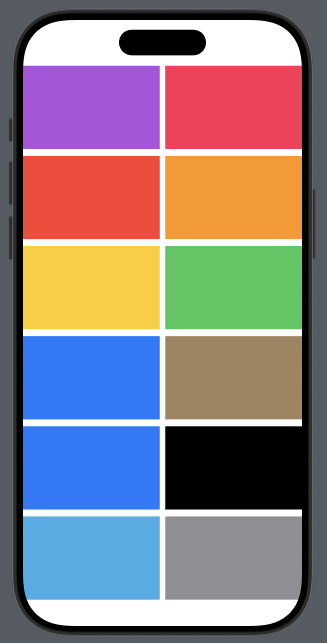 |
3. LazyVGrid와 Picker 응용
Picker를 사용하여 현재 상태에 따른 LazyVGrid의 모습을 바꾸는 코드를 작성한다.
import SwiftUI

enum LayoutType: CaseIterable {
    case table, grid, triple
}

extension LayoutType {
    // 레이아웃 타입에 대한 컬럼이 자동으로 설정되도록 한다
    var columns: [GridItem] {
        switch self {
        case .table:
            return [
                // flexible 하나로 한 줄로 표현
                GridItem(.flexible())
            ]
        case .grid:
            return [
                // flexible 두 개로 두 줄 표현
                GridItem(.flexible()),
                GridItem(.flexible())
            ]
        case .triple:
            return [
                // adaptive를 통해 크기가 닿는데까지 아이템을 여러개 삽입
                GridItem(.adaptive(minimum: 100))
            ]
        }
    }
}

struct SimpleLayoutView: View {
    // Picker의 초기 값
    @State var selectedLayoutType: LayoutType = .table

    var body: some View {

        VStack {
            Picker(selection: $selectedLayoutType, content: {
                ForEach(LayoutType.allCases, id: \.self) { layoutType in
                    switch layoutType {
                    case .table:
                        Image(systemName: "list.bullet")
                    case .grid:
                        Image(systemName: "square.grid.2x2.fill")
                    case .triple:
                        Image(systemName: "square.grid.3x3.fill")
                    }
                }
            }, label: {
                Text("레이아웃 타입")
            })
            .pickerStyle(.segmented)
            .frame(width: 250)

            ScrollView {
                LazyVGrid(columns: selectedLayoutType.columns) {
                	// 100개의 아이템 생성
                    ForEach(1...100, id: \.self) {_ in
                        switch selectedLayoutType {
                        case .table:
                            Circle()
                                .frame(width: 200)
                                .foregroundColor(.green)
                        case .grid:
                            RoundedRectangle(cornerRadius: 25.0)
                                .foregroundColor(Color.pink)
                                .frame(height: 200)
                                .overlay {
									Circle()
                                    	.frame(width: 100)
                                    }
                        case .triple:
                            Rectangle()
                                .frame(height: 120)
                                .foregroundColor(.blue)
                        }
                    }
                }
                // Picker 값 변화시 애니메이션 효과 처리
                .animation(.default, value: selectedLayoutType)
            }
            .padding(.horizontal, 10)
        }
    }
}| 코드 실행 결과 |
|---|
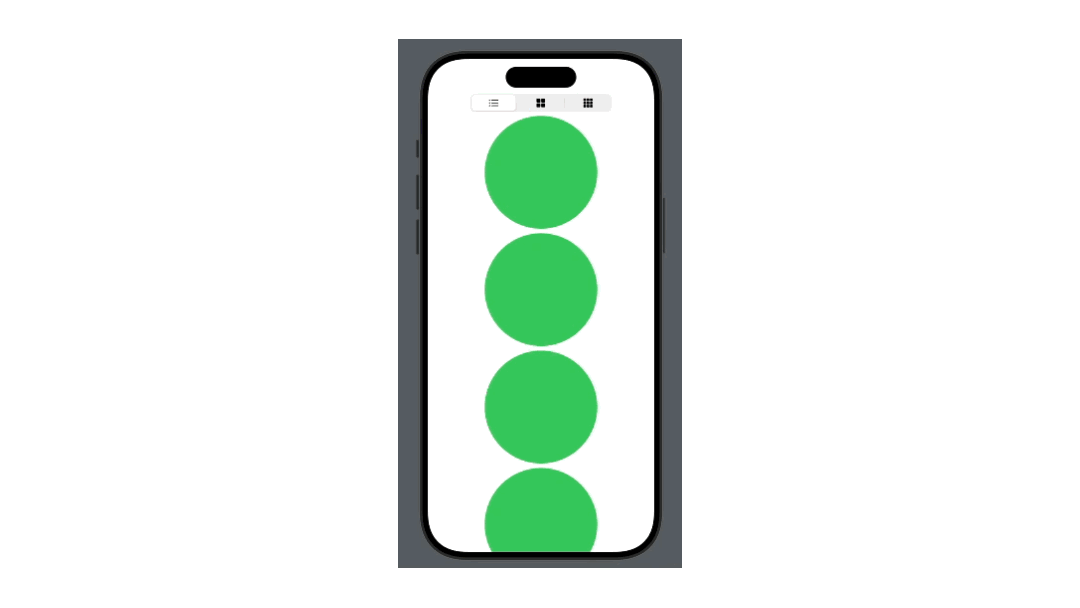 |
-오늘의 학습 후기-
오늘은 SwiftUI에서 LazyVGrid를 사용하는 방법에 대해 학습하였다.
팀 프로젝트를 진행하기 앞서, 익혀야 할 기능이라고 생각하여 학습을 진행하였다.
사전캠프 기간 동안 진행할 새로운 프로젝트에 대해 팀원들과 회의를 진행하였고, 현재는 윤곽이 잡혀 기획안을 작성 중에 있다.
주제는 'swift 입문자를 위한 퀴즈&사전 앱'으로, Swift 코드에 대한 전반적인 지식을 획득할 수 있도록 도움을 주는 앱을 구상 중에 있다.
다음주 중으로 기획안을 완성하여 프로젝트에 착수할 예정이다.
이유있는 코드를 쓰자!!