1. Intro
스프링에서 파일 다운로드 처리 대하여 알아보겠습니다.
2. 개발환경
- spring boot 2.6.2
- Java 11
- Gradle 7.3.2
- Intellij IDEA 2021.2.4 ️
3. 파일 다운로드
ResponseEntity Resource 이용
@Controller
public class DownloadController {

  private static final String SAMPLE_FILE_NAME = "스프링.png"; // (1)

  @Value("classpath:static/spring.png") // (2)
  private Resource resource;

  @GetMapping("/download/img")
  public ResponseEntity<Resource> downloadImg() {
    return ResponseEntity.ok()
        .contentType(MediaType.IMAGE_PNG) // (3)
        .header(HttpHeaders.CONTENT_DISPOSITION, ContentDisposition.inline() // (4)
            .filename(SAMPLE_FILE_NAME, StandardCharsets.UTF_8)
            .build()
            .toString())
        .body(resource);
  }

  @GetMapping("/download/file")
  public ResponseEntity<Resource> downloadFile() {
    return ResponseEntity.ok()
        .contentType(MediaType.APPLICATION_OCTET_STREAM) // (5)
        .header(HttpHeaders.CONTENT_DISPOSITION, ContentDisposition.attachment() // (6)
            .filename(SAMPLE_FILE_NAME, StandardCharsets.UTF_8)
            .build()
            .toString())
        .body(resource);
  }
}
공통
- (1) 한글명 다운로드 처리도 함께 테스트하기 위해 선언해두었습니다.
- (2) classpath static 폴더에 위치한 png 파일을 Resource 객체로 주입 받습니다.
브라우저에서 바로 렌더링 되는 api (/download/img)
- (3) 렌더링 처리될 Content-Type 헤더를 지정합니다.
- (4) 브라우저에서 바로 보일 수 있도록 Content-Disposition 헤더를 inline 으로 지정합니다.
파일 다운로드 api (/download/file)
- (5) 브라우저에서 다운로드 기능을 수행하도록 application/octet-stream 로 지정합니다.
- (6) 파일 다운로드 창이 뜨도록 Content-Disposition 헤더를 attachment 로 지정합니다.
테스트 코드
@WebMvcTest(DownloadController.class)
@Slf4j
class DownloadControllerTest {

  @Autowired
  private MockMvc mockMvc;

  @Test
  void downloadImg() throws Exception {
    // when
    MvcResult mvcResult = mockMvc.perform(get("/download/img"))
        .andExpect(status().isOk())
        .andReturn();

    // then
    MockHttpServletResponse response = mvcResult.getResponse();

    int contentLength = response.getContentLength();
    String contentType = response.getContentType();
    String contentDisposition = response.getHeader(HttpHeaders.CONTENT_DISPOSITION);

    assertAll(
        () -> assertThat(contentLength).isEqualTo(9183),
        () -> assertThat(contentType).isEqualTo(MediaType.IMAGE_PNG_VALUE),
        () -> assertThat(contentDisposition).contains("inline", "UTF-8")
    );

    // inline; filename*=UTF-8''%EC%8A%A4%ED%94%84%EB%A7%81.png
    log.info("contentDisposition : {}", contentDisposition);
  }

  @Test
  void downloadFile() throws Exception {
    // when
    MvcResult mvcResult = mockMvc.perform(get("/download/file"))
        .andExpect(status().isOk())
        .andReturn();

    // then
    MockHttpServletResponse response = mvcResult.getResponse();

    int contentLength = response.getContentLength();
    String contentType = response.getContentType();
    String contentDisposition = response.getHeader(HttpHeaders.CONTENT_DISPOSITION);

    assertAll(
        () -> assertThat(contentLength).isEqualTo(9183),
        () -> assertThat(contentType).isEqualTo(MediaType.APPLICATION_OCTET_STREAM_VALUE),
        () -> assertThat(contentDisposition).contains("attachment", "UTF-8")
    );

    // attachment; filename*=UTF-8''%EC%8A%A4%ED%94%84%EB%A7%81.png
    log.info("contentDisposition : {}", contentDisposition);
  }
}
Content-Length Header
컨트롤러에서 ResponseEntity 를 리턴 할 경우 HttpEntityMethodProcessor handleReturnValue 에서 처리하며
AbstractMessageConverterMethodProcessor writeWithMessageConverters 에서 메세지 컨버터를 선택하여 처리합니다.
이때 선택되는 메세지 컨버터는 ResourceHttpMessageConverter 이며,
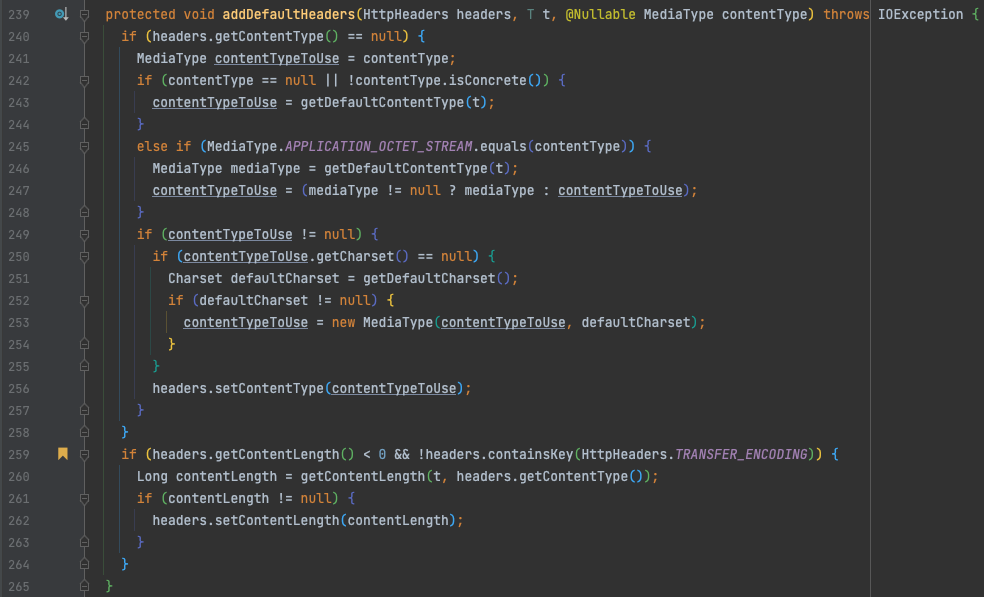
부모 클래스 AbstractHttpMessageConverter 의 실제 write 하는 메서드에서 211 Line addDefaultHeaders 를 확인해보면
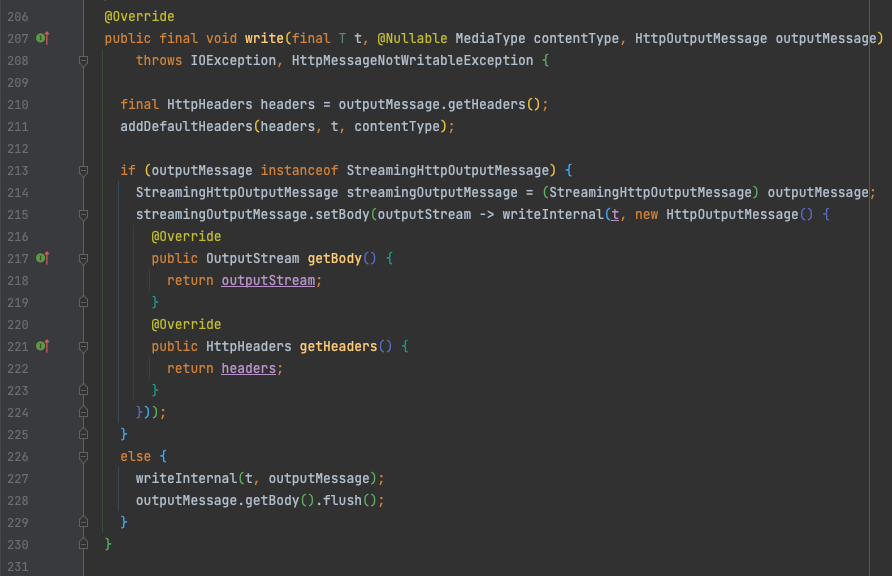
259 Line 에서 실제 Content-Length 가 세팅되어 있지 않을 경우 자동으로 추가해줍니다.
따라서 컨트롤러에서 따로 해당 헤더를 세팅해주지 않아도 됩니다.
파일 다운로드시 한글 파일명 깨짐
기존 브라우저별 한글 깨짐 처리
기존 여러 샘플을 보면 브라우저에서 파일 다운로드시에 한글 깨지는것을 방지 하기위해 하단과 같이
User-Agent 로 분기 처리하여 브라우저별 filename Encoding 하는것을 자주 볼 수 있습니다.
public String getBrowser(HttpServletRequest request) {
  String userAgent = request.getHeader("User-Agent");

  if (userAgent.contains("MSIE") || userAgent.contains("Trident") || userAgent.contains("Edge")) {
    return "MSIE";
  } else if (userAgent.contains("Chrome")) {
    return "Chrome";
  } else if (userAgent.contains("Opera")) {
    return "Opera";
  } else if (userAgent.contains("Safari")) {
    return "Safari";
  } else if (userAgent.contains("Firefox")) {
    return "Firefox";
  } else {
    return "";
  }
}

public String encodeFileName(String browser, String filename) {
  if ("MSIE".equals(browser)) {
    return URLEncoder.encode(filename, StandardCharsets.UTF_8).replaceAll("\\+", "%20");
  }
  if ("Firefox".equals(browser)) {
    return // ...
  }
  if ("Chrome".equals(browser)) {
    return // ...
  }
  ...
}
RFC6266, RFC5987 이용
상단의 방법 보단 RFC6266 과 RFC5987 스펙을 다양한 브라우저에서 지원함에
따라 해당 명세를 이용하여 Content-Disposition 을 설정 할 경우 한번에 처리 가능 합니다.
http://test.greenbytes.de/tech/tc2231 에서 확인 가능하며
IE 의 경우 IE9 부터 지원 가능합니다.
| Test | Results |
|---|---|
| FF22 | pass |
| MSIE8 | unsupported |
| MSIE9 | pass |
| Opera | pass |
| Saf6 | pass |
| Konq | pass |
| Chr25 | pass |
Spring ContentDisposition Class
해당 처리를 하기 위해 Spring에서 손쉽게 사용 할 수 있는 클래스도 지원 합니다.
ContentDisposition 에 filename 에 charset 을 지정 할 경우 자동으로 해당 스펙으로 헤더를 인코딩 합니다.
@Slf4j
class ContentDispositionTest {

  @ParameterizedTest
  @CsvSource({
      "스프링.png, inline; filename*=UTF-8''%EC%8A%A4%ED%94%84%EB%A7%81.png",
      "스프링1234.png, inline; filename*=UTF-8''%EC%8A%A4%ED%94%84%EB%A7%811234.png",
      "스프링-!@#$%.png, inline; filename*=UTF-8''%EC%8A%A4%ED%94%84%EB%A7%81-!%40#$%25.png"
  })
  void buildContentDisposition(String filename, String expected) {
    // when
    ContentDisposition contentDisposition = ContentDisposition.inline()
        .filename(filename, StandardCharsets.UTF_8)
        .build();

    // then
    assertThat(contentDisposition.toString()).isEqualTo(expected);
  }
}
Content-Disposition 헤더 분석
Content-Disposition: inline; filename*=UTF-8''%EC%8A%A4%ED%94%84%EB%A7%81.png
RFC2231 의 4. Parameter Value Character Set and Language Information 참조
파라미터 값에 문자셋이나 언어를 지정해야 할 경우 아스터리스크(*)를 붙이고 ' 를 구분자로 하여
문자셋, 언어, 값 순으로 설정하면 됩니다.
- ex 1) title*=us-ascii'en-us'value
- ex 2) filename*=UTF-8''value
그리고 값은 URL-encoded 로 인코딩합니다.
마지막으로 문자셋이나 언어는 비워 둘 수있지만 반드시 ' 를 표시해야 합니다.
4. 마무리
블로그에 사용된 코드는 Github 에서 확인 하실 수 있습니다.

덕분에 도움이 많이 됐네요 !
내용 잘 봤습니다.