코코아톡 클론코딩 하면서 알게된 것들 정리 하는 느낌?
1. 유용한 VSC 단축키
nav>ul>li*4>a 입력
<nav>
        <ul>
            <li><a href=""></a></li>
            <li><a href=""></a></li>
            <li><a href=""></a></li>
            <li><a href=""></a></li>
        </ul>
</nav>
2. import에는 순서가 중요하다!
@import url("https://fonts.googleapis.com/css2?family=Open+Sans:wght@400;600&display=swap");
@import "reset.css";
@import "variables.css";

/* Components */
@import "components/status-bar.css";
@import "components/nav-bar";- 만약 variables.css가 제일 아래에 있다면
그 안에 있는 변수들을 사용하지 못하는 경우가 발생한다.
3. border-box
box-sizing: border-box;- "패딩을 줘도 신경 쓰지마, box 사이즈를 늘리지 말아줘" 이런 뜻
- border-box를 사용하지 않을 경우 (패딩 50일 때)
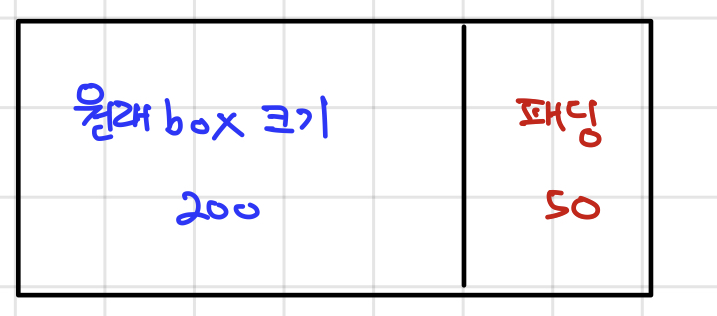
- css는 box를 패딩 값만큼 크게 만들어버리기 때문에 밀려서 안 나오는 부분이 생길 수 있다
- 패딩을 주고 싶은데 box 사이즈는 그대로 있길 바랄 때 사용!
4. 사각형을 원으로 만들고 싶을 때
-> 사각형 width의 절반을 border-radius의 값으로 쓰면 된다.
	width: 30px;
    height: 30px;
    border-radius: 15px;
5. Class Modifier
-> 블럭이나 요소가 어떤 상황일 때 다른 스타일을 가져야 한다면 modifier를 사용한다.
<img src="#" class="user-component__avatar" />
<img src="#" class="user-component__avatar user-component__avatar--xl"/>
.user-component__avatar {
width: 70px;
height: 70px;
border-radius: 30px;
margin-right: 20px;
margin-bottom: 20px;
}
.user-component__avatar--xl {
width: 80px;
height: 80px;
}6. 이미지 조정
-> 이미지 크기 조정을 font-size를 활용해서도 할 수 있다.
.find-icons__icon i {
  font-size: 30px;
}
7. Divider -> |
<div class="divider"></div>.open-post__members .divider {
width: 1px;
height: 15px;
background-color: rgba(0, 0, 0, 0.2);
margin: 0 5px;
}- 이렇게 작성하는 이유틑 코드 상에 또 다른 divider가 있을 수 있기 때문
- open-post_members 안에 있는 divider에게 적용이란 뜻
8. 자주 쓰이는 조합
  display: flex;
  justify-content: space-between;
  align-items: center;
9. margin-right : auto ??
width: 100%;
- 쓸 수 있는 만큼 다 써라
- margin, padding, border 영역 다 포함
- 포함 하지 않는 방법은
box-sizing: border-box;
width: auto;
- 알아서 적당히 조절해라
- 블록 요소의 초기값으로 자동 설정
- margin, padding, border 영역 포함 X
10. z-index
-> z-index는 기본적으로 div가 있는 위치가 맨 앞에서부터 몇 번째인지를 나타낸다. 즉, layer의 순서가 몇 번째인지를 나타내는 것 (position-fixed 느낌)
#chat-screen .status-bar {
  z-index: 2;
}- 숫자가 높을수록 위 층에 존재함(덮어씌움)
- z-index의 기본 값은 0
11. order 속성
-> 순서 설정, flex children에게만 적용
.message-row--own .message__bubble {
  order: 1;
}
.message-row--own .message__time {
  order: 0;
}- 시간이 나오고 그다음에 말 풍선이 나온다.
12. 화면 덮기
#splash-screen {
  background-color: var(--yellow);
  position: absolute;
  height: 100vh;
  width: 100;
  top: 0;
}
Width: 100vw: 화면 넓이의 100%를 의미Height: 100vh: 화면 높이의 100%를 의미
13. forwards
-> 애니메이션의 마지막 속성이 유지된다.
animation: hideSplashScreen 0.4s ease-in-out forwards;Ex)@keyframes hideSplashScreen {
from {
opacity: 1;
}
to {
opacity: 0;
}
}- 이 경우 opacity: 1로 돌아오지 않고 0이 유지
14. animation-delay
-> 애니메이션이 시작하지 않고 설정시간동안 멈춤
animation-delay: 2s;15. Github-Pages
-> github에서 특별한 이름이 붙여진 branch를 가지고 있으면 공짜로 Static 호스팅을 할 수 있도록 해준다.
cf) Static website : HTML, CSS, JavaScript로만 이루어진 사이트를 의미, front-end만 가능, back-end는 다룰 수 없음
1) gh-pages 브랜치 생성 (저장소는 public 이어야 함)
2) publish branch 클릭
3) repository 들어가서 Environments -> GitHub-pages 클릭
4) view Deployment로 들어가기
- 수정할 경우
master에서 커밋 만들기 (꼭 마스터에서 수정!) -> push -> gh-pages 브랜치로 이동 -> { Branch - Update from master - push }
출처
9. margin-right: auto? : https://oh-potato.tistory.com/7?category=1213426
인증용 결과물