이전 글에서는 MeasureClient를 통해 심박수를 측정하는 방법을 알아보았습니다.
하지만 MeasureClient에는 다음과 같은 한계가 존재했습니다.
- 백그라운드에서 유지되지 않음
- 여러 앱에서 심박수 측정을 할 경우 먹통이 됨
이러한 한계를 극복하기 위해 MeasureClient를 ForegroundService와 함께 사용하는 등
여러 방법을 시도해보았지만 안드로이드 OS 자체를 거스를 수는 없었습니다.
그러던 도중 ExerciseClient를 보게 되었는데, 처음에는 오로지 운동 추적 목적으로 사용해야 효율적이라고 생각하고 고민조차 하지 않았었습니다.
하지만 심박수 측정의 지속성과 실시간성 모두 챙기려면 ExerciseClient가 해결책이 될 수 있겠다고 생각하여 적용하게 되었습니다.
이번 글에서는 ExerciseClient를 통한 실시간 심박수 측정 방법에 대해 알아보겠습니다.
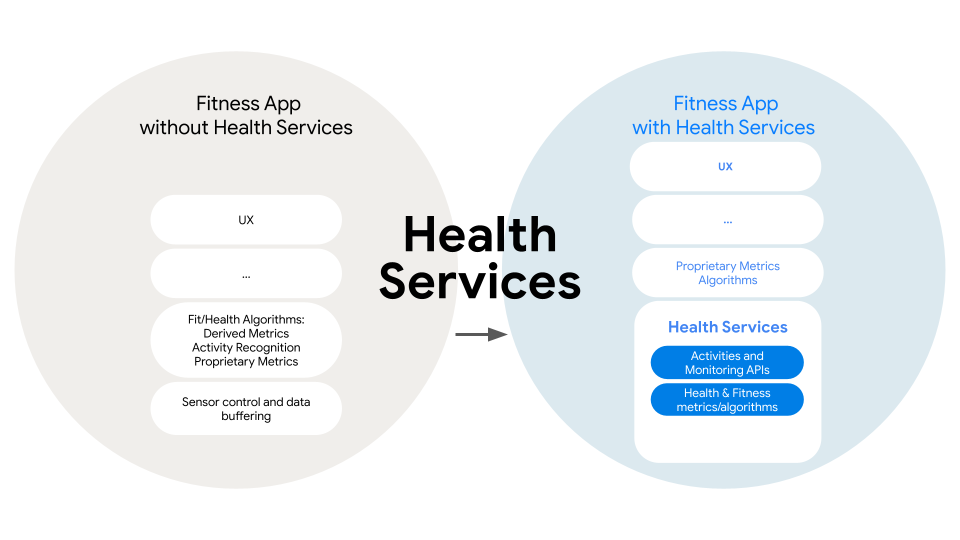
ExerciseClient
건강 데이터 측정만을 위한 이전 API와는 다르게 ExerciseClient는 사용자의 운동 목표 설정 및 추적 등
전반적으로 운동에 대한 것을 처리하기 위한 API입니다.
기본적으로 운동에 대해 생각해보면 실시간성, 지속성 모두 보장될 수 있어야 하기 때문에
ExerciseClient를 사용할 때 고려해야 할 점이 여럿 있습니다.
공식 문서에서도 관련된 내용을 언급하고 있습니다.
사실 안드로이드에서의 장기 작업과 비슷하다고도 할 수 있을 것 같습니다.
장기 작업은 기본적으로 ForegroundService를 통해 처리하며,
알림 등을 통해 사용자에게 어떤 작업이 진행되고 있는지 알려줄 수 있어야 합니다.
워치에서는 Ongoing Activity라는 API를 이용한다는 것 외에는
기존에 처리하던 방식과 크게 다르지 않을 거라고 생각했습니다.
운동 유형
ExerciseClient는 운동 세션을 시작할 때, 어떤 유형의 운동을 할지 설정해야 합니다.
운동 유형은 ExerciseType이라는 클래스로 처리하게 되는데, 무려 92가지나 있습니다.
public class ExerciseType @RestrictTo(RestrictTo.Scope.LIBRARY) public constructor(
    /** Returns a unique identifier of for the [ExerciseType], as an `int`. */
    public val id: Int,

    /** Returns a human readable name to represent this [ExerciseType]. */
    public val name: String
) {

    public companion object {
        // Next ID: 93
        /** The current exercise type of the user is unknown or not set. */
        @JvmField public val UNKNOWN: ExerciseType = ExerciseType(0, "UNKNOWN")
        @JvmField public val ALPINE_SKIING: ExerciseType = ExerciseType(92, "ALPINE_SKIING")
        @JvmField public val BACKPACKING: ExerciseType = ExerciseType(84, "BACKPACKING")
        @JvmField public val BACK_EXTENSION: ExerciseType = ExerciseType(1, "BACK_EXTENSION")
        @JvmField public val BADMINTON: ExerciseType = ExerciseType(2, "BADMINTON")
        ..
	}
제 테스트 기기에서는 전부 확인해보진 못했지만, 기기 별로 운동 유형 지원 여부가 다를 수 있으니
운동 세션을 시작하기 이전에 확인해야 한다고 합니다.
물론 심박수 측정만 한다면 어떤 운동 유형으로든 세션을 시작해도 상관은 없는데,
아무 유형이나 골랐다가 기기가 지원하지 않는 유형일 수 있으니 보편적인 것을 선택해야 할 것 같습니다..
ExerciseUpdateCallback
이전에 MeasureCallback이라는 인터페이스를 구현하여 등록했듯이,
ExerciseClient에도 인터페이스를 구현하여 등록해야 합니다.
public interface ExerciseUpdateCallback {

    /** Called when this callback has been successfully registered with Health Services. */
    public fun onRegistered()

    /**
     * Called when Health Services reports a failure with the registration of this callback.
     *
     * @param throwable a throwable sent by Health Services with information about the failure
     */
    public fun onRegistrationFailed(throwable: Throwable)

    /**
     * Called during an ACTIVE exercise or on any changes in [ExerciseState].
     *
     * @param update the [ExerciseUpdate] containing the latest exercise information
     */
    public fun onExerciseUpdateReceived(update: ExerciseUpdate)

    /**
     * Called during an [ExerciseState.ACTIVE] exercise once a lap has been marked.
     *
     * @param lapSummary an [ExerciseLapSummary] containing a summary of data collected during the
     * past lap
     */
    public fun onLapSummaryReceived(lapSummary: ExerciseLapSummary)

    /**
     * Called during an [ExerciseState.ACTIVE] exercise when the availability of a [DataType]
     * changes.
     *
     * @param dataType the [DataType] which experienced a change in availability
     * @param availability the new [Availability] state
     */
    public fun onAvailabilityChanged(dataType: DataType<*, *>, availability: Availability)
}onRegistered, onRegistrationFailed, onAvailabilityChanged는 이전과 동일합니다.
onExerciseUpdateReceived는 운동 세션이 진행중일 때 운동 상태가 변경되면 호출되는데,
메소드 인자로 전달되는 ExerciseUpdate를 통해 원하는 데이터를 가져올 수 있습니다.
public class ExerciseUpdate internal constructor(
    /** Returns the list of the latest [DataPoint]s. */
    public val latestMetrics: DataPointContainer,

    /**
     * Returns the latest [ExerciseGoalType.ONE_TIME_GOAL] [ExerciseGoal]s that have been achieved.
     * [ExerciseGoalType.MILESTONE] [ExerciseGoal]s will be returned via
     * [latestMilestoneMarkerSummaries].
     */
    public val latestAchievedGoals: Set<ExerciseGoal<out Number>>,

    /** Returns the latest [MilestoneMarkerSummary]s. */
    public val latestMilestoneMarkerSummaries: Set<MilestoneMarkerSummary>,

    /**
     * Returns the [ExerciseStateInfo] containing the current [ExerciseState] and
     * [ExerciseEndReason], if applicable.
     */
    public val exerciseStateInfo: ExerciseStateInfo,

    /**
     * Returns the [ExerciseConfig] used by the exercise when the [ExerciseUpdate] was dispatched
     * and returns `null` if the exercise is in prepare phase and hasn't been started yet.
     */
    public val exerciseConfig: ExerciseConfig? = null,

    /**
     * Returns the [ActiveDurationCheckpoint] which can be used to determine the active duration of
     * the exercise in a way that is consistent with Health Services. Clients can anchor their
     * application timers against this to ensure their view of the active duration matches the view
     * of Health Services.
     */
    public val activeDurationCheckpoint: ActiveDurationCheckpoint? = null,

    /** The duration since boot when this ExerciseUpdate was created. */
    private val updateDurationFromBoot: Duration? = null,

    /**
     * Returns the time at which the exercise was started or `null` if the exercise is in prepare
     * phase and hasn't started yet.
     */
    public val startTime: Instant? = null,

    internal val activeDurationLegacy: Duration,
)
위 프로퍼티 중에서 latestMetrics를 통해 신체 데이터, 위치, 거리 등의 정보를 가져올 수 있습니다.
그 외에는 사용자가 설정한 운동 목표 등 운동 세션에 대한 전반적인 정보를 얻을 수 있습니다.
마지막으로 onLapSummaryReceived는 운동 도중 랩이 완료될 때 호출됩니다.
여기서 말하는 랩은 특정 구간이라고 생각하면 되는데, 예를 들어 러닝에서 1km마다 데이터를 수집해서 km 당 페이스를 알려주고 싶을 때 명시적으로exerciseClient.markLap() 메소드를 호출하면 랩이 생성됩니다.
심박수 측정에서는 크게 신경쓰지 않아도 되는 부분이기 때문에 넘어가겠습니다.
데이터 배치
운동은 위에서 언급했듯이 장기적으로 실행될 수 있는 작업이며,
앱 설계에 따라 다르지만 센서를 통해 실시간 데이터를 수집할 수 있습니다.
워치의 화면이 켜져있는 상태에서는 매우 짧은 주기(1Hz)로 데이터가 처리됩니다.
하지만 워치의 화면이 꺼져있는 상태에서도 동일하게 동작한다면 배터리가 버티지 못할 것입니다.
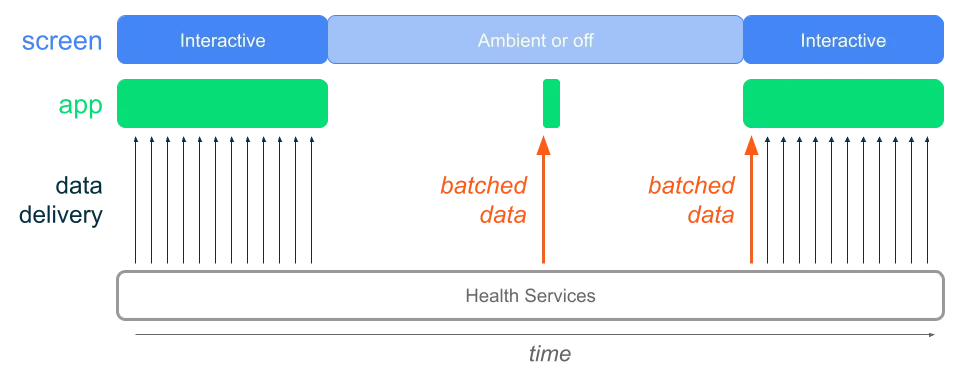
따라서 안드로이드의 Health Service에서는 기본적으로 데이터 배치를 실시합니다.
이 때 센서는 기존과 동일한 주기로 센서에서 데이터를 수집하지만,
앱으로 바로 보내지 않고 버퍼에 모아두었다가 일괄적으로 전송하게 됩니다.
근데 만약에 사용자가 워치가 아닌 워치와 연결된 특정 디바이스의 화면을 본다고 가정하면,
워치의 화면이 꺼져있을 때는 실시간 심박수를 볼 수 없게 됩니다.
또 화면이 꺼져있을 때 데이터가 앱으로 전송되는 주기를 개발자가 직접 제어할 수 없기 때문에,
별도의 처리를 하지 않는다면 실시간성을 보장할 수 없습니다.
이러한 문제를 해결하기 위해서 구글은 BatchingMode를 도입했습니다.
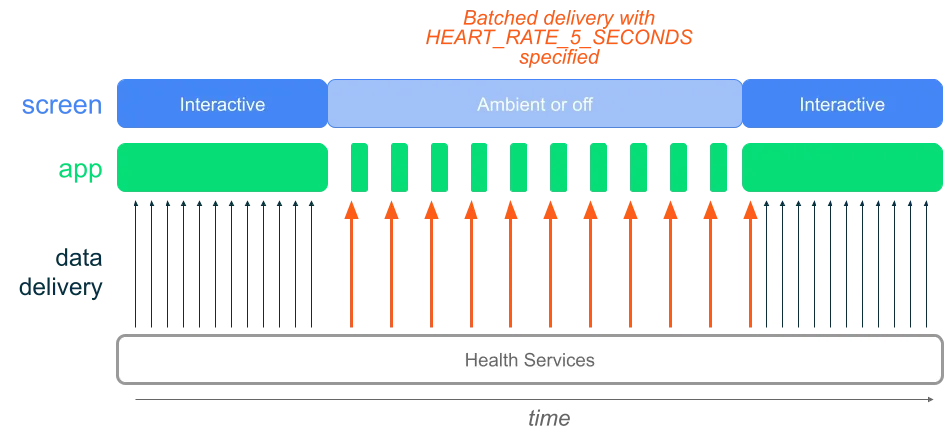
기존에는 버퍼에 있는 데이터를 수신받을 때까지 수 분을 기다려야 했지만,
구글에서 제공하는 BatchingMode를 사용하면 5초에 한 번씩 데이터를 수신할 수 있습니다.
public class BatchingMode
internal constructor(
    /** Unique identifier for the [BatchingMode], as an `int`. */
    internal val id: Int,
) {
    public companion object {
        /**
         * Batching mode for receiving [DataType.HEART_RATE_BPM] updates with fast frequency.
         *
         * Note: This mode will cause significantly increased power consumption compared to the
         * default batching mode, while still being more power efficient than streaming when in
         * non-interactive state. The exact power/performance tradeoff of this mode is device
         * implementation dependent and batched updates may be aligned with other wake ups but
         * target five second updates.
         */
        @JvmField public val HEART_RATE_5_SECONDS: BatchingMode = BatchingMode(1)
}
아직 테스트를 진행하는 기능인지는 몰라도 개발자가 직접 주기를 설정할 수는 없고,
대신 HEART_RATE_5_SECONDS라는 상수밖에 사용하지 못합니다.
BatchingMode는 기기 별로 지원 여부가 상이하기 때문에, 지원 여부를 확인해야 합니다.
val capabilities = exerciseClient.getCapabilitiesAsync().await()
return BatchingMode.HEART_RATE_5_SECONDS in capabilities.supportedBatchingModeOverrides
또한 BatchingMode가 실시간으로 심박수를 측정해야 하는 앱에는 좋은 해결책이 될 순 있으나,
그렇지 않은 경우에는 결국 배터리를 조금 더 소모해서 데이터를 수신하는 것이기 때문에
러닝 앱처럼 단독으로 사용되는 워치 앱은 기존의 절약 모드를 그대로 사용하는 것이 좋습니다.
심박수 측정
이제 기존에 MeasureClient를 사용하던 방식에서 코드를 수정하겠습니다.
private val exerciseClient = healthClient.exerciseClientMeasureClient와 동일하게 HealthServicesClient에서 접근할 수 있습니다.
먼저, 운동 유형 및 배치 모드 지원 여부를 확인합니다.
    override suspend fun hasHeartRateCapability(): Boolean {
        val capabilities = exerciseClient.getCapabilitiesAsync().await()
        if (ExerciseType.WALKING in capabilities.supportedExerciseTypes) {
            val walkingCapabilities = capabilities.getExerciseTypeCapabilities(ExerciseType.WALKING)
            return (
                DataType.HEART_RATE_BPM in walkingCapabilities.supportedDataTypes &&
                    BatchingMode.HEART_RATE_5_SECONDS in capabilities.supportedBatchingModeOverrides
            )
        }
        return false
    }
위에서 언급했듯이 운동 유형은 무엇을 선택하든 상관없는데,
저는 그래도 걷기 운동이 어지간한 디바이스는 다 지원하지 않을까 해서 그냥 이렇게 설정했습니다.
override fun getMeasureResult(): Flow<MeasureResult> =
        callbackFlow {
            val callback =
                object : ExerciseUpdateCallback {
                    override fun onAvailabilityChanged(
                        dataType: DataType<*, *>,
                        availability: Availability,
                    ) {
                        if (dataType == DataType.HEART_RATE_BPM && availability is DataTypeAvailability) {
                            trySendBlocking(MeasureResult.Availability(availability == DataTypeAvailability.AVAILABLE))
                        }
                    }

                    override fun onExerciseUpdateReceived(update: ExerciseUpdate) {
                        val heartRateData = update.latestMetrics.getData(DataType.HEART_RATE_BPM)
                        heartRateData.latestHeartRate()?.let { heartRate ->
                            trySendBlocking(MeasureResult.HeartRate(heartRate))
                        }
                    }

                    override fun onRegistered() {}

                    override fun onRegistrationFailed(throwable: Throwable) {}

                    override fun onLapSummaryReceived(lapSummary: ExerciseLapSummary) {}
                }

            exerciseClient.setUpdateCallback(callback)
            startExerciseSession()

            awaitClose {
                runBlocking {
                    stopExerciseSession()
                    exerciseClient.clearUpdateCallbackAsync(callback)
                }
            }
        }
그리고 ExerciseUpdateCallback을 구현하여 ExerciseClient에 등록합니다.
여기서 더 많은 일들을 할 수 있지만, 심박수 측정 외에는 처리할 것이 없을 뿐만 아니라 기존의 코드를 크게 변경시키고 싶지 않았기 때문에 이런 식으로 코드를 작성했습니다.
private suspend fun startExerciseSession() {
        runCatching {
            val config =
                ExerciseConfig
                    .builder(ExerciseType.WALKING)
                    .setDataTypes(setOf(DataType.HEART_RATE_BPM))
                    .setBatchingModeOverrides(setOf(BatchingMode.HEART_RATE_5_SECONDS))
                    .setIsAutoPauseAndResumeEnabled(false)
                    .build()
            exerciseClient.startExerciseAsync(config).await()
        }.onFailure { Log.e("Widyu", "Failed to start exercise session", it) }
    }

    private suspend fun stopExerciseSession() {
        runCatching {
            exerciseClient.endExerciseAsync().await()
        }.onFailure { Log.e("Widyu", "Failed to stop exercise session", it) }
    }
운동 세션은 MeasureClient와는 다르게 콜백을 등록하고 플로우를 구독하는 순간부터 시작하는 것이 아니라,
위처럼 startExercise 혹은 startExerciseAsync를 명시적으로 호출해야 시작됩니다.
운동 유형은 지원 여부를 확인했던 것과 동일한 것으로 설정하고,
데이터 유형 또한 심박수만을 가져올 예정이기 때문에 HEART_RATE_BPM만 포함되어 있습니다.
그리고 BatchingMode를 사용하려면 ExerciseConfig에 위처럼 코드를 작성해야 합니다.
이렇게 하면 운동 세션을 시작할 준비가 되는데, 앱이 백그라운드로 전환되었을 때도 운동 세션을 유지하려면 포그라운드 서비스를 구현해야 합니다.
@AndroidEntryPoint
class HeartRateForegroundService : Service() {
    @Inject
    lateinit var repository: HeartRateRepository

    @Inject
    lateinit var notificationManager: WidyuNotificationManager

    private val serviceScope: CoroutineScope = CoroutineScope(Dispatchers.Default + SupervisorJob())
    private var isRunning: Boolean = false
    private var job: Job? = null

    override fun onStartCommand(
        intent: Intent?,
        flags: Int,
        startId: Int,
    ): Int {
        super.onStartCommand(intent, flags, startId)
        if (isRunning) return START_STICKY

        startService()
        startMeasurement()
        return START_STICKY
    }

    private fun startService() {
        isRunning = true
        notificationManager.createChannel()
        ServiceCompat.startForeground(
            this,
            WidyuNotificationManager.NOTIFICATION_ID,
            notificationManager.buildNotification(),
            if (Build.VERSION.SDK_INT >= Build.VERSION_CODES.UPSIDE_DOWN_CAKE) {
                ServiceInfo.FOREGROUND_SERVICE_TYPE_HEALTH
            } else {
                0
            },
        )
    }

    private fun startMeasurement() {
        if (job?.isActive == true) return

        job =
            repository
                .getHeartRate()
                .catch { Log.e("Widyu", "Service Measurement Error", it) }
                .onEach { result ->
                    if (result is MeasureResult.HeartRate) {
                        Log.d("Widyu", "Service Heart Rate: ${result.value}")
                    }
                }.launchIn(serviceScope)
    }

    override fun onDestroy() {
        job?.cancel()
        job = null
        isRunning = false
        super.onDestroy()
    }

    override fun onBind(intent: Intent?): IBinder? = null

    companion object {
        fun newIntent(context: Context): Intent = Intent(context, HeartRateForegroundService::class.java)
    }
}
포그라운드 서비스 구현에는 크게 특별한 점은 없는 것 같습니다.
차이점이 있다면, 포그라운드 서비스 실행 시 나타나는 알림에 Ongoing Activity API를 사용한 것입니다.
Ongoing Activity API는 Wear OS에서 운동과 같은 장기 실행 작업을 시스템 UI에 노출시켜주는 역할을 하며,
특히 사용자가 앱에서 시계 화면으로 이동했다가 다시 앱으로 돌아올 때 런쳐를 실행해서 돌아오는 것과 같은 불필요한 동작을 줄여줍니다.
Wear OS에 친화적인 알림 UI를 구성할 수 있다는 것이 가장 큰 장점인 것 같습니다.
fun buildNotification(): Notification {
        val notificationIntent = MainActivity.newIntent(context)
        val pendingIntent =
            PendingIntent.getActivity(
                context,
                0,
                notificationIntent,
                PendingIntent.FLAG_IMMUTABLE or PendingIntent.FLAG_UPDATE_CURRENT,
            )

        val notificationBuilder =
            NotificationCompat
                .Builder(context, NOTIFICATION_CHANNEL)
                .setContentTitle(NOTIFICATION_TITLE)
                .setContentText(NOTIFICATION_TEXT)
                .setContentIntent(pendingIntent)
                .setCategory(NotificationCompat.CATEGORY_WORKOUT)
                .setVisibility(NotificationCompat.VISIBILITY_PUBLIC)
                .setOngoing(true)

        val ongoingActivity =
            OngoingActivity
                .Builder(context, NOTIFICATION_ID, notificationBuilder)
                .setTouchIntent(pendingIntent)
                .setStaticIcon(R.drawable.ic_launcher_background)
                .build()

        ongoingActivity.apply(context)
        return notificationBuilder.build()
    }
Notification 객체를 생성할 때 setOngoing(true)를 추가하고,
OngoingActivity 객체에서 원하는 아이콘, 눌렀을 때의 동작 등을 지정하면 됩니다.
이제 위에서 구현한 포그라운드 서비스를 시작하면 심박수 측정이 시작되고,
또한 이전과 다르게 워치 화면이 꺼져있는 상태에서도 심박수 측정이 잘 되는 것을 볼 수 있습니다.
다른 운동 앱과의 충돌
운동 세션을 시작한 상태에서 삼성 헬스같은 다른 운동 앱에서 또 운동 세션을 시작할 경우
기존 앱의 심박수 측정이 멈추는 현상을 확인할 수 있습니다.
이전 MeasureClient도 그랬듯이 OS의 제약인 것 같은데, 여러 개의 운동 세션을 진행할 수 없습니다.
따라서 운동 세션이 이미 진행되고 있는지, 다른 앱에서 운동을 하는지에 대한 여부를 확인해야 합니다.
	private suspend fun isTracking(): Boolean {
        val exerciseInfo = exerciseClient.getCurrentExerciseInfo()
        return exerciseInfo.exerciseTrackedStatus == OWNED_EXERCISE_IN_PROGRESS
    }

    private suspend fun isTrackingInAnotherApp(): Boolean {
        val exerciseInfo = exerciseClient.getCurrentExerciseInfo()
        return exerciseInfo.exerciseTrackedStatus == OTHER_APP_IN_PROGRESS
}ExerciseClient로부터 현재 진행중인 운동 데이터를 가져와서 비교합니다.
public class ExerciseInfo(
    /** Returns the [ExerciseTrackedStatus]. */
    @ExerciseTrackedStatus public val exerciseTrackedStatus: Int,

    /**
     * Returns the [ExerciseType] of the active exercise, or [ExerciseType.UNKNOWN] if there is no
     * active exercise.
     */
    public val exerciseType: ExerciseType,
)

public annotation class ExerciseTrackedStatus {

    public companion object {
        /** Exercise Tracked Status is an unknown or unexpected value. */
        public const val UNKNOWN: Int = 0
        /** An app other than the calling one owns the active exercise in progress. */
        public const val OTHER_APP_IN_PROGRESS: Int = 1
        /** The current calling app owns the active exercise in progress. */
        public const val OWNED_EXERCISE_IN_PROGRESS: Int = 2
        /** There is not currently any exercise in progress owned by any app. */
        public const val NO_EXERCISE_IN_PROGRESS: Int = 3
    }
}ExerciseInfo의 exerciseTrackedStatus를 통해 현재 운동 세션 자체의 상태를 알 수 있습니다.
만약 다른 앱에서 운동 세션을 시작하게 되면 자동으로 기존의 운동 세션이 중단되기 때문에,
isTrackingInAnotherApp을 통해 운동 세션이 중단되었음을 사용자에게 알려줘야 합니다.
참고로 다른 앱으로 넘어간 운동 세션의 소유권을 가져올 수 있는 방법은 없는 것 같습니다.
이렇게 ExerciseClient를 통한 심박수 측정에 대해 알아보았습니다.
다음 글에서는 측정한 심박수를 연결된 디바이스로 전송하는 방법에 대해 작성해보겠습니다.