토스뱅크카드
토스뱅크카드는 다른 카드와 다르게 움푹 파인 부분이 있습니다.
이를 코드로 구현하고 싶어서 만들게 되었습니다.
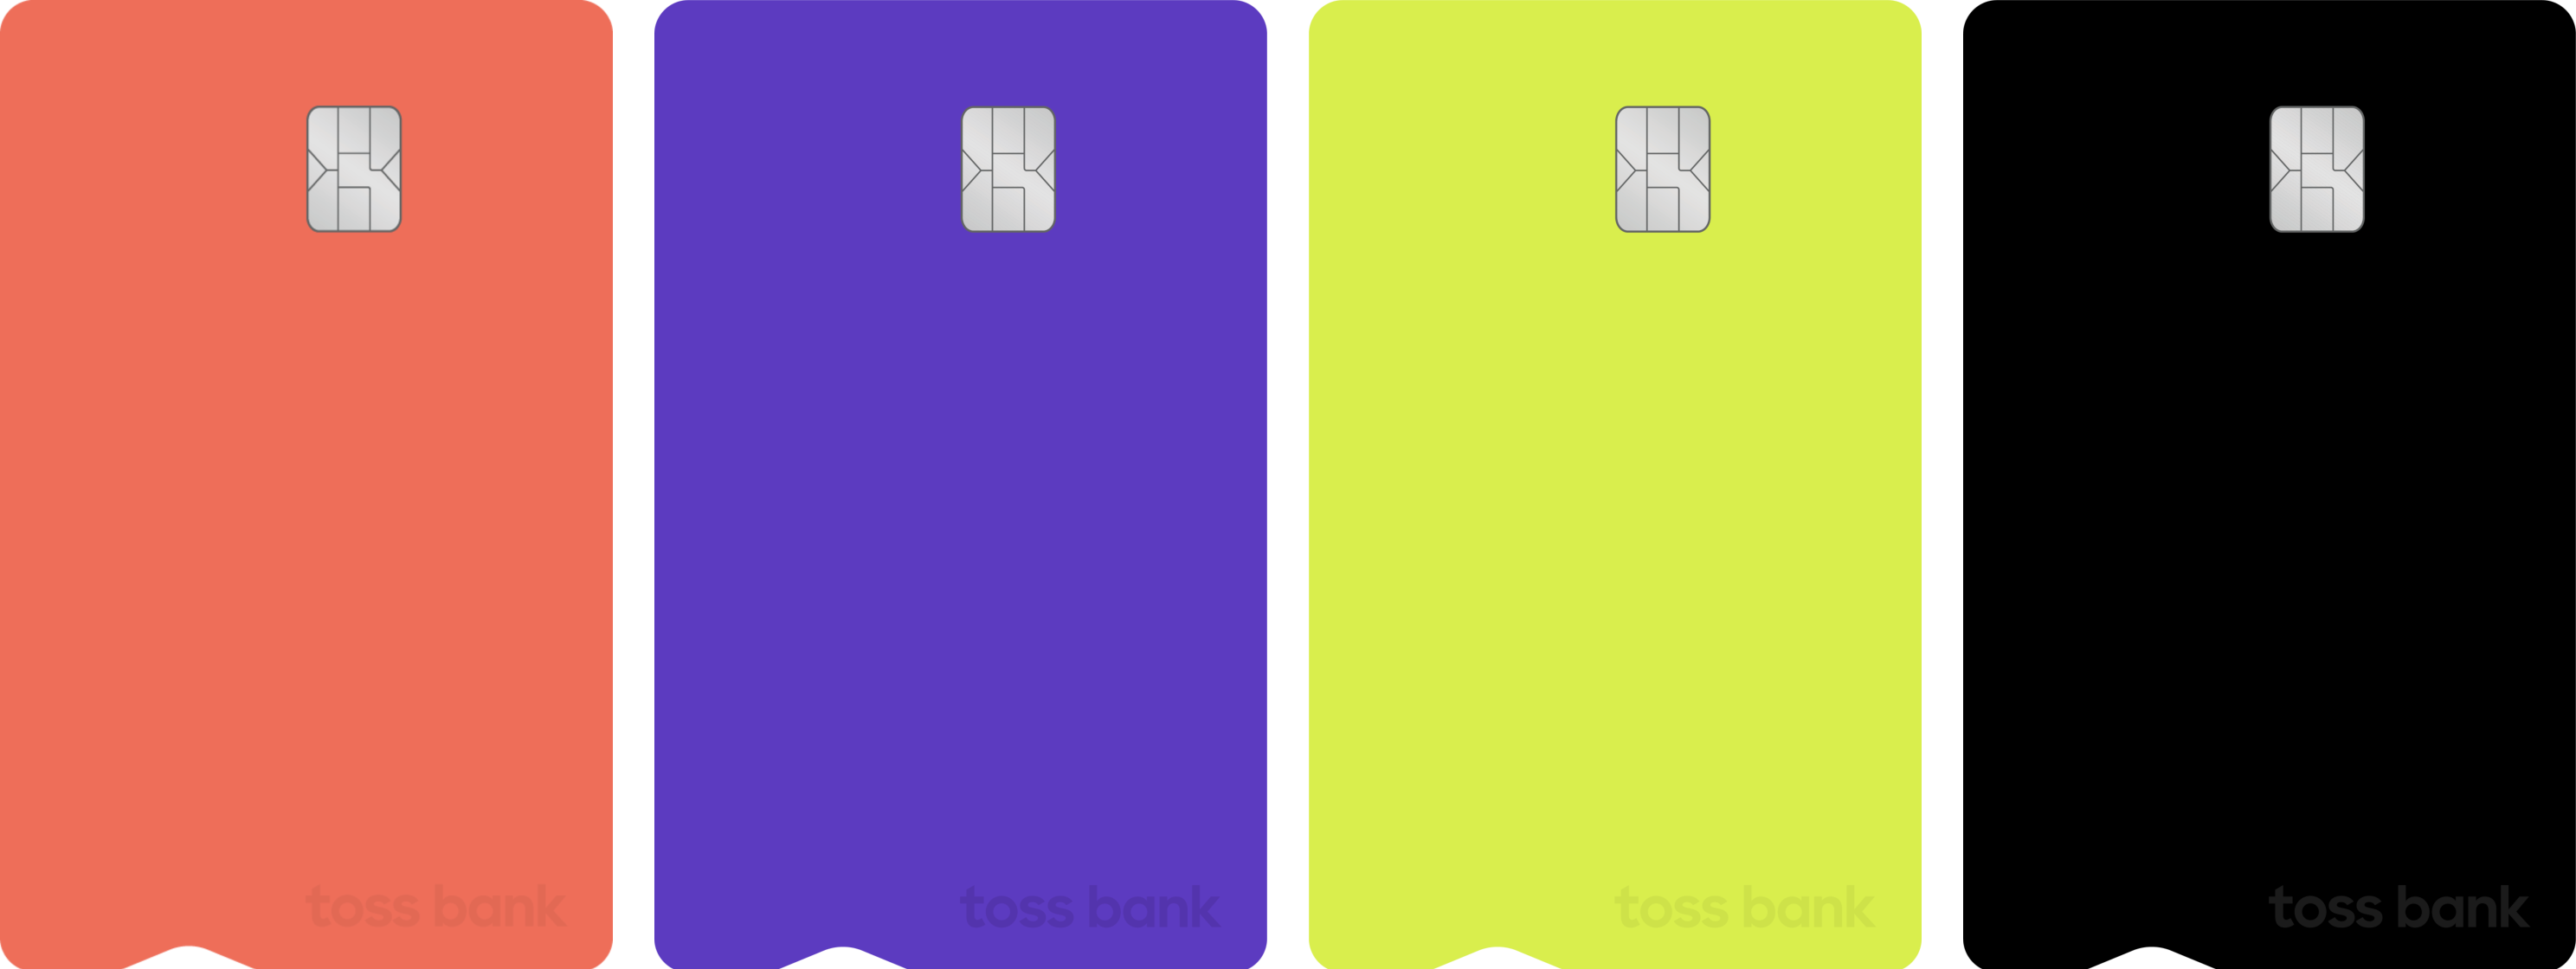 이미지 출처: https://www.tossbank.com/product-service/card/check-card
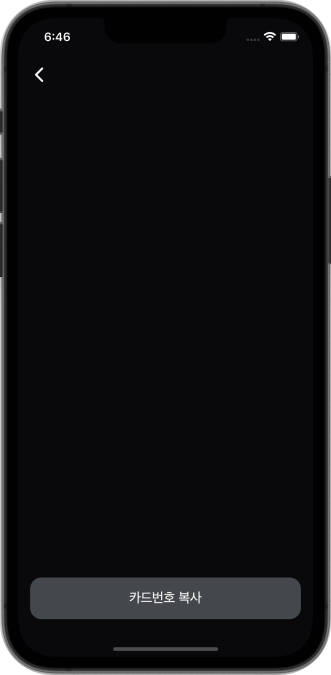
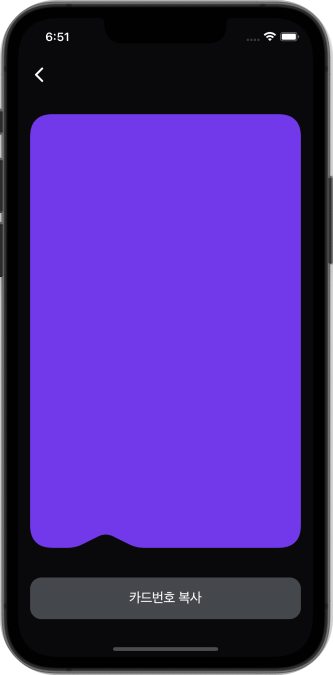
기본 레이아웃
기본 레이아웃인 앱바와 하단 버튼을 우선 구현했습니다.
Widget build(BuildContext context) {
return Scaffold(
backgroundColor: kBlack,
body: SafeArea(
child: Column(
children: [
_appBar(),
const Spacer(),
_copyButton(),
],
),
),
);
}
// 앱바.
Widget _appBar() {
return Padding(
padding: const EdgeInsets.only(bottom: 24),
child: Align(
alignment: Alignment.centerLeft,
child: CupertinoButton(
pressedOpacity: 1,
onPressed: () {},
child: const Icon(
Icons.arrow_back_ios_new_rounded,
color: Colors.white,
),
),
),
);
}
// 복사 버튼.
Widget _copyButton() {
return CupertinoButton(
pressedOpacity: 1,
onPressed: () {},
child: Container(
width: double.infinity,
padding: const EdgeInsets.symmetric(vertical: 16),
decoration: BoxDecoration(
color: kGreyButton,
borderRadius: BorderRadius.circular(15),
),
child: const Center(
child: Text(
'카드번호 복사',
style: TextStyle(
color: Colors.white,
fontSize: 18,
),
),
),
),
);
}CustomPaint
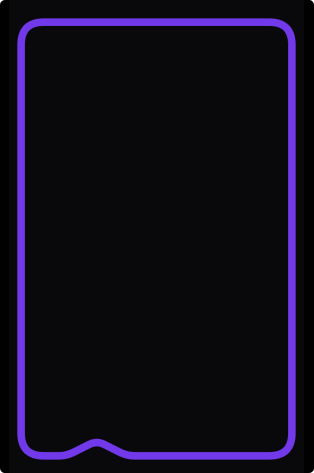
CustomPaint는 직접 원하는 도형을 그릴 때 유용합니다.
decoration으로는 커스텀 마이징 하는데 한계가 있기 때문에 CustomPaint를 이용해서 카드를 구현했습니다.
CustomPaint는 Decoration 위젯가 비슷하게 설정을 할 수 있는데, painter를 통해서 원하는 도형을 그릴 수 있습니다.
CustomPaint(
  size: Size(_width, _height),
  painter: CardPainter(),
),
CustomPainter
도형을 그릴 클래스를 생성하고 CustomPainter를 상속받으면 됩니다.
class CardPainter extends CustomPainter {}CustomPainter를 상속받은 클래스는 필수적으로 paint, shouldRepaint 메서드를 override 해야합니다.
void paint(Canvas canvas, Size size) {
// TODO: implement paint
}
bool shouldRepaint(covariant CustomPainter oldDelegate) {
// TODO: implement shouldRepaint
throw UnimplementedError();
}paint()
paint는 개체를 페인트 해야 할 때마다 호출되어야 합니다. canvas에 그리는 동작들이 여기에 정의됩니다.
paint 메서드는 간단하게는 아래의 순서대로 진행하면 됩니다.
Path() 정의 -> Paint() 정의 -> Path(), Paint() 결합
Path
Path()에는 다양한 메서드들이 있습니다. 이 메서드를 통해서 원하는 도형을 그리면 됩니다.
저는 간단하게 moveTo(), lineTo(), quadraticBezierTo() 만 이용해서 그렸습니다.
final _cardWidth = size.width;
final _cardHeight = size.height;
const double _cardBorderRadius = 30;

// path.
final _path = Path()

// 시작 지점으로 이동.
..moveTo(0, _cardBorderRadius)

// 왼쪽 하단으로 라인.
..lineTo(0, _cardHeight - _cardBorderRadius)
..quadraticBezierTo(0, _cardHeight, _cardBorderRadius, _cardHeight)

// 들어가는 부분.
..lineTo(50, _cardHeight)
..quadraticBezierTo(60, _cardHeight, 70, _cardHeight - 5)
..lineTo(90, _cardHeight - 15)
..quadraticBezierTo(100, _cardHeight - 20, 110, _cardHeight - 15)
..lineTo(130, _cardHeight - 5)
..quadraticBezierTo(140, _cardHeight, 150, _cardHeight)

// 오른쪽 하단으로 라인.
..lineTo(_cardWidth - _cardBorderRadius, _cardHeight)
..quadraticBezierTo(_cardWidth, _cardHeight, _cardWidth, _cardHeight - _cardBorderRadius)

// 오른쪽 상단으로 라인.
..lineTo(_cardWidth, _cardBorderRadius)
..quadraticBezierTo(_cardWidth, 0, _cardWidth - _cardBorderRadius, 0)

// 왼쪽 상단으로 라인.
..lineTo(_cardBorderRadius, 0)
..quadraticBezierTo(0, 0, 0, _cardBorderRadius);

...
Paint
Paint()를 통해서 canvas에 그린 개체의 세부 디자인을 할 수 있습니다.
PaintingStyle을 통해서 Path에서 정의한 동작들을 선으로 놔둘지 선들을 채울지 정할 수 있습니다.
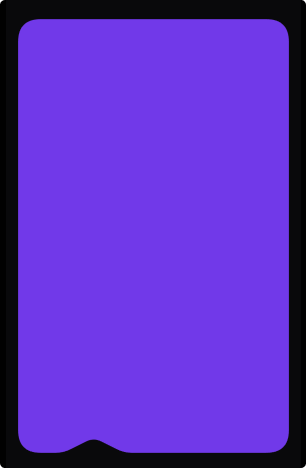
// paint 설정.
final _paint = Paint()
  ..color = kPurple
  ..strokeWidth = 10
  ..style = PaintingStyle.fill;
shouldRepaint()
shouldRepaint는 화면을 새로 그릴지 말지를 정하는 메서드입니다.
새 인스턴스가 이전 인스턴스와 다른 정보를 나타내는 경우 메서드는 true를 반환해야 하고 그렇지 않으면 false를 반환해야 합니다.
메서드가 false를 반환하면 paint() 호출이 최적화될 수 있습니다.
다음
CustomPaint을 통해서 토스뱅크카드를 구현을 했으니
다음에는 나머지 카드정보, 토스 로고, 마스터카드 로고를 구현할 예정입니다.