[React] Sidebar 구현 (feat. react-minimal-side-navigation)
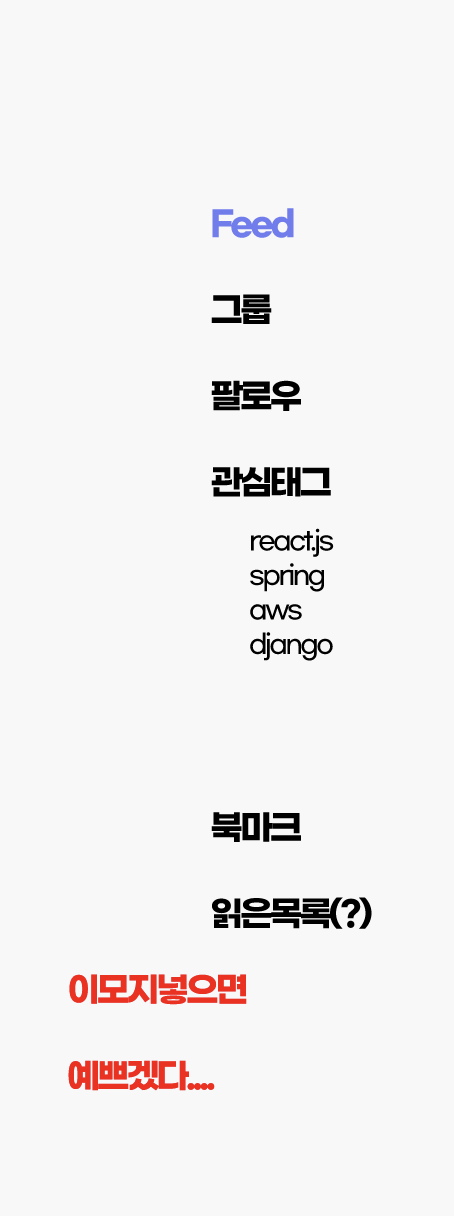
구현해야할 사이드바 디자인이다.

다음과 같이 초기 디자인 구성을 잡았고, Sidebar를 구현할 방법들을 찾아보았다.
react-minimal-side-navigation
디자인에서 보이듯이 태그목록은 드롭다운 메뉴 형식으로 보여줘야했기에 이런 기능까지 제공해주는 라이브러리를 사용했다.
https://reactjsexample.com/minimal-side-navigation-component-for-react
설치
# via npm
npm install react-minimal-side-navigation

# or yarn
yarn add react-minimal-side-navigation
Usage
사용방법에 대한 예시코드가 나와있다.
Navigation 컴포넌트에 있는 items라는 props에 원하는 item 객체를 만들어주면 된다.
태그목록은 하위목록들로 보여줄 것이라고 했는데 이는 subNav로 이용해 구현할 수 있었다.
elemBefore이라는 프로퍼티를 이용해서 아이콘도 넣어줄 수 있다.
onSelect라는 props를 이용하면 item 객체에 설정해준 itemId에 해당하는 값을 가져올 수 있다. 나중에 해당 카테고리를 누르면 해당 카테고리에 해당하는 피드들을 보여주도록 만들어야하는데, 이 함수를 이용해서 선택된 값을 처리해주면 되겠다는 생각이 들었다.
공식문서에 나와있는 샘플 코드를 먼저 살펴보자. 이를 참고해서 내가 원하는 Sidebar를 구현했다.
import React from 'react';

import {Navigation} from 'react-minimal-side-navigation';
import 'react-minimal-side-navigation/lib/ReactMinimalSideNavigation.css';

function App() {
    return (
      <>
        <Navigation
            // you can use your own router's api to get pathname
            activeItemId="/management/members"
            onSelect={({itemId}) => {
              // maybe push to the route
            }}
            items={[
              {
                title: 'Dashboard',
                itemId: '/dashboard',
                // you can use your own custom Icon component as well
                // icon is optional
                elemBefore: () => <Icon name="inbox" />,
              },
              {
                title: 'Management',
                itemId: '/management',
                elemBefore: () => <Icon name="users" />,
                subNav: [
                  {
                    title: 'Projects',
                    itemId: '/management/projects',
                  },
                  {
                    title: 'Members',
                    itemId: '/management/members',
                  },
                ],
              },
              {
                title: 'Another Item',
                itemId: '/another',
                subNav: [
                  {
                    title: 'Teams',
                    itemId: '/management/teams',
                  },
                ],
              },
            ]}
          />
      </>
    );
}
사이드바 카테고리 선택 로직
위의 사용방법에서 설명했듯이, 해당 카테고리를 클릭했을 때 어떤 동작을 수행하고 싶다면 onSelect, itemId를 활용한다.
itemId에 해당 카테고리를 눌렀을 때 이동할 url을 설정해주고, onSelect 함수에서 url을 변경해주는 방법이 아마도 가장 일반적으로 사용될 것이다.
 {
	title: '팔로우',
	itemId: "/follow",,
 },
React Router의 navigate 함수를 사용한 예시이다. url 변경말고도 할 작업이 있다면 onSelect 안에 작성해주면 된다.
onSelect={({ itemId }) => {
	navigate(itemId);
}}
하위목록 설정
하위 목록은 subNav 배열 안에 원하는 태그들을 설정해주면 된다.
              subNav: [
                {
                  title: "Projects",
                  itemId: "/about/projects",
                  // Optional
                  elemBefore: () => <Icon name="cloud-snow" />
                },
                {
                  title: "Members",
                  itemId: "/about/members",
                  elemBefore: () => <Icon name="coffee" />
                }
              ]
결과 화면
위 설명들은 기본적으로 사용하는 방법이다. 실제로 내가 완성한 사이드바는 다음과 같다. redux를 사용한 프로젝트여서 중간 해당 관련 코드들이 뒤섞여있지만, react-minimal-side-navigation를 활용하는 방법은 동일하다. 위의 기본 설명을 살짝 응용한 것 뿐이다.
.gif)
전체 코드
import React, { useEffect } from 'react';
import styled from 'styled-components';
import 'styles/sidebar.css';
import { useDispatch, useSelector } from 'react-redux';
import { useNavigate } from 'react-router-dom';
import { Navigation } from 'react-minimal-side-navigation';

import { Icon } from 'semantic-ui-react';
import { SET_TYPE } from 'reducers/postListType';

const Bar = styled.div`
  position: sticky;
  top: 200px;
  width: 10.5rem;
  height: 100%;
  /* position: fixed;
  left: 19rem;
  top: 12rem;
  transform: translate(1em, 12rem); */
`;

const SideBar = () => {
  const navigate = useNavigate();
  const dispatch = useDispatch();

  const { user } = useSelector((state) => state.authentication);

  const setArr = [];

  useEffect(() => {
    // 배열로 받은 태그목록을 배열 내 각각의 object로 변환한 뒤 아래 subNav에 전달
    if (user) {
      (user.user.tags || []).forEach((tag) => {
        const curObj = {};
        curObj.title = tag;
        curObj.itemId = `/tags/${tag}`;
        setArr.push(curObj);
      });
    }
  }, []);

  const setType = (itemId) => {
    if (typeof itemId === 'object') {
      dispatch({
        type: SET_TYPE,
        item: `${itemId.item}`,
        title: `${itemId.title}`,
        isTag: false,
      });
    }

    if (typeof itemId === 'string') {
      dispatch({
        type: SET_TYPE,
        item: `${itemId.slice(6)}`,
        title: `${itemId.slice(6)}`,
        isTag: true,
      });
    }
  };
  return (
    <>
      <Bar>
        <Navigation
          onSelect={({ itemId }) => {
            if (user && itemId !== '/tags') {
              setType(itemId);
            }
            if (!user && itemId.item !== 'main') {
              navigate('/signin');
            }
          }}
          items={[
            {
              title: '피드',
              itemId: { item: 'main', title: '피드' },
              elemBefore: () => <Icon name="th large" style={{ fontSize: '1.2rem' }} />,
            },
            {
              title: '관심태그',
              itemId: '/tags',
              elemBefore: () => <Icon name="tags" style={{ fontSize: '1.2rem' }} />,

              subNav: user ? setArr : null,
            },
            {
              title: '북마크',
              itemId: { item: 'bookmark', title: '북마크' },
              elemBefore: () => <Icon name="bookmark" style={{ fontSize: '1.2rem' }} />,
            },
            {
              title: '읽은 목록',
              itemId: { item: 'study', title: '읽은 목록' },
              elemBefore: () => <Icon name="eye" style={{ fontSize: '1.2rem' }} />,
            },
          ]}
        />
      </Bar>
    </>
  );
};

export default SideBar;
이미 만들어져있는 css말고 직접 커스텀해서 css 적용하신거죠?!