배열 - Array
여러개의 데이터를 보관하는 역할을 수행하는 객체
변수(또는 상수) 에는 데이터를 하나씩, 배열에는 여러개의 데이터를 대입할 수 있다.
let number = 3; // one number in variable
let numbers = [1, 2, 3] // multiple numbers in an array
배열은 필통이다
하나에 필통 - 배열이라는 하나의 객체로 묶어진다면... 필통같은 역할을 한다
배열 리터럴 - array literal
- 배열 리터럴 - 쉼표로 구분한 값들을 대괄호로 묶어서 표현한다.
const arr = [1, 2, 3, 4, 5, 6, 7, 8]- Array 생성자
const arr = new Array(1, 2, 3, 4, 5, 6, 7, 8)배열의 특징
- 배열에 포함된 값 'item'
- 왼쪽부터 순서(번호)가 매겨진다. 이를 index number 라 한다.
- 인덱스 번호는 0부터 시작한다.
- 배열 요소 수는 원하는 개수만큼 포함시킬 수 있으며, 0개일 수도 있다.
- 다양한 유형의 데이터를 포함할 수 있다. 숫자, 문자열, 객체 등...
인덱스 번호 확인
대괄호([]) 연산자를 이용해서 특정 index번호의 배열 요소를 참조할 수 있다.
참조할수 있다 = 곧 읽거나 쓸 수 있다는 것을 의미한다.
배열 메소드
An array is an object. 여기에는 메소드가 다수 정의되어 있다 (속성도요)
// push : add an item to array
const vos = ["1", "2,", "3"]

vos[0] = "one";
vos[1] = "two";
vos[2] = "three";

// push : add an item to an array
vos.push("four);
console.log(vos); // (4) ['one', 'two', 'three', 'four']

// pop : 배열의 끝부분부터 요소 제거하기
vos.pop();
console.log(vos); // (3) ['one', 'two', 'three']

// indexOf : 주어진 요소의 유무를 인덱스 번호로 확인
console.log(indexOf("two")); // 1
console.log(indexOf("three")); // 2

// splice : 정해진 위치에서부터 정해진 개수만큼 요소 제거
vos.splice(0, 2);
console.log(vos); // []

// splice로 요소 지운 다음, 대체 값을 채우는 것도 가능하다!
vos.splice(0, 3, "1", "2", "3");
console.log(vos) // (3) ['1', '2', '3']

// forEach : 배열의 개별 요소에 대한 함수를 차례대로 호출
vos.ForEach(function(item){
  console.log("포이치에서 호출된 함수! " + item)
  // 포이치에서 호출된 함수! 1
  // 포이치에서 호출된 함수! 2
  // 포이치에서 호출된 함수! 3
});
Element.classList
classList property 속성은 웹 요소(Element)로부터 클래스 코렉션을 반환하는 속성이다.
<p class="hello greet good">
  안녕하세요
</p>
const p = document.querySelector('p')
console.log(p.classList)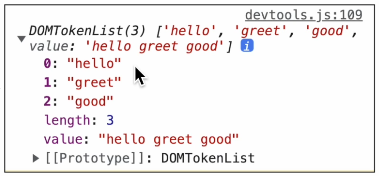
실습에서 다뤘던 코드
<!DOCTYPE html>
<html lang="en">
<head>
  <meta charset="UTF-8">
  <meta name="viewport" content="width=device-width, initial-scale=1.0">
  <title>클래스 리스트</title>
  <style>
    .hungry {
      max-width: 50%;
      max-height: 50%;
    }
  </style>
</head>
<body>
<img src="/images/napoleon-at-brienne-16149.jpg" alt="napoleon-at-brienne">
<br>
<button id="add">ADD STYLE</button>
<button id="remove">REMOVE STYLE</button>
<button id="toggle">TOGGLE STYLE</button>

  <script>
const img = document.querySelector("img");
const addBtn = document.querySelector("#add");
const removeBtn = document.querySelector("#remove");
const toggleBtn = document.querySelector("#toggle");

console.log(img.classList);

addBtn.addEventListener("click", function(){
  img.classList.add("hungry")
  console.log(img.classList.contains("hungry"))
})

removeBtn.addEventListener("click", function(){
  img.classList.remove("hungry")
  console.log(img.classList.contains("hungry"))
})

toggleBtn.addEventListener("click", function(){
  img.classList.toggle("hungry")
  console.log(img.classList.contains("hungry"))
})

  </script>
</body>
</html>
관련 메소드 methods
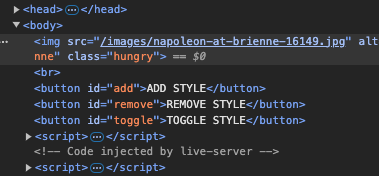
add, remove, and toggle styles to image with the style tag "hungry"
first added an image to body and created buttons for three functions
1. ADD STYLE
2. REMOVE STYLE
3. TOGGLE STYLE
<img src="/images/napoleon-at-brienne-16149.jpg" alt="napoleon-at-brienne">
<br>
<button id="add">ADD STYLE</button>
<button id="remove">REMOVE STYLE</button>
<button id="toggle">TOGGLE STYLE</button>
then in the <script> part of the html document, we created variables for img, addBtn, removeBtn, and toggleBtn
I can create an .addEventListener for whenever the buttons are clicked to add the class "hungry" to the image.
We can see the style being added to the image below:
Now using the .addEventListner method I can create multiple functions for addBtn, removeBtn, and toggleBtn.
This will either add, remove, or toggle ("hungry") style to the image.
Allowing for an interactive method of changing the image style as toggled by the buttons.